Geeks in Phoenix

Geek Blog


How to manage Windows 11 Virtual Memory

Is your Windows 11 computer slow at switching between programs? Are you getting low memory warnings? If so, then you might need to change your Virtual Memory settings in Windows 11.

Most computer users know about RAM (Random Access Memory) and how the more you have, the better your system will run. But do you know what happens when your computer runs out of available RAM for programs?

That is where Virtual Memory (paging file) comes into the picture. Each program requires a certain amount of memory (RAM) to operate. When you have more programs running than available RAM, Windows will utilize the Virtual Memory.

If a program is inactive, Windows can transfer it to the Virtual Memory to free up RAM for other active programs. Then when you switch to that program, Windows will bring it back into the RAM and transfer another inactive program to the Virtual Memory, hence the name paging file.

But with the amount of RAM that computers come with nowadays, many people do not need to worry about Virtual Memory. But there are certain times when you can use to modify the Virtual Memory settings.

But if you are like me and have several programs running simultaneously, customizing the Virtual Memory's size and location can help your computer's performance.

With the release of Windows 11, Microsoft increased the minimum memory requirement from two (2) GB to four (4) GB. But just like Windows 10, the actual memory used when idle is around two (2) GB.

So that means when you have only four (4) GB of RAM, two (2) GB is dedicated to Windows 11. So right out of the gate, you have only 50% of available RAM, and when that is used up, the Virtual Memory kicks in.

So if your Windows 11 computer has between 4 and 8 GB of RAM, you could see your performance increase significantly by customizing your Virtual Memory. If your computer has 8 - 16 GB of RAM, you could get a boost in performance.

If your system has more than 16 GB of RAM, you may or may not see any change in performance. But you would have to modify the Virtual Memory settings and see how your system runs.

Note: Creating a substantial Virtual Memory (paging file) can take a lot of disk space. Also, having the Virtual Memory on an SSD (Solid State Drive) can shorten the drive's life, as Windows 11 is always reading and writing to the Virtual Memory.

Now, if your computer has more than one (1) drive, like most gaming systems, it is recommended to place the paging file on the drive that does not have the operating system.

The calculation for the Virtual Memory comes from early in the history of Windows, when RAM was measured in KB's (kilobyte), not MB's (megabytes) or GB's (gigabytes).

Windows 11 Paging File formula

  • 1024 x total amount of RAM = ?
  • ? x 1.5 = Initial paging file size
  • Initial paging file size x 3 = Maximum paging file size

Take 1024 and multiply it by the total amount of RAM your system has. For example, if your computer has 4 GB of RAM, you would take 1024 and multiply it by 4, which equals 4096. Then multiply 4096 by 1.5, which equals 6144. This is the initial paging file size. Then take 6144 and multiply it by 3, which equals 18432. This would be the maximum paging file size.

How to change the Virtual Memory in Windows 11

The Virtual Memory settings are located inside of the Advanced system settings. We can get there from the About sub-menu of the System category inside of the Settings app. There are several ways to get there.

  1. Left-click on the Start Windows logo key button to bring up the Start menu.
  2. In the list of pinned apps on the Start menu, left-click on Settings.
  3. In the left-hand column, left-click on System.
  4. Scroll down the right-hand column and left-click on About.

or

  1. Right-click on the Start button Windows logo to bring up the Power User menu.
  2. Left-click on System.

or

  1. Press the Windows logo key Windows logo key + X to bring up the Power User menu.
  2. Press the letter Y to select System.

or

  1. Press the Windows logo key Windows logo key + Pause.

Now you should have the Settings app open to the About sub-menu of the System category.

  1. Under Device specifications, make a note of how much installed RAM your computer has.
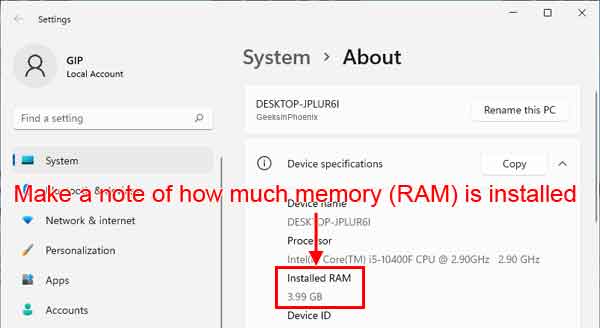
    The device specifications inside of Windows 11
    You will need this for the paging file calculation.
  2. Scroll down the right-hand column and left-click on the link labeled Advanced system settings.
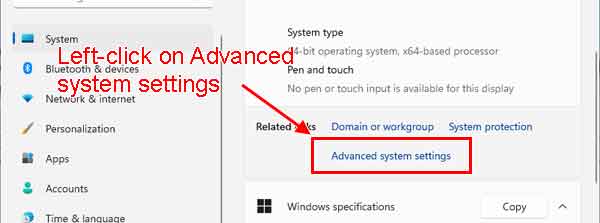
    The Advanced system settings link inside of Windows 11
    The System Properties dialog box will appear.
  3. The Advanced tab should be active. If not, just left-click on it to bring it up.
  4. Left-click on the Settings ... button in the Performance section.
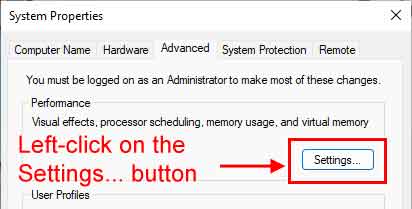
    The System Properties dialog box inside of Windows 11
  5. Left-click on the Advanced tab of the Performance Options dialog box.
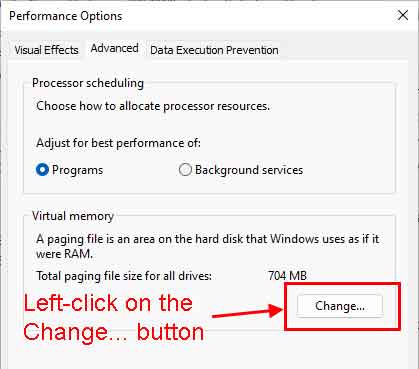
    The Performance Options dialog box inside of Windows 11
  6. Left-click on the Change ... button inside of the Virtual memory section.
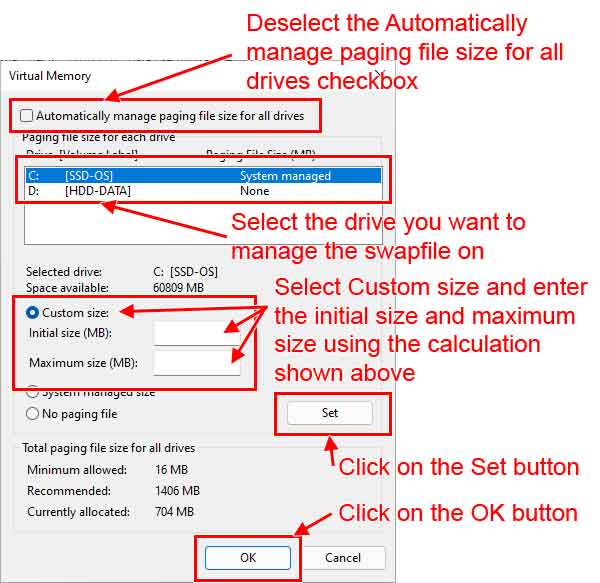
    The Virtual Memory dialog box inside of Windows 11
  7. Deselect the Automatically manage paging file size for all drives checkbox.
  8. Select the drive you want to manage the paging file on.
  9. Select Custom size and enter the initial size and maximum size using the calculation shown above.
  10. Left-click on the Set button.
  11. Left-click on the OK button.

Check out the video below for more information on setting up your paging file on a computer with multiple drives.

How to manage Windows 10 Virtual Memory

Updated June 22, 2020

Optimizing Virtual Memory in Windows has always been an easy way to fine-tune the performance of a computer. When I started working with Windows computers in the 90s, the measurement of memory was Megabytes (MB), now it's Gigabytes (GB). The calculation contained in this article is for Windows computers that have 8 GB or less of memory. If your system has 16 GB or more of memory, you can give this Virtual Memory calculation a try, but you might find that letting Windows automatically manage the paging file will work. Give it a try and let us know how you make out in the comments below.

Your computer has two types of memory, Random Access Memory (RAM) and Virtual Memory. All programs use RAM, but when there isn't enough RAM for the application you're trying to run, Windows temporarily moves information that would usually be stored in RAM to a file on your hard disk called a Paging File. The data temporarily stored in the paging file is also referred to as virtual memory. Using virtual memory, in other words, moving information to and from the paging file, frees up enough RAM for running programs correctly.

The more RAM your computer has, the faster your programs will generally run. If a lack of RAM is slowing your computer, you might be tempted to increase virtual memory to compensate. However, your computer can read data from RAM much more quickly than from a hard disk, so adding RAM is a better solution.

If you receive error messages that warn of low virtual memory, you need to either add more RAM or increase your paging file size so that you can run the program on your computer. Windows usually manages this automatically, but you can manually change the virtual memory size if the default size isn't large enough for your needs.

If you have more than one drive in your computer, you can have more than one pagefile. If you have a Solid State Drive (SSD) and a Hard Disk Drive (HDD), I recommend placing the paging file on the HDD, as Windows is continuously reading and writing to the virtual memory. This wear and tear can shorten the life span of an SSD.

How to calculate Windows 10 Virtual Memory / Paging File

There is a formula for calculating the correct pagefile size. The Initial size is one and a half (1.5) x the amount of total system memory. The Maximum size is three (3) x the initial size. So let's say you have 4 GB (1 GB = 1,024 MB x 4 = 4,096 MB) of memory. The initial size would be 1.5 x 4,096 = 6,144 MB and the maximum size would be 3 x 6,144 = 18,432 MB.

How to change Windows 10 Virtual Memory / Paging File

All the information and links you will need are going to be on the System page.

  1. Bring up the System page by either:
    • Pressing the Windows logo key Windows logo key + Pause
    • or
    • Open File Explorer by left-clicking the manilla folder icon on the Taskbar or pressing the Windows logo key Windows logo key + E simultaneously. When File Explorer is open, right-click on This PC and select Properties on the context menu that appears.
  2. Make a note of the installed memory (RAM)
    System page inside of Windows 10
  3. Click on the Advanced system settings link
  4. Click on the Advanced tab of the System Properties dialog box
    System Properties dialog box inside of Windows 10
  5. Click on the Settings ... button in the Performance section
  6. Click on the Advanced tab of the Performance Options dialog box
    Performance Options dialog box inside of Windows 10
  7. Click on the Change ... button inside of the Virtual memory section
  8. Deselect the Automatically manage paging file size for all drives checkbox
    Virtual Memory dialog box inside of Windows 10
  9. Select Custom size and enter the initial size and maximum size using the calculation shown above
  10. Click on the Set button

Managing Virtual Memory / Pagefile in Windows 8

Your computer has two types of memory, Random Access Memory (RAM) and Virtual Memory. All programs use RAM, but when there isn't enough RAM for the program you're trying to run, Windows temporarily moves information that would usually be stored in RAM to a file on your hard disk called a Paging File. The amount of data temporarily stored in a paging file is also referred to as virtual memory. Using virtual memory, in other words, moving information to and from the paging file, frees up enough RAM for programs to run correctly.

The more RAM your computer has, the faster your programs will generally run. If a lack of RAM is slowing your computer, you might be tempted to increase virtual memory to compensate. However, your computer can read data from RAM much more quickly than from a hard disk, so adding RAM is a better solution.

If you receive error messages that warn of low virtual memory, you need to either add more RAM or increase your paging file size to run the program on your computer. Windows usually manages this automatically, but you can manually change the virtual memory size if the default size isn't large enough for your needs.

There is a formula for calculating the correct pagefile size. The Minimum pagefile size is one and a half (1.5) x the amount of memory. The Maximum pagefile size is three (3) x the minimum pagefile size. Let's say you have 2 Gb (2,048 Mb) of memory. The minimum pagefile size would be 1.5 x 2,048 = 3,072 Mb and the maximum pagefile size would be 3 x 3,072 = 9,216 Mb.

How to change the pagefile size in Windows 8

  1. Open the System Properties, press the Windows logo key Windows logo key + Pause, or use the Power User menu (Windows logo key Windows logo key + X) and select System.
    Managing Windows 8 virtual memory 1
  2. If you are going to use the formula above to configure your pagefile, note the amount of installed memory under the System category.
    Managing Windows 8 virtual memory 2
  3. In the left pane, click Advanced system settings. If you're prompted for an administrator password or confirmation, type the password or provide confirmation.
  4. On the Advanced tab under Performance, click Settings.
    Managing Windows 8 virtual memory 3
  5. Click the Advanced tab and then under Virtual memory, click Change.
    Managing Windows 8 virtual memory 4
  6. Clear the Automatically manage paging file size for all drives checkbox.
    Managing Windows 8 virtual memory 5
  7. Under Drive [Volume Label], click the drive that contains the paging file you want to change.
  8. Click Custom size, type a new size in megabytes in the Initial size (MB) and Maximum size (MB) box, click Set, and then click OK.

Note: Increases in size usually don't require a restart for the changes to take effect, but if you decrease the size, you'll need to restart your computer. It is recommended that you don't disable or delete the paging file.

Managing Virtual Memory / Pagefile in Windows Vista

If your computer lacks the Random Access Memory (RAM) needed to run a program or operation, Windows uses Virtual Memory to compensate. Virtual memory combines your computer’s RAM with temporary space on your hard disk. When RAM runs low, virtual memory moves data from RAM to a space called a paging file. Moving data to and from the paging file frees up RAM to complete its work.

The more RAM your computer has, the faster your programs will generally run. If a lack of RAM is slowing your computer, you might be tempted to increase virtual memory to compensate. However, your computer can read data from RAM much more quickly than from a hard disk, so adding RAM is a better solution.

If you receive error messages that warn of low virtual memory, you need to either add more RAM or increase the size of your paging file so that you can run the programs on your computer. Windows usually manages the size automatically, but you can manually change the size of virtual memory if the default size is not enough for your needs.

Find out how much RAM your computer has

Random Access Memory (RAM) is a general indication of performance that is measured either in megabytes (MB) or gigabytes (GB): the larger the number, the faster some programs will run.

To open the System Properties, press Windows logo key + Pause

Windows Vista Sytem RAM Size

In the System section, under Memory (RAM), you can view the amount of RAM your computer has.

Change the size of virtual memory

If you receive warnings that your virtual memory is low, you'll need to increase the minimum size of your paging file. Windows sets the initial minimum size of the paging file at the amount of random access memory (RAM) installed on your computer plus 300 megabytes (MB), and the maximum size at 3 times the amount of RAM installed on your computer. If you see warnings at these recommended levels, then increase the minimum and maximum sizes.

To open the System Properties, press Windows logo key + Pause

Windows Vista Pagefile Settings 1

In the left pane, click Advanced system settings. If you are prompted for an administrator password or confirmation, type the password or provide confirmation.


Windows Vista Pagefile Settings 2

On the Advanced tab, under Performance, click Settings.


Windows Vista Pagefile Settings 3

Click the Advanced tab, and then, under Virtual memory, click Change.


Windows Vista Pagefile Settings 4

Clear the Automatically manage paging file size for all drives check box.

Under Drive [Volume Label], click the drive that contains the paging file you want to change.

Click Custom size, type a new size in megabytes in the Initial size (MB) or Maximum size (MB) box, click Set, and then click OK. There is a formula for calculating the correct pagefile size. Minimum pagefile size is one and a half (1.5) x amount of memory. Maximum pagefile size is three (3) x minimum pagefile size. Say you have 4 Gb (4,096 Mb) of memory. 1.5 x 4,096 = 6,144 Mb would be the min. pagefile size and 3 x 6,144 = 18,432 Mb would be the max. pagefile size.

Note:
Increases in size usually don't require a restart for the changes to take effect, but if you decrease the size, you'll need to restart your computer. It is recommended that you don't disable or delete the paging file.

Managing Virtual Memory / Pagefile in Windows XP

When your computer runs low on Random Access Memory (RAM), and more is needed to complete your current task, Windows uses hard drive space to simulate system RAM. In Windows, this is known as Virtual Memory and often called the Pagefile. The default size of the virtual memory pagefile (appropriately named Pagefile.sys) created during installation should be 1.5 times the amount of RAM on your computer.

You can optimize virtual memory use by dividing the space between multiple drives and removing it from slower or heavily accessed drives. To best optimize your virtual memory space, divide it across as many physical hard drives as possible. When selecting drives, keep the following guidelines in mind:

  • Try to avoid having a pagefile on the same drive as the system files.
  • Avoid putting a pagefile on a fault-tolerant drive, such as a mirrored volume or a RAID-5 volume. Pagefiles do not need fault-tolerance, and some fault-tolerant systems are slow because they write data to multiple locations.
  • Do not place multiple pagefiles on different partitions on the same physical disk drive.

#1 - Find out how much RAM your computer has

Windows XP System Properties page

To open the System Properties, press Windows logo key + Pause. In the System section, under Memory (RAM), you can view the amount of RAM your computer has.

#2 - change the size of the virtual memory paging file

You must be logged on as an administrator or a member of the Administrators group in order to complete this procedure. If your computer is connected to a network, network policy settings might also prevent you from completing this procedure.

    Windows XP Pagefile Settings 1
  1. To open the System Properties, press Windows logo key + Pause

  2. Windows XP Pagefile Settings 2
  3. On the Advanced tab, under Performance, click Settings.

  4. Windows XP Pagefile Settings 3
  5. On the Advanced tab, under Virtual memory, click Change.

  6. Windows XP Pagefile Settings 4
  7. Under Drive [Volume Label], click the drive that contains the paging file you want to change.
  8. Under Paging file size for selected drive, click Custom size, and type a new paging file size in megabytes in the Initial size (MB) and Maximum size (MB) box, and then click Set. If you decrease the size of either the initial or maximum page file settings, you must restart your computer to see the effects of those changes. Increases typically do not require a restart.

Notes:

  • To have Windows choose the best paging file size, click System managed size.
  • For best performance, do not set the initial size to less than the minimum recommended size under Total paging file size for all drives. Use the following formula for calculating the correct pagefile size. Minimum pagefile size is one and a half (1.5) x amount of memory. Maximum pagefile size is three (3) x minimum pagefile size. Say you have 4 Gb (4,096 Mb) of memory. 1.5 x 4,096 = 6,144 Mb would be the min. pagefile size and 3 x 6,144 = 18,432 Mb would be the max. pagefile size. Usually, you should leave the paging file at its recommended size, although you might increase its size if you routinely use programs that require a lot of memory.
  • To delete a paging file, set both initial size and maximum size to zero, or click No paging file. Microsoft strongly recommends that you do not disable or delete the paging file.

Free computer diagnostics

Repairing a PC can sometimes be expensive, and that is why we offer free basic in-shop diagnostics. Give one of our professional and experienced technicians a call at (602) 795-1111, and let's see what we can do for you.

Check out our reviews

Geeks In Phoenix LLC, BBB Business Review

Customer service is #1

Here at Geeks in Phoenix, we take pride in providing excellent customer service. We aim to give the highest quality of service  from computer repair, virus removal, and data recovery.

Bring your computer to us and save

Repairing a computer can be time-consuming. That is why we base our in-shop service on the time we work on your computer, not the time it takes for your computer to work! From running memory checking software to scanning for viruses, these are processes that can take some time.

Contact us

If you have any questions, please feel free to give us a call at (602) 795-1111  and talk with one of our Geeks. Or you can send us a message from our contact page , and one of our Geeks will get back to you as soon as possible. Or you can stop by and see us. Here are our hours and location.

Like Geeks in Phoenix on Facebook

Follow Geeks in Phoenix on Twitter

Watch Geeks in Phoenix on YouTube