Is your Windows 11 computer slow at switching between programs? Are you getting low memory warnings? If so, then you might need to change your Virtual Memory settings in Windows 11.
Most computer users know about RAM (Random Access Memory) and how the more you have, the better your system will run. But do you know what happens when your computer runs out of available RAM for programs?
That is where Virtual Memory (paging file) comes into the picture. Each program requires a certain amount of memory (RAM) to operate. When you have more programs running than available RAM, Windows will utilize the Virtual Memory.
If a program is inactive, Windows can transfer it to the Virtual Memory to free up RAM for other active programs. Then when you switch to that program, Windows will bring it back into the RAM and transfer another inactive program to the Virtual Memory, hence the name paging file.
But with the amount of RAM that computers come with nowadays, many people do not need to worry about Virtual Memory. But there are certain times when you can use to modify the Virtual Memory settings.
But if you are like me and have several programs running simultaneously, customizing the Virtual Memory's size and location can help your computer's performance.
With the release of Windows 11, Microsoft increased the minimum memory requirement from two (2) GB to four (4) GB. But just like Windows 10, the actual memory used when idle is around two (2) GB.
So that means when you have only four (4) GB of RAM, two (2) GB is dedicated to Windows 11. So right out of the gate, you have only 50% of available RAM, and when that is used up, the Virtual Memory kicks in.
So if your Windows 11 computer has between 4 and 8 GB of RAM, you could see your performance increase significantly by customizing your Virtual Memory. If your computer has 8 - 16 GB of RAM, you could get a boost in performance.
If your system has more than 16 GB of RAM, you may or may not see any change in performance. But you would have to modify the Virtual Memory settings and see how your system runs.
Note: Creating a substantial Virtual Memory (paging file) can take a lot of disk space. Also, having the Virtual Memory on an SSD (Solid State Drive) can shorten the drive's life, as Windows 11 is always reading and writing to the Virtual Memory.
Now, if your computer has more than one (1) drive, like most gaming systems, it is recommended to place the paging file on the drive that does not have the operating system.
The calculation for the Virtual Memory comes from early in the history of Windows, when RAM was measured in KB's (kilobyte), not MB's (megabytes) or GB's (gigabytes).
Windows 11 Paging File formula
- 1024 x total amount of RAM = ?
- ? x 1.5 = Initial paging file size
- Initial paging file size x 3 = Maximum paging file size
Take 1024 and multiply it by the total amount of RAM your system has. For example, if your computer has 4 GB of RAM, you would take 1024 and multiply it by 4, which equals 4096. Then multiply 4096 by 1.5, which equals 6144. This is the initial paging file size. Then take 6144 and multiply it by 3, which equals 18432. This would be the maximum paging file size.
How to change the Virtual Memory in Windows 11
The Virtual Memory settings are located inside of the Advanced system settings. We can get there from the About sub-menu of the System category inside of the Settings app. There are several ways to get there.
- Left-click on the Start
 button to bring up the Start menu.
- In the list of pinned apps on the Start menu, left-click on Settings.
- In the left-hand column, left-click on System.
- Scroll down the right-hand column and left-click on About.
or
- Right-click on the Start button to bring up the Power User menu.
- Left-click on System.
or
- Press the Windows logo key + X to bring up the Power User menu.
- Press the letter Y to select System.
or
- Press the Windows logo key + Pause.
Now you should have the Settings app open to the About sub-menu of the System category.
- Under Device specifications, make a note of how much installed RAM your computer has.
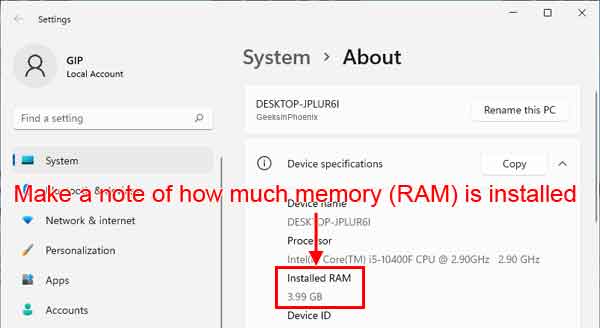
You will need this for the paging file calculation.
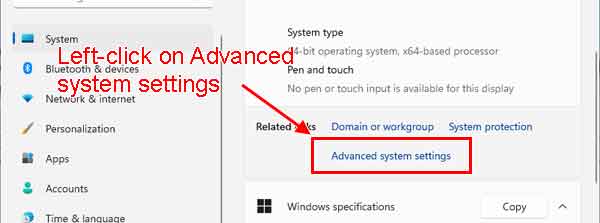
- Scroll down the right-hand column and left-click on the link labeled Advanced system settings.
The System Properties dialog box will appear.
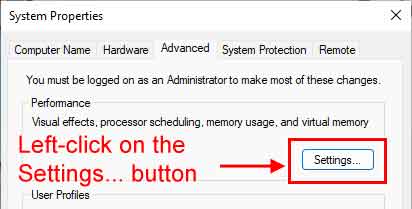
- The Advanced tab should be active. If not, just left-click on it to bring it up.
- Left-click on the Settings ... button in the Performance section.
- Left-click on the Advanced tab of the Performance Options dialog box.

- Left-click on the Change ... button inside of the Virtual memory section.
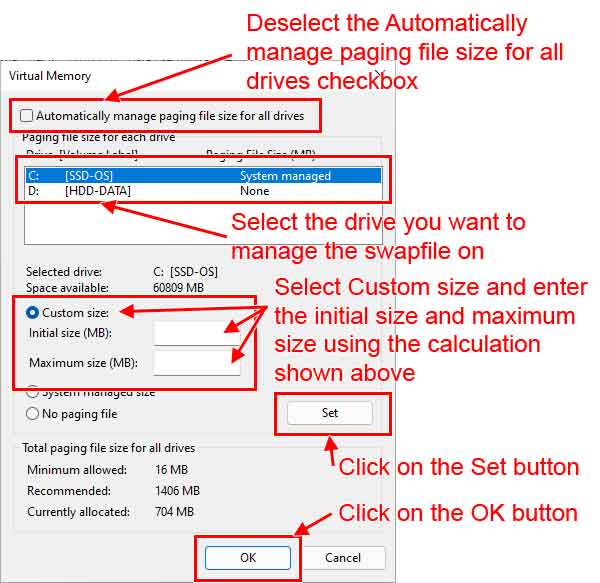
- Deselect the Automatically manage paging file size for all drives checkbox.
- Select the drive you want to manage the paging file on.
- Select Custom size and enter the initial size and maximum size using the calculation shown above.
- Left-click on the Set button.
- Left-click on the OK button.
Check out the video below for more information on setting up your paging file on a computer with multiple drives.
ca1e96bc-f9c5-42c0-82c5-8a2a5826a2a3|10|4.7|96d5b379-7e1d-4dac-a6ba-1e50db561b04