Geeks in Phoenix

Geek Blog


How to manage Windows 11 Virtual Memory

Is your Windows 11 computer slow at switching between programs? Are you getting low memory warnings? If so, then you might need to change your Virtual Memory settings in Windows 11.

Most computer users know about RAM (Random Access Memory) and how the more you have, the better your system will run. But do you know what happens when your computer runs out of available RAM for programs?

That is where Virtual Memory (paging file) comes into the picture. Each program requires a certain amount of memory (RAM) to operate. When you have more programs running than available RAM, Windows will utilize the Virtual Memory.

If a program is inactive, Windows can transfer it to the Virtual Memory to free up RAM for other active programs. Then when you switch to that program, Windows will bring it back into the RAM and transfer another inactive program to the Virtual Memory, hence the name paging file.

But with the amount of RAM that computers come with nowadays, many people do not need to worry about Virtual Memory. But there are certain times when you can use to modify the Virtual Memory settings.

But if you are like me and have several programs running simultaneously, customizing the Virtual Memory's size and location can help your computer's performance.

With the release of Windows 11, Microsoft increased the minimum memory requirement from two (2) GB to four (4) GB. But just like Windows 10, the actual memory used when idle is around two (2) GB.

So that means when you have only four (4) GB of RAM, two (2) GB is dedicated to Windows 11. So right out of the gate, you have only 50% of available RAM, and when that is used up, the Virtual Memory kicks in.

So if your Windows 11 computer has between 4 and 8 GB of RAM, you could see your performance increase significantly by customizing your Virtual Memory. If your computer has 8 - 16 GB of RAM, you could get a boost in performance.

If your system has more than 16 GB of RAM, you may or may not see any change in performance. But you would have to modify the Virtual Memory settings and see how your system runs.

Note: Creating a substantial Virtual Memory (paging file) can take a lot of disk space. Also, having the Virtual Memory on an SSD (Solid State Drive) can shorten the drive's life, as Windows 11 is always reading and writing to the Virtual Memory.

Now, if your computer has more than one (1) drive, like most gaming systems, it is recommended to place the paging file on the drive that does not have the operating system.

The calculation for the Virtual Memory comes from early in the history of Windows, when RAM was measured in KB's (kilobyte), not MB's (megabytes) or GB's (gigabytes).

Windows 11 Paging File formula

  • 1024 x total amount of RAM = ?
  • ? x 1.5 = Initial paging file size
  • Initial paging file size x 3 = Maximum paging file size

Take 1024 and multiply it by the total amount of RAM your system has. For example, if your computer has 4 GB of RAM, you would take 1024 and multiply it by 4, which equals 4096. Then multiply 4096 by 1.5, which equals 6144. This is the initial paging file size. Then take 6144 and multiply it by 3, which equals 18432. This would be the maximum paging file size.

How to change the Virtual Memory in Windows 11

The Virtual Memory settings are located inside of the Advanced system settings. We can get there from the About sub-menu of the System category inside of the Settings app. There are several ways to get there.

  1. Left-click on the Start Windows logo key button to bring up the Start menu.
  2. In the list of pinned apps on the Start menu, left-click on Settings.
  3. In the left-hand column, left-click on System.
  4. Scroll down the right-hand column and left-click on About.

or

  1. Right-click on the Start button Windows logo to bring up the Power User menu.
  2. Left-click on System.

or

  1. Press the Windows logo key Windows logo key + X to bring up the Power User menu.
  2. Press the letter Y to select System.

or

  1. Press the Windows logo key Windows logo key + Pause.

Now you should have the Settings app open to the About sub-menu of the System category.

  1. Under Device specifications, make a note of how much installed RAM your computer has.
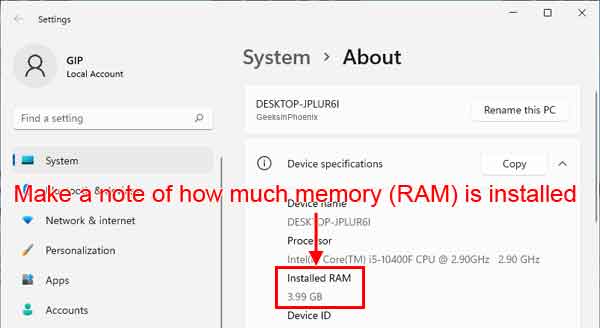
    The device specifications inside of Windows 11
    You will need this for the paging file calculation.
  2. Scroll down the right-hand column and left-click on the link labeled Advanced system settings.
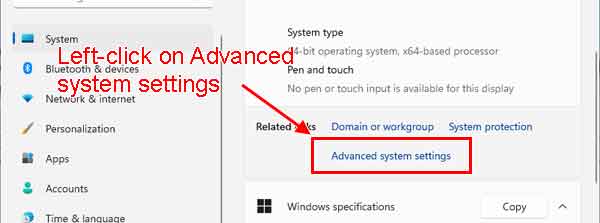
    The Advanced system settings link inside of Windows 11
    The System Properties dialog box will appear.
  3. The Advanced tab should be active. If not, just left-click on it to bring it up.
  4. Left-click on the Settings ... button in the Performance section.
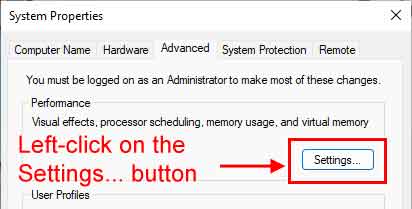
    The System Properties dialog box inside of Windows 11
  5. Left-click on the Advanced tab of the Performance Options dialog box.
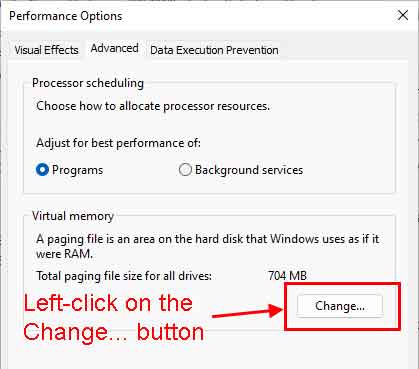
    The Performance Options dialog box inside of Windows 11
  6. Left-click on the Change ... button inside of the Virtual memory section.
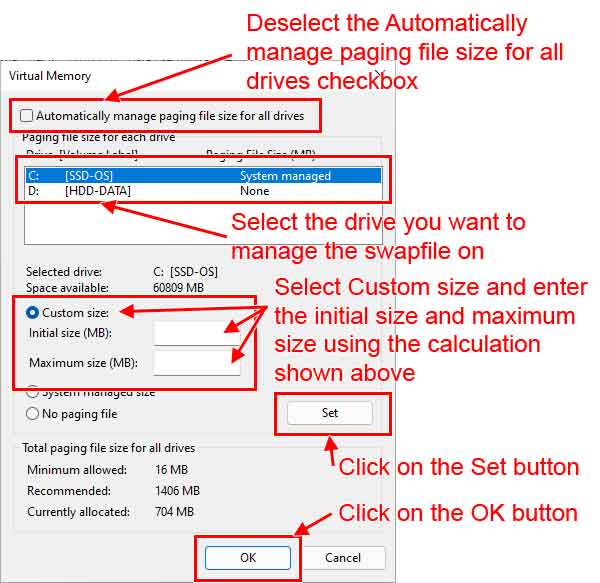
    The Virtual Memory dialog box inside of Windows 11
  7. Deselect the Automatically manage paging file size for all drives checkbox.
  8. Select the drive you want to manage the paging file on.
  9. Select Custom size and enter the initial size and maximum size using the calculation shown above.
  10. Left-click on the Set button.
  11. Left-click on the OK button.

Check out the video below for more information on setting up your paging file on a computer with multiple drives.

Windows 11 hardware requirements explained

Are you confused about the hardware requirements for Windows 11? Want to know why your computer can or cannot be upgraded to Windows 11? Let's take a detailed look at the hardware requirements for Windows 11.

Windows 11 hardware requirements explained

With Windows 11, Microsoft is focusing on security and is starting to enforce the hardware requirements to run it. Previous versions of Windows (10, 8.1, and 7) all had the exact general hardware requirement.

But with Windows 10, the security requirements were still there, but they were not being enforced. The Unified Extensible Firmware Interface (UEFI), Secure Boot, and Trusted Platform Module (TPM) (see below) requirements were optional for Windows 10 to install and run.

Case in point, TPM has always been required for BitLocker encryption to be enabled. Windows 10 would use either TPM 1.2 or TPM 2.0. But the TPM 1.2 standard has been depreciated, so TPM 2.0 is now the defacto standard.

And if you look into UEFI, you will find that Secure Boot is part of that standard. And since UEFI can take advantage of TPM, it makes sense to include all three (3) in the requirements for Windows 11.

Note: Sorry for anybody still running a 32-bit version of Windows 10, but Windows 11 is only available in a 64-bit version.

Hardware requirements for Windows 7, 8.1 and 10

Processor - 1 Gigahertz (GHz) or faster 32-bit (x86) or 64-bit (x64) processor

Memory - 1 Gigabyte (GB) RAM (32-bit) or 2 GB RAM (64-bit)

Storage - 16 GB (32-bit) or 20 GB (64-bit)

Graphics card - Compatible with DirectX 9 with WDDM 1.0 or higher driver

Hardware requirements for Windows 11

Processor - 1 Gigahertz (GHz) or faster with two or more cores on a compatible 64-bit processor or System on a Chip (SoC). This requirement is now particular on what processors are compatible with Windows 11. General Rule of thumb: If the processor is less than three (3) years old, it should run Windows 11. Microsoft has a list of processors that are compatible with Windows 11.

Memory - 4 Gigabytes (GB) RAM. This requirement has increased from 2GB to 4GB, which is no biggie. I have not seen a computer with only 2 GB of memory in over a decade now.

Storage - 64 GB or larger storage device. This requirement has also increased, and it is about time. I have seen Windows 8.1 and Windows 10 installed on 32 GB drives, which is not pretty. The biggest problem is there usually is not enough free space to perform a feature update. I recommend at least a 256 GB drive for the operating system and programs.

Graphics card - DirectX 12 graphics device or later with WDDM 2.0 driver. Since DirectX 12 was released with Windows 10 back in 2015, most modern graphic cards will be compatible with Windows 11.

Hardware requirements that are no longer optional

Display - High definition (720p) display greater than 9" diagonally, 8 bits per color channel. This requirement is pretty easy to meet.

System firmware - UEFI and Secure Boot capable. UEFI (Unified Extensible Firmware Interface) has been used for over a decade now, so most computers running have UEFI enabled. And since the Secure Boot specification is part of the UEFI, that too should already be in place. However, you may have to change some settings in your computer's BIOS (Basic Input / Output System) to enable UEFI and Secure Boot.

TPM - Trusted Platform Module (TPM) 2.0. Besides the processor requirement, this is another stumbling point for upgrading to Windows 11. A TPM can be a separate module that you connect to your motherboard or be part of the chipset on your motherboard. Most modern motherboards will use FTPM (Firmware Trusted Platform Module) that is included in the chipset. However, you may have to change some settings in your computer's BIOS (Basic Input / Output System) to enable the TPM.

Storage structure - There are two (2) types of drive structures; MBR (Master Boot Record) and GPT (GUID Partition Table). Previous versions of Windows would run on either of these structures. Windows 11 requires GTP for the drive that contains Windows 11. Microsoft has included a tool inside Windows 10 to convert drives from MBR to GPT. Here is a link to the documentation for MBR2GPT.EXE.

Free computer diagnostics

Repairing a PC can sometimes be expensive, and that is why we offer free basic in-shop diagnostics. Give one of our professional and experienced technicians a call at (602) 795-1111, and let's see what we can do for you.

Check out our reviews

Geeks In Phoenix LLC, BBB Business Review

Customer service is #1

Here at Geeks in Phoenix, we take pride in providing excellent customer service. We aim to give the highest quality of service  from computer repair, virus removal, and data recovery.

Bring your computer to us and save

Repairing a computer can be time-consuming. That is why we base our in-shop service on the time we work on your computer, not the time it takes for your computer to work! From running memory checking software to scanning for viruses, these are processes that can take some time.

Contact us

If you have any questions, please feel free to give us a call at (602) 795-1111  and talk with one of our Geeks. Or you can send us a message from our contact page contact page , and one of our Geeks will get back to you as soon as possible. Or you can stop by and see us. Here are our hours and location.

Like Geeks in Phoenix on Facebook

Follow Geeks in Phoenix on Twitter

Watch Geeks in Phoenix on YouTube