Geeks in Phoenix

Geek Blog


Five things you can do to maintain your Windows 10 or Windows 11 computer

We all want to keep our computers running smoothly, but to do that, we need to perform maintenance periodically. So here are five (5) things you can do to keep your Windows 10 or Windows 11 computer running smoothly.

Five things you can do to maintain your Windows 10 or Windows 11 computer

If you are anything like me, you expect your computer always to be running at 100%, ready to work at a moment's notice. And it is possible to get that level of performance, but it does require regular maintenance.

I use all of the procedures outlined in this article on average of once a month, and I will usually perform these tasks at the end of the workday or on the weekend. That way, I minimize the loss of production time.

Check for corrupt system files

This is the first thing I do when I notice a system not running normally. If fact, this is one of the first things we do when a Windows-based computer comes into the shop. With the number of system files Windows uses, file corruption is quite common.

Check Windows 10 system files with System File Checker

How to check and repair system files in Windows 11

Check for drive errors

The next thing I do is check for errors in the file system. Just like scanning for corrupt system files, checking the rest of the files and folders on the drive is essential. A quick check every month is excellent preventative maintenance.

How to check your drive for errors in Windows 10

How to check your drive for errors in Windows 11

Clean up unnecessary Windows folders and files

Now that we have checked for system/file errors on the drive, let's start cleaning up the unnecessary files that accumulate. A couple of different programs built into Windows can do a great job of cleaning up Windows 10 or Windows 11.

Clean up Windows 10 with Disk Cleanup

Clean up your Windows 10 computer using the Storage feature

Clean up Windows 11 with Storage Sense and Disk Cleanup

Clear out your browser cache

Once we clean up all of the miscellaneous Windows files, we need to clean up our browser(s). Internet browsers, like Google Chrome and Microsoft Edge, use a cache of websites they have visited to speed up browsing.

But the problem is the browsers do not empty the cache automatically, so left unattended, a browser cache can become extremely large. Periodic clearing of your browser cache is highly recommended.

There is a benefit to cleaning out your browser cache; you will be removing any old website data. This can help if you have difficulty logging into a website, as any saved website data will be purged.

How to clean up and reset Google Chrome

How to clean up and reset Mozilla Firefox

How to clean up and reset Microsoft Edge

Defragment and optimize your drive

And finally, after checking for errors and cleaning up files, we need to ensure that the files and folders are in their correct location. If you use the advanced way of running Defrag, you can optimize the boot performance.

How to defragment and optimize your drive in Windows 10

How to defragment and optimize your drive in Windows 11

Clean up Windows 11 with Storage Sense and Disk Cleanup

Updated January 16, 2024

Are you running out of free space on your Windows 11 computer? Or maybe you would like to clean up all the clutter that can build up over time? If so, here is how to clean and free up space on Windows 11 using Storage Sense and Disk Cleanup.

Clean up Windows 11 with Storage Sense and Disk Cleanup

Windows 11 has two (2) built-in programs that you can use to clean up Windows 11: Storage Sense and Disk Cleanup. They both have similar features, and they both can be run manually or automatically.

Note: Both of these programs will permanently delete files on your computer, so you need to be careful what you decide to clean up. Remember, once you delete a file or files with either one of these programs, you cannot get them back.

Storage Sense

The Storage Sense feature inside of Windows 11 Settings

Storage Sense is relatively new, as it first appeared in Windows 10 version 1809. It is simple to use, as it only has a few settings that you can change.

Storage Sense can be run automatically when your computer starts to run out of free space or every day, week, or month. It can delete files in your Recycle Bin and Downloads folder based on how long those files have been there. You can run Storage Sense manually, too.

How to open Storage Sense in Windows 11

  1. Left-click on the Start Windows logo key button to bring up the Start menu.
  2. In the list of pinned apps on the Start menu, left-click on Settings.
  3. In the left-hand column, left-click on System.
  4. Scroll down the right-hand column and left-click on Storage.
  5. In the right-hand column, left-click on Storage Sense.

Disk Cleanup

The Disk Cleanup program inside of Windows 11

Disk Cleanup has been inside Windows for some time now and has far more options for cleaning up Windows 11. And there are two (2) ways to run Disk Cleanup, which I refer to as Standard and Advanced.

Disk Cleanup can clean up user and system files, ranging from the Recycle Bin and temporary Internet files for users to Windows Update and thumbnails for the system.

The Standard way to run Disk Cleanup

  1. Left-click on the Start button Windows logo to bring up the Start menu.
  2. In the upper right-hand corner of the Start menu, left-click on All apps.
  3. Scroll down the list of programs and left-click on Windows Tools.
  4. Left-click on Disk Cleanup.

or

  1. Open File Explorer using one of the following:
    • Left-click on the File Explorer icon (manilla folder) on the Taskbar.
    • Press the Windows logo key Windows logo + E at the same time.
    • Use the Power User menu by right-clicking on the Start Windows logo button and selecting File Explorer.
  2. In the left-side column, left-click on This PC.
  3. In the right-side column, right-click on the drive you want to optimize and select Properties.
  4. On the General tab, left-click on the Disk Cleanup button.

If you started Disk Cleanup from the Windows Tools shortcut and have more than one (1) drive inside your computer, you may be prompted for which drive you want to clean up.

From the dialog box that appears, you will see a list of user files that can be deleted. If you are looking to clean up your user profile, select the files you want to delete and left-click on the OK button.

If you want to clean up system files, then left-click on the Clean up system files button. If this is the drive with Windows installed on it, you will have several more file options to choose from. Select the files you want to clean up and left-click on the OK button.

The Advanced way to run Disk Cleanup

Using the advanced way of starting Disk Cleanup will give you all of the user and system settings options. And you can also use Task Scheduler to run the advanced Disk Cleanup settings on a schedule you set.

The first thing you need to do is open a Command Prompt with Administrator privileges. Note: The full name of Disk Cleanup is cleanmgr.exe, but you only need to use cleanmgr in the Admin Command Prompt.

How to open a Command Prompt with Administrator privileges in Windows 11

In the Admin Command Prompt, type the following and then press Enter.

cleanmgr

This will start Disk Cleanup, just like starting it from the Windows Tools shortcut. But you can use command-line switches to get all of the options (user and system). You can use several different command-line switches with cleanmgr, but you will only need to use two: /sageset:n and /sagerun:n.

cleanmgr /sageset:n

/sageset:n - This switch displays the Disk Cleanup settings dialog box and creates a registry key to store your selected settings. The n value is stored in the registry and allows you to specify different tasks for Disk Cleanup to run. The n value can be any integer value from 0 to 65535. To get all the available options when using the /sageset switch, you may need to specify the drive letter that contains the Windows installation.

cleanmgr /sagerun:n

/sagerun:n - This switch runs the specified tasks assigned to the n value using the /sageset switch. All drives in the computer will be enumerated, and the selected profile will be run against each drive.

How to create a Scheduled Task to run Disk Cleanup

First, you will need to have created a preset configuration using the /sageset:n switch. Then open Task Scheduler and create a new task.

  1. Left-click on the Start button Windows logo to bring up the Start menu.
  2. In the upper right-hand corner of the Start menu, left-click on All apps.
  3. Scroll down the list of programs and left-click on Windows Tools.
  4. Left-click on Task Scheduler.
  5. In the right column labeled Actions, select Create Basic Task. The Create a Basic Task Wizard will appear.
  6. Give the task a name and description, and then select Next.
  7. Select when you want it to run (trigger).
  8. When prompted for what task you want to perform, select Start a program, then select Next.
  9. When prompted for a program/script to start, select Browse and navigate to C:\Windows\System32\ and select cleanmgr.exe.
  10. In the Add arguments section, type /sagerun:n and then select Next.
  11. Then select Finish, and you're all set.

You can also create a shortcut with the cleamgr /sagerun:n command, that way, you can run it manually whenever you want.

Clean up Windows 10 with Disk Cleanup

There are a lot of programs out there that can clean up your Windows 10 computer. But did you know that one of the best ones comes with Windows 10? Here's how to clean up your Windows 10 computer with Disk Cleanup.

Clean up Windows 10 with Disk Cleanup

Disk Cleanup has been included with Windows since Windows XP and is part of my regular scheduled maintenance. Disk Cleanup can be run two (2) different ways and can have three (3) different sets of options. The first way to run it is from any of the shortcuts built into Windows (Start menu or disk properties). When you use a built-in shortcut, you will have two (2) different sets of options, user and system.

Disk Cleanup user options in Windows 10
Disk Cleanup system options in Windows 10

When you run Disk Cleanup with user options, you can clean up user-specific files such as downloaded program files, temporary Internet files, and the recycle bin. With system options, you can also clean up Windows system files like Windows temporary files, device driver packages, and previous installations of Windows, just to name a few.

Disk Cleanup command line options in Windows 10

Disk Cleanup can also be run using command line switches. When you do this, you get the maximum options available. But you will have to run it at an administrative command prompt to configure these options. These options include all user and system options plus a few more, like old chkdsk files, Windows Update Cleanup, and Windows ESD installation files.

How to run Disk Cleanup from the Start menu

  1. Left-click on the Start Windows logo button.
  2. Scroll down to Windows Administrative Tools and left-click to expand.
  3. Left-click on Disk Cleanup. If you have more than one (1) drive, you will be prompted on which drive you want to clean up.

Disk Cleanup will scan your system for files that it can remove and open with the available user options. You can now choose which user files you would like to delete. To activate the system options, you will need to select Clean up system files in the lower left-hand corner. When you do this, Disk Cleanup will close and rescan your computer.

This time Disk Cleanup will now include system files that can be removed. It will also have a second tab on top called More Options. Under More Options, you will find other options, Programs and Features and System Restore and Shadow Copies.

Programs and Features will take you to the Control Panel, where you can uninstall programs or add/remove Windows features. Selecting System Restore and Shadow Copies will delete all but the most recent restore point. Use this carefully, as you cannot get back any restore points once they are deleted.

How to run Disk Cleanup from an administrative command prompt

You can run Disk Cleanup with or without command-line switches. When you run Disk Cleanup without any switches, it opens with the system options selections. When you run it with switch /sageset:n, you will get even more options than the system settings.

The first thing you will need to do is open an Administrative Command Prompt.

How to open a Command Prompt with Administrator privileges in Windows 10

Then type the following into the command prompt to run Disk Cleanup.

cleanmgr

Disk Cleanup can also be used with command-line switches, further expanding on its features. And when used with the /sageset:n and /sagerun:n switches, you can save multiple configurations that can be used in a shortcut or as a scheduled task. Here's an explanation of the /sageset:n and /sagerun:n switches.

cleanmgr /sageset:n

/sageset:n - This switch displays the Disk Cleanup settings dialog box and creates a registry key to store the settings you select. The n value is stored in the registry and allows you to specify different tasks for Disk Cleanup to run. The n value can be any integer value from 0 to 65535. To get all the available options when using the /sageset switch, you may need to specify the drive letter that contains the Windows installation.

cleanmgr /sagerun:n

/sagerun:n - This switch runs the specified tasks assigned to the n value by using the /sageset switch. All drives in the computer will be enumerated, and the selected profile will be run against each drive.

How to run Disk Cleanup as a Scheduled Task

First, you will need to have created a preset configuration using the /sageset:n switch. Then open Task Scheduler and create a new task.

  1. Left-click on the Start Windows logo button.
  2. Scroll down to Windows Administrative Tools and left-click to expand.
  3. Left-click on Task Scheduler.
  4. In the right column labeled Actions, select Create Basic Task. The Create a Basic Task Wizard will appear.
  5. Give the task a name and description and then select Next.
  6. Select when you want it to run (trigger).
  7. When prompted for what task you want to perform, select Start a program, then select Next.
  8. When prompted for a program/script to start, select Browse and navigate to C:\Windows\System32\ and select cleanmgr.exe.
  9. In the Add arguments section, type /sagerun:n and then select Next.
  10. Then select Finish, and you're all set.

How to speed up the boot time of your computer

Updated January 3, 2023

Does it seem like your computer takes forever to boot up? Waiting for your Windows-based computer to boot can be quite frustrating. But there are a few things you can do. Here is how to speed up the boot time of your computer.

How to speed up the boot time of your computer

Check the drive for errors

If your computer has a Hard Disk Drive (HDD), this is the first thing you want to do. HDD's are notorious for not writing data back to the exact place where the data was read. Little known fact, but Microsoft didn't invent the Disk Operating System (DOS). It bought Quick and Dirty Operating System (QDOS) in the early '80s and renamed it MS-DOS. If you have a Solid State Drive (SSD), you can bypass this step, as SSD's don't have moving parts.

Check for hardware issues first with the software provided by the manufacturer of your HDD. The Ultimate Boot CD (UBCD) has all of the significant drive manufacturer's diagnostics software built-in, so this is always the right place to start.

Diagnose computer hardware issues with the Ultimate Boot CD

Then check for software issues with Windows built-in CHKDSK.

Check your hard disk for errors in Windows Vista / Windows 7

Check your hard drive for errors in Windows 8

Check your hard drive for errors in Windows 10

How to check your drive for errors in Windows 11

Uninstall any unwanted programs

This one is a no-brainer. Allot of adware/junkware will load itself up at boot, causing an increase in boot time. It also takes away resources that could be used by programs you want to run. The first thing to do is to go to the Control Panel > Programs > Programs and Features. Then go through the list of programs to see which ones can be uninstalled. Remember that you can change the way the programs are listed just by clicking on the column name. I like to know when a program was installed because you can find many unwanted clutter installations that way.

Remove unwanted items from startup
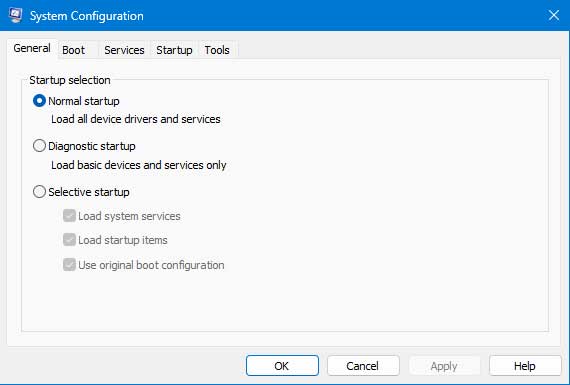
MSCONFIG inside of Windows 11

You can temporarily disable programs and services that start up with Windows using MSCONFIG. MSCONFIG is a diagnostic tool built into Windows that allows you to troubleshoot boot issues. You can enable and disable various boot settings, including programs and services that startup with Windows. Just open an Administrator Command Prompt and type MSCONFIG.

How to open a Command Prompt with Administrator privileges in Windows Vista and Windows 7

How to open a Command Prompt with Administrator privileges in Windows 8

How to open a Command Prompt with Administrator privileges in Windows 10

How to open a Command Prompt with Administrator privileges in Windows 11

Once you have your system fine-tuned with MSCONFIG, you could leave your system running in diagnostic mode by having MSCONFIG not displayed at startup. That's one of the first things I check for on systems I work on. It just too easy to let it go. But if you want to permanently remove the items you have disabled in MSCONFIG, here's how to do it.
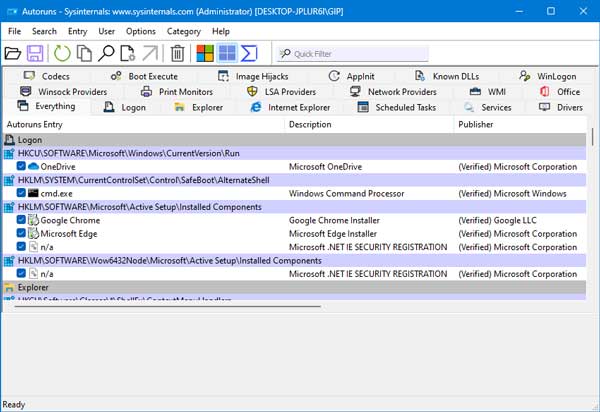
The Autoruns Everything tab inside of Windows 11
The Everything tab inside of Autoruns

  1. Download and extract the latest version of Autoruns from Microsoft.
  2. Open MSCONFIG and make a note of each item you have disabled.
  3. On the General tab of MSCONFIG, select Normal startup, then left-click Apply and OK. When prompted, close MSCONFIG and do not restart the computer. Yes, this will enable all of the items you have disabled, but we will delete them next.
  4. Open the folder where you saved Autoruns.exe, right-click on it and select Run as Administrator.
  5. Once it is done scanning, you need to find the items you had disabled with MSCONFIG. Check the Services and the Logon tabs first. Remember that you can check the logon items for each user with the User pull-down menu. Once you find your things, you can 1) disable it with the checkbox on the left or 2) you can right-click on it and select Delete.

Clean up the drive

It's time to clean up some of the clutter that seems to pile up. Using Windows built-in Disk Cleanup tool (cleanmgr.exe) will quickly clean out all sorts of crap, like user temp files and temporary Internet files. If you want to go a little further with cleaning your drive, download a copy of CCleaner.

Free up more disk space with Windows Vista / Windows 7 Disk Cleanup

Clean up your hard drive in Windows 8 with Disk Cleanup

Clean up Windows 10 with Disk Cleanup

Clean up your Windows 10 computer using the Storage feature

Clean up Windows 11 with Storage Sense and Disk Cleanup

Clean up and optimize your computer for free with CCleaner

Defragment your HDD

This is another step that only pertains to HDD's since SSD's don't get fragmented. If your HDD is fragmented, it takes it longer to find and load files. Optimizing the HDD structure will always give you a little more speed. You can use Windows built-in Optimize and Defragment drive tool or another disk utility like Defraggler from Piriform.

Geek Tip: If you use run the Disk Defragmenter from an Admin Command Prompt, you can use the /B switch to optimize the boot performance. For example, if you want to optimize booting on the C: drive, you would use the following:

Defrag C: /B

Using Disk Defragmenter in Windows Vista

Using Disk Defragmenter in Windows 7

Defragment and Optimize your hard drive in Windows 8

How to defragment and optimize your drive in Windows 10

How to defragment and optimize your drive in Windows 11

Perform advanced disk defragmentation with Defraggler from Piriform

If you want to go the extra mile with optimizing your HDD, remove the swap file before you defrag and restore it after you're done. And when you restore it, go ahead and use the following calculations.

The minimum pagefile size is one and a half (1.5) x the amount of memory. The maximum pagefile size is three (3) x the minimum pagefile size. Let's say you have 2 Gb (2,048 Mb) of memory. The minimum pagefile size would be 1.5 x 2,048 = 3,072 Mb and the maximum pagefile size would be 3 x 3,072 = 9,216 Mb.

Free up more disk space with Windows 7 Disk Cleanup

During your computer's regular use, you will accumulate several unnecessary files (temporary setup/internet files, recycle bin, etc.). You can remove these files with the built-in Disk Cleanup (cleanmgr.exe) utility inside of Windows 7. And it can be run a couple of different ways and with different options.

Running Disk Cleanup (cleanmgr.exe) on demand

There are a couple of different ways to run Disk Cleanup on demand. The following procedure cleans up files associated with your user account. You can also use Disk Cleanup to clean up all the files on your computer.

Windows 7 Disk Cleanup dialog box with standard options

  1. Click Start, and then type Disk Cleanup in the Start Search box.
    or
    Click Start, then All Programs, then Accessories, then System Tools, then Disk Cleanup
  2. In the Drives list, click the hard disk drive that you want to clean up, and then click OK
  3. In the Disk Cleanup dialog box, on the Disk Cleanup tab, select the checkboxes for the file types that you want to delete, and then click OK
  4. In the message that appears, click Delete files

The More Options tab is available when you choose to clean files from all users on the computer. This tab includes two additional ways to free even more disk space:

Windows 7 Disk Cleanup dialog box with more options

  • Programs and Features. This option opens Programs and Features in Control Panel, where you can uninstall programs that you no longer use. The Size column in Programs and Features shows how much disk space each program uses.
  • System Restore and Shadow Copies. With this option, you can delete all but the most recent restore point on the disk.
    System Restore uses restore points to return your system files to an earlier point in time. If your computer is running normally, you can save disk space by deleting the earlier restore points.
    In some editions of Windows 7, restore points can include previous versions of files, known as shadow copies, and backup images created with Windows Complete PC Backup. These files and images will also be deleted.

Running Disk Cleanup (cleanmgr.exe) as a scheduled task

You can also run Disk Cleanup from a command prompt. This gives you a few more options, like predefined settings for running Disk Cleanup as a scheduled task in Task Scheduler. First, we need to bring up a command prompt.

Windows 7 Disk Cleanup dialog box with sageset options

  1. Click Start, and then type cmd in the Start Search box.
  2. In the search results list, right-click Command Prompt, and then click Run as Administrator.
  3. If you are prompted by User Account Control, click Continue.

You can start the Disk Cleanup tool by running cleanmgr.exe. Disk Cleanup supports the following command-line switches:

  • cleanmgr /d driveletter: - This switch selects the drive that you want Disk Cleanup to clean. Note that the /d switch is not used with /sagerun:n.
  • cleanmgr /sageset:n - This switch displays the Disk Cleanup Settings dialog box and creates a registry key to store the settings you select. The n value is stored in the registry and allows you to specify different tasks for Disk Cleanup to run. The n value can be any integer value from 0 to 65535. To get all the available options when you are using the /sageset switch, you may need to specify the drive letter that contains the Windows installation.
  • cleanmgr /sagerun:n - This switch runs the specified tasks that are assigned to the n value by using the /sageset switch. All drives in the computer will be enumerated, and the selected profile will be run against each drive.

How to run Disk Cleanup (cleanmgr.exe) on-demand and as a scheduled task inside of Windows 7.

Free computer diagnostics

Repairing a PC can sometimes be expensive, and that is why we offer free basic in-shop diagnostics. Give one of our professional and experienced technicians a call at (602) 795-1111, and let's see what we can do for you.

Check out our reviews

Geeks In Phoenix LLC, BBB Business Review

Customer service is #1

Here at Geeks in Phoenix, we take pride in providing excellent customer service. We aim to give the highest quality of service  from computer repair, virus removal, and data recovery.

Bring your computer to us and save

Repairing a computer can be time-consuming. That is why we base our in-shop service on the time we work on your computer, not the time it takes for your computer to work! From running memory checking software to scanning for viruses, these are processes that can take some time.

Contact us

If you have any questions, please feel free to give us a call at (602) 795-1111  and talk with one of our Geeks. Or you can send us a message from our contact page contact page , and one of our Geeks will get back to you as soon as possible. Or you can stop by and see us. Here are our hours and location.

Like Geeks in Phoenix on Facebook

Follow Geeks in Phoenix on Twitter

Watch Geeks in Phoenix on YouTube