Geeks in Phoenix

Geek Blog


Clean up Windows 11 with Storage Sense and Disk Cleanup

Updated January 16, 2024

Are you running out of free space on your Windows 11 computer? Or maybe you would like to clean up all the clutter that can build up over time? If so, here is how to clean and free up space on Windows 11 using Storage Sense and Disk Cleanup.

Clean up Windows 11 with Storage Sense and Disk Cleanup

Windows 11 has two (2) built-in programs that you can use to clean up Windows 11: Storage Sense and Disk Cleanup. They both have similar features, and they both can be run manually or automatically.

Note: Both of these programs will permanently delete files on your computer, so you need to be careful what you decide to clean up. Remember, once you delete a file or files with either one of these programs, you cannot get them back.

Storage Sense

The Storage Sense feature inside of Windows 11 Settings

Storage Sense is relatively new, as it first appeared in Windows 10 version 1809. It is simple to use, as it only has a few settings that you can change.

Storage Sense can be run automatically when your computer starts to run out of free space or every day, week, or month. It can delete files in your Recycle Bin and Downloads folder based on how long those files have been there. You can run Storage Sense manually, too.

How to open Storage Sense in Windows 11

  1. Left-click on the Start Windows logo key button to bring up the Start menu.
  2. In the list of pinned apps on the Start menu, left-click on Settings.
  3. In the left-hand column, left-click on System.
  4. Scroll down the right-hand column and left-click on Storage.
  5. In the right-hand column, left-click on Storage Sense.

Disk Cleanup

The Disk Cleanup program inside of Windows 11

Disk Cleanup has been inside Windows for some time now and has far more options for cleaning up Windows 11. And there are two (2) ways to run Disk Cleanup, which I refer to as Standard and Advanced.

Disk Cleanup can clean up user and system files, ranging from the Recycle Bin and temporary Internet files for users to Windows Update and thumbnails for the system.

The Standard way to run Disk Cleanup

  1. Left-click on the Start button Windows logo to bring up the Start menu.
  2. In the upper right-hand corner of the Start menu, left-click on All apps.
  3. Scroll down the list of programs and left-click on Windows Tools.
  4. Left-click on Disk Cleanup.

or

  1. Open File Explorer using one of the following:
    • Left-click on the File Explorer icon (manilla folder) on the Taskbar.
    • Press the Windows logo key Windows logo + E at the same time.
    • Use the Power User menu by right-clicking on the Start Windows logo button and selecting File Explorer.
  2. In the left-side column, left-click on This PC.
  3. In the right-side column, right-click on the drive you want to optimize and select Properties.
  4. On the General tab, left-click on the Disk Cleanup button.

If you started Disk Cleanup from the Windows Tools shortcut and have more than one (1) drive inside your computer, you may be prompted for which drive you want to clean up.

From the dialog box that appears, you will see a list of user files that can be deleted. If you are looking to clean up your user profile, select the files you want to delete and left-click on the OK button.

If you want to clean up system files, then left-click on the Clean up system files button. If this is the drive with Windows installed on it, you will have several more file options to choose from. Select the files you want to clean up and left-click on the OK button.

The Advanced way to run Disk Cleanup

Using the advanced way of starting Disk Cleanup will give you all of the user and system settings options. And you can also use Task Scheduler to run the advanced Disk Cleanup settings on a schedule you set.

The first thing you need to do is open a Command Prompt with Administrator privileges. Note: The full name of Disk Cleanup is cleanmgr.exe, but you only need to use cleanmgr in the Admin Command Prompt.

How to open a Command Prompt with Administrator privileges in Windows 11

In the Admin Command Prompt, type the following and then press Enter.

cleanmgr

This will start Disk Cleanup, just like starting it from the Windows Tools shortcut. But you can use command-line switches to get all of the options (user and system). You can use several different command-line switches with cleanmgr, but you will only need to use two: /sageset:n and /sagerun:n.

cleanmgr /sageset:n

/sageset:n - This switch displays the Disk Cleanup settings dialog box and creates a registry key to store your selected settings. The n value is stored in the registry and allows you to specify different tasks for Disk Cleanup to run. The n value can be any integer value from 0 to 65535. To get all the available options when using the /sageset switch, you may need to specify the drive letter that contains the Windows installation.

cleanmgr /sagerun:n

/sagerun:n - This switch runs the specified tasks assigned to the n value using the /sageset switch. All drives in the computer will be enumerated, and the selected profile will be run against each drive.

How to create a Scheduled Task to run Disk Cleanup

First, you will need to have created a preset configuration using the /sageset:n switch. Then open Task Scheduler and create a new task.

  1. Left-click on the Start button Windows logo to bring up the Start menu.
  2. In the upper right-hand corner of the Start menu, left-click on All apps.
  3. Scroll down the list of programs and left-click on Windows Tools.
  4. Left-click on Task Scheduler.
  5. In the right column labeled Actions, select Create Basic Task. The Create a Basic Task Wizard will appear.
  6. Give the task a name and description, and then select Next.
  7. Select when you want it to run (trigger).
  8. When prompted for what task you want to perform, select Start a program, then select Next.
  9. When prompted for a program/script to start, select Browse and navigate to C:\Windows\System32\ and select cleanmgr.exe.
  10. In the Add arguments section, type /sagerun:n and then select Next.
  11. Then select Finish, and you're all set.

You can also create a shortcut with the cleamgr /sagerun:n command, that way, you can run it manually whenever you want.

How to enable automatic registry backups in Windows 10 and Windows 11

Updated January 15, 2024

When it comes to repairing Windows-based computers, the one thing that will positively stop Windows from starting up is a corrupt registry. Having a backup of the registry is essential for quickly getting a system back up and running. So here is how to enable automatic registry backups in Windows 10 and Windows 11.

How to enable automatic registry backups in Windows 10 and Windows 11

In previous versions of Windows, the operating system would automatically backup the registry. In fact, Windows did automatically back up the registry until Windows 10 version 1803.

With Windows 10 version 1803, Microsoft disabled the automatic registry backup to help reduce the overall footprint of Windows. Microsoft would prefer you to use the System Restore feature.

But considering that Windows 10 and Windows 11 can take up to 40GB or more of disk space, the folder that contains the registry backup (Windows\System32\config\RegBack) only takes up roughly 100MB or so of disk space. I do not see a problem with having a backup of the registry.

Now over the past couple of years, I have seen an increase in Windows computers that do not have System Protection enabled. System Protection is the feature that creates and manages the System Restore feature.

So when I get a computer in the shop with a corrupted registry, and there are no System Restore points, then the only thing I can do is reformat the drive and reinstall Windows. But you can re-enable the automatic registry backup with a simple registry edit.

Note: If you are not comfortable editing the registry, don't hesitate to contact a local computer technician to assist you.

From my experience, getting the registry backups going again is a two-step process. First, you create the registry key and restart your computer to take effect. Then you run the built-in task inside of Task Scheduler. Let's start with the registry editor.

How to open the Registry Editor in Windows 10 / Windows 11

  1. Open the Registry Editor by either
  2. Navigate to HKLM (HKEY_LOCAL_MACHINE) > System > CurrentControlSet > Control > Session Manager > Configuration Manager
    Registry Editor open to Configuration Manager entry
  3. In the left-hand column, right-click on Configuration Manager and select New > DWORD (32-bit) Value.
    Creating the new DWORD value EnablePeriodicBackup
  4. Name the new DWORD value EnablePeriodicBackup.
    Registry Editor open to EnablePeriodicBackup value
  5. Right-click on the EnablePeriodicBackup value and select Modify.
    Modifying the EnablePeriodicBackup value
  6. Change the Value data from 0 to 1 and left-click on OK.
    Changing the default EnablePeriodicBackup value from 0 to 1
  7. Restart your computer.

Using File Explorer, navigate to the Windows\System32\config\RegBack folder and see if the registry files are backed up. If you encounter a couple of dialog boxes that tell you that you do not have permission to access this folder, left-click on Continue.

You should see five (5) files in this folder; DEFAULT, SAM, SECURITY, SOFTWARE, and SYSTEM. And more than likely, they will be only 0KB in size. If that is the case, we will need to run the task that backups the registry.

Now we need to run the built-in task RegIdleBackup to get the Windows to start backing up the registry. Once you run the RegIdleBackup task, you should restart your computer again to get it fully functional.

How to open the Task Scheduler in Windows 10 / Windows 11

  1. Open the Task Scheduler by either
  2. When Task Scheduler appears, navigate down the left-hand column to Task Scheduler Library > Microsoft > Windows > Registry.
    The RegIdleBackup task inside of Task Manager
  3. In the center column, highlight the RegIdleBackup task and select Run in the right-hand column.
  4. There is no set schedule for this task. If you right-click on the RegIdleBackup task and select Properties from the context menu, you can create a new Trigger for it.
  5. When you are all done, restart your computer.

Windows will now be backing up the registry regularly. Now that you enabled automatic registry backups let's check and see if they are working.

Let's use File Explorer again to navigate to the Windows\System32\config\RegBack folder and see if the registry files have increased in size. You should now see they are no longer 0KB.

How to disable or enable auto-start programs and drivers in Windows 10 and Windows 11

Updated March 26, 2024

In doing computer repair, I often get asked, "Why does my computer take so long to start up?". Quite frequently, it turns out there are items set to auto-start that don't need to or don't exist anymore. Here's how to disable programs, drivers, and services that auto-start in Windows 10 and Windows 11.

How to disable or enable auto-start programs and drivers in Windows 10 and Windows 11

Now, this one doesn't cost any money and can dramatically improve the time it takes for your computer and programs to start up. By minimizing the number of applications that launch at startup, you can also free up memory.

Now, there are three (3) programs I use to enable or disable programs, drivers, or services that start up in Windows 10 and Windows 11. The built-in programs (Task Manager and System Configuration) are pretty safe to use but still can degrade performance if not used properly. The third program (Autoruns / Autoruns64) can be dangerous because not only can it enable or disable entries, but it can also delete them.

Note: I recommended that you make changes one at a time and restart between them. That way, you can find out if you need that program or service you just disabled. Yes, it's time-consuming, but sometimes you have to do it.

Task Manager (Auto-start programs)

The Startup tab inside of Task Manager
The Startup tab inside of Windows 10 / Windows 11 Task Manager

Using Task Manager is the most comfortable and safest way to enable or disable programs that auto-start with Windows 10 and Windows 11. None of the programs listed here are going to prevent your computer from starting if disabled. You will not find any program listed here that Windows 10 or Windows 11 requires to operate.

Now, for those of you who are not familiar with Task Manager, it's a built-in program that does a lot of different things. It monitors running programs, system performance, and active processes. And it also manages programs that auto-start with Windows.

How to start Task Manager in Windows 10 and Windows 11

  1. Right-click on the Start Windows logo key button to bring up the Power User menu.
  2. Left-click on Task Manager.

or

  1. Press CTRL + ALT + DEL all at the same time.
  2. From the security screen that appears, left-click on Task Manager.

or

  1. Right-click on an empty area of the Taskbar.
  2. On the context menu that appears, left-click on Task Manager.

Sometimes, the first time you run Task Manager, it will only display running apps. You have to left-click the More details arrow to view all the tabs. The location of the tabs varies from Windows 10 (across the top) to Windows 11 (down the left side).

Once the tabs are displayed, left-click on Startup (Windows 10) or Startup apps (Windows 11). From here, all you have to do is highlight the program name and select the Enable / Disable button.

System Configuration (Auto-start services)

The Services tab inside of System Configuration

This program is used mainly for diagnostics, so there are no splashy graphics. With System Configuration, you can change the services that auto-start with Windows. Be careful about making changes here, as they can have a significant impact on system performance.

How to start System Configuration in Windows 10

  1. Left-click on the Start button Windows logo and scroll down the list of applications to Windows Administrative Tools.
  2. Left-click on Windows Administrative Tools to expand the contents.
  3. Scroll down and left-click on System Configuration.

How to start System Configuration in Windows 11

  1. Left-click on the Start button Windows logo to bring up the Start menu.
  2. In the upper right-hand corner of the Start menu, left-click on All apps.
  3. Scroll down the list of programs and left-click on Windows Tools.
  4. Left-click on System Configuration.

How to start System Configuration in both Windows 10 and 11

  1. Press the Windows logo key Windows logo key + R to bring up the Run dialog box.
  2. Type in MSCONFIG and left-click on OK.

From the default dialog box, select the Service tab. There, you will find all the services that auto-start with Windows. Remember that some of the Microsoft services listed cannot be disabled, so it's always best to select the Hide all Microsoft services checkbox at the bottom of the services section.

Once you have made your changes left-click on the Apply button, then left-click on the OK button. You will get a dialog box prompting you to either Restart or Exit without restart. Left-click on Restart, and you're ready to go. Remember to make changes one at a time and restart in between changes.

Autoruns / Autoruns64 (Auto-start programs, drivers, and services)

The Everything tab inside of Microsoft Autoruns
The Everything tab inside Microsoft Autoruns

Autoruns.exe (32-bit) and Autoruns64.exe (64-bit) are part of Microsoft's Sysinternals Suite of troubleshooting utilities and do not come with Windows 10 or Windows 11. But they are free, require no installation, and can be downloaded separately or with the complete suite (see links below).

Now Autoruns.exe will only run on 32-bit versions of Windows 10, and Autoruns64.exe will only run on 64-bit versions of Windows 10 and Windows 11. Windows 11 does not come in a 32-bit version. Most versions of Windows 10 are 64-bit, so if you have any doubt about what version of Windows 10 you have, download Autoruns64.exe first.

This program is the most complex of them all. And the most dangerous! Why do you ask? Besides being able to disable programs, drivers, and services that auto-start, you can also delete their load points altogether. So be careful!

Once you have downloaded the files and extracted them to a permanent location, open that folder with File Explorer. Locate either Autoruns.exe or Autoruns64.exe (depending on your version of Windows 10). Right-click on the release of Autoruns for your version of Windows 10 / Windows 11 and select Run as administrator from the context menu.

When you start Autoruns, it automatically scans your computer for auto-start programs, drivers, and services. Autoruns has multiple tabs for the different Windows auto-start locations (logon, services, drivers, etc.), including one called Everything. And if you select the User pull-down menu on the toolbar on top of the program, you can also select the different user profiles.

If you want to disable/enable a program or driver, left-click on the checkbox on the left-hand side of the entry. You can also delete an entry, but I recommend that you back it up first, just in case. If you find you don't need the backup, you can delete the file later.

To back up an entry in Autoruns, you right-click on it, and a context menu will appear. Left-click on Jump to entry ... and the Registry Editor opens to the location in the registry of that entry. Right-click on the selected entry in the Registry Editor, and a context menu appears. Left-click on Export and select a location and file name for your backup file.

Autoruns
Sysinternals Suite

Clean up Windows 10 with Disk Cleanup

Updated September 24, 2024

There are a lot of programs out there that can clean up your Windows 10 computer. But did you know that one of the best comes with Windows 10? Here's how to clean up your Windows 10 computer with Disk Cleanup.

Clean up Windows 10 with Disk Cleanup

Disk Cleanup has been included with Windows since Windows XP and is part of my regular scheduled maintenance. Disk Cleanup can be run intwo (2) different ways and can have three (3) different sets of options. The first way to run it is from any of the shortcuts built into Windows (Start menu or disk properties). When you use a built-in shortcut, you will have two (2) different sets of options: user and system.

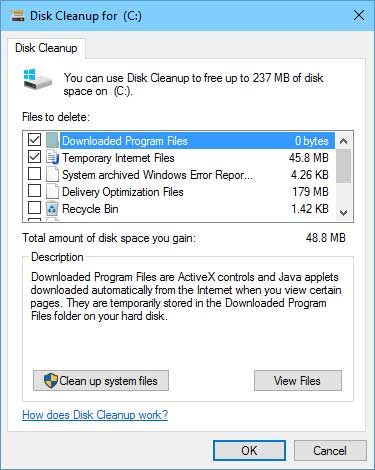
Disk Cleanup user options in Windows 10
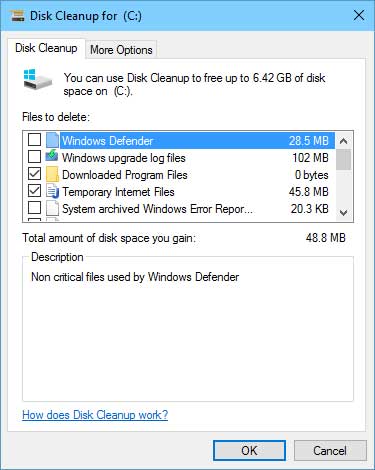
Disk Cleanup system options in Windows 10

When you run Disk Cleanup with user options, you can clean up user-specific files such as downloaded program files, temporary Internet files, and the recycle bin. With system options, you can also clean up Windows system files like Windows temporary files, device driver packages, and previous installations of Windows, to name a few.

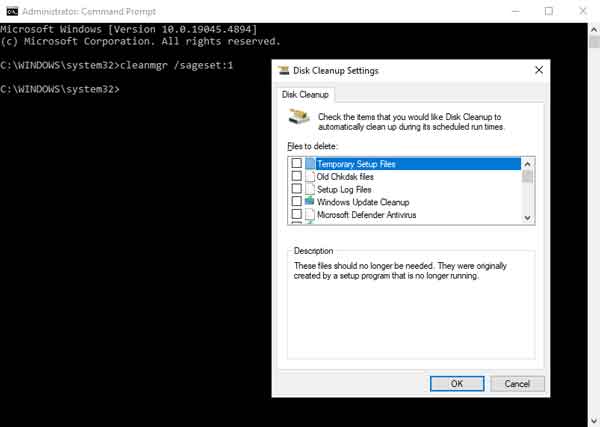
Disk Cleanup command line options in Windows 10

Disk Cleanup can also be run using command line switches. When you do this, you get the maximum options available. But you will have to run it at an administrative command prompt to configure these options. These options include all user and system options plus a few more, like old chkdsk files, Windows Update Cleanup, and Windows ESD installation files.

How to run Disk Cleanup from the Start menu

  1. Left-click on the Start Windows logo button.
  2. Scroll down to Windows Administrative Tools and left-click to expand.
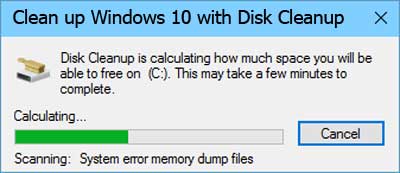
  3. Left-click on Disk Cleanup. If you have more than one (1) drive, you will be prompted on which drive you want to clean up.

Disk Cleanup will scan your system for files that it can remove and open with the available user options. You can now choose which user files you would like to delete. To activate the system options, you will need to select Clean up system files in the lower left-hand corner. When you do this, Disk Cleanup will close and rescan your computer.

This time, Disk Cleanup will now include system files that can be removed. It will also have a second tab on top called More Options. Under More Options, you will find other options: Programs and Features and System Restore and Shadow Copies.

Programs and Features will take you to the Control Panel, where you can uninstall programs or add/remove Windows features. Selecting System Restore and Shadow Copies will delete all but the most recent restore point. Use this carefully, as you cannot get back any restore points once they are deleted.

How to run Disk Cleanup from an administrative command prompt

You can run Disk Cleanup with or without command-line switches. When you run Disk Cleanup without any switches, it opens with the system options selections. When you run it with switch /sageset:n, you will get even more options than the system settings.

The first thing you will need to do is open an Administrative Command Prompt.

How to open a Command Prompt with Administrator privileges in Windows 10

Then, type the following into the command prompt to run Disk Cleanup.

cleanmgr

Disk Cleanup can also be used with command-line switches, further expanding on its features. And when used with the /sageset:n and /sagerun:n switches, you can save multiple configurations that can be used in a shortcut or as a scheduled task. Here's an explanation of the /sageset:n and /sagerun:n switches.

cleanmgr /sageset:n

/sageset:n - This switch displays the Disk Cleanup settings dialog box and creates a registry key to store the settings you select. The n value is stored in the registry and allows you to specify different tasks for Disk Cleanup to run. The n value can be any integer value from 0 to 65535. To get all the available options when using the /sageset switch, you may need to specify the drive letter that contains the Windows installation.

cleanmgr /sagerun:n

/sagerun:n - This switch runs the specified tasks assigned to the n value by using the /sageset switch. All drives in the computer will be enumerated, and the selected profile will be run against each drive.

How to run Disk Cleanup as a Scheduled Task

First, you will need to have created a preset configuration using the /sageset:n switch. Then open Task Scheduler and create a new task.

  1. Left-click on the Start Windows logo button.
  2. Scroll down to Windows Administrative Tools and left-click to expand.
  3. Left-click on Task Scheduler.
  4. In the right column labeled Actions, select Create Basic Task. The Create a Basic Task Wizard will appear.
  5. Give the task a name and description, and then select Next.
  6. Select when you want it to run (trigger).
  7. When prompted for what task (action) you want to perform, select Start a program, then select Next.
  8. When prompted for a program/script to start, select Browse and navigate to C:\Windows\System32\ and select cleanmgr.exe.
  9. In the Add arguments section, type /sagerun:n and then select Next.
  10. Then select Finish, and you're all set.

Free up more disk space with Windows 7 Disk Cleanup

During your computer's regular use, you will accumulate several unnecessary files (temporary setup/internet files, recycle bin, etc.). You can remove these files with the built-in Disk Cleanup (cleanmgr.exe) utility inside of Windows 7. And it can be run a couple of different ways and with different options.

Running Disk Cleanup (cleanmgr.exe) on demand

There are a couple of different ways to run Disk Cleanup on demand. The following procedure cleans up files associated with your user account. You can also use Disk Cleanup to clean up all the files on your computer.

Windows 7 Disk Cleanup dialog box with standard options

  1. Click Start, and then type Disk Cleanup in the Start Search box.
    or
    Click Start, then All Programs, then Accessories, then System Tools, then Disk Cleanup
  2. In the Drives list, click the hard disk drive that you want to clean up, and then click OK
  3. In the Disk Cleanup dialog box, on the Disk Cleanup tab, select the checkboxes for the file types that you want to delete, and then click OK
  4. In the message that appears, click Delete files

The More Options tab is available when you choose to clean files from all users on the computer. This tab includes two additional ways to free even more disk space:

Windows 7 Disk Cleanup dialog box with more options

  • Programs and Features. This option opens Programs and Features in Control Panel, where you can uninstall programs that you no longer use. The Size column in Programs and Features shows how much disk space each program uses.
  • System Restore and Shadow Copies. With this option, you can delete all but the most recent restore point on the disk.
    System Restore uses restore points to return your system files to an earlier point in time. If your computer is running normally, you can save disk space by deleting the earlier restore points.
    In some editions of Windows 7, restore points can include previous versions of files, known as shadow copies, and backup images created with Windows Complete PC Backup. These files and images will also be deleted.

Running Disk Cleanup (cleanmgr.exe) as a scheduled task

You can also run Disk Cleanup from a command prompt. This gives you a few more options, like predefined settings for running Disk Cleanup as a scheduled task in Task Scheduler. First, we need to bring up a command prompt.

Windows 7 Disk Cleanup dialog box with sageset options

  1. Click Start, and then type cmd in the Start Search box.
  2. In the search results list, right-click Command Prompt, and then click Run as Administrator.
  3. If you are prompted by User Account Control, click Continue.

You can start the Disk Cleanup tool by running cleanmgr.exe. Disk Cleanup supports the following command-line switches:

  • cleanmgr /d driveletter: - This switch selects the drive that you want Disk Cleanup to clean. Note that the /d switch is not used with /sagerun:n.
  • cleanmgr /sageset:n - This switch displays the Disk Cleanup Settings dialog box and creates a registry key to store the settings you select. The n value is stored in the registry and allows you to specify different tasks for Disk Cleanup to run. The n value can be any integer value from 0 to 65535. To get all the available options when you are using the /sageset switch, you may need to specify the drive letter that contains the Windows installation.
  • cleanmgr /sagerun:n - This switch runs the specified tasks that are assigned to the n value by using the /sageset switch. All drives in the computer will be enumerated, and the selected profile will be run against each drive.

How to run Disk Cleanup (cleanmgr.exe) on-demand and as a scheduled task inside of Windows 7.

Free computer diagnostics

Repairing a PC can sometimes be expensive, and that is why we offer free basic in-shop diagnostics. Give one of our professional and experienced technicians a call at (602) 795-1111, and let's see what we can do for you.

Check out our reviews

Geeks In Phoenix LLC, BBB Business Review

Customer service is #1

Here at Geeks in Phoenix, we take pride in providing excellent customer service. We aim to give the highest quality of service  from computer repair, virus removal, and data recovery.

Bring your computer to us and save

Repairing a computer can be time-consuming. That is why we base our in-shop service on the time we work on your computer, not the time it takes for your computer to work! From running memory checking software to scanning for viruses, these are processes that can take some time.

Contact us

If you have any questions, please feel free to give us a call at (602) 795-1111  and talk with one of our Geeks. Or you can send us a message from our contact page , and one of our Geeks will get back to you as soon as possible. Or you can stop by and see us. Here are our hours and location.

Like Geeks in Phoenix on Facebook

Follow Geeks in Phoenix on Twitter

Watch Geeks in Phoenix on YouTube