Are you having problems finding files in Windows 10 or Windows 11? Are your searches not finding the data you are looking for? If so, you may want to look at the Indexing Options inside Windows 10 and Windows 11.

Have you ever typed in a query in the search box in Windows 10 or Windows 11 and not found the file or folder you were looking for? You know it is on your computer somewhere, but Windows just does not seem to find it.
Windows 10 and Windows 11 have a built-in index that contains the properties of specific files and folders. The special folders (Desktop, Documents, Downloads, Music, Pictures, and Videos) are mainly indexed by default, but you can modify where and what Windows indexes.
And some files can have their contents indexed too. For example, if you have Microsoft Office installed, you can have the contents of Word documents, OneNote notebooks, and Outlook data included in the index.
In fact, many of the apps built into Windows use the index in one way or another. File Explorer, Microsoft Edge, and Cortana, to name a few. And the cool thing is it all just runs smoothly in the background, most of the time.
But there may be a time when you just do not feel you are finding all of your files or, in the case of Outlook, your e-mails. One of the most common issues I deal with as a computer technician is when users search inside Outlook for an item and the index does not find any matches. Yes, Outlook, by default, uses the index when searching for items inside of Outlook.
So let's look at the indexing options in Windows 10 and Windows 11. There is no difference between the indexing options in either Windows 10 or Windows 11, just the way you get to it.
How to get to the indexing options in Windows 10
- Bring up a Search Dialog box by either:
- Left-clicking in the Type here to search box on the right-hand side of the Start button

- Press the Windows Logo key + S at the same time.
- In the Search Dialog box, type Indexing Options.
- In the search results, left-click on Indexing Options.
or
- Left-click on the Start button to bring up the Start menu.
- Scroll down the list of apps and left-click on Windows System to expand the folder.
- Left-click on Control Panel.
- On the upper right-hand side of the Control Panel, change View by: from Category to Large Icons.
- Double left-click on Indexing Options.
How to get to the indexing options in Windows 11
- Left-click on the Start button to bring up the Start menu.
- On the top of the Start menu there is a search field. Type Indexing Options.
- In the search results, left-click on Indexing Options - Control Panel.
or
- Left-click on the Start button to bring up the Start menu.
- In the upper right-hand corner of the Start menu, left-click on All apps.
- Scroll down the list of programs and left-click on Windows Tools.
- Double left-click on Control Panel.
- On the upper right-hand side of the Control Panel, change View by: from Category to Large Icons.
- Double left-click on Indexing Options.
Configuring Indexing Options inside of Windows 10 and Windows 11

Note: Changing the properties of certain features inside of Indexing Options will cause an immediate rebuild of the index. Rebuilding the index can take several hours to even days; it depends on how much data the indexing service has to process. Any searches performed while the index is rebuilding may be incomplete.
The Indexing Options main window displays the locations that are currently indexed. At the bottom, there are three (3) buttons: Modify, Advanced, and Pause. Clicking on the Modify button will bring up the Indexed Locations window.
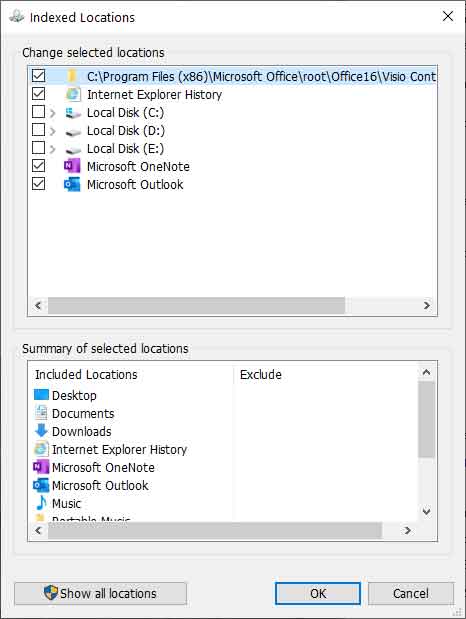
Here you can add or remove locations on your computer you want the indexing service to monitor. Tip: If you click on a location in the Summary of selected locations in the lower half of the window, it will open that location in the Change selected locations in the upper half of the window.
Clicking on the Advanced button on the Indexing Options main window brings up the Advanced Options windows. It has two (2) tabs: Index Settings and Files Types.
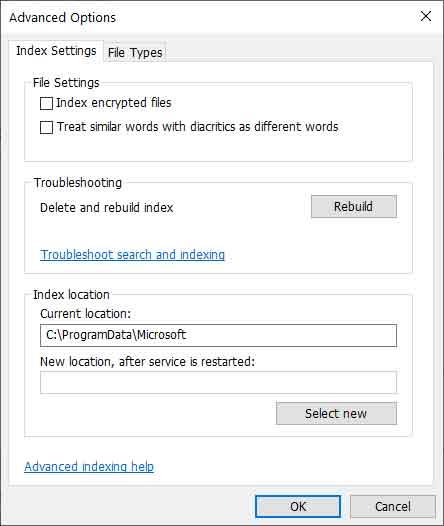
File Settings
- Index encrypted files - This option is only available if you use disk encryption, like Bitlocker.
- Treat similar words with diacritics as different words - by default Windows recognizes diacritics according to the language version you are using. If you change this setting, all diacritics will be recognized.
Troubleshooting
- Delete and rebuild index - There will be times when rebuilding the index is required. As noted before, if you decide to rebuild the index, please allow plenty of time for your computer to complete the task.
Index location
- Displays the current location of the index. You can change where the index is stored by clicking on the Select new button.
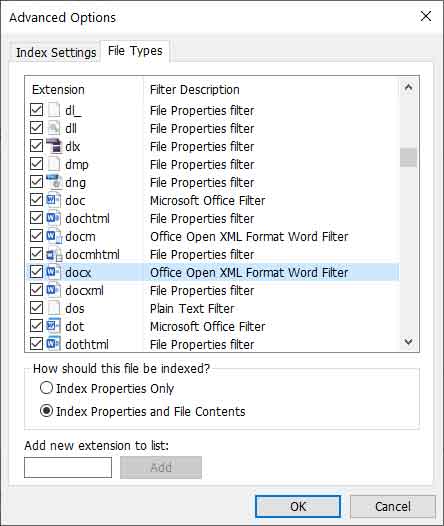
The File Types tab lists all of the file extensions currently registered in the index. You can add or remove a file extension or modify the properties of an existing extension.
0327a5a0-a4bf-4dda-9dcb-e905adf2e974|2|5.0|96d5b379-7e1d-4dac-a6ba-1e50db561b04