Updated October 5, 2022
Have you ever had a problem finding some of Windows' built-in administrative tools? Don't you wish you could have them in one easy-to-find location? You can do just that and more with the Microsoft Management Console.

The Microsoft Management Console (MMC) is a program you can use to create and save collections of administrative tools called Consoles. Consoles contain items such as snap-ins, extension snap-ins, monitor controls, tasks, wizards, and documentation required to manage many of the hardware, software, and networking components of your Windows system.

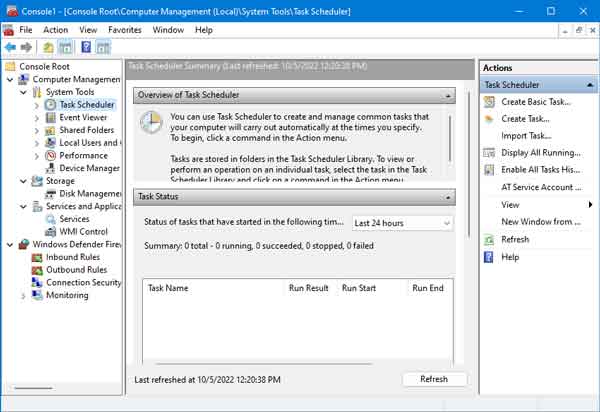
The Microsoft Management Console inside of Windows 11
Here is a list of some of the more useful MMC Snapins:
- Computer Management
- Device Manager
- Disk Management
- Event Viewer
- Link to Web Address
- Performance Monitor
- Print Management
- Services
- Shared Folders
- Task Scheduler
- Windows Defender Firewall
Using the Run dialog box to start the Microsoft Management Console
All versions of Windows:
On the keyboard, press the Windows logo key  + R
+ R
Windows 8.1, Windows 10, and Windows 11:
Right-click on the Windows logo  on the Start Menu or press the Windows logo key
  + X and then select Run
For all the different ways you can bring up the Run dialog box, check out How to get to and use the Run dialog box in Windows.
In the Run dialog box that appears, type mmc and select OK. If you're prompted for an administrator password or confirmation, type the password or provide confirmation. When the Microsoft Management Console appears, it is time to add some content.
How to add or remove Microsoft Management Console snap-ins
- Left-click on the File pull-down menu and select Add/Remove Snap-in
- In the list of snap-ins that appear, left-click the snap-in you want to add to your console and then left-click on the Add button
- If prompted, select either Local computer or Another computer. If you choose Another computer, you will have to browse your network for that computer. Be sure to select the checkbox for Allow the select computer to be changed when launching from the command line.
- Then left-click on Finish. This will bring you back to the Add/Remove Snapin screen. When you finish adding snap-ins, left-click on the OK button in the screen's lower right-hand corner.
How to add, edit, or remove a Microsoft Management Console Taskpad View
- Open a previously saved console, right-click on the console name and left-click either New Taskpad View, Edit Taskpad View, or Delete Taskpad View from the dialog menu that appears. If you do not have any Taskpad Views already inside the console, the only option that will appear is New Taskpad View.
- If you are creating a new Taskpad View, the New Taskpad View Wizard will appear. Just follow the prompts and choose the Taskpad default settings. If you don't like how it looks, you can always go back and edit the layout later. If you select a Taskpad View, the general settings and associated tasks will appear.
- When you finish creating a new Taskpad View, you can create a new task to go inside it. If you edit an existing Taskpad View, you can go to the Tasks tab and select the current Tasks.
- When adding new tasks, the New Task Wizard will appear. Just follow the prompts and select the command type you want to use. You can run a command from a menu, run a script or program, open a web page, or open a tree item from your MMC favorite list.
When you are finished setting up your console, don't forget to save it in a place where you can quickly access it, like your Desktop.
3b5f4f3d-518b-496b-80f1-e8329acb41e5|1|5.0|96d5b379-7e1d-4dac-a6ba-1e50db561b04