When it comes to the performance of your Windows 11 computer, the faster your drive can read and write files, the better. So keeping your drive in tip-top shape is essential. So here is how to defragment and optimize your drive in Windows 11.

Imagine opening a filing cabinet and finding someone mixed up all the files. It would take you more time to find the files you were looking right? The same thing holds true for your computer.
When I started working with computers, there were only a couple of storage options: Hard Disk Drives (HDD) and Floppy Disk Drives (FDD). And DOS and early versions of Windows were notorious for not writing files back to exactly where they were found, and this a how a drive gets fragmented.
So HDDs required regular defragmentation to maintain their performance. On the other hand, Solid State Drives (SSD) write files back to the same place they found them. The only maintenance SSDs require is free space consolidation.
And the built-in defragment/optimization program in Windows 11 can handle both HDDs and SSDs. In fact, there are two (2) versions of the defrag program. One has a GUI (Graphic User Interface), The other uses a Command Line Interface (CLI).
I like to refer to the different versions as Standard (GUI) and Advanced (CLI). The Standard version is simple to use but has limited features, and the Advanced version is a little harder to use but has more features.
The Standard way to defrag/optimize your drives in Windows 11
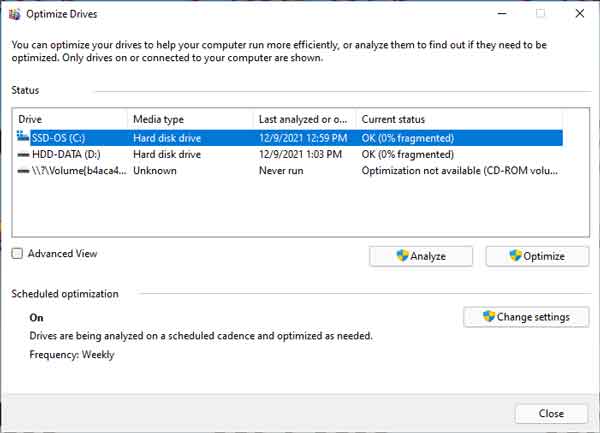
To perform Standard defragment/optimization, you will need to open the Defragment and Optimize Drives program. Here are a couple of ways of opening the app.
- Left-click on the Start button
 to bring up the Start menu.
- In the upper right-hand corner of the Start menu, left-click on All apps.
- Scroll down the list of programs and left-click on Windows Tools.
- Left-click on Defragment and Optimize Drives.
or
- Open File Explorer using one of the following:
- Left-click on the File Explorer icon (manilla folder) on the Taskbar.
- Press the Windows logo key + E at the same time.
- Use the Power User menu by right-clicking on the Start button and selecting File Explorer.
- In the left-side column, left-click on This PC.
- In the right-side column, right-click on the drive you want to optimize and select Properties.
- Left-click on the Tools tab.
- Under Optimize and defragment drive, left-click on Optimize.
Once you have the Optimize Drives program open, just highlight the drive you want to optimize and select either Analyze or Optimize. You can also change the schedule that Windows 11 uses for scheduled optimization.
The Advanced way to defrag/optimize your drives in Windows 11
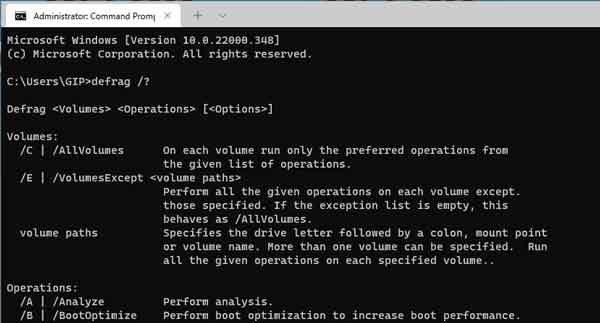
To perform Advanced defragment/optimization, you will need to run command-line syntax(s) and parameter(s) in an Administrative Command Prompt. The link below opens in a new window.
How to open a Command Prompt with Administrator privileges in Windows 11
The name of the program you want to run is Defrag. There are multiple syntaxes and parameters you can use with Defrag. The complete list and a few examples are listed below. The correct usage of syntaxes and parameters are as follows:
Defrag <Volumes> <Operations> [<Options>]
Examples:
- Defrag C: /U /V
- Defrag C: D: /TierOptimize /MultiThread
- Defrag C:\mountpoint /Analyze /U
- Defrag /C /H /V
| Volumes |
| /C | /AllVolumes |
On each volume run only the preferred operations from the given list of operations. |
| /E | /VolumesExcept <volume paths> |
Perform all the given operations on each volume except those specified. If the exception list is empty, this behaves as /AllVolumes. |
| volume paths |
Specifies the drive letter followed by a colon, mount point, or volume name. More than one volume can be specified. Run all the given operations on each specified volume. |
| Operations |
| /A | /Analyze |
Perform analysis. |
| /B | /BootOptimize |
Perform boot optimization to increase boot performance. |
| /D | /Defrag |
Perform traditional defrag (this is the default). On a tiered volume, traditional defrag is performed only on the Capacity tier. |
| /G | /TierOptimize |
On tiered volumes, optimize files to reside on the appropriate storage tier. |
| /K | /SlabConsolidate |
On thinly provisioned volumes, perform slab consolidation to increase slab usage efficiency. |
| /L | /Retrim |
On thinly provisioned volumes, perform retrim to release free slabs. On SSDs perform retrim to improve write performance. |
| /O | /Optimize |
Perform the proper optimization for each media type. |
| /T | /TrackProgress |
Track progress of a running operation for a given volume. An instance can show progress only for a single volume. To see progress for another volume launch another instance. |
| /U | /PrintProgress |
Print the progress of the operation on the screen. |
| /V | /Verbose |
Print verbose output containing the fragmentation statistics. |
| /X | /FreespaceConsolidate |
Perform free space consolidation, moves free space towards the end of the volume (even on thin provisioned volumes). On tiered volumes consolidation is performed only on the Capacity tier. |
| Options |
| /H | /NormalPriority |
Run the operation at normal priority (default is low). |
| /I | /MaxRuntime n |
Available only with TierOptimize. Tier optimization would run for at most n seconds on each volume. |
| /LayoutFile <file path> |
Available only with BootOptimize. This file contains the list of files to be optimized. The default location is %windir%\Prefetch\layout.ini. |
| /M | /MultiThread [n] |
Run the operation on each volume in parallel in the background. For TierOptimize, at most n threads optimize the storage tiers in parallel. Default value of n is 8. All other optimizations ignore n. |
| /OnlyPreferred |
When volumes are specified explicitly, defrag performs all the given operations on each specified volume. This switch lets defrag run only the preferred operations, from the given list of operations, on each specified volume. |
257ad47c-db35-4bd9-b8f4-2127e18f964f|2|5.0|96d5b379-7e1d-4dac-a6ba-1e50db561b04