Geeks in Phoenix

Geek Blog


Using a drive adapter or docking station to access a drive

When it comes to repairing computers, there are times when I have to be able to access Hard Disk Drives (HDD), Solid State Drives (SSD), or CD/DVD drives outside of a laptop or desktop case. That is when I need to use a drive adapter or docking station. So here are some of my favorite drive adapters and dock stations.

Using a drive adapter or docking station to access a drive

Having a power supply or motherboard fail can be a real pain in the butt. You cannot get your computer to start up, but you cannot even get to any of your documents or settings. That is when having a second computer and a drive adapter or docking station comes in handy.

Using a drive adapter or docking station can convert an HDD or SSD drive to a USB device. And if you use a drive adapter, you can connect a CD/DVD drive to an ultra-thin laptop and use it a record or playback CDs or DVDs.

Now I have several different drive adapters and docking stations that I use for different uses. The majority of them are USB 3.0, but I do have a few that are USB 2.0.

The easiest one to use is a drive adapter that attaches directly to the back of the device. This type is what I use to connect a CD/DVD drive to ultra-thin laptops that do not have CD/DVD drive. I also use it with desktop computers with CD/DVD drives that do not work.

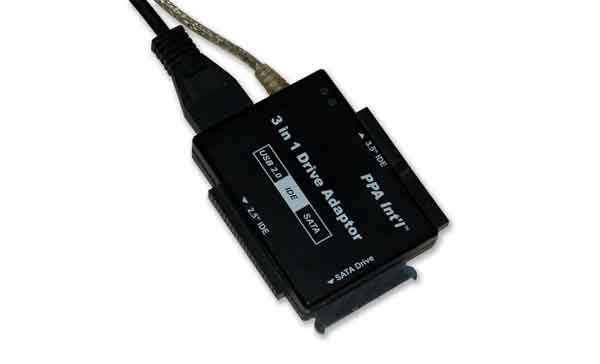
Photo of a single drive adapter

Now the majority of drive adapters and docking stations can only work with Serial ATA (SATA) drives. The one pictured above works with SATA drives and 2.5" or 3.5" Parallel ATA (PATA) for those 'old school' drives.

And the cool thing about this drive adapter is the power supply for it uses a standard Molex connector. You can use it to power up any older device that has a Molex connection.

Photo of a single drive docking station

The most common docking station is for a single SATA drive. The beautiful thing about docking stations is they have power buttons, so you do not have to disconnect the USB connection before disconnecting the power supply.

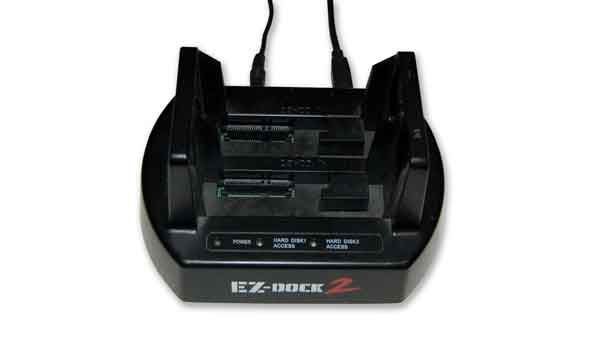
Photo of a multiple drive docking station

You can also get docking stations that can hold more than one drive. These come in handy if you are cloning one drive to another. They can also be used to recreate failed RAID (Redundant Array of Independent Disks) arrays.

The downside to docking stations is you can only connect 2.5" or 3.5" HDD's or SSD's to them. If you want to attach a CD/DVD drive, you will need to use a drive adapter.

Using either a drive adapter or docking station is just like using an external drive. Just attach it to a USB port and power it up. Most computers will automatically install a driver and assign it a drive letter. From there, you are ready to go.

How to replace a CD/DVD/BD drive in your desktop computer

When it comes to desktop computer repair, one of the most common hardware failures is CD/DVD/BD drives. If you're having problems with getting the disk tray to eject or disks are not being recognized, it may be time to replace it. Here's how to replace a CD/DVD/BD drive in your desktop computer.

How to replace a CD/DVD/BD drive in your desktop computer

So you're tired of trying to get your old desktop CD/DVD/BD drive to work and are ready to replace it with a new one. Having to use a paper clip to manually eject your computer's CD/DVD/BD drive tray can get old quick. Replacing a desktop CD/DVD/BD drive is relatively easy; you have to make sure you get one with the correct connections and dimensions.

Find a new drive

The majority of CD/DVD/BD drives on the market nowadays will have SATA (Serial ATA) connectors for data and power. But there are still quite a few older systems that still use PATA (Parallel ATA) for data and 4 Pin Molex for power. SATA type drives are the de facto standard, so finding PATA replacement drives can be tricky. Newegg and TigerDirect are good places to find these older style drives.

SATA and PATA drive connections
PATA and SATA drive connections

Desktop CD/DVD drives have standard width and height dimensions, so all you have to do is check your existing drive's depth. Sometimes you have room to put a deeper drive in, and sometimes you don't. Always check to see what kind of space you have available before purchasing a replacement drive.

Uninstall the old software

Once you have your new CD/DVD/BD drive, you will need to uninstall the software that came with your old CD/DVD/BD drive. It's usually a version of Nero or PowerDVD, and it is branded to your old drive. Once you remove the old drive, the software that came bundled with it won't work anymore. Your new drive should have come with its own disk burning software.

Install the new drive

From here, we need to turn the computer off, disconnect the power cord from the back of the system, and open up the case. Now there are two possible ways of mounting the CD/DVD/BD drive in the case: screws or quick release rails. You may have to remove the front bezel from the case to access the CD/DVD/BD drive, as it will need to come out the front of the case. Please note the connections and remove the old drive and replace it with the new one.

Drives attached by screws and quick release rails

Install the new software

Once you get the system back together, power it up, and let Windows discover the new CD/DVD/BD drive. Windows may require a restart to finalize the setup. After that, you are ready to install the software that came with the new drive.

Free computer diagnostics

Repairing a PC can sometimes be expensive, and that is why we offer free basic in-shop diagnostics. Give one of our professional and experienced technicians a call at (602) 795-1111, and let's see what we can do for you.

Check out our reviews

Geeks In Phoenix LLC, BBB Business Review

Customer service is #1

Here at Geeks in Phoenix, we take pride in providing excellent customer service. We aim to give the highest quality of service  from computer repair, virus removal, and data recovery.

Bring your computer to us and save

Repairing a computer can be time-consuming. That is why we base our in-shop service on the time we work on your computer, not the time it takes for your computer to work! From running memory checking software to scanning for viruses, these are processes that can take some time.

Contact us

If you have any questions, please feel free to give us a call at (602) 795-1111  and talk with one of our Geeks. Or you can send us a message from our contact page contact page , and one of our Geeks will get back to you as soon as possible. Or you can stop by and see us. Here are our hours and location.

Like Geeks in Phoenix on Facebook

Follow Geeks in Phoenix on Twitter

Watch Geeks in Phoenix on YouTube