Note: Google turned this project over to MIT, so they are currently maintaining it. The links at the bottom of this article have been changed.
Have you ever had an idea for an Android app but didn't know how to go about creating it? Then MIT App Inventor for Android may be just what you're looking for. The MIT App Inventor for Android is an Integrated Development Environment (IDE) based on Java. It consists of two different interfaces: Designer and Block Editor.

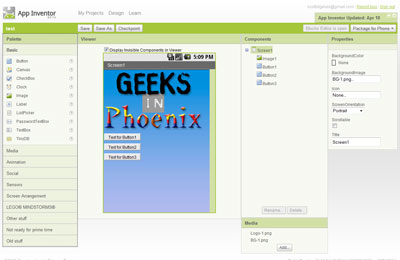
The Designer interface for MIT App Inventor for Android
The Designer interface is where you create the layout for the screen for your app. You drag and drop visual and non-visual components from the Palette to the Viewer (it looks like the display from an Android phone) to assemble the screen. For visualization purposes, a check box allows you to turn on or off the display of non-visible components. A Components list on the right will enable you to select and edit the properties of each of them.

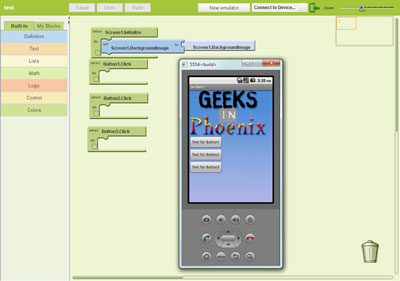
The Blocks Editor interface for MIT App Inventor for Android
The Blocks Editor interface is where you add functionality (programming) to the components you created in the Designer. There are two columns to the left, Built-in and My Blocks, and a design area in the center. You drag and drop different functions from the Built-in and My Blocks to assemble strings of functions. They are color-coded and shaped so that certain functions can only go into relative functions (sort of like a jigsaw puzzle). It's an intuitive interface that is easy to learn. Here's a quote from the MIT App Inventor website:
App Inventor lets you develop applications for Android phones using a web browser and either a connected phone or emulator. The App Inventor servers store your work and help you keep track of your projects.
You build apps by working with:
- The App Inventor Designer, where you select the components for your app.
- The App Inventor Blocks Editor, where you assemble program blocks that specify how the components should behave. You assemble programs visually, fitting pieces together like pieces of a puzzle.
Your app appears on the phone step-by-step as you add pieces to it, so you can test your work as you build. When you're done, you can package your app and produce a stand-alone application to install.
If you don't have an Android phone, you can build your apps using the Android emulator, software that runs on your computer and behaves just like the phone.
The App Inventor development environment is supported for Mac OS X, GNU/Linux, and Windows operating systems, and several popular Android phone models. Applications created with App Inventor can be installed on any Android phone. (See system requirements.)
Before you can use App Inventor, you need to set up your computer and install the App Inventor Setup package on your computer.
For more information on MIT App Inventor for Android, follow the links below:
MIT App Inventor for Android
Getting started with MIT App Inventor
5046c4b0-208e-494c-b597-3abc1134e62a|0|.0|96d5b379-7e1d-4dac-a6ba-1e50db561b04