Geeks in Phoenix

Geek Blog


How to open a Command Prompt with Administrator privileges in Windows 11

There may be a time when you need to bypass the Windows GUI (Graphical User Interface) and enter commands directly into an Administrative Command Prompt. Quite a few of our favorite Geeks Tips require the use of it. So here's how to open a Command Prompt with Administrator privileges in Windows 11.

The Command Prompt with Administrator privileges in Windows 11

Open a Command Prompt with Administrator privileges in Windows 11

  1. Left-click on the Start button Windows logo to bring up the Start menu.
  2. In the upper right-hand corner of the Start menu, left-click on All apps.
  3. Scroll down the list of programs and left-click on Windows Tools.
  4. Right-click on Command Prompt.
  5. On the context menu that appears, left-click on Run as administrator. If you're prompted for an administrator password or confirmation, type the password or provide confirmation.

or

  1. Left-click on the magnifying glass to the right of the Start button Windows logo to bring up the Search dialog box.
  2. In the Search dialog box, type Command Prompt.
  3. In the list of results, the Command Prompt should be highlighted.
  4. In the right-hand column under Command Prompt, there is an options menu. Left-click on Run as administrator. If you're prompted for an administrator password or confirmation, type the password or provide confirmation.

Using the Power User menu to open a Command Prompt with Administrator privileges in Windows 11

  1. Right-click on the Start button Windows logo to bring up the Power User menu.
  2. Left-click on Windows Terminal (Admin). If you're prompted for an administrator password or confirmation, type the password or provide confirmation.
  3. On the title bar, left-click on the pull-down menu and left-click on Command Prompt.

or

  1. Press the Windows logo key Windows logo key + X to bring up the Power User menu.
  2. Press the letter A to select Windows Terminal (Admin). If you're prompted for an administrator password or confirmation, type the password or provide confirmation.
  3. On the title bar, left-click on the pull-down menu and left-click on Command Prompt.

How to change the default program for Windows Terminal

  1. Right-click on the Start button Windows logo to bring up the Power User menu.
  2. Left-click on Windows Terminal (Admin). If you're prompted for an administrator password or confirmation, type the password or provide confirmation.
  3. On the title bar, left-click on the pull-down menu
    The Settings pull down menu for Windows Terminal inside of Windows 11
    and left-click on Settings.
  4. In the right-hand column under Startup, left-click on the Default profile pull-down menu
    The Default profile pull down menu for Windows Terminal inside of Windows 11
    and left-click on Command Prompt.

or

  1. Press the Windows logo key Windows logo key + X to bring up the Power User menu.
  2. Press the letter A to select Windows Terminal (Admin). If you're prompted for an administrator password or confirmation, type the password or provide confirmation.
  3. On the title bar, left-click on the pull-down menu
    The Settings pull down menu for Windows Terminal inside of Windows 11
    and left-click on Settings.
  4. In the right-hand column under Startup, left-click on the Default profile pull-down menu
    The Default profile pull down menu for Windows Terminal inside of Windows 11
    and left-click on Command Prompt.

Windows 11 hardware requirements explained

Are you confused about the hardware requirements for Windows 11? Want to know why your computer can or cannot be upgraded to Windows 11? Let's take a detailed look at the hardware requirements for Windows 11.

Windows 11 hardware requirements explained

With Windows 11, Microsoft is focusing on security and is starting to enforce the hardware requirements to run it. Previous versions of Windows (10, 8.1, and 7) all had the exact general hardware requirement.

But with Windows 10, the security requirements were still there, but they were not being enforced. The Unified Extensible Firmware Interface (UEFI), Secure Boot, and Trusted Platform Module (TPM) (see below) requirements were optional for Windows 10 to install and run.

Case in point, TPM has always been required for BitLocker encryption to be enabled. Windows 10 would use either TPM 1.2 or TPM 2.0. But the TPM 1.2 standard has been depreciated, so TPM 2.0 is now the defacto standard.

And if you look into UEFI, you will find that Secure Boot is part of that standard. And since UEFI can take advantage of TPM, it makes sense to include all three (3) in the requirements for Windows 11.

Note: Sorry for anybody still running a 32-bit version of Windows 10, but Windows 11 is only available in a 64-bit version.

Hardware requirements for Windows 7, 8.1 and 10

Processor - 1 Gigahertz (GHz) or faster 32-bit (x86) or 64-bit (x64) processor

Memory - 1 Gigabyte (GB) RAM (32-bit) or 2 GB RAM (64-bit)

Storage - 16 GB (32-bit) or 20 GB (64-bit)

Graphics card - Compatible with DirectX 9 with WDDM 1.0 or higher driver

Hardware requirements for Windows 11

Processor - 1 Gigahertz (GHz) or faster with two or more cores on a compatible 64-bit processor or System on a Chip (SoC). This requirement is now particular on what processors are compatible with Windows 11. General Rule of thumb: If the processor is less than three (3) years old, it should run Windows 11. Microsoft has a list of processors that are compatible with Windows 11.

Memory - 4 Gigabytes (GB) RAM. This requirement has increased from 2GB to 4GB, which is no biggie. I have not seen a computer with only 2 GB of memory in over a decade now.

Storage - 64 GB or larger storage device. This requirement has also increased, and it is about time. I have seen Windows 8.1 and Windows 10 installed on 32 GB drives, which is not pretty. The biggest problem is there usually is not enough free space to perform a feature update. I recommend at least a 256 GB drive for the operating system and programs.

Graphics card - DirectX 12 graphics device or later with WDDM 2.0 driver. Since DirectX 12 was released with Windows 10 back in 2015, most modern graphic cards will be compatible with Windows 11.

Hardware requirements that are no longer optional

Display - High definition (720p) display greater than 9" diagonally, 8 bits per color channel. This requirement is pretty easy to meet.

System firmware - UEFI and Secure Boot capable. UEFI (Unified Extensible Firmware Interface) has been used for over a decade now, so most computers running have UEFI enabled. And since the Secure Boot specification is part of the UEFI, that too should already be in place. However, you may have to change some settings in your computer's BIOS (Basic Input / Output System) to enable UEFI and Secure Boot.

TPM - Trusted Platform Module (TPM) 2.0. Besides the processor requirement, this is another stumbling point for upgrading to Windows 11. A TPM can be a separate module that you connect to your motherboard or be part of the chipset on your motherboard. Most modern motherboards will use FTPM (Firmware Trusted Platform Module) that is included in the chipset. However, you may have to change some settings in your computer's BIOS (Basic Input / Output System) to enable the TPM.

Storage structure - There are two (2) types of drive structures; MBR (Master Boot Record) and GPT (GUID Partition Table). Previous versions of Windows would run on either of these structures. Windows 11 requires GTP for the drive that contains Windows 11. Microsoft has included a tool inside Windows 10 to convert drives from MBR to GPT. Here is a link to the documentation for MBR2GPT.EXE.

Windows logo key shortcuts for Windows 11

Updated January 15, 2024

In 1995, Microsoft released Windows 95, and navigating Windows was changed forever. Along with introducing the Start menu, Microsoft also added a new control key to PC keyboards, the Windows logo key.

Windows logo key shortcuts for Windows 11

Like the Command key on Apple keyboards, it allows the user to run shortcuts to open programs or execute repetitive commands, like showing the Desktop. Windows 95 had only twelve Windows logo key shortcuts, while Windows 11 has over sixty. So here is the complete list of Windows logo key shortcuts inside Windows 11.

Windows logo key shortcuts for Windows 11

Press To
Windows logo key Open Start menu
Windows logo key + A Open Quick Settings (part of the Action Center)
Windows logo key + B Highlights Show Hidden Icons on Taskbar
Windows logo key + C Open Windows Copilot
Windows logo key + Shift + C Open Charms menu
Windows logo key + Ctrl + C Turn on Color Filters (must enable in Color Filter settings first)
Windows logo key + D Show Desktop
Windows logo key + E Open File Explorer
Windows logo key + F Open Feedback Hub
The following seven (7) Windows logo key shortcuts are for the Game Bar
Windows logo key + G Open the Game Bar
Windows logo key + Alt +B Turn HDR on or off (applies to the Xbox Game Bar app version 5.721.7292.0 or newer)
Windows logo key + Alt + G Record the last few moments of gameplay. (you can change the amount of time recorded in Game Bar > Settings)
Windows logo key + Alt + R Start / stop recording
Windows logo key + Alt + Print Screen Take a screenshot of your game
Windows logo key + Alt + T Show / hide the recording timer
Windows logo key + Alt + M Start / stop microphone recording
Windows logo key + H Open Speech Services (voice dictation)
Windows logo key + I Open Settings
Windows logo key + J Set focus to an available Windows tip
Windows logo key + K Open Cast (connect to wireless display and audio devices)
Windows logo key + Alt + K Toggle microphone mute in apps that support Call Mute
Windows logo key + L Switch users (lock computer if on a domain)
Windows logo key + M Minimize all open windows (show Desktop)
Windows logo key + Shift + M Restore open minimized windows
Windows logo key + N Opens Notification Center (part of the Action Center)
Windows logo key + O Lock device orientation
Windows logo key + P Open Project (project video to another screen)
Windows logo key + Q Opens Search dialog box
Windows logo key + Ctrl + Q Opens Quick Assist
Windows logo key + R Opens Run dialog box
Windows logo key + S Opens Search dialog box
Windows logo key + Shift + S Open the Snipping Bar
Windows logo key + T Set focus on Taskbar and cycle through pinned / running desktop apps
Windows logo key + U Opens Accessibility section in Settings
Windows logo key + V Displays Clipboard history
Windows logo key + W Opens Widgets
Windows logo key + X Opens Power User menu
Windows logo key + Z Opens Snap layouts menu
Windows logo key + 1-9 Go to the app at the given position on the Taskbar
Windows logo key + + (plus) Zoom in (Magnifier)
Windows logo key + - (minus) Zoom out (Magnifier)
Windows logo key + , (comma) Peek at the Desktop
Windows logo key + Spacebar Switch input language and keyboard layout
Windows logo key + Tab Show all open apps and view additional desktops
Windows logo key + Esc Close Magnifier
Windows logo key + Home Minimize non-active desktop windows
Windows logo key + Pause/Break Open System in Settings
Windows logo key + Left Arrow Snap desktop window to the left (+Shift to move window to left monitor)
Windows logo key + Right Arrow Snap desktop window to the right (+Shift to move window to right monitor)
Windows logo key + Up Arrow Maximize desktop window (+Shift to keep width)
Windows logo key + Down Arrow Restore/minimize desktop window (+Shift to keep width)
Windows logo key + F1 Opens How to get help in Windows 11 search in a browser
Windows logo key + Ctrl + Enter Turn Narrator on or off
Windows logo key + Ctrl + D Add a Desktop
Windows logo key + Ctrl + Right arrow Switch between desktops you’ve created on the right
Windows logo key + Ctrl + Left arrow Switch between desktops you’ve created on the left
Windows logo key + Ctrl + F4 Close the Desktop you’re using
Windows logo key + Shift + Right arrow Move an app to a monitor on the right
Windows logo key + Shift + Left arrow Move an app to a monitor on the left
Windows logo key + Period (.) or Semicolon (;) Open the emoji, kaomoji, and symbol panel

For more Windows keyboard shortcuts, see the links below:

Windows logo key keyboard shortcuts

General keyboard shortcuts

Natural keyboard shortcuts

Dialog box keyboard shortcuts

Accessibility keyboard shortcuts

Windows Explorer keyboard shortcuts

Clean up your Windows 10 computer using the Storage feature

Have you ever gotten a low disk space warning on your Windows 10 computer? Do you wish you could quickly and easily clean up the unwanted temporary files and the recycle bin? If so, look no further than the Storage feature inside of Windows 10.
Clean up your Windows 10 computer using the Storage options

For years now, I have been using the Disk Cleanup program inside of each version of Windows. It has been an easy way to clean up the junk (temporary files, Internet cache, recycle bin, etc.) that can build up in Windows.

But finding the Disk Cleanup program to run it can be a little tricky. There are multiple ways to run it when you find it, which can get confusing for a novice computer user.

Thankfully, Microsoft has integrated most of the functionality of Disk Cleanup into the Storage feature inside the Windows 10 Settings program. And getting to the Storage feature could not be any easier.
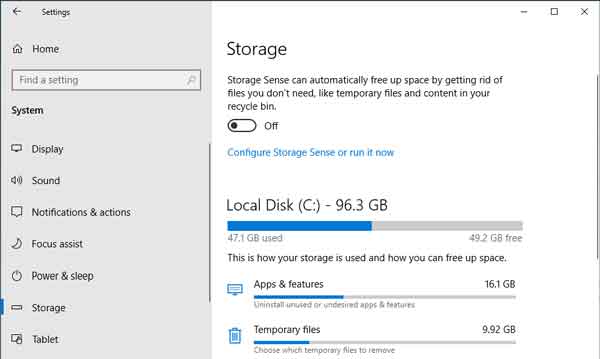
The Storage feature inside of Windows 10 Settings

How to get to Storage feature in Windows 10

  1. Left-click on the Start Windows logo menu and left-click on the Gear (Settings) icon. It should be the second icon up from the bottom.
  2. Left-click on the System category
  3. In the left-hand column, left-click on Storage. All of the storage options will appear in the right-hand column.

Note: All files removed using the Storage feature are permanently deleted, so be careful what files you choose to delete. Remember that once you delete a file, it is gone for good.

There are two (2) sections under the Storage area. The first is Storage Sense, with only a slider switch to turn it on or off and a button to bring up the configuration page.

Introduced in Windows 10 version 1809, Storage Sense is a simple 'Set and Forget' utility that can automatically clean out files you do not need anymore, like files in your Downloads folder and the recycle bin.

Storage Sense can automatically clean out a user's Downloads folder and recycle bin on a preset schedule. You can set it up to run automatically every day, every week, every month, or only when you start to run out of free disk space. You can also run it manually whenever you need to free up some disk space quickly.

The second section is part of the Storage Reserve. Storage Reserve allocates space to facilitate proper performance and successful updates to Windows 10. This section lists the drives currently attached to your computer and how that storage is being distributed. That includes all fixed or removable HDDs, SSDs, and USB external drives.

Every drive has a status bar that shows the used / free space. Below the drive status bar, you will find the categories of different types of files that can be safely deleted. You may have to click on the 'Show more categories' button to view all available categories.

The list of categories is pretty extensive, so it may take some time to go through each one. The categories range from system & reserved, apps & features, and all of the special folders (Desktop, Documents, Downloads, Music, Pictures, and Videos).

Each category has also has a status bar that shows how much space those particular files are taking up. When you click on a category listed under a drive, you will be taken to another page with more options for that category.

Now when you click on the Temporary files category, you will be presented with a selection of options of which files you want to clean up. These are similar to the categories used in Disk Cleanup.

Remember that the majority of the items listed under Temporary files can be safely deleted. You may not want to remove all the files you have in your Downloads folder, so you might think about cleaning that folder up manually with File Explorer.

Also, if you choose the Windows Update Cleanup option, the clean-up process will happen the next time you reboot your computer. So be prepared for a longer boot time the next time you restart your computer.

My first look at Windows 11

Microsoft recently announced that they are releasing a successor to Windows 10, aptly named Windows 11. So join me as I take a look at Windows 11.

My first look at Windows 11

When Microsoft announced the next version of Windows, I went looking for a beta or technical preview of Windows 11. I soon found out that the only way to get a version of Windows 11 is through their Insider Program.

Well, it just so happens that I had created a Virtual Machine (VM) a couple of years ago for the Windows 10 Insider Program. I started it, and sure enough, Windows informed me that I need to download a new build of Windows.

I went through the upgrade process, and when all was said and done, I had Windows 11 Insider Preview running inside a VM. So let's take a look at Windows 11.

Note: This build of Windows 11 that I am using for this article is just a beta, so the look and the way it operates may and probably will change before the final release of Windows 11.

Login Screen

The Windows 11 Logon Screen

Not much different here from Windows 10. The default font has changed, but other than that, it looks and feels like Windows 10.

Taskbar

The Windows 11 Taskbar

The first thing you will notice when the Desktop appears is that the Start button and pinned programs are centered in the Taskbar. Is this by default, and can it be easily changed back to left-justified.

Start Menu

The Windows 11 Start Menu

The Start Menu has gotten a makeover, with a new cleaner looking layout. All the same features are available, but they are arranged completely different.

Power User menu

The Windows 11 Power Users menu

It is still there, The only component of Windows 8.1 to still be inside of Windows. Don't remember Windows 8.1? That is one version of Windows I would love to forget.

Settings

The Windows 11 Settings app

As with the Start Menu, the Settings app has also received a makeover, getting broken into two (2) columns. The categories are now listed in the left-side column, and sub-categories are listed in the right-hand column.

Control Panel

The Windows 11 Control Panel

Microsoft has been trying to eliminate the Control Panel for a while now, but it still exists in the preview build I am running. Who knows if it will make it to the final build of Windows 11.

File Explorer

The Windows 11 File Explorer

File Explorer has gotten a small makeover too. The Ribbon appears to be gone, and a simple toolbar with the most commons functions has taken its place. We will have to wait until the final build to see if the Ribbon is truly gone.

The overall look and feel of Windows 11 is smoother than Windows 10. With rounded corners on dialog boxes and newer icons, Windows 11 looks like an excellent successor to Windows 10.

But of course, we will have to wait and see how the final build of Windows 11 looks and feels. For a more in-depth look at this version of Windows 11, check out the video below.

Free computer diagnostics

Repairing a PC can sometimes be expensive, and that is why we offer free basic in-shop diagnostics. Give one of our professional and experienced technicians a call at (602) 795-1111, and let's see what we can do for you.

Check out our reviews

Geeks In Phoenix LLC, BBB Business Review

Customer service is #1

Here at Geeks in Phoenix, we take pride in providing excellent customer service. We aim to give the highest quality of service  from computer repair, virus removal, and data recovery.

Bring your computer to us and save

Repairing a computer can be time-consuming. That is why we base our in-shop service on the time we work on your computer, not the time it takes for your computer to work! From running memory checking software to scanning for viruses, these are processes that can take some time.

Contact us

If you have any questions, please feel free to give us a call at (602) 795-1111  and talk with one of our Geeks. Or you can send us a message from our contact page contact page , and one of our Geeks will get back to you as soon as possible. Or you can stop by and see us. Here are our hours and location.

Like Geeks in Phoenix on Facebook

Follow Geeks in Phoenix on Twitter

Watch Geeks in Phoenix on YouTube