Did you just notice that you do not have any sound in Windows 10 or Windows 11? Not getting any audible notices when you receive a new email or delete a file? Here are 4 things you can do to fix no sound in Windows 10 or Windows 11.
Losing the audio from your Windows-based computer can be really frustrating. One minute you hear a video playing in your browser, and the next minute you hear nothing. This problem is more common than you think. So here are 4 things you do to restore the sound in Windows 10 and Windows 11.
Check to see if the default audio device has been muted
The most common problem I have seen is the default audio device gets accidentally muted. I have gone on several service calls for no audio, only to find the volume has been muted. A quick check can save you time and money.
How to check if the default audio device has been muted in Windows 10 and Windows 11
- Left-click on the speaker icon on the right-hand side of the Taskbar.
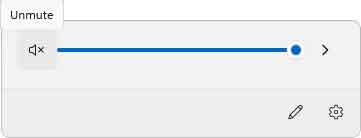
- In the popup that appears, look at the speaker icon on the left side of the volume slider.
- If there is an X to the right of the speaker icon, left-click on the speaker icon to unmute the device.
Check the default audio device
This is the most common issue regarding the loss of sound in Windows. With more computers coming with a built-in sound card and graphic cards with HDMI and Display Port (DP) connections, you have to make sure you are using the correct device for audio.
If you connect your monitor to your computer using an HDMI or DP connection, you must ensure your monitor has speakers to playback audio. If your monitor does not have speakers built-in, you need speakers or headphones to hear the audio.
How to check the default audio device in Windows 10 in Windows 11
- Left-click on the speaker icon on the right-hand side of the Taskbar.
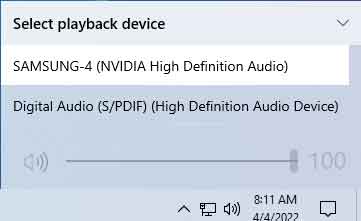
- Left-click on the audio device you want to use for sound.
- Move the volume slider left and right to hear a sample tone. If you do not hear the sample tone, select a different device and try moving the volume slider again. You have found the correct audio device when you hear the sample tone.
Run the audio troubleshooter
The Playing Audio troubleshooter is simple to use and can be extremely helpful when you are in a hurry. Once you select the device to test, the troubleshooter scans for any issues and offers recommendations on what you might try to restore your computer's audio.
How to run the audio troubleshooter in Windows 10 and Windows 11
- Right-click on the speaker icon on the right-hand side of the Taskbar.
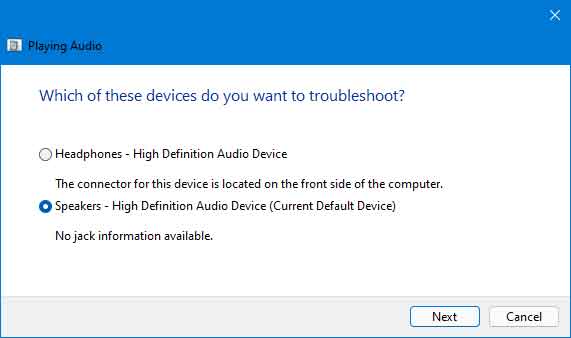
- Left-click on Troubleshoot sound problems.
Remove and reinstall the driver for your audio device
If you have tried all of the previous solutions, this will usually fix 99% of the problems with your computer's audio issues. There are two (2) different ways to remove and reinstall the drivers for your audio device.
The first way is to use the existing driver already installed in the Windows driver catalog. Often, the audio device configuration gets corrupted, and simply removing and reinstalling the driver with the device defaults will work to resolve sound problems.
The second way is to download a new driver package from the manufacturer's website. Most computers nowadays have sound cards built into the motherboard, but there are times when the user needs a more advanced sound card. That is when you find a separate sound card may have been installed.
Either way, you will need to find the make and model of your motherboard or sound card and go over to their website, and download the latest driver package. Here is how to remove and reinstall the drivers for your audio device.
How to remove and reinstall the driver for your audio device in Windows 10 and Windows 11
To remove the existing driver for any device inside Windows, you need to get to Device Manager. There are a couple of different ways to get to Device Manager, the first way is through the Start Menu, and the second way is using the Power User menu.
How to bring up the Device Manager in Windows 10
- Left-click on the Start button
 to bring up the Start menu.
- Scroll down the list of apps and left-click on Windows Administrative Tools to expand the folder.
- Left-click on Computer Management.
- Under Computer Management (Local), left-click on Device Manager.
or
- Right-click on the Start button on bring up the Power User menu.
- From the context menu that appears, left-click on Device Manager.
How to bring up the Device Manager in Windows 11
- Left-click on the Start button to bring up the Start menu.
- In the upper right-hand corner of the Start menu, left-click on All apps.
- Scroll down the list of programs and left-click on Windows Tools.
- Left-click on Computer Management.
- Under Commuter Management (Local), left-click on Device Manager.
or
- Right-click on the Start button on bring up the Power User menu.
- From the context menu that appears, left-click on Device Manager.
Once you have Device Manager open, scroll down the list of devices until you get to Sound, video and game controllers. Double left-click on the Sound, video, and game controllers category to expand it.
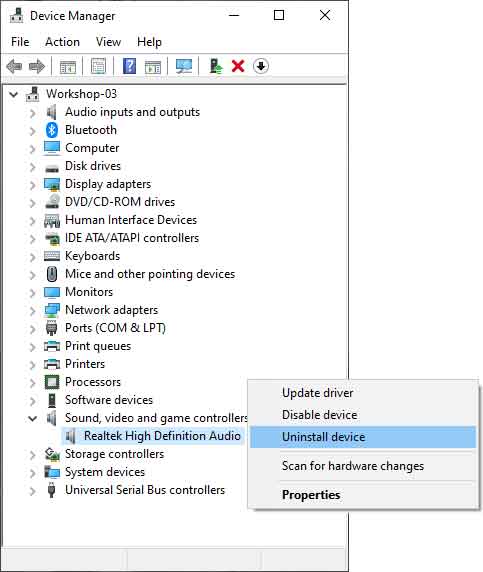
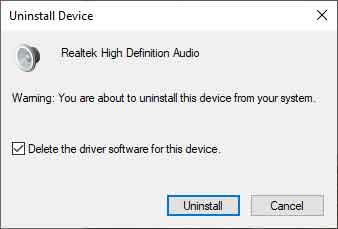
Find the audio device in the list that appears that you want to remove and reinstall. Right-click on that device and select Uninstall device from the context menu that appears. A dialog box will appear, warning you about uninstalling the device.
Make sure you check the box next to Delete the driver software for this device and then left-click Uninstall.
Then restart your computer. Once your computer restarts, Windows will automatically reinstall the driver with the factory defaults. You should now have audio.
If you still do not have any sound, install the latest software package from the manufacturer's website. Once done, restart your computer for the changes to take effect.
4814d765-dadd-4083-b073-9e220940d757|1|5.0|96d5b379-7e1d-4dac-a6ba-1e50db561b04