Being in computer repair, I have to keep track of a lot of client files and folders. The Search charm in Windows 8 works great, but sometimes the files or folders I'm looking for are not in any of the default (libraries, off-line files, and e-mail) index locations (program and system files are excluded, as most people rarely need to search them). Adding files and folders to the Indexing Options is easy. Here's how to modify the Indexing Options inside of Windows 8.
How to access the Indexing Options in Windows 8
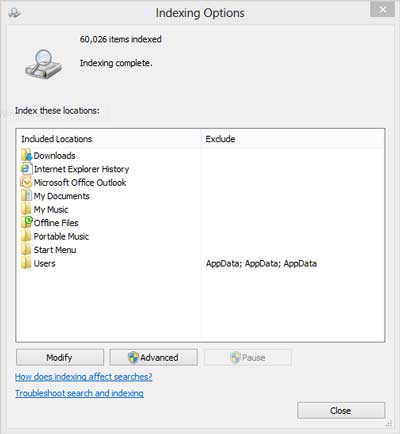
Main screen for Indexing Options inside of Windows 8
- Swipe in from the right side of the screen or press the Windows logo key
 + C to bring up the Charm bar. Left-click on Search button in Charm Bar, then Left-click on Settings in the Search charm.
or
Press the Windows logo key + W to bring up Settings in the Search charm.
- Type Indexing Options in the Search field on the Search pane.
- In the results on the left-hand side, left-click on Indexing Options.
How to add a file type to the index in Windows 8
If you use an unusual file type that's not currently recognized by the index, you can add it to the index so you can search in Windows 8 by that file type.
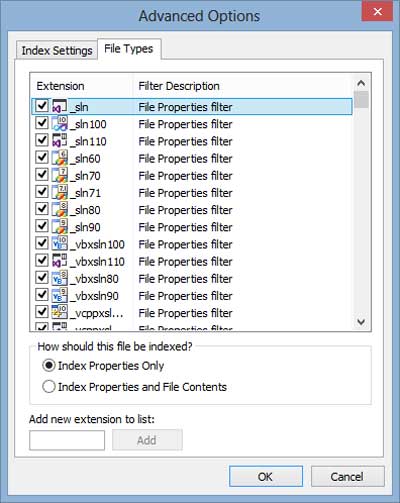
Advanced Indexing Options File Types tab inside of Windows 8
- Open Indexing Options (see above).
- Let-click on Advanced. If you're prompted for an administrator password or confirmation, type the password or provide confirmation.
- In the Advanced Options dialog box, left-click the File Types tab.
- In the Add new extension to list box, type the file name extension (for example, "txt"), and then left-click Add.
- Left-click Index Properties Only or Index Properties and File Contents, and then left-click OK.
How to add a folder to the index in Windows 8
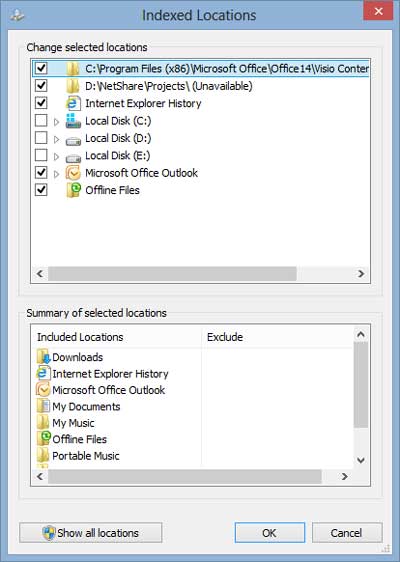
Indexed Locations screen for Indexing Options inside of Windows 8
- Open Indexing Options (see above).
- Left-click on Modify.
- To add or remove a location, select or clear its check box in the Change selected locations list, and then left-click on OK.
- If you don't see all locations on your PC in the list, choose Show all locations. Administrator permission required You might be asked for an admin password or to confirm your choice. (If all locations are already listed, Show all locations won't be available.)
- If you want to include a folder but not all of its subfolders, select the folder, expand the folder, and then clear the check box next to any subfolder you don't want to be included in the index. These folders will appear in the Exclude column of the Summary of selected locations list.
- Indexing all of the files/folders on your system is not recommended. It is recommended that you index only your frequently used files and folders for best performance.
How to rebuild the Index inside of Windows 8
The index requires almost no maintenance. However, if the index can't find a file that you know exists in an indexed location, you might need to rebuild the index. Rebuilding the index can take several hours, and searches might be incomplete until the index is fully rebuilt.
- Open Indexing Options (see above).
- Left-click on Advanced. If you're prompted for an administrator password or confirmation, type the password or provide confirmation.
- In the Advanced Options dialog box, left-click the Index Settings tab, and then left-click on Rebuild. If you're prompted for an administrator password or confirmation, type the password or provide confirmation.
How to index encrypted files in Windows 8
Before you add encrypted files to the index, we recommend that you have Windows BitLocker (Windows 8 Pro and Windows 8 Enterprise only) or a non-Microsoft encryption program enabled on your system drive (the drive that Windows is installed on). The index will automatically rebuild each time this setting is changed. This can take a long time and might cause searches to be incomplete until the process is complete.
- Open Indexing Options (see above).
- Left-click on Advanced. If you're prompted for an administrator password or confirmation, type the password or provide confirmation.
- In the Advanced Options dialog box, left-click the Index Settings tab,
- Left-click the Index encrypted files check box to select it and then left-click OK. If you're prompted for an administrator password or confirmation, type the password or provide confirmation.
Notes:
- Although you can use a non-Microsoft program to encrypt your system drive, non-Microsoft file encryption programs are not supported. Windows only supports files encrypted using the Encrypting File System (EFS).
- Suppose you add encrypted files to the index, and you're not using full-volume encryption for the location of the index, encrypted data from your files, for example. In that case, text from an encrypted Microsoft Word document will be added to the index. The index is obscured so that it's not easily readable if someone tries to open the index files, but it doesn't have strong data encryption. If someone were to gain access to your computer, they could extract your data from the index. Therefore, the location of the index should also be encrypted to help protect your indexed data.
How to index words with and without diacritics as different words in Windows 8
Suppose you commonly use diacritics (small signs added to letters to change the pronunciation of words) in your file and folder names. In that case, you can configure the index to recognize words with diacritics differently. By default, Windows recognizes diacritics according to the language version you are using. If you change this setting, all diacritics will be recognized. The index will automatically be rebuilt each time this setting is changed. This can take a long time and might cause searches to be incomplete until the process is complete.
- Open Indexing Options (see above).
- Left-click on Advanced. If you're prompted for an administrator password or confirmation, type the password or provide confirmation.
- In the Advanced Options dialog box, left-click the Index Settings tab.
- Left-click the Treat similar words with diacritics as different words check box to select it, then left-click OK.
How to change the location where the index is stored in Windows 8
If you need to free up space on a hard disk, you can change the index's location. If you change this location, the Windows Search service will automatically be restarted, and the change will not go into effect until the restart is complete.
- Open Indexing Options (see above).
- Left-click on Advanced. If you're prompted for an administrator password or confirmation, type the password or provide confirmation.
- In the Advanced Options dialog box, left-click the Index Settings tab.
- Under Index location, left-click on Select new, browse to and left-click the new location, then left-click on OK.
Note:
- When you change the index location, you should choose a location on a non-removable hard disk formatted using the NTFS file system.
69b614bf-22d4-458a-bd97-b5aac8b0ad9c|0|.0|96d5b379-7e1d-4dac-a6ba-1e50db561b04