Geeks in Phoenix

Geek Blog


Managing Virtual Memory / Pagefile in Windows 7

Updated October 15, 2020

Your computer has two types of memory, Random Access Memory (RAM) and Virtual Memory. All programs use RAM, but when there isn't enough RAM for the program you're trying to run, Windows temporarily moves information that would usually be stored in RAM to a file on your hard disk called a Paging File. The amount of data temporarily stored in a paging file is also referred to as virtual memory. Using virtual memory, in other words, moving information to and from the paging file, frees up enough RAM for programs to run correctly.

The more RAM your computer has, the faster your programs will generally run. If a lack of RAM is slowing your computer, you might be tempted to increase virtual memory to compensate. However, your computer can read data from RAM much more quickly than from a hard disk, so adding RAM is a better solution.

If you receive error messages that warn of low virtual memory, you need to either add more RAM or increase your paging file size so that you can run the programs on your computer. Windows usually manages this automatically, but you can manually change the virtual memory size if the default size isn't large enough for your needs.

Change the size of virtual memory

If you receive warnings that your virtual memory is low, you'll need to increase your paging file's minimum size. By default, Windows creates a paging file that can be smaller than the amount of random access memory (RAM) installed on your computer. The recommended minimum page file size should be 1.5X the current amount of RAM, and the maximum size should be 3X the minimum (see custom size below). If you see warnings at these recommended levels, then increase the minimum and maximum sizes.

To open the System Properties, press Windows logo key + Pause

Windows 7 Pagefile Settings 1

In the left pane, click Advanced system settings. If you're prompted for an administrator password or confirmation, type the password or provide confirmation.
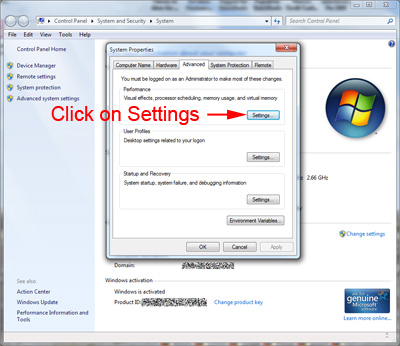
Windows 7 Pagefile Settings 2

On the Advanced tab, under Performance, click Settings.
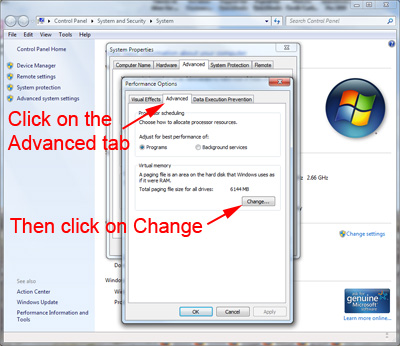
Windows 7 Pagefile Settings 3

Click the Advanced tab, and then, under Virtual memory, click Change.
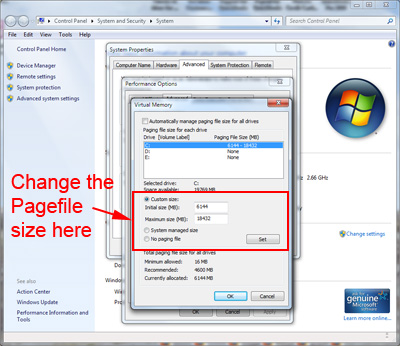
Windows 7 Pagefile Settings 4

Clear the Automatically manage paging file size for all drives check box.

Under Drive [Volume Label], click the drive that contains the paging file you want to change.

Click Custom size, type a new size in megabytes in the Initial size (MB) or Maximum size (MB) box, click Set, and then click OK. There is a formula for calculating the correct pagefile size. Minimum pagefile size is one and a half (1.5) x amount of memory. Maximum pagefile size is three (3) x minimum pagefile size. Say you have 4 Gb (4,096 Mb) of memory. 1.5 x 4,096 = 6,144 Mb would be the min. pagefile size and 3 x 6,144 = 18,432 Mb would be the max. pagefile size.

Note:
Size increases usually don't require a restart for the changes to take effect, but you'll need to restart your computer if you decrease the size. It is recommended that you don't disable or delete the paging file.

My five favorite tips for maintaining your Windows computer

Updated April 21, 2023

One of the questions I often get asked is, "What can I do to maintain my computer". So in this article, I am going to share my five favorite tips for maintaining your Windows-based computer.

Regularly check your drive(s) for errors

This is one of the first things I do when I get a system in the shop. An error on the disk can cause all sorts of issues, so occasionally running a quick standard disk check is recommended. It is always best to try fixing any errors before they become huge problems.

For more information on how to perform a checkdisk, select your operating system below.

How to check your drive(s) for errors in Windows 11

How to check your drive(s) for errors in Windows 10

How to check your drive(s) for errors in Windows 8.1

How to check your drive(s) for errors in Windows 7 / Windows Vista

How to check your drive(s) for errors in Windows XP

Manually defragment and optimize your drive(s)

Even though Windows runs Defrag as part of the routine maintenance (usually weekly), you can always occasionally run it, as it is probably the best single thing you can do to speed up your computer. Imagine a filing cabinet where all of the folders were out of order and files were misplaced throughout the cabinet. How could you find anything? Same thing with your computer's drive. Disk Defragmenter takes care of that for you. And you can run it as a scheduled task too.

Select your operating system below for more information on how to use Disk Defragmenter.

How to defragment and optimize your drive in Windows 11

How to defragment and optimize your drive in Windows 10

How to defragment and optimize your drive in Windows 8.1

How to defragment and optimize your drive in Windows 7

How to defragment and optimize your drive in Windows Vista

How to defragment and optimize your drive in Windows XP

Clean up your drive(s) regularly

Now, Windows does include programs to clean up the miscellaneous files that build up over time, but by default, it is not set up to run automatically. You can set up Windows to perform these routine tasks, which include deleting temporary files and emptying the Recycle Bin.

For more information on how to use Disk Cleanup and Storage Sense, select your operating system below.

How to clean up your drive in Windows 11

How to clean up your drive in Windows 10

How to clean up your drive in Windows 8.1

How to clean up your drive in Windows 7 / Windows Vista

Install Windows updates when they become available

Once a month, Microsoft releases security patches called Cumulative Updates. They fix known security issues and should be applied as soon as possible. Microsoft has been using the same schedule for
releasing them for decades now. The second Tuesday of every month is known in the IT world as 'Patch Tuesday', so mark your calendar. And if, for some reason, Windows Update does not work correctly, click on the link below.

Troubleshooting problems with Windows Update

Backup of your computer on a regular schedule

Nothing can beat a complete backup when it comes to getting a computer back running after a drive failure. Sure, a drive failure is an extreme example, but it could be an update that did not install correctly or a corrupt driver that is preventing your system from booting correctly. And the software is already built-in; all you need is an external drive for the backup and a USB flash drive for a repair drive.

How to backup your Windows 11 computer

How to backup your Windows 10 computer

How to backup your Windows 8.1 computer

How to backup your Windows 7 / Windows Vista computer

How to backup your Windows XP computer

Simple security with Microsoft Security Essentials

In this article, I am going to spotlight Microsoft Security Essentials (MSE). This is not Microsoft's first venture into the ant-virus market, but it is probably the best. Having used some of the more well-know anti-virus software (Norton / Symantec, McAfee, etc.) for over a decade, I decided to give MSE a try.

Microsoft Security Essentials

All of the articles I had read on Microsoft Security Essentials were quite positive, so I installed it on my netbook running Windows 7 in June. Since then, I have taken the netbook on several on-site service calls and vacation. I am happy to report that the netbook remains virus-free. What I like is the small footprint the software has. It does not take five minutes to start up Windows, as can happen on systems with limited resources (such as netbooks).

MSE works quite well with Windows 7 built-in firewall. The interface is clean and easy to use, unlike some of the anti-virus software out there. It's easy enough for a novice user to navigate. It also integrates into Windows Update. Here's a quote from Microsoft's website:

Microsoft Security Essentials provides real-time protection for your home PC that guards against viruses, spyware, and other malicious software.

Microsoft Security Essentials is a free* download from Microsoft that is simple to install, easy to use, and always kept up to date so you can be assured your PC is protected by the latest technology. It’s easy to tell if your PC is secure — when you’re green, you’re good. It’s that simple.

Microsoft Security Essentials runs quietly and efficiently in the background so that you are free to use your Windows-based PC the way you want—without interruptions or long computer wait times.

I encourage you to take a look at Microsoft Security Essentials. It's simple and free.

Android 2.2 (Froyo) OS Update

I got a notice on my Motorola Android phone the other day, telling me that the Android OS 2.2 (Froyo) update was ready for download. I backed up my Android, disconnected the USB cord from my pc, and started the update.

Android 2.2 OS Update
Home Screens for both Android 2.1 and Android 2.2

The first noticeable change is on the Home screen. The Home screen now has dedicated shortcuts for Phone, Launcher, and Browser. On either side of the Shortcuts are Home Screen tabs, which make switching between the five different panels and knowing which one you're viewing a breeze.

The Browser has been enhanced using a new rendering engine, V8, which enables faster loading of JavaScript heavy pages. The ability to play Flash videos is apparently on its way.

The Camera and Gallery got a makeover too. There are now onscreen buttons for controlling zoom, flash, focus, exposure, white balance, and geo-tagging. The Camcorder now uses the LED flash to record video in low light or at night.

A new feature is the ability to tether the 3G connection using the USB cable. On some Android models, like the Nexus One, you can also create a portable WlFi hotspot. There may be additional fees for these services, so it's best to contact your service provider for more details.

The support for Exchange has also been upgraded. Remote wipe, Auto-discovery, and improved security are just a few of the changes.

There are changes under the hood too. Using Dalvik JIT, performance has been increased up 2x-5x for CPU heavy code. And Kernel Memory Management Boost improved memory reclaim performance by 20% for faster switching between applications.

Note:
I did have a couple of issues with existing applications on my phone. One I had to remove completely. Another, DejaOffice, had to be reinstalled, as it had an updated version for this platform (Android 2.2).

Update 8/20/2010: I recently had my Bluetooth headset die, and since writing this article have replaced it. I am happy to report that the voice-enabled dialing feature in this update does work.

Windows 7 User Account Control (UAC) and Failed Installations

I recently got an e-mail asking if I knew why the installation of software that was downloaded would fail on Windows 7. This issue is part of Windows 7's User Account Control. Let's say I was surfing the web with Internet Explorer (IE) and clicked to download a file. When the IE download prompt comes up, I can 'Run' or 'Save As' the file. If I select 'Run', I am running the application as a standard user, even if I have administrator privileges. Let me explain.

By default, standard users and administrators access resources and run applications in the security context of standard users. When a user logs on to a computer, the system creates an access token for that user. The access token contains information about the level of access that the user is granted, including specific security identifiers (SIDs) and Windows privileges.

When an administrator logs on, two separate access tokens are created for the user: a standard user access token and an administrator access token. The standard user access token contains the same user-specific information as the administrator access token, but the administrative Windows privileges and SIDs are removed. The standard user access token is used to start applications that do not perform administrative tasks (standard user applications), such as Internet Explorer. The standard user access token is then used to display the desktop (Explorer.exe). As a result, all applications run as a standard user unless a user provides consent or credentials to approve an application to use a full administrative access token.

The best way to be sure you are running a downloaded application with the administrator token is to open Windows Explorer, navigate to the directory you downloaded the file to, right-click on the file and select 'Run as Administrator'.

Free computer diagnostics

Repairing a PC can sometimes be expensive, and that is why we offer free basic in-shop diagnostics. Give one of our professional and experienced technicians a call at (602) 795-1111, and let's see what we can do for you.

Check out our reviews

Geeks In Phoenix LLC, BBB Business Review

Customer service is #1

Here at Geeks in Phoenix, we take pride in providing excellent customer service. We aim to give the highest quality of service  from computer repair, virus removal, and data recovery.

Bring your computer to us and save

Repairing a computer can be time-consuming. That is why we base our in-shop service on the time we work on your computer, not the time it takes for your computer to work! From running memory checking software to scanning for viruses, these are processes that can take some time.

Contact us

If you have any questions, please feel free to give us a call at (602) 795-1111  and talk with one of our Geeks. Or you can send us a message from our contact page contact page , and one of our Geeks will get back to you as soon as possible. Or you can stop by and see us. Here are our hours and location.

Like Geeks in Phoenix on Facebook

Follow Geeks in Phoenix on Twitter

Watch Geeks in Phoenix on YouTube