Have you ever opened a filing cabinet and couldn't find the file or folder you were looking for? The same thing can happen to your computer when your hard drive becomes fragmented. To keep all of your files in the right place, optimizing your hard drive regularly is highly recommended. You can do this with Windows 8 built-in hard drive optimizing utility, Defragment and Optimize Drives.
Standard hard drive optimization in Windows 8
- Go to the Start menu.
- Right-click the Start menu background to bring up the app commands.
- Select 'All apps'.
- Scroll to the 'File Explorer' tile and left-click on it.
- Left-click on 'Computer'.
- Right-click the hard drive that you want to optimize, and then click 'Properties'.
- Click the 'Tools' tab, and then, under 'Optimize and defragment drive', click 'Optimize'.
- Select the drive you want to defrag and click on 'Optimize'.
Or
- Go to the Start menu.
- Right-click the Start menu background to bring up the app commands.
- Select 'All apps'.
- Scroll to the 'Control Panel' tile and left-click on it.
- On the upper right side of the Control Panel, there is a 'View by:' pull-down menu (the default is Category). Left-click on the arrow to the right and select either 'Large icons' or 'Small icons'.
- Left-click on 'Administrative Tools'.
- Double left-click 'Defragment and Optimize Drives'.
- Select the drive you want to optimize and click on 'Optimize'.
Advanced hard drive optimization in Windows 8
- Open a Command Prompt with Administrative privileges (click here for instructions)
- Use the following command-line syntax(s) and parameter(s) to run DEFRAG:
DEFRAG <volumes> | /C | /E <volumes> [<task(s)>] [/H] [/M | [/U] [/V]]
Where <task(s)> is omitted (traditional defrag), or as follows: /A | [/D] [/K] [/L] | /O | /X
Or, to track an operation already in progress on a volume:
DEFRAG <volume> /T
| Value |
Description |
| /A |
Perform analysis on the specified volumes. |
| /C |
Perform the operation on all volumes. |
| /D |
Perform traditional defrag (this is the default). |
| /E |
Perform the operation on all volumes except those specified. |
| /H |
Run the operation at normal priority (default is low). |
| /K |
Perform slab consolidation on the specified volumes. |
| /L |
Perform retrim on the specified volumes. |
| /M |
Run the operation on each volume in parallel in the background. |
| /O |
Perform the proper optimization for each media type. |
| /T |
Track an operation already in progress on the specified volume. |
| /U |
Print the progress of the operation on the screen. |
| /V |
Print verbose output containing the fragmentation statistics. |
| /X |
Perform free space consolidation on the specified volumes. |
d3336f46-d255-4b0a-be23-1358168304d1|0|.0|96d5b379-7e1d-4dac-a6ba-1e50db561b04
Keeping your hard drive free from errors is essential to the performance of your Windows 8 computer. When it comes to computer repair, this is one of the first things I do. So, if your experiencing problems opening an application or file, it may be time to check your hard drive for errors with Windows 8 built-in disk checking utility, CHKDSK (Check Disk).
There are two ways to run CHKDSK, standard, and advanced. Here are the procedures for both.
Standard hard drive error checking in Windows 8
- Go to the Start menu.
- Right-click the Start menu background to bring up the app commands.
- Select 'All apps'.
- Scroll to the 'File Explorer' tile and left-click on it.
- Left-click on 'Computer'.
- Right-click the hard drive that you want to check, and then click 'Properties'.
- Click the 'Tools' tab, and then, under 'Error-checking', click 'Check Now'. If you are prompted for an administrator password or confirmation, type the password or provide confirmation.
- Select 'Scan drive'.
Advanced hard drive error checking in Windows 8
- Open a Command Prompt with Administrative privileges (click here for instructions)
- Use the following command-line syntax(s) and parameter(s) to run CHKDSK:
CHKDSK [volume[[path]filename]]] [/F] [/V] [/R] [/X] [/I] [/C] [/L[:size]] [/B]
[/scan] [/spotfix]
| volume |
Specifies the drive letter (followed by a colon), mount point, or volume name. |
| filename |
FAT/FAT32 only: Specifies the files to check for fragmentation. |
| /F |
Fixes errors on the disk. |
| /V |
On FAT/FAT32: Displays the full path and name of every file on the disk. On NTFS: Displays cleanup messages, if any. |
| /R |
Locates bad sectors and recovers readable information (implies /F, when /scan not specified). |
| /L:size |
NTFS only: Changes the log file size to the specified number of kilobytes. If a size is not specified, it displays the current size. |
| /X |
Forces the volume to dismount first if necessary. All opened handles to the volume would then be invalid (implies /F). |
| /I |
NTFS only: Performs a less vigorous check of index entries. |
| /C |
NTFS only: Skips checking of cycles within the folder structure. |
| /B |
NTFS only: Re-evaluates bad clusters on the volume (implies /R) |
| /scan |
NTFS only: Runs an online scan on the volume |
| /forceofflinefix |
NTFS only: (Must be used with "/scan") Bypass all online repair; all defects found are queued for offline repair (i.e. "chkdsk /spotfix"). |
| /perf |
NTFS only: (Must be used with "/scan") Uses more system resources to complete a scan as fast as possible. This may have a negative performance impact on other tasks running on the system. |
| /spotfix |
NTFS only: Runs spot-fixing on the volume |
| /sdcleanup |
NTFS only: Garbage collects unneeded security descriptor data (implies /F). |
| /offlinescanandfix |
Runs an offline scan and fix on the volume. |
The /I or /C switch reduces the amount of time required to run CHKDSK by skipping certain volume checks.
dfa4c217-d5a1-4bf3-9df6-52c26ed6db32|0|.0|96d5b379-7e1d-4dac-a6ba-1e50db561b04
During the course of using your Windows 8 computer, you may need to run some commands from the Command Prompt. But most of them require you do it with Administrative privileges. Here's how to open a Command Prompt with Administrator privileges in Windows 8.
A Command Prompt in Windows 8 with Administrator privileges
Using a mouse
- Go to the Start menu.
- Right-click the Start menu background to bring up the app commands.
- Select 'All apps'.
- Right-click the 'Command Prompt' tile to bring up the app commands.
- Select 'Run as administrator'. If you're prompted for an administrator password or confirmation, type the password or provide confirmation.
Using a keyboard
- Go to the Start menu.
- Press the Windows logo key
 + Z to open the app commands.
- Press Enter to select 'All apps'.
- Use the arrow keys to navigate to the 'Command Prompt' tile.
- Press the Application key
 to bring up the app commands.
- Use the arrow keys to navigate to 'Run as administrator' and press Enter. If you're prompted for an administrator password or confirmation, type the password or provide confirmation.
Using touch
- Go to the Start menu.
- Swipe up from the bottom of the Start menu to bring up the app commands.
- Select 'All apps'.
- Scroll to the 'Command Prompt' tile and press and hold it to bring up the app commands.
- Select 'Run as administrator'. If you're prompted for an administrator password or confirmation, type the password or provide confirmation.
403f0292-134f-4486-b03a-01cc591c1500|0|.0|96d5b379-7e1d-4dac-a6ba-1e50db561b04
As a IT consultant, I'm always looking for great sources for the latest technical information. I need ebooks that are easy to use, focused on topic and have a practical application. And it just so happens that one of my favorite sources for ebooks, Packt Publishing, has just reached 1000 titles.

Packt Publishing Technical & IT Book and eBook Store
Packt Publishing, establish in 2004, has a wide assortment of technical and IT books. From web development to web graphics, e-learning to e-commerce, IT architecture to games, and everything in between. They also have a great selection of books on application development and open-source projects.
Since Packt Publishing has just reached 1000 titles, they want to celebrate and you get the gift. If you have registered over on their site https://account.packtpub.com/login by 9/30/12, you can download any one e-book for free. Packt is opening its online library for one week (10/1/12 - 10/7/12) to members, giving them time research their choice of free ebook.
For more information on Packt Publishing, follow the link below:
Packt Publishing
ce3d9749-03f9-4dc0-9e01-b37242ff5d21|0|.0|96d5b379-7e1d-4dac-a6ba-1e50db561b04
Is your network connection running slow? Or maybe your Internet browser isn't allowing you to go to specific websites? Installing/uninstalling applications or viruses/malware/spyware can add unwanted entries into the network protocol. If so, it may be time to reset your network adapter inside of Windows 8.
Command Prompt with administrator privileges in Windows 8
Windows 8 has a built-in administrator tool, Network Shell (Netsh), that allows you to configure and monitor network adapters on your Windows 8 computer. Netsh can completely reset your network adapter back to its default state. It can also reset the Windows Firewall in Windows 8. All you need is a Command Prompt with administrator privileges.
How to open a Command Prompt with administrator privileges in Windows 8
To use Netsh, you will need to open a Command Prompt with administrator privileges. There are a few ways to do this:
Using a mouse
- Go to the Start menu.
- Right-click the Start menu background to bring up the app commands.
- Select 'All apps'.
- Right-click the 'Command Prompt' tile to bring up the app commands.
- Select 'Run as administrator'. If you're prompted for an administrator password or confirmation, type the password or provide confirmation.
Using a keyboard
- Go to the Start menu.
- Press the Windows logo key + Z to open the app commands.
- Press Enter to select 'All apps'.
- Use the arrow keys to navigate to the 'Command Prompt' tile.
- Press the Application key to bring up the app commands.
- Use the arrow keys to navigate to 'Run as administrator' and press Enter. If you're prompted for an administrator password or confirmation, type the password or provide confirmation.
Using touch
- Go to the Start menu.
- Swipe up from the bottom of the Start menu to bring up the app commands.
- Select 'All apps'.
- Scroll to the 'Command Prompt' tile and press and hold it to bring up the app commands.
- Select 'Run as administrator'. If you're prompted for an administrator password or confirmation, type the password or provide confirmation.
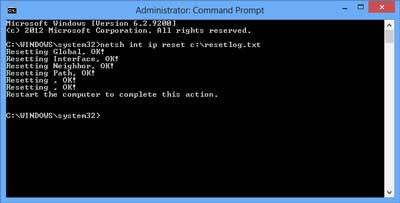
Netsh commands for resetting your network adapter in Windows 8
The following is a list of the Netsh commands you can use at a Command Prompt with administrator privileges to reset your network adapter in Windows 8.
netsh advfirewall reset Restores the Windows Firewall with Advanced Security policy to the default policy. The current active policy can be optionally exported to a specified file. This command returns all settings to not configured and deletes all connection security and firewall rules in a Group Policy object.
netsh branchcache reset Resets the BranchCache service. Flushes the local cache. Every configuration parameter of BranchCache will be reset to its default value.
netsh int ip reset c:\resetlog.txt Resets TCP/IP and related components to a clean state.
netsh int ipv6 reset Resets IPv6 configuration state.
netsh winsock resetResets Winsock Catalog to a clean state. All Winsock Layered Service Providers which were previously installed must be reinstalled. This command does not affect Winsock Name Space Provider entries.
23bc0a74-fed5-4ff2-b327-289b4064bfa4|4|4.0|96d5b379-7e1d-4dac-a6ba-1e50db561b04