Geeks in Phoenix

Geek Blog


Perform advanced disk defragmentation with Defraggler from Piriform

Have you ever opened a filing cabinet just to find the folders just scattered around? The files are all over the place, and you cannot find what you're looking for. The same thing can happen to the folders/files on your Windows based computer. Windows does come with a disk defrag program, but its options are minimal. If you're looking for something more in a disk defrag program, check out Defraggler by Piriform.

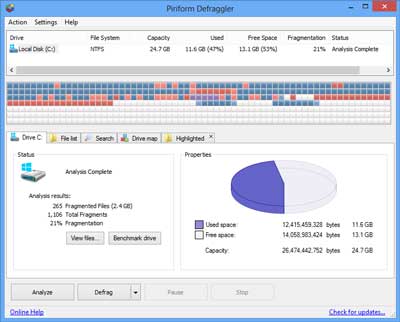
Drive view inside of Defraggler

With Defraggler, you can do much more than just defragment your hard drive. You can do a quick or full defrag, defrag only free space, and my favorite, boot-time defrag. And it uses the same technology as Windows built-in defragmenter to read and write files. You can even have the option to replace the Windows built-in defrag program with Defraggler.

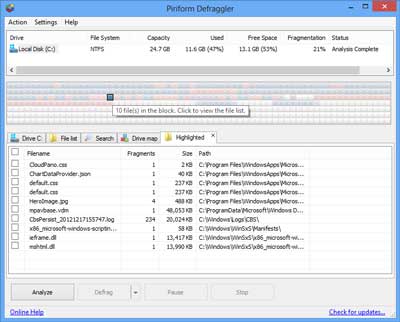
Block detail view inside of Defraggler

Defraggler also has something that has been missing from Windows built-in defragmenter for years, a drive map showing the status of files on your hard drive. And what is cool is that you can left-click on a block, and Defraggler will tell you what file(s) are located in it. And best of all, it's free. Here's a quote from the Piriform website:

Defragment exactly what you want
Most defrag tools only allow you to defrag an entire drive. Defraggler lets you specify one or more files, folders, or the whole drive to defragment.

Safe and Secure
When Defraggler reads or writes a file, it uses the exact same techniques that Windows uses. Using Defraggler is just as safe for your files as using Windows.

Compact and portable
Defraggler's tough on your files – and light on your system.

Interactive drive map
At a glance, you can see how fragmented your hard drive is. Defraggler's drive map shows you blocks that are empty, not fragmented, or needing defragmentation.

Quick Defrag
Give your hard drive a quick touch-up with Quick Defrag.

Defragment free space
Organizes empty disk space to further prevent fragmentation.

Scheduled defragmentation
Defragment while you sleep - and wake up with a faster PC. Set Defraggler to run daily, weekly or monthly.

Multi-lingual support
No matter what your native tongue is, Defraggler speaks your language. It currently supports 37 languages.

For more information on Defraggler, just follow the link below:

Defraggler - File and Disk Defragmentation

Check the protected system files in Windows with System File Checker

There may come a time when your Windows-based computer starts to run improperly. Installing and uninstalling software, viruses, and malware are just a few things that can corrupt the integrity of system files. When it comes to computer repair on a system running Windows, I always like to check for corrupt system files. You can too with Windows built-in System File Checker (SFC).

System File Checker running in Command Prompt inside of Windows 8

SFC scans the integrity of all protected system files and replaces incorrect versions with correct Microsoft versions. Everything SFC does is documented in the CBS.log file. If SFC finds any files that it cannot repair, check the CBS.log for more information. See the bottom of command-line syntax(s) and parameter(s) for details on how to view the CBS.log.

Running SFC in Windows Vista, Windows 7, and Windows 8

To ensure that SFC runs with administrator privileges on Windows Vista, Windows 7, and Windows 8, you will need to run it at an administrative Command Prompt.

  1. Open a Command Prompt with Administrative privileges

    How to open a Command Prompt with Administrator privileges in Windows Vista and Windows 7

    How to open a Command Prompt with Administrator privileges in Windows 8

  2. Use the following command line syntax(s) and parameter(s) to run SFC:

sfc [/scannow] [/verifyonly] [/scanfile=<file>] [/verifyfile=<file>] [/offwinddir=<offline windows directory>/offbootdir=<offline boot directory>]

/scannow Scans integrity of all protected system files and repairs files with problems when possible.
/verifyonly Scans integrity of all protected system files. No repair operation is performed.
/scanfile Scans integrity of the referenced file, repairs file if problems are identified. Specify full path <file>.
/verifyfile Verifies the integrity of the file with full path <file>. No repair operation is performed.
/offbootdir For offline repair specify the location of the offline boot directory.
/offwinddir For offline repair specify the location of the offline windows directory.
/? Displays help at the command prompt.

You can view the CBS.log file in Notepad using the following code at the same administrative Command Prompt used to start SFC.
notepad %systemroot%\Logs\CBS\CBS.log

Running SFC in Windows XP

To use SFC, you will need to open a Command Prompt.

  1. Click the Start button, then Programs, Accessories, and click on Command Prompt
    or
    Press Windows logo key + R. This will bring up the Run dialog box. Type CMD and click OK
  2. Use the following command line syntax(s) and parameter(s) to run SFC:

sfc [/scannow] [/scanonce] [/scanboot] [/revert] [/purgecache] [/cachesize=<x>]

/scannow Scans all protected system files once.
/scanonce Scans all protected system files once.
/scanboot Scans all protected system files every time the computer is restarted.
/revert Returns the scan to its default operation.
/purgecache Purges the Windows File Protection file cache and scans all protected system files immediately.
/cachesize=<x> Sets the size, in MB, of the Windows File Protection file cache.
/? Displays help at the command prompt.

When SFC is done, you can view the log file in Notepad using the following code at the same Command Prompt used to start SFC.
notepad %systemroot%\Logs\CBS\CBS.log

How to open a Command Prompt with Administrator privileges in Windows Vista and Windows 7

At some point in time, you may need to run a program or command from a Command Prompt with Administrative privileges. Some of the best features inside Windows Vista and Windows 7 are only accessible through an administrative Command Prompt. Here's how to open a Command Prompt with Administrator privileges in Windows Vista and Windows 7.

A Command Prompt in Windows 7 with Administrator privileges

  1. Left-click on the Start button.
  2. Left-click on All Programs.
  3. Left-click on Accessories.
  4. Right-click on Command Prompt.
  5. On the context menu that appears, left-click on Run as administrator. If you're prompted for an administrator password or confirmation, type the password or provide confirmation.
    or
  1. Left-click on the Start button.
  2. In the search box above the Start button, type Command Prompt.
  3. In the list of results, right-click Command Prompt.
  4. On the context menu that appears, left-click Run as administrator. If you're prompted for an administrator password or confirmation, type the password or provide confirmation.
    or
  1. Press the Windows logo key Windows logo key + X to bring up the Power User command menu.
  2. Left-click on Command Prompt (Admin). If you're prompted for an administrator password or confirmation, type the password or provide confirmation.

Use your voice to operate your computer with Speech Recognition in Windows 8

Did you know that you can use your voice to control your Windows 8 computer? With Speech Recognition inside Windows 8, you can start programs, open menus, click buttons and other objects on the screen, dictate text into documents, and write and send e-mails. Just about everything you can do with your keyboard and mouse can be done with only your voice. All you need is a microphone.

Speech Recognition interface inside of Windows 8

Starting Speech Recognition in Windows 8

  1. Swipe in from the right side of the screen or press the Windows logo key Windows logo key + C to bring up the Charm bar.
  2. Left-click on Search button in Charm Bar.
  3. Left-click on Apps in Search.
  4. Type Speech Recognition in the Search field on the Search pane.
  5. In the results on the left-hand side, left-click on Windows Speech Recognition.

or

  1. Go to the Start menu.
  2. Right-click the Start menu background to bring up the app commands.
  3. Left-click on All apps.
  4. Scroll to the Windows Speech Recognition tile and left-click on it.

The first time you run Speech Recognition, you will get the setup wizard. After completing the setup wizard, It is recommended that you go through the Speech Recognition Voice Training.

Using Speech Recognition to control your Windows 8 computer

You can use simple, short commands to control your computer. The following table shows some of the most commonly used Speech Recognition commands. Words that look like this (italic) indicate that you can replace the example word or phrase with similar words and get useful results.

Note: Any time you need to find out what commands to use, say "what can I say?"

To do this Say this
Select any item by its name Click File; Start; View
Select any item or icon Click Recycle Bin; Click Computer; Click file name
Double tap or double-click any item   Double-click Recycle Bin; Double-click Computer; Double-click file name
Switch to an open app Switch to Paint; Switch to WordPad; Switch to program name; Switch application
Scroll in one direction Scroll up; Scroll down; Scroll left; Scroll right
Insert a new paragraph or new line in a document New paragraph; New line
Select a word in a document Select word
Select a word and start to correct it Correct word
Select and delete specific words Delete word
Show a list of applicable commands What can I say?
Update the list of speech commands that are currently available Refresh speech commands
Turn on listening mode Start listening
Turn off listening mode Stop listening
Move the Speech Recognition microphone bar Move speech recognition
Minimize the microphone bar Minimize speech recognition
View Windows Help and Support content about specific tasks How do I do something? For example, say “How do I install a printer?” and a list of Help topics is returned. Note that this command is available only if you're using the U.S. English Speech Recognizer.
Insert a new line in the document New line
Insert a new paragraph in the document New paragraph
Insert a tab Tab
Insert the literal word for the next command (for example, you can insert the word "comma" instead of the punctuation mark) Literal word
Insert the numeral form of a number Numeral number
Put the cursor before a specific word Go to word
Put the cursor after a specific word Go after word
Don't insert a space before the next word No space
Go to the start of the sentence that the cursor is in Go to start of sentence
Go to the start of the paragraph that the cursor is in Go to start of paragraph
Go to the start of the document Go to start of document
Go to the end of the sentence that the cursor is in Go to end of sentence
Go to the end of the paragraph that the cursor is in Go to end of paragraph
Go to the end of the current document Go to end of document
Select the word in the current document Select word
Select the word range in the current document Select word range; Select word through word
Select all text in the current document Select all
Select a number of words before the location of the cursor Select previous 20 words; Select previous 10 words
Select a number of words after the location of the cursor Select next 20 words; Select next 10 words
Select the last text you dictated Select that
Clear the selection on the screen Clear selection
Capitalize the first letter of the word Caps word
Capitalize all the letters of the word All caps word
Make all the letters in the word lowercase No caps word
Change the next number of words to uppercase Change next 10 words to uppercase
Change the next number of words to lowercase Change next 10 words to lowercase
Delete the previous sentence Delete previous sentence
Delete the next sentence Delete next sentence
Delete the previous paragraph Delete previous paragraph
Delete the next paragraph Delete next paragraph
Delete the selected or last dictated text Delete that

For more information on Speech Recognition and a complete list of commands, just right-click the Speech Recognition icon on the Desktop Taskbar and select Open Speech Recognition Reference Card.

Using Task Scheduler in Windows 8

The Task Scheduler inside of Windows 8 automates scheduling system tasks, which perform actions at a specific time or when a particular event occurs, such as checking for updates or running scripts. Task Scheduler provides an organized view of scheduled tasks and a convenient point of access for managing them.

The main screen for Task Scheduler inside of Windows 8

If you use a specific program regularly, you can use the Create Basic Task Wizard to create a task that opens the program for you automatically according to the schedule you choose. For example, if you use a financial program on a specific day each month, you can schedule a task that opens the program automatically, so you don't risk forgetting to open it yourself.

Running Task Scheduler in Windows 8

  1. On the Start menu, swipe in from the right side of the screen or press the Windows logo key Windows logo key + C to bring up the Charm bar.
  2. Left-click on the Settings button in Charm Bar.
  3. Left-click on Tiles in Settings.
  4. Drag the Show/hide administrative tools slider to the Yes position.
  5. Left-click on the background of the Start menu, making the Charm bar disappear.
  6. Once the administrative tools appear, left-click on Task Scheduler.

or

  1. Swipe in from the right side of the screen or press the Windows logo key Windows logo key + C to bring up the Charm bar
  2. Left-click on Search button in Charm Bar.
  3. Left-click on Apps in Search.
  4. Type Task Scheduler in the Search field on the Search pane
  5. In the results on the left-hand side, left-click on Task Scheduler.

If you are prompted for an administrator password or confirmation, type the password or provide confirmation.

Click the Action menu, and then click Create Basic Task.

  • Type a name for the task and an optional description, and then click Next.

Select one of the following:

  • To select a schedule based on the calendar, click Daily, Weekly, Monthly, or One time, click Next, specify the schedule you want to use, and then click Next.
  • To select a schedule based on common recurring events, click When the computer starts or When I log on and then click Next.
  • To select a schedule based on specific events, click When a specific event is logged, click Next, specify the event log and other information using the drop-down lists, and then click Next.
  • To schedule a program to start automatically, click Start a program, and then click Next. Click Browse to find the program you want to start, and then click Next.

Click Finish.

Triggers and Actions

The two key concepts involved in scheduling a task are triggers and actions. A trigger causes a task to run, and an action is the work that is performed when the task is run. The actions a task can perform include running a program, sending an e-mail message, and showing a message box. For example, you can send an e-mail when a certain event entry is logged in the event log or run a maintenance script when a user logs on to a computer. Occurrences that can trigger a task to run include: a computer starting up, a computer entering an idle state, or a user unlocking a workstation. In addition, you can schedule a task to run at a specified time.

Free computer diagnostics

Repairing a PC can sometimes be expensive, and that is why we offer free basic in-shop diagnostics. Give one of our professional and experienced technicians a call at (602) 795-1111, and let's see what we can do for you.

Check out our reviews

Geeks In Phoenix LLC, BBB Business Review

Customer service is #1

Here at Geeks in Phoenix, we take pride in providing excellent customer service. We aim to give the highest quality of service  from computer repair, virus removal, and data recovery.

Bring your computer to us and save

Repairing a computer can be time-consuming. That is why we base our in-shop service on the time we work on your computer, not the time it takes for your computer to work! From running memory checking software to scanning for viruses, these are processes that can take some time.

Contact us

If you have any questions, please feel free to give us a call at (602) 795-1111  and talk with one of our Geeks. Or you can send us a message from our contact page contact page , and one of our Geeks will get back to you as soon as possible. Or you can stop by and see us. Here are our hours and location.

Like Geeks in Phoenix on Facebook

Follow Geeks in Phoenix on Twitter

Watch Geeks in Phoenix on YouTube