Geeks in Phoenix

Geek Blog


How to estimate the power required for your custom-built computer

Whether you are building a new computer or replacing/upgrading your existing one, one of the most important considerations is the Power Supply Unit (PSU). The PSU is responsible for delivering power to all the components in your system, including the motherboard, CPU, graphics card(s), and other peripherals. Choosing the correct PSU is crucial to ensure stable and reliable performance and prevent damage to your components.

How to estimate the power required for your custom-built computer

Two (2) components in your computer will consume most of the power: the motherboard and the graphics card(s). The motherboard uses a relatively small amount of energy but supplies power to the CPU, memory, PCIe slots, and USB ports.

To determine the appropriate wattage for your PSU, you must first consider the power requirements of your components. Here are some guidelines to help you estimate how many watts your PSU should be:

  • CPU: The power consumption of your CPU depends on its model and clock speed. Generally, high-end CPUs require more power than budget models. You can find the power requirements of your CPU on the manufacturer's website.
  • Graphics card(s): If you plan on using a dedicated graphics card(s), these will be one of the most power-hungry components in your system. High-end graphics cards can consume up to 450 watts under load, so check the manufacturer's specifications before choosing a PSU.
  • Motherboard: Your motherboard's power consumption is relatively low compared to other components, but it still requires some power. Make sure to choose a PSU that can provide enough power for all the motherboard components, including the CPU and memory.
  • Storage: Hard drives and SSDs consume very little power, so you don't need to worry about them when choosing a PSU.
  • Other components: If you plan to use other components, such as a sound card, network adapter, or USB devices, make sure to factor in their power requirements when estimating your PSU wattage.

Now, some online power supply calculators can estimate the power requirements given the specifications of the components. You can use these websites to calculate a rough estimate of the amount of power your computer will require. Here are a few online power supply calculators.

Newegg - Power Supply Calculator

PC builds - Power Supply Calculator

Cooler Master - Power Supply Calculator

Once you have a rough estimate of the power requirements for your components, add some extra headroom to ensure stable and reliable performance. A good rule of thumb is to choose a PSU that can provide at least 20% more power than your estimated requirements.

In conclusion, choosing the suitable PSU is crucial to ensure stable and reliable performance for your computer. By estimating the power requirements of your components and adding some extra headroom, you can choose a PSU that meets your needs and provides room for future upgrades.

Troubleshooting graphics card issues in Windows

Updated February 15, 2024

Are you having video problems when trying to play a game? Maybe your screen goes blank for a second or two? If so, here is how to troubleshoot the graphics card in your Windows-based computer.

Troubleshooting graphics card issues in Windows

If you are currently experiencing issues with the graphics on your computer, it may be due to a problem with your graphics card. You can take a few steps to diagnose the issue and potentially resolve the problem.

The first step is to check for updates. It's important to ensure that your graphics card drivers are up-to-date. To do this, you can visit the manufacturer's website and download the latest updates. This will ensure that your graphics card is functioning optimally and may resolve any issues you are experiencing.

Next, run a stress test. Using a graphics card stress testing tool, you can test your graphics card and identify potential issues. This will help you determine whether the problem lies with the card or another component of your computer.

The Ultimate Boot CD (UBCD) is a great diagnostic tool that includes a video memory stress test. All you have to do is download the latest ISO file and burn it to a CD/DVD or use Rufus to create a bootable USB drive.

You may have to change some settings in your motherboard's BIOS to get the UBCD to boot correctly. The UBCD is built on a Linux platform, so you may need to turn off secure boot and UEFI boot features temporarily.

Diagnose computer hardware issues with the Ultimate Boot CD

Create custom installation media with Rufus

While you test your graphics card, it is essential to monitor the temperature of your graphics card. High temperatures can cause issues with the card, so it's important to keep an eye on it and ensure it's not overheating. You may need to take additional steps to cool it down if it is. Most graphics card testing tools will include the ability to monitor the clock speed and temperature.

Here are some free graphics testing tools:

  • FurMark - FurMark is a popular choice for stress testing your graphics card. It's designed to push your GPU to its limits and help you identify any potential stability issues. With FurMark, you can customize your testing parameters, track your GPU's temperature, and clock speed in real-time.
  • MSI Afterburner - MSI Afterburner is a popular overclocking tool but also includes a built-in GPU stress test. This software is handy for gamers who want to optimize their graphics settings for a specific game. With MSI Afterburner, you can monitor your GPU's clock speed, temperature, and fan speed while running a stress test.
  • Heaven Benchmark - Heaven Benchmark is another popular benchmarking tool designed to stress test your graphics card. This software is handy for users who want to see how their GPU performs under different conditions. With Heaven Benchmark, you can customize your testing parameters and track your GPU's temperature and clock speed in real-time.
  • MSI Kombuster - Optimize your gaming PC's performance with MSI Kombustor, the ultimate stress test for your graphics card. With MSI Kombuster, you can use the preset testing parameters or customize your own. You can monitor your GPU's clock speed, temperature, GPU load, and GPU power. Note: MSI Kombuster only works with NVidia-based graphic cards.

Another factor to consider is physical damage. Examine your graphics card for any visible damage. If there is damage, it may need to be replaced. Handling your computer components carefully and avoiding any physical damage is important.

Finally, check your computer's power supply. Ensure that it's adequate for your graphics card. If it's not, you may need to upgrade your power supply to ensure that your graphics card is receiving the necessary power to function correctly.

These troubleshooting tips can help you identify any issues with your graphics card and ensure it's running at its full potential. Whether a gamer or a casual user, these tips can help you get the most out of your graphics card and improve your computer's overall performance.

In conclusion, if you're experiencing graphics performance issues, diagnosing the problem as quickly as possible is important. By following these steps, you can diagnose and potentially resolve any problems you are experiencing with your graphics card.

Five free programs to keep your Windows computer running like new

As our lives have become increasingly digitized, our computers have become the central hub for all our information and activities. But with all that use comes clutter, which can slow down our machines and even put us at risk for security breaches. That's why it's essential to regularly clean up our computers. Fortunately, there are several free tools available to help you keep your Windows computer running like new.

Five free programs to keep your Windows computer running like new

The first tool(s) I recommend is Storage Sense / Disk Cleanup, which are built into Windows. These tools will scan your computer for unnecessary files, such as temporary files and system files, and give you the option to delete them. To access Storage Sense or Disk Cleanup, follow the instructions below.

How to open Storage Sense in Windows 11

  1. Left-click on the Start Windows logo key button to bring up the Start menu.
  2. In the list of pinned apps on the Start menu, left-click on Settings.
  3. Scroll down the right-hand column and left-click on Storage.
  4. In the right-hand column, left-click on Storage Sense.

How to open Disk Cleanup in Windows 11

  1. Left-click on the Start button Windows logo to bring up the Start menu.
  2. In the upper right-hand corner of the Start menu, left-click on All apps.
  3. Scroll down the list of programs and left-click on Windows Tools.
  4. Left-click on Disk Cleanup.

How to open Storage Sense in Windows 10

  1. Left-click on the Start Windows logo menu and left-click on the Gear (Settings) icon. It should be the second icon up from the bottom.
  2. Left-click on the System category
  3. In the left-hand column, left-click on Storage. All of the storage options will appear in the right-hand column.

How to open Disk Cleanup in Windows 10

  1. Left-click on the Start Windows logo button.
  2. Scroll down the list of programs to Windows Administrative Tools and left-click to expand.
  3. Left-click on Disk Cleanup. If you have more than one (1) drive, you will be prompted on which drive you want to clean up.

For complete details on Storage Sense and Disk Cleanup, click on the link below for your version of Windows.

Clean up Windows 11 with Storage Sense and Disk Cleanup

Clean up your Windows 10 computer using the Storage feature

Clean up Windows 10 with Disk Cleanup

Another great tool is Adwcleaner, which is designed to remove adware and other potentially unwanted programs from your computer. Adware can slow down your machine and even put you at risk for malware infections.

Adwcleaner can also detect and remove pre-installed software (bloatware), requires no installation, and is easy to use. For more information on Adwcleaner, check out the following artilce.

Clean up your Internet browser with AdwCleaner

Autoruns is another valuable tool for cleaning up your computer. This tool allows you to see all of the programs set to run when you start your computer and allows you to disable any that you don't need. This can help speed up your machine and reduce the amount of clutter on your desktop.

Autoruns is one of the free utilities included in the Sysinternals Suite from Microsoft. Check out the following links for more information on Autoruns and Sysinternals Suite.

Autoruns for Windows

Troubleshoot your computer and more for free with Sysinternals Suite from Microsoft

CCleaner is a popular and powerful tool that can clean up your computer's registry, temporary files, and other unnecessary data. It also includes several other features, such as a file shredder and a program uninstaller.

CCleaner also includes a software updater and a duplicate file finder and can manage System Restore points. For more information on CCleaner, check out the following article.

Clean up and optimize your computer for free with CCleaner

Finally, Revo Uninstaller is an excellent tool for removing programs that you no longer need. Unlike the default Windows uninstaller, which can leave behind files and registry entries, Revo Uninstaller will completely remove the program and all of its associated files. This can free up valuable space on your hard drive and help keep your computer running smoothly.

Revo Uninstaller has a cool feature called Hunter Mode that allows you to find a shortcut or link to the program you want to uninstall. For more information on Revo Uninstaller, check out the following link.

Revo Uninstaller

In conclusion, cleaning up your computer is an important task that can help keep your machine running smoothly and reduce the risk of security breaches. You can easily clean up your computer by using free tools such as Storage Sense / Disk Cleanup, Adwcleaner, Autoruns, CCleaner, and Revo Uninstaller and enjoy a faster, more secure computing experience.

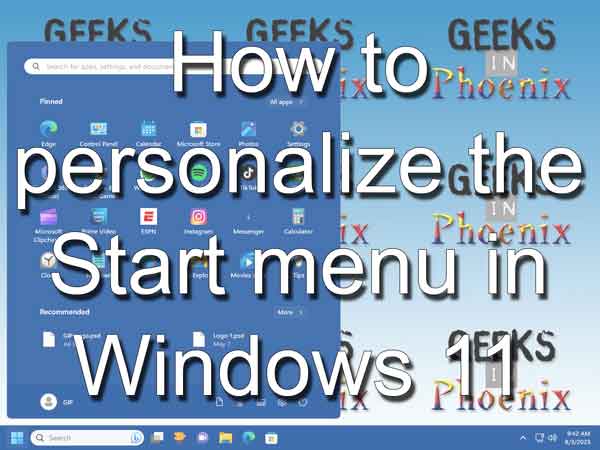
How to personalize the Start menu in Windows 11

Are you tired of the default Start menu in Windows 11? Do you feel like it's cluttered with unnecessary apps and features? If so, you're not alone. Many users find the Start menu overwhelming and distracting, ultimately impacting their productivity. Fortunately, there's a solution - personalizing your Start menu.
How to personalize the Start menu in Windows 11

By customizing your Start menu, you can maximize your productivity and unleash the full potential of your Windows 11 experience. You can create a unique and effective Start menu that caters to your specific needs and preferences, making your computing experience more enjoyable overall.

To get started, you'll need to explore the various customization options available in Windows 11. From rearranging your app tiles to pinning your favorite programs, there are plenty of ways to make your Start menu work for you. By taking the time to personalize your Start menu, you can streamline your workflow and access the apps and tools you need with just a few clicks.

Consider customizing your Start menu today to improve your Windows 11 experience and maximize productivity. With time and effort, you can create a Start menu tailored to your unique needs and preferences, making your computing experience more enjoyable and efficient. Let's get started.

All the changes outlined in this article are done inside the Settings app. You can bring up the Settings app by:

  • Left-clicking on the Start button Windows logo to bring up the Start menu.
  • In the list of pinned apps on the Start menu, left-click on Settings.
  • or
  • Right-click on the Start button Windows logo to bring up the Power User menu.
  • In the list of programs that appear, left-click on Settings.
  • or
  • Press the Windows logo key Windows logo + I

Once you open the Settings app, left-click on Personalization in the left-hand column. This will display all of the Personalization categories in the right-hand column.

These customizations are in no particular order. Let's start with the alignment of the Start menu on the Taskbar.

Changing the location of the Start menu on the Taskbar

Settings > Personalization > Taskbar > Taskbar behaviors

Windows 10 only allowed the Start menu to be located in the corner of the Taskbar, although you could place the Taskbar along any of the screen edges (left, right, top, or bottom). With Windows 11, you currently only have the option of the bottom of the screen.

But you can change the Start button's alignment (left or center). Inside of Taskbar behaviors, you can change the alignment between left and center using the pull-down menu.

Changing the accent color of the Start menu

Settings > Personalization > Colors

This option can be changed inside the Colors category. The only way you can change the Start menu accent color is by selecting Dark or Custom mode under Choose your mode. If you choose Dark mode, you can set the accent color for the Start menu and the Taskbar. If you choose Custom mode, you must select Dark mode for Windows to be able to set the accent color.

Changing the Start menu options

Settings > Personalization > Start
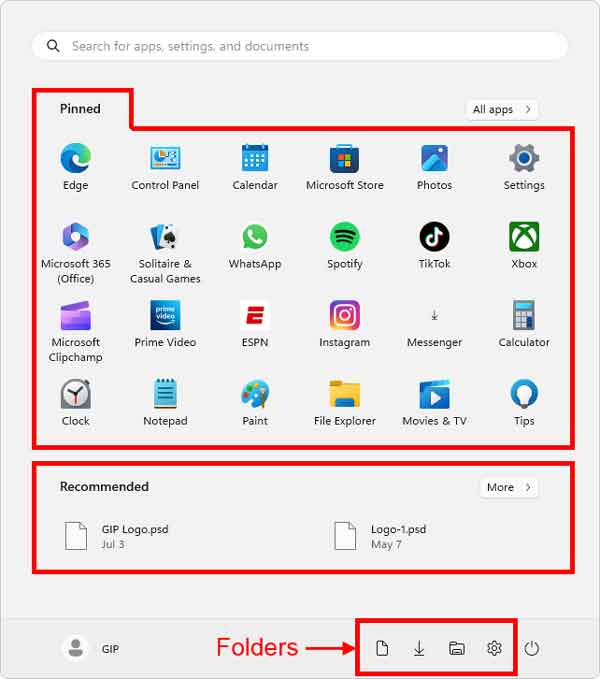
Windows 11 Start menu features and areas

There are three (3) areas that you can customize on the Start menu; Pinned (programs /apps), Recommended (recently accessed files), and Folders (Settings, File Explorer, Documents, Downloads, Music, Pictures, Videos, Network, and Personal Folder).

The first option is the layout of the Start menu. You have three (3) choices; More pins, Default (an even mix of pins and recommendations), and More recommendations.

The next set of options you can toggle on or off. They are:

  • Show recently added apps
  • Show recently used apps
  • Show recently opened items in Start, Jump Lists, and File Explorer
  • Show recommendations for tips, shortcuts, new apps, and more

The next option is the Folders category. Here, you can select which folders appear on the Start menu next to the Power button. You can choose any or all of the following folders: Settings, File Explorer, Documents, Downloads, Music, Pictures, Videos, Network, and Personal Folder.

Changing the Pinned apps on the Start menu

To add a program or folder to the Pinned apps area, locate the folder or program and right-click on it. From the context menu that appears, select Pin to Start.

To remove a program or folder from the Pinned apps area, right-click on it and select Unpin from Start.

To rearrange the Pinned apps, press and hold the left mouse button on the app you want to move and relocate it.

Changing the Recommended files

The only way to add a file to the Recommended area is to open a file with the associated program, then save it.

To remove a file from the Recommended area, right-click on it and select Remove from the list.

My Digital Toolbox 6

Every computer technician has at least one digital toolbox (I personally have over a dozen). Years ago, they used to be a stack of CDs/DVDs, but now they are USB flash and external drives. And the contents are constantly changing. So here is the latest version of My Digital Toolbox.

My Digital Toolbox 6

Rufus

Main screen inside of Rufus 

Many companies that develop operating systems will create ISO (International Organization for Standardization) image files of their OS for users to download and install. This worked out excellent a few years ago when most computers came with CD/DVD drives. But now, finding a computer with a CD/DVD drive is challenging. So how do you use an ISO image to install software? One way is to create a bootable USB drive. When creating bootable USB drives, nothing is easier than using Rufus. I have used many bootable drive creators over the years, and Rufus is the easiest way of doing it. Rufus can create bootable USB drives from the installation ISO files for most Windows and Linux versions.

Rufus: Create bootable USB drives the easy way

Paint.NET

Main screen inside of Paint dot NET

Paint.NET was initially meant to be a replacement for the Paint program inside Windows. But it has developed into a full-blown graphics program with features similar to Adobe Photoshop. Features include layers, history, plugins, special effects, and multiple file formats. The latest version of Paint.NET includes a graphics section for fine-tuning the hardware acceleration settings. Paint.NET is available from their website for free or from the Microsoft Store for a fee.

Paint.NET - Free Software for Digital Photo Editing

CrystalDiskInfo

Main screen inside of CrystalDiskInfo

Would you like to know if the drive in your computer was healthy? You sure would, but most software for diagnosing drives will only tell you when they start to fail. With CrystalDiskInfo, you can find out the exact state of your drive(s). CrystalDiskInfo uses the same information as those other analyzers but with more precise results. This way CrystalDiskInfo can predict an imminent drive failure before it happens. It runs on the current versions of Windows and Windows Server.

CrystalDiskInfo - Crystal Dew World

Free computer diagnostics

Repairing a PC can sometimes be expensive, and that is why we offer free basic in-shop diagnostics. Give one of our professional and experienced technicians a call at (602) 795-1111, and let's see what we can do for you.

Check out our reviews

Geeks In Phoenix LLC, BBB Business Review

Customer service is #1

Here at Geeks in Phoenix, we take pride in providing excellent customer service. We aim to give the highest quality of service  from computer repair, virus removal, and data recovery.

Bring your computer to us and save

Repairing a computer can be time-consuming. That is why we base our in-shop service on the time we work on your computer, not the time it takes for your computer to work! From running memory checking software to scanning for viruses, these are processes that can take some time.

Contact us

If you have any questions, please feel free to give us a call at (602) 795-1111  and talk with one of our Geeks. Or you can send us a message from our contact page contact page , and one of our Geeks will get back to you as soon as possible. Or you can stop by and see us. Here are our hours and location.

Like Geeks in Phoenix on Facebook

Follow Geeks in Phoenix on Twitter

Watch Geeks in Phoenix on YouTube