Geeks in Phoenix

Geek Blog


Everything you wanted to know about Windows 10 shortcuts

When it comes to using a Windows-based computer, accessing programs, folders, and files quickly is essential for productivity. This is where shortcuts come in handy. Let's take a closer look at the different types of shortcuts you can have on your Windows 10 computer.

Everything you wanted to know about Windows 10 shortcuts

Before we proceed any further, let's take a look at the history of shortcuts in Windows. All three types of shortcuts I will be discussing in this article were introduced in 1995 with the release of Windows 95.

Windows 95 had a new graphical user interface called Windows Explorer (now named File Explorer). When you hear File Explorer, you probably think of the file manager program you navigate to find your documents, pictures, and music. And you would be right.

But File Explorer is also responsible for displaying the Start Menu, Taskbar, and Desktop. All of the shortcuts I will be discussing are directly related to File Explorer.

Geek Tip: If you ever start Windows 10 and get to a black screen with just a white cursor arrow, that is a sign that File Explorer did not start. You can manually start File Explorer and here is how to do it.

How to fix the Windows 10 black screen with a white mouse cursor

The different types of Windows 10 shortcuts

Now, there are three (3) kinds of shortcuts in Windows 10;

  • File - which contains a link to a program, file, or folder.
  • Internet - which contains a link to a file or website on the Internet.
  • Keyboard - which is when you press two (2) or more keys on the keyboard simultaneously.

The first two types of shortcuts (File and Internet) are small files that contain a link to a specific file, folder, or website. You can spot one of these types of shortcuts by the curled arrow overlay in the lower left-hand corner of the shortcut's icon on the Desktop or File Explorer. Shortcuts on the Start Menu do not have the curled arrow.

The third type of shortcut (Keyboard) is when you use a combination of keys on your keyboard to start a program or action. Usually, these are applications or actions that you use frequently. You can even add keyboard shortcuts to File shortcuts on your Desktop.

File and Internet shortcuts

As I said before, File and Internet shortcuts are just files with different extensions. File shortcuts have a .lnk extension, Internet shortcuts use .url extensions.

File and Internet shortcuts on the Desktop, Taskbar, and the Tiles section of the Start menu are relatively easy to create. To learn how to create File and Internet shortcuts quickly, check out the following article.

How to create a shortcut in Windows 10

Creating shortcuts in the Start menu's application list can be challenging only because the location where Start menu shortcuts is hidden by default. But if you want to learn more on how to customize the Start menu, check out the following article.

How to customize the Start menu in Windows 10

Keyboard shortcuts

When it comes right down to it, Keyboard shortcuts are the fastest way to open various programs and settings in Windows 10. You do not have to go hunting for a Desktop icon or open the Start menu.

Just by pressing two or more keys simultaneously on your keyboard, you can bring up File Explorer or the Run dialog box. Using the Clipboard, you can also copy, cut or paste text or images too.

There are so many Keyboard shortcuts in Windows 10 that I cannot list them all here. So the following articles cover almost all Keyboard shortcuts there are.

Windows logo key shortcuts for Windows 10

General keyboard shortcuts

Accessibility keyboard shortcuts

Dialog box keyboard shortcuts

My favorite left hand Windows keyboard shortcuts

How to use all of the Clipboard features in Windows 10

Now the only Keyboard shortcut not covered in all of these articles are the ones you create yourself. Desktop shortcuts can also have Keyboard shortcuts associated with them too.

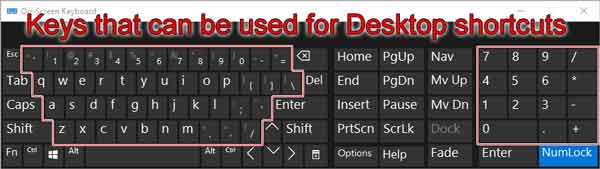
When it comes to shortcut keys in Desktop shortcuts, you have to remember that you can use a combination of keys and numbers on the keyboard or just numbers on the numeric keypad.

The Desktop keyboard shortcut keys use a combination of three (3) keys, with the first two keys having to be Ctrl + Alt. Desktop numeric keypad shortcut keys are a single digit.

  1. Right-click on the Desktop shortcut you want to modify and select Properties from the context menu that appears.
    The properties form of a Desktop shortcut
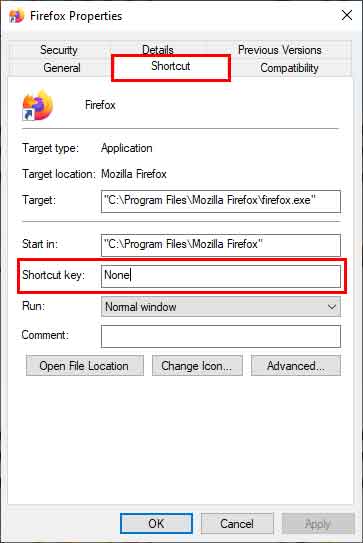
  2. Left-click on the Shortcut tab and left-click on the Shortcut key field.
    Keys that can be used for Desktop shortcuts
  3. Press the desired key you want to associate with the Desktop shortcut. Remember that any key you press on the keyboard will automatically add Ctrl + Alt to the key you pressed. Numeric keys have Num before the actual number key.

See the video below for more details.

How to fix the Windows 10 black screen with a white mouse cursor

Have you ever started Windows 10, and the only thing that appeared was a black screen with a white cursor? Here is how to get the Windows 10 Graphic User Interface (GUI) to appear.

How to fix the Windows 10 black screen with a white mouse cursor

Usually, when you log in to Windows 10, the Start menu, Taskbar, and the Desktop will appear with all of your favorite icons. But there may be a time when all that appears is a black screen with a white mouse cursor.

What has happened is the GUI has failed to load. And believe it or not, it is the File Explorer. But getting a GUI to appear is easy.

How to get the Graphic User Interface (GUI) to appear in Windows 10

  1. Press CTRL + ALT + DEL at the same time. This will bring up the Windows 10 lock screen.
    The Windows 10 lock screen
  2. On the Windows 10 lock screen, left-click on Task Manager.
    The Windows 10 Task Manager without running apps
  3. If when Task Manager appears, there is nothing showing but a message that says There are no running apps, left-click on the arrow next to More Details in the lower left-hand corner. Task Manager will now show all details.
    The Windows 10 Task Manager with running apps
  4. In the upper left-hand corner of Task Manager, left-click on File, then Run new task.
    The Windows 10 Task Manager Create new task dialog box
  5. In the Create new task form that appears, type in Explorer and left-click on OK.
  6. The Desktop, Start menu, and Taskbar will now appear.

Create, extract and edit archive files with 7-Zip

For decades now, we have been compressing files and folders to make them smaller to attach to an e-mail or archive. I have used many archiving programs over the years, but the best one I have found is 7-Zip.

The 7-Zip File Manager

7-Zip is one of the most straightforward archiving programs I have ever used. It can work with a ton of different file types and has a high compression rate.

7-Zip can create several different archive files, including ZIP, TAR, and of course, 7z. And it can also open over thirty (30) other archive formats, including CAB, DMG, ISO, and RAR.

The 7-Zip File Manager is straightforward to use and has a ton of features. Besides being able to create and open archive files, it can also edit them, including splitting and combining archive files.

But the best feature is the right-click context menu. You can right-click on some files or folders and quickly create an archive file from them (7z or ZIP).

The 7-Zip right-click context menu

Or you can right-click on an archive file and quickly open, extract or test it. And the cool thing is you can edit the functions that the right-click menu can perform.

7-Zip is an open-source program that began over twenty years (20) ago and is still going strong. It has been translated into over ten (10) different languages, including French, Spanish, and German.

7-Zip is available in either 32 or 64-bit versions and can run on all Windows versions from Windows XP and up. And it is free to use for either personal or commercial use.

For more information on 7-Zip, follow the link below.

7-Zip

Easily create, edit, and burn CD, DVD, and BD disks with AnyBurn

Are you looking for a program that can create, edit and burn Compact Disk (CD), Digital Video Disc (DVD), and Blu-ray (BD) disks? One that has a simple to use interface but has a ton of features? If so, then look no further than AnyBurn by Power Software.

The main screen inside of AnyBurn

Now I have been working with different disk formats for over twenty (20) years and have never found a more straightforward program than AnyBurn. Its simple user interface so easy to navigate that it is hard to go back to some of the disk programs I have used in the past.

With AnyBurn, you can create, edit, and burn various types of disk formats, including data and audio. It can even erase rewritable disks too. If it has to do with CDs, DVDs, or BDs, AnyBurn can handle it. AnyBurn can work with over 25 image file formats. Some of the formats include DMG, ISO, IMG, and VCD formats.

The settings screen inside of AnyBurn

There are a couple of cool features that make AnyBurn stand out. The first one is to create a bootable USB drive from image files. With more computers not having optical drives, making a bootable USB drive from an image file, like an ISO, is essential.

The second outstanding feature is being able to rip music from audio CDs and burn audio CDs from your existing music library. If your car stereo has a CD drive, this can be a fantastic feature.

AnyBurn runs on several different Windows versions, from Windows XP to Windows 10, and is available in both 32 and 64-bit versions. There is even a portable version that requires no installation. Just extract the files to a folder, and you are ready to go. It is great for having on a flash drive.

Now the best thing about AnyBurn is that it is free to use for personal or business use. For more information on AnyBurn, follow the link below.

AnyBurn

What file system should you use for your external drive?

With the three top operating systems, it is hard to know exactly what file system your operating system will work with. One file system may be fully compatible (read and write) with your OS, while another may not be compatible at all. So here is a list of the various file systems and what operating systems they work with.

What file system should you use for your external drive?

Windows operating system

  • FAT (File Allocation Table) (FAT12, FAT16, FAT32) - FAT was initially developed for floppy disks and was soon adapted to hard drives and other devices. With the limited file size (4GB for FAT32) and limited volume size (32TB for FAT32), and the ever-increasing size of drives, FAT is now used only for smaller USB drives.
  • exFAT (Extensible File Allocation Table) - exFAT was designed as a replacement for FAT and optimized for USB flash drives and SD cards.
  • NTFS (NT File System) - Microsoft introduced NTFS in Windows NT 3.1, and is now the default file system for Windows.
  • ReFS (Resilient File System) - ReFS was created to overcome some of the problems NTFS had with data storage. It appeared in Windows Server 2012, and support for it has been removed from Windows 10.

MAC operating system

  • HFS (Hierarchical File System) - HFS was the original file system for the Mac OS. Over the years, support for HFS has been cut back to read-only in newer Mac OS versions. Starting with Mac OS 10.15, support for HFS was removed.
  • HFS+ (Hierarchical File System Extended) - HFS+ was the replacement for the HFS file system as it supported larger file sizes. HFS+ is still supported in the Mac OS but is no longer the default file system.
  • APFS (Apple File System) - APFS is now the default file system for Mac OS, iOS, and iPadOS.

Linux operating system

  • EXT (Extended File System) - EXT was the first file system designed specifically for Linux. EXT had a file system limit of 2GB and was soon replaced.
  • EXT2 (Second Extended File System) - EXT2 replaced EXT as the default file system for Linux in the mid-'90s. Many versions of Linux still use EXT2 for the file system for USB flash drives.
  • EXT3 (Third Extended File System) - EXT3 replaced EXT2 as the default file system for Linux in the early '00s. One of the main advantages of EXT3 is its compatibility (forward and backward) with EXT2.
  • EXT4 (Fourth Extended File System) - EXT4 replaced EXT3 as the default file system for Linux in the late '00s. There are several advantages to EXT4, including larger volume and file sizes and backward compatibility with EXT2 and EXT3.

Compatibly Index

File System Operating System
FAT Windows (1) Linux (1) Mac OS (1)
exFAT Windows (1) Linux (3) Mac OS (1)
NTFS Windows (1) Linux (3) Mac OS (2)
ReFS Windows (3) Linux (3) Mac OS (3)
HFS Windows (3) Linux (3) Mac OS (3)
HFS+ Windows (3) Linux (3) Mac OS (1)
APFS Windows (3) Linux (3) Mac OS (1)
EXT Windows (3) Linux (3) Mac OS (3)
EXT2 Windows (3) Linux (1) Mac OS (3)
EXT3 Windows (3) Linux (1) Mac OS (3)
EXT4 Windows (3) Linux (1) Mac OS (3)
1. Full read and write compatibility by default.
2. Read only compatibility by default.
3. No compatibility by default.

Note: There is third-party software that can give full read and write access to file systems that are not compatible with an operating system by default.

Conclusion

So if you are looking for a file system for your external drive compatible with Windows, Linux, and Mac OS, look no further than FAT32. It has survived the test of time and is the only file system that can be used without additional software on all three operating systems.

Free computer diagnostics

Repairing a PC can sometimes be expensive, and that is why we offer free basic in-shop diagnostics. Give one of our professional and experienced technicians a call at (602) 795-1111, and let's see what we can do for you.

Check out our reviews

Geeks In Phoenix LLC, BBB Business Review

Customer service is #1

Here at Geeks in Phoenix, we take pride in providing excellent customer service. We aim to give the highest quality of service  from computer repair, virus removal, and data recovery.

Bring your computer to us and save

Repairing a computer can be time-consuming. That is why we base our in-shop service on the time we work on your computer, not the time it takes for your computer to work! From running memory checking software to scanning for viruses, these are processes that can take some time.

Contact us

If you have any questions, please feel free to give us a call at (602) 795-1111  and talk with one of our Geeks. Or you can send us a message from our contact page contact page , and one of our Geeks will get back to you as soon as possible. Or you can stop by and see us. Here are our hours and location.

Like Geeks in Phoenix on Facebook

Follow Geeks in Phoenix on Twitter

Watch Geeks in Phoenix on YouTube