Geeks in Phoenix

Geek Blog


Things to do before and after upgrading your computer to Windows 11

Are you planning on upgrading from Windows 10 to Windows 11? Before you do, there are a few things you should do to ensure a smooth transition. In this article, we'll look at a few things to do before and after upgrading your computer to Windows 11.
Things to do before and after upgrading your computer to Windows 11

Before upgrading to Windows 11

Check hardware compatibility

This is the first thing you need to do. Windows Update will typically prompt you to upgrade Windows 10 to Windows 11 if it sees that your computer has a Trusted Platform Module (TPM) version 2.0 enabled. This is the only hardware requirement that has changed between Windows 10 and Windows 11.

If your computer was built after 2018, it more than likely has a TPM 2.0 component. The problem is that manufacturers disabled the TPM prior to the release of Windows 11, as they felt it was not required for Windows 10, so why have it enabled by default?

So, computers built between 2018 and 2021 have a TPM 2.0 component included but not enabled. To enable the TPM 2.0 component, you will need to turn it on inside your system's BIOS (Basic Input/Output System). A quick check inside Windows 10 will tell you if the TPM component is enabled and what version it is.

Using a Run dialog box (Windows logo key Windows logo+ R) or Search box (Windows logo key Windows logo + S), you can check the status of the TPM component inside your system. Just type TPM.MSC into a Run dialog box and select OK, or type TPM.MSC into a Search box and choose tpm.msc Microsoft Common Console Document.
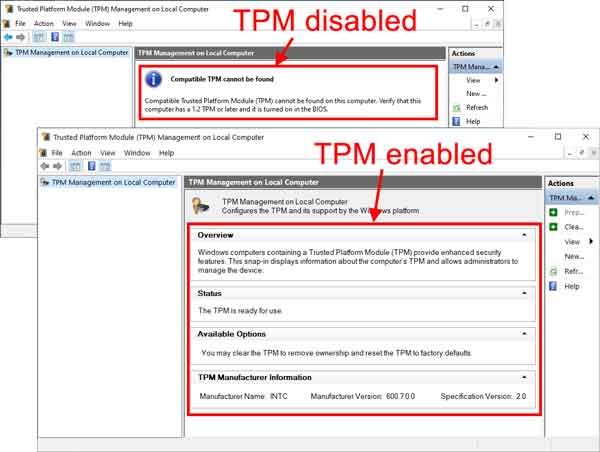
TPM status inside of Windows 10

When the TPM Management console opens, it should display the TPM's status and version. If you get a message stating that a compatible TPM cannot be found and your computer was manufactured between 2018 and 2021, you should check the website of the manufacturer of your computer/motherboard for a user manual to find instructions on how to enable the TPM.

Geek tip: If you ever have to replace the CMOS battery in your computer, the BIOS can reset itself to factory defaults. If the factory defaults had the TPM turned off, then things like Bitlocker drive encryption will not work correctly.

Check your drive for errors

You should definitely check the drive that has Windows installed on it for errors. You want to make sure the folders and files contained on it aren't damaged. There is nothing worse than getting halfway through the upgrade process only to get an error that causes the upgrade to fail.

How to run a standard disk check in Windows 10

  1. Open File Explorer using one of the following:
    • Left-click on the File Explorer icon (manilla folder) on the Taskbar.
    • Press the Windows logo key Windows logo + E at the same time.
    • Use the Power User menu by right-clicking on the Start Windows logo button and selecting File Explorer.
  2. In the left-side column, left-click on This PC.
  3. In the right-side column, right-click on the drive you want to check and select Properties.
  4. Left-click on the Tools tab.
  5. Under Error checking, left-click on Check.
  6. Left-click on Scan drive.

If you want to run an advanced disk check, follow the link below.

How to check your drive for errors in Windows 10

Backup your computer

As the old saying goes, "It's always better to be safe than sorry," and this couldn't be more true when it comes to your computer. Having a good 'bare metal' backup is essential when it comes to an operating system upgrade.

Yes, 99.99% of the time, nothing goes wrong with an in-place upgrade, but there is always the possibility. A full backup will definitely bring a greater degree of safety to the whole upgrade process.

Backup your files with File History and Windows Backup in Windows 10

If you decide to do a full 'bare metal' backup, you will definitely want to create a recovery drive just in case.

How to create a recovery drive in Windows 10 and Windows 11

Clean up the junk

Whether or not you upgrade your operating system, giving it a good cleaning can do wonders for your computer's performance, not to mention making the upgrade process a little bit simpler.

Removing temporary folders and files, emptying the recycle bin, and clearing out your downloads folder are just a few ways to prepare your computer before upgrading to Windows 11. Windows 10 has two (2) different programs built in to help with cleaning out junk.

Clean up your Windows 10 computer using the Storage feature

Clean up Windows 10 with Disk Cleanup

Uninstall unnecessary programs/apps

Over time, you may have installed programs that you no longer use. Before upgrading to Windows 11, it's a good idea to uninstall any unnecessary programs to free up space on your computer. This can also speed up the upgrade process and ensure Windows 11 runs smoothly.

How to uninstall a program or app in Windows 10

  1. Left-click on the Start Windows logo menu and left-click on the Gear (Settings) icon. It should be the second icon up from the bottom.
  2. Left-click on the Apps category.
  3. In the right-hand column, you will find a list of installed programs (App & features).
  4. Scroll down the list of apps and left-click any program you would like to remove, and select Uninstall.

Uninstall or disable your anti-virus

If you are using any anti-virus program other than Microsoft Windows Defender, you should disable or remove it before upgrading to Windows 11. I have seen anti-virus programs slow down an upgrade and even cause it to fail.

You can save yourself a headache or two by at least disabling your anti-virus software. Although uninstalling is the best option, disabling should work just as well.

Upgrade to Windows 11

So, if you haven't yet been prompted to upgrade to Windows 11 through Windows Update and your computer has a TPM 2.0 component enabled, you can manually upgrade your computer using the Windows 11 Installation Assistant. Just download it and run it.

Windows 11 Installation Assistant

After upgrading to Windows 11

Now that you have a new operating system, you will want to ensure you have all of the latest and greatest drivers for the components inside your computer. First, you should check for driver updates on the website of your computer or motherboard manufacturer. After that, if you have a dedicated graphics card, you should look for updated drivers for it. This will help ensure that your computer runs Windows 11 smoothly and efficiently.

What you can do if you do not want to use OneDrive

Cloud-based storage is fantastic. You can access your data from any location. But what if you do not want your personal data stored on the cloud? What if you just want all of your personal data stored on your local computer only? If that is the case, here is what you can do if you do not want to use Microsoft OneDrive.

What you can do if you do not want to use OneDrive

Microsoft OneDrive is an excellent cloud-based storage solution and can be extremely valuable for backing up data. However, the problem I see with my customers is that most novice Windows users don't know what it is or how they ended up using it.

The explanation is simple: When you create a new user in Windows, whether it is when you first start your new computer or add a user, Windows prompts you to log in with a Microsoft account. When that new user logs in, OneDrive is automatically enabled by default.

There are several different ways to get rid of OneDrive from your computer. You can disable it, unlink it from your computer, or completely uninstall it. But when all is said and done, you may have to manually restore your user shell folders to their original locations (more on that later).

How to unlink OneDrive from your user account

  1. Right-click the OneDrive icon OneDrive iconin the system tray (located at the bottom right corner of the screen).
  2. Select Settings from the context menu that appears.
  3. In the Microsoft OneDrive dialog box, go to the Account tab.
  4. Left-click on the Unlink this PC shortcut.
  5. A warning message appears telling you that locally stored files will remain in place while online versions will be deleted. Left-click on the Unlink account button.
  6. The Set up OneDrive dialog box should appear. Left-click the X in the upper right-hand corner to close the dialog box.

Now that OneDrive is no longer syncing your data, you can either disable OneDrive from starting or uninstall it. However, you might notice that some of your user shell folders (Desktop, Documents, and Pictures) were not returned to their original locations. We will take a look at those later in this article.

How to disable OneDrive in Windows

  1. Right-click on the Start Windows logo key button to bring up the Power User menu.
  2. Left-click on Task Manager.

or

  1. Press CTRL + ALT + DEL all at the same time.
  2. From the security screen that appears, left-click on Task Manager.

or

  1. Right-click on an empty area of the Taskbar.
  2. On the context menu that appears, left-click on Task Manager.

Sometimes, the first time you run Task Manager, it will only display running apps. You have to left-click the More details arrow to view all the tabs. The location of the tabs varies from Windows 10 (across the top) to Windows 11 (down the left side).

Once the tabs are displayed, left-click on Startup (Windows 10) or Startup apps (Windows 11). From here, all you have to do is highlight OneDrive and select the Enable / Disable button. Restart your computer so the changes take effect.

How to uninstall Microsoft OneDrive

There are two (2) ways to uninstall OneDrive: the Settings app or the Control Panel.

How to uninstall Microsoft OneDrive using the Settings app

Windows 11

  1. Left-clicking on the Start button Windows logo to bring up the Start menu.
  2. In the list of pinned apps on the Start menu, left-click on Settings.
  3. In the left-hand column, left-click on Apps.
  4. In the right-hand column, left-click on Installed apps.
  5. The right-hand column displays a list of all the installed apps. Find Microsoft OneDrive, left-click on the three (3) horizontal dots (...) on the right, and select Uninstall.

Windows 10

  1. Left-click on the Start Windows logo menu and select Settings (the gear icon).
  2. Left-click on Apps.
  3. In the right-hand column, Apps and features will be displayed. Left-click on Microsoft OneDrive and select Uninstall.

How to uninstall Microsoft OneDrive using the Control Panel

Windows 11

  1. Left-click on the Start Windows logo key button to bring up the Start menu.
  2. In the upper right-hand corner of the Start menu, left-click on All apps.
  3. Scroll down the list of programs and left-click on Windows Tools.
  4. Double left-click on the Control Panel.

Windows 10

  1. Left-click on the Start Windows logo button to bring up the Start menu.
  2. Scroll down the list of programs until you get to Windows System, and then left-click on it to expand it.
  3. Left-click on Control Panel.

By default, the Control Panel opens up in the category view but can be changed to large or small icons. A pull-down menu in the top-right corner labeled View by: allows you to change the view.

  • If viewing the Control Panel by Category, left-click on Uninstall a program under Programs.
  • If viewing by Large/Small Icons, left-click Programs and Features.

A list of all the programs installed will appear. Left-click on Microsoft OneDrive and select the Uninstall button at the top of the list of programs.

How to restore the location of your user shell folders back to default

Now that you have either disabled, unlinked, or uninstalled OneDrive, you must check and see where your user shell folders are located. By default, OneDrive moves your Desktop, Documents, and Pictures folders to a folder under your user profile (C:\Users\YourUserName\OneDrive).

The easiest way to check is to open File Explorer by left-clicking the manilla folder icon on the Taskbar or pressing the Windows logo key Windows logo key + E. Right-click on any of the Quick access links and left-click on Properties from the context menu that appears. Left-click on the Location tab and check where that folder is located.

If it points to the OneDrive folder inside your user profile (C:\Users\YourUserName\OneDrive), you have two choices: You can leave them right where they are or change them back to default.

Location tab on the properties of a Desktop special folder

While checking the properties of your user shell folders, you can also restore them to their default location(s). Just left-click the Restore Default button in the lower left-hand corner of the folder properties.

You may get a dialog box pop-up that tells you that the folder you are trying to move does not exist in the new location and asks if you want to create it. Just left-click on Yes and proceed to restore the folder its original location.

At this point your user shell folders should be back in their original default location(s). But if you encounter an error when trying to restore your user shell folders, something similar to Can't move the folder because there is a folder in the same location that can't be redirected. Access is denied. then you will need to modify the Registry.

The truth about user shell folders is that they are just entries in the Registry and can be modified using the Registry Editor. But remember that editing the registry incorrectly can cause your computer to not operate correctly and possibly not even boot up, so be very careful when editing the registry.

If you do not feel comfortable editing the registry, don't hesitate to contact a local computer repair shop, like Geeks in Phoenix, for assistance. The first thing you need to do is open the Registry Editor.

Remember that changing the location of user shell folders in the registry does not actually move your files back to that location. You will have to manually move them from the OneDrive folder to the location you specify in the registry.

How to restore the location of your user shell folders using the Registry Editor

  1. Bring up the Run dialog box by either:
    Pressing the Windows logo key Windows logo key + R
    or
    Right-click on the Windows logo Windows logo key on the Start Menu or press the Windows logo key Windows logo key + X and then select Run
  2. In the Run dialog box that appears, type regedit and select OK. If you're prompted for an administrator password or confirmation, type the password or provide confirmation.

Once you open the Registry Editor, let's backup the registry first.

  1. With the Registry Editor open, highlight Computer in the left-hand column to backup the complete registry.
  2. Left-click on the File pull-down menu and left-click on Export.
  3. Select the location and a descriptive file name for the backup file, then left-click on Save.

Now, let's change the location of your user shell folders in the Registry.

  1. Verify that the folders you want to redirect to (Desktop, Documents, Pictures, etc.) currently exist inside your user profile folder (C:\Users\YourUserName). If they do not, then you will need to create them before proceeding.
  2. With the Registry Editor open, navigate to the following key:
    HKEY_CURRENT_USER\Software\Microsoft\Windows\CurrentVersion\Explorer\User Shell Folders
    The Registry Editor open to the user shell folders registry keys
  3. In the right-hand column, right-click on the Name of the value you want to change and select Modify... from the context menu.
  4. Enter either the default value for that folder from the table below or the path to the actual folder (C:\Users\YourUserName\Documents). Make sure the actual folder exists before changing the folder key.
  5. Log off or restart your computer for the registry change(s) to take effect.

Default user shell folder registry values

Registry key name Folder Data (default value)
{374DE290-123F-4565-9164-39C4925E467B} Downloads %USERPROFILE%\Downloads
Desktop Desktop %USERPROFILE%\Desktop
Favorites Favorites %USERPROFILE%\Favorites
My Music Music %USERPROFILE%\Music
My Pictures Pictures %USERPROFILE%\Pictures
My Video Videos %USERPROFILE%\Videos
Personal Documents %USERPROFILE%\Documents

The ultimate guide for building your custom computer

Nothing is more fun for me than planning, purchasing, and assembling all of the components for a custom-built system. I guess that's why I like repairing computers. But most people do not know where to start when it comes to putting together a custom-built computer. So here is the ultimate guide for building your own custom computer.

The ultimate guide for building your custom computer

I have been building and repairing computers since the late '90s and have assembled hundreds of systems. What got me started building custom computers was the fact that I could not upgrade the graphic processor inside the Packard-Bell system I had.

Long story short, I contacted the manufacturer of the graphics processor installed on the motherboard and was told that Packard-Bell had ordered the graphic chip with one of the pins disabled. That way, I would have to go back to Packard-Bell to get an upgraded chip.

I decided to build a computer instead and have been running custom-built computers ever since. In fact, I just recently recycled one of my very first AT cases (it had six (6) 5.25" bays and was over three (3) feet tall). So, without further ado, let's start planning, purchasing, and assembling your custom-built computer.

Note: All links included in this article will open in a separate window.

Planning your computer

If you need to become more familiar with the technical jargon surrounding computer components, this is where you want to start. Understanding the jargon used with computer components is essential to the success of your custom computer build. Let's take a look at the vocabulary surrounding building a custom computer.

Defining confusing computer hardware verbiage

It's an age-old problem: Form vs. function. Do you want a sleek-looking computer that takes up a small amount of space or one that can handle multiple graphic cards and run games with intensive graphics? Let's take a look at some of the things you might want to consider when planning out our custom-built computer,

Things to keep in mind when building a custom-built computer

Sometimes, the simplest things can become problems. For example, using plastic-coated wire twist ties instead of plastic zip ties for cable management or installing case fans with the incorrect air flow direction. These common mistakes can cause problems down the road. Let's take care of them right here and now.

Common problems to avoid when building your own computer

Your computer case is a reflection of you and your style. You can get one with a ton of glass and lights or one that is basic with no bells and whistles. It's entirely up to you. Let's look at some of your options when selecting a computer case.

Tips for choosing the perfect case for your computer

The motherboard is likely the most important component you will choose. With so many options, like the different types of I/O connectors and the number and type of PCIe expansion slots, choosing a motherboard can be daunting. So, let's take a closer look at finding the right motherboard.

Tips for choosing the right motherboard for your custom-built computer

When someone is planning on building a computer for gaming, this is usually the first component they look at. Whether you plan on surfing the web and watching cat videos or are planning a multi-monitor gaming rig, the graphics card you choose is important. So, let's take a deeper dive into graphics cards.

Tips for choosing the right graphics card for your custom-built computer

Keeping your CPU cool is a major priority, as is selecting the right CPU cooler. Should you go with an air-cooled heatsink or a liquid pump and radiator type? Are you planning on overclocking your CPU? Let's examine the options for choosing a CPU cooler.

Tips for choosing the right CPU cooler for your custom-built computer

By now, you should have a good idea of what components you will use to build your computer, so it is time to decide on a power supply. With your choice of case, motherboard, and graphic card(s), you should be able to determine the best power supply for your computer. Let's look at how to determine how much power your computer will require.

How to estimate the power required for your custom-built computer

Purchasing the components

You should now have a list of parts you want to use to build your computer. The trick is to make sure that all of them are compatible. Since you will probably be ordering most, if not all, of the components online, why not check their compatibility online, too? Let's look at some online resources for selecting and purchasing computer components.

How to find compatible computer parts online

Assembling your computer

At this point, you should have all the parts needed to assemble your computer. The following article describes how I typically build a computer. It is long but has plenty of images to guide you through your computer build.

How to build a computer

Tips for boosting productivity in Windows 11

Are you looking to boost your productivity on Windows 11? With its sleek design and improved functionality, Windows 11 offers a variety of features and tools that can help you work more efficiently. In this article, we'll explore some tips and tricks to help you get the most out of your Windows 11 experience while improving your productivity.

Tips for boosting productivity in Windows 11

Start menu: The Start menu is Windows 11's central hub, and customizing it can help you access your most-used apps and files quickly. You can rearrange, resize, and pin tiles to the Start menu to create a personalized layout that suits your workflow. This can save you time and improve your efficiency by reducing the time spent searching for apps and files.

How to personalize the Start menu in Windows 11

Virtual desktops: One of the most useful features of Windows 11 is the ability to create and manage virtual desktops. This feature allows you to create multiple desktops for different tasks and switch between them easily. For example, you can have one desktop for work-related tasks and another for personal use.

This feature can help you stay focused and organized, reducing distractions and boosting productivity. Additionally, you can set a unique background for each desktop to quickly identify your current desktop.

How to create multiple desktops in Windows 11

  1. Left-click on the Task view icon Task view icon on the Taskbar on the Taskbar and select New desktop
  2. Open the programs you want to use on that desktop
  3. Left-click on the Task view icon Task view icon on the Taskbar again to switch between desktops

How to set the background for a desktop

  1. Right-click on the desktop you want to change and select Choose background
  2. Choose an image from the recent images or left-click on Browse photos to select an image

Keyboard shortcuts: Keyboard shortcuts are a quick and easy way to perform tasks in Windows 11 without having to navigate through menus and options. Learning a few essential keyboard shortcuts can save you time and boost your productivity. For example, press the Windows logo key Windows logo + D to minimize all windows and go to the desktop, or press the Windows logo key Windows logo + E to open File Explorer.

Windows logo key shortcuts for Windows 11

My favorite left-hand Windows keyboard shortcuts

You can create keyboard shortcuts for items on your Desktop.

Everything you wanted to know about Windows shortcuts

You can also create custom keyboard shortcuts using the Keyboard Manager app inside the free Microsoft PowerToys.

Free Microsoft PowerToys for Windows 10 and Windows 11

Focus assist: Focus assist is a feature that blocks notifications and alerts while you're working on a task, reducing distractions and helping you stay focused. You can customize Focus assist settings to allow specific notifications or set it to turn on automatically during specific times or when you're presenting. This can help improve your productivity by reducing interruptions and allowing you to focus on the task at hand.

When you enable Focus assist, a timer will appear on the screen, the do not disturb button will turn on, apps in the Taskbar will not flash to get your attention, and badge notifications in the Taskbar will be turned off. There are several ways to start Focus assist in Windows 11.

How to start Focus assist from the Notiification center

  1. Left-click on the Notification icon Notification icon on the Windows 11 Taskbar(bell) on the right end of the Taskbar
  2. Adjust the length of time if you like, and then left-click on the Focus button.

How to start Focus assist from Settings

  1. Left-click on the Start button Windows logo to bring up the Start menu.
  2. In the list of pinned apps on the Start menu, left-click on Settings.
  3. Left-click on the System category in the left-hand column.
  4. Scroll down the right-hand column and left-click on Focus.

How to start Focus assist from the Clock app

  1. Left-click on the Start button Windows logo to bring up the Start menu.
  2. In the upper right-hand corner of the Start menu, left-click on All apps.
  3. Scroll down the list of programs and left-click on Clock.

Snap layouts and Snap groups: Windows 11 includes a new feature called Snap layouts and Snap groups that makes it easier to organize and manage multiple windows on your screen. Snap layouts allow you to quickly arrange your windows in predefined layouts, while Snap groups let you save and restore groups of windows for specific tasks. This can help you work more efficiently by reducing the time spent resizing and rearranging windows.

How to open Snap layouts

To open the Snap layout box, select the open program window and do either:

  • Press the Windows logo key Windows logo + Z
    or
  • Hover your mouse cursor over the Minimize or Maximize button

When you Snap every space with selected windows, this then becomes a Snap group.

Taskbar: The Taskbar in Windows 11 is more customizable than ever. It lets you pin your most-used apps and files for quick access and show only the apps you need, reducing clutter and improving productivity.

You can also easily add an existing shortcut to the Taskbar by right-clicking on almost any shortcut on the Start menu or Desktop and selecting Pin to taskbar. Additionally, you can use the Taskbar to access the Start menu, search, and virtual desktops, making it a central hub for your workflow.

Widgets: Windows 11 includes a new Widgets feature that provides quick access to news, weather, and other information. You can customize the Widgets to show only the information you need, making them useful tools for staying up-to-date on the latest news and events. This can help improve your productivity by reducing the time spent searching for information.

In conclusion, there are many ways to improve productivity on Windows 11. By using virtual desktops, customizing your Start menu, using keyboard shortcuts, enabling Focus assist, using Snap layouts and Snap groups, utilizing the Taskbar, and using the Widgets feature, you can work more efficiently and get more done in less time. By implementing these tips and tricks, you'll be well on your way to becoming a Windows 11 power user.

Tips for choosing the right CPU cooler for your custom-built computer

Are you looking for ways to keep your computer running smoothly and prevent overheating? The CPU (Central Processing Unit) cooler is a critical component that plays a significant role in keeping your computer cool. Choosing the right cooler that meets your needs and keeps your system from overheating is essential. In this article, we'll explore some tips for selecting the right CPU cooler for your custom-built computer.

Tips for choosing the right CPU cooler for your custom-built computer

Shopping for a CPU cooler can be a daunting task due to the overwhelming number of options available. To choose the right CPU cooler, you will need to take into consideration the type of CPU, available space, noise level, and whether you prefer an air or liquid cooler. Aesthetics may also play a role in your decision. Let's look at some of the things you must consider when choosing the right CPU cooler.

Compatibility and size: The first thing to consider in choosing the right CPU cooler for your custom-built computer is compatibility. Most CPU coolers will fit the majority of motherboards on the market, but if the CPU is relatively new, the coolers that support it may be limited.

The second thing you need to consider is the size of the CPU cooler. With CPU coolers, you must look at the space required for the heatsink (air) or radiator (liquid). For air coolers, is there enough room between the CPU on the motherboard and the side panel on the case? For liquid coolers, is there enough room in the case for a radiator and fan assembly?

Air or liquid: When it comes to CPU cooling, there are two (2) primary options: air or liquid cooling. Air coolers use fans to circulate air over a heatsink, while liquid coolers use a closed-loop system to circulate coolant over the CPU and through the radiator. While both options can provide excellent cooling performance, liquid cooling is typically more efficient and quieter than air cooling.

A manufacturers stock air CPU cooler

Now, some CPUs will come with a standard air cooler included. These work perfectly fine for surfing the web or checking email, but if you plan on putting the CPU under a heavy load, an air cooler with a larger heatsink or liquid cooler might be the best bet.

A performance air CPU cooler

Many years ago, Intel used to have different warranty periods for CPUs that came with and without their cooler (3 years with / 1 year without), so checking the warranty coverage is recommended. Also, remember that liquid cooling can be more expensive and challenging to install, so it's essential to weigh the pros and cons before making a decision.

With liquid cooling, there are two (2) types of systems: All-In-One (AIO) or a custom loop. AIOs are sealed and are not serviceable.
A all-in-one liquid CPU cooler
Custom loops are open and can be serviced.
A custom loop liquid CPU cooler
AIOs are easier to install but can not have any of the parts repaired or coolant replaced. Custom loops can be repaired, and coolant can be replaced, but use hard acrylic lines that must be cut and bent to the specific application.

Noise levels: The noise level is another critical factor to consider when choosing a CPU cooler. Some coolers can be loud, especially if you over-clock your CPU, which can be distracting and annoying when trying to work or play games. If you're looking for a quieter option, consider a liquid cooler or a low-noise air cooler. Be sure to check the specifications and reviews to get an idea of how loud a particular cooler is before making a purchase.

Remember that an air cooler with a large heatsink and multiple fans or a liquid cooler with a large radiator and multiple fans will cool much better than the manufacturer cooler. But with more fans comes more noise, so check the specifications of any cooler you are looking to purchase.

Cooling performance: One of the most important factors to consider when choosing a CPU cooler is the cooling performance. The cooler's ability to dissipate heat from the CPU significantly affects the overall system temperature. A high-performance cooler will keep your CPU running at optimal temperatures, which can improve system stability and prevent damage to your components.

Be sure to look for coolers with a high thermal efficiency rating and a high airflow rate for maximum cooling performance. Remember that with a large surface area, like with a large heatsink or radiator, you will get better cooling performance. And with plenty of airflow, your CPU will keep its cool even when throttled to the max.

Your budget: Finally, it's essential to consider your budget when choosing a CPU cooler. CPU coolers can range in price from as little as $20 to as much as $200 or more. While more expensive coolers may provide better cooling performance, they may not be necessary for your system. Be sure to weigh the features and benefits of each cooler against its price to find the best option for your needs and budget.

In conclusion, choosing the right CPU cooler for your computer is critical to keeping your system running smoothly and preventing overheating. By considering factors such as compatibility and size, air or liquid cooling, noise levels, cooling performance, and budget, you can find the perfect cooler to meet your needs and keep your computer cool. Be sure to do your research, read reviews, and compare options to make an informed decision and keep your computer running at its best.

Free computer diagnostics

Repairing a PC can sometimes be expensive, and that is why we offer free basic in-shop diagnostics. Give one of our professional and experienced technicians a call at (602) 795-1111, and let's see what we can do for you.

Check out our reviews

Geeks In Phoenix LLC, BBB Business Review

Customer service is #1

Here at Geeks in Phoenix, we take pride in providing excellent customer service. We aim to give the highest quality of service  from computer repair, virus removal, and data recovery.

Bring your computer to us and save

Repairing a computer can be time-consuming. That is why we base our in-shop service on the time we work on your computer, not the time it takes for your computer to work! From running memory checking software to scanning for viruses, these are processes that can take some time.

Contact us

If you have any questions, please feel free to give us a call at (602) 795-1111  and talk with one of our Geeks. Or you can send us a message from our contact page contact page , and one of our Geeks will get back to you as soon as possible. Or you can stop by and see us. Here are our hours and location.

Like Geeks in Phoenix on Facebook

Follow Geeks in Phoenix on Twitter

Watch Geeks in Phoenix on YouTube