Like a lot of people, I use Microsoft Outlook as a PIM (Personal Information Manager). And being in the computer repair industry, I need to keep all of my data (contacts, calendar, etc.) synchronized and up to date on both my PC and smartphone. I found I can do all of this quite easily with CompanionLink.
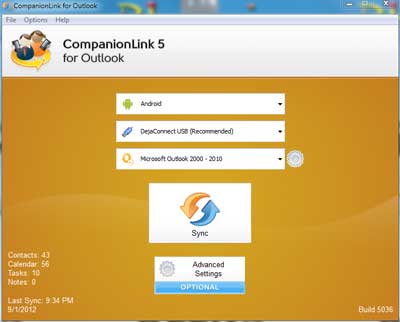
CompanionLink 5 for Outlook setup screen
I wrote an article a while back about syncing Outlook with my Android phone using CompanionLink on my PC and DejaOffice on my Android. It works because you install CompanionLink on your PC or Mac and install DejaOffice on your Android, iPhone / iPad, Blackberry, etc. You then define what database (Outlook, ATC!, etc.) and what fields (contacts, calendar, etc.) you want to sync.
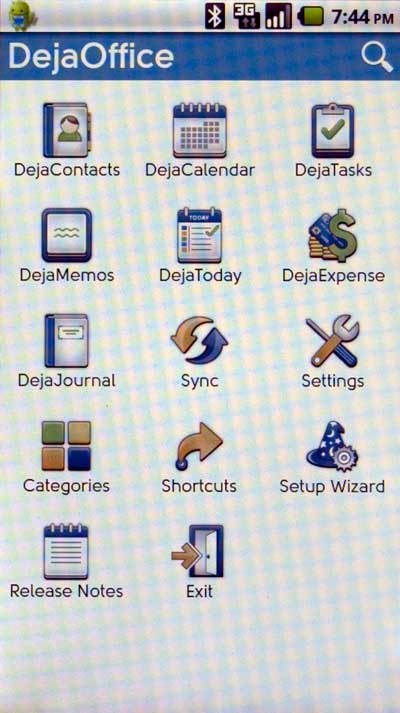
DejaOffice 2.2 main screen
Recently they released a new version of both CompanionLink (V5) and DejaOffice (V2.2) with more capabilities and features. They have multiple versions for different applications (I use CompanionLink for Outlook). Here's a quote from their website on the products they offer:
Our products work with Android, iPhone, iPad, BlackBerry, HP webOS, Palm OS, and Windows devices. We also sync with Google, Gmail, Google Apps, and Windows Live (Hotmail) accounts
CompanionLink for Outlook
Sync Microsoft Outlook with Android, iPhone, iPad, BlackBerry, Windows Phone, or any Google/Gmail account. Supports two-way sync of contacts, calendar, tasks and notes.
CompanionLink for Palm Desktop
Sync Palm Desktop or Pimlical with smartphones, tablets, or any Google/Gmail account. Supports two-way sync of contacts, calendar, tasks and memos.
CompanionLink Express
Sync ACT!, Lotus Notes, HighRise, or GroupWise with smartphones, tablets, or any Google/Gmail account. Supports two-way sync of contacts, calendar, tasks and notes.
CompanionLink Professional
Sync Salesforce CRM, Goldmine, or any other supported database with smartphones, tablets, or any Google/Gmail account. Includes all the features of CompanionLink Express, plus the ability to sync to from multiple databases, sync with up to 5 devices, and advanced sync options.
CompanionLink for Google
Sync Microsoft Outlook contacts and calendar to Google Contacts, Google Calendar, and Google Tasks. Works with any Google, Gmail, or Google Apps account. Two-way sync is fully supported so you can make changes to data in Outlook or in Google.
CompanionLink for Outlook.com / Windows Live
Sync Outlook with your Windows Live Hotmail account. Supports two-way sync of contacts, calendar, and tasks.
CompanionLink for Time & Chaos
Sync Time & Chaos with smartphones, tablets, or any Google/Gmail account. Supports two-way sync of contacts, calendar, tasks and notes.
CompanionLink FA
Sync Wise Agent, Infusionsoft, SalesJunction, or Respond with smartphones, tablets, Outlook, or any Google/Gmail account. Supports two-way sync of contacts, calendar, tasks and notes.
CompanionLink for Mac
Sync Mac's Address Book and iCal with any Android device. You can also keep Outlook for Mac in sync with Android. Requires OS X Lion (10.7) or Mountain Lion (10.8).
For more information on CompanionLink and DejaOffice, follow the links below:
CompanionLink
CompanionLink FAQ's
d05ef87e-86d3-4bda-b6ec-3f5226a599ba|0|.0|96d5b379-7e1d-4dac-a6ba-1e50db561b04