Geeks in Phoenix

Geek Blog


Create your own Windows font character with Private Character Editor

Updated October 23, 2022

Do you have a company logo or a simple graphic that you would like to use often in a Windows program, like Microsoft Word or Excel? Maybe your line of work has special characters you would like to use but cannot find inside any of the installed Windows fonts? If so, you may want to create your own with Private Character Editor.

Using Private Character Editor (PCE), you can create up to 6,400 unique characters (such as special letters and logos) for use in your font library. PCE contains essential tools (pencil, brush, line, rectangle, and circle) for creating and editing characters and more advanced options.

The Private Character Editor inside of Windows 11

There are some pros and cons to creating your characters. Pro: you can insert your unique character into any text line and change its size and color. Con: your special character can only be one color (font color) and is low-resolution. If you're looking for multiple colors and high resolution, you need to use a graphic instead. But if you are looking for a way to insert a single-color logo or unique character into a text line, this might be the answer.

My custom Windows logo character inserted into a WordPad document

Now starting PCE can be kind of hard the first time since there is no shortcut to the program. But once you know where it is and how to start it, you're ready to rock and roll. The program name for PCE is eudcedit.exe, and it's located in the Windows\system32 directory. The easiest way to start it up is by using the Run dialog box.

How to open the Run dialog box

All versions of Windows:
On the keyboard, press the Windows logo key Windows logo key + R

Windows 8.1, Windows 10, and Windows 11:
Right-click on the Windows logo Windows logo key on the Start Menu or press the Windows logo key Windows logo key + X and then select Run

For all of the ways to open a Run dialog box, check out How to get to and use the Run dialog box in Windows.

In the Run dialog box that appears, type eudcedit and select OK.

Things to keep in mind when creating special characters using Private Character Editor.

  • You can choose to link your private characters to all the fonts in your font library (so that any font you've selected can display your private characters). Or you can choose to link your private characters only to specific fonts (so that only the specified font can show your private characters).
  • Using the Select Code dialog box, you can view your entire set of private characters. The Select Code dialog box displays miniature views of all your private characters with their corresponding hexadecimal values.
  • If you want to create a new private character using an existing character as your model, you can copy the current character to the Edit grid and then modify it to suit your needs. Or you can display the existing character in a Reference window alongside your Edit grid for use as a visual reference. You can use any character from any font that is installed on your computer.
  • By default, PCE creates characters using the Unicode character set. If you have installed one of the Asian input languages (such as Chinese, Japanese, or Korean), you can also use PCE with the Windows character set.

Once you have created your unique character, you will need to use the Character Map application to copy it to the clipboard, so you can paste it into your Windows program (see video below). You will first need to open the Character Map using one of the ways listed in the following article.

Using special font characters in Windows with Character Map

Once you have Character Map open, you will find your custom character at the top of the Font list under All Fonts (Private Characters).
List of Private Characters inside of Character Map
Insert your custom character as you would any other one.

  1. Left-click the Font pull-down menu and select All Fonts (Private Characters).
  2. Left-click on the special character you want to insert into the document.
  3. Left-click Select and then left-click Copy.
  4. Open/switch to your document and left-click the location in the document where you want the special character to appear.
  5. Left-click the program's Edit menu or right-click the location where you want the character to appear and select Paste.

Use the Character Map program to insert your special character
Once your unique character is inserted, you can change its format (color, size, bold, italic, etc.) any way you like.

How to clean up and reset the Internet Explorer

In repairing computers for a living, the one thing I find myself doing continually is cleaning up and resetting web browsers. Removing adware, malware and viruses can screw up the Internet Explorer. So here is how to clean up and reset the Internet Explorer.

How to clean up and reset the Internet Explorer

Internet Explorer (IE) has been included in every version of Windows since Windows 98. Microsoft has made cleaning IE reasonably straightforward, but there can be some tricky items. All of IE's settings are accessible from either inside of IE or the Control Panel. The best way is to go through the Control Panel because that is when IE is not technically running. If you use Outlook or Windows Mail, you will need to close these programs too before attempting to clean up IE, as they use IE to rendered HTML formatted e-mails.

When it comes to resetting the IE, you have to first get into the Control Panel. The easiest way to do it with Windows Vista and Windows 7 is to type Control Panel into the search box above the Start button and select Control Panel from the search results. The easiest and fastest way in Windows 8 is to use the Power Users menu (Windows logo key Windows logo key + X) and then select Control Panel. In Windows 10, use the search box next to the Start Windows logo button, type Control Panel, and click on it from the results. Once you have the Control Panel up, select Network and Internet then Internet Options (if viewing by category) or just Internet Options (if viewing by icons).

The Internet Properties General tab inside of Windows 10

The Internet Options haven't changed much over the years, so the tabs on the Internet Properties will look similar in Windows Vista as they do in Windows 10. When you first open Internet Properties, the General tab appears by default. You can go down to Browsing history and delete everything from temporary Internet files and cookies to form data and passwords. Remember that you cannot get it back once you delete something like passwords, so choose carefully.

The Internet Properties Programs tab inside of Windows 10

Once you're done with the General tab, go over to the Programs tab and select Manage add-ons. Here is where you enable, disable and sometimes delete add-ons that have been installed into the IE. There are times when all you can do is disable an add-on, so that is when you'll need a third-party program like CCleaner from Piriform. CCleaner can clean up all of the major browsers, but the only one I've had issues with getting rid of third-party applications is IE.

The Internet Properties Advanced tab inside of Windows 10

The last tab in Internet Properties is Advanced, and it is the most powerful. It has only two buttons, Restore advanced settings and Reset. The first one you click is Restore advanced settings, then click on Apply in the lower right-hand corner. Then to completely reset IE click on Reset. You will get a screen warning you that you are about to reset IE back to its original default settings. Windows 7, Windows 8, and Windows 10 users will also have the option of deleting personal settings. Remember that these cannot be undone, so choose carefully. If in doubt, leave the personal files checkbox empty. You can always come back and remove them if need be.

Now, if after you have reset IE, you find you cannot get into some secure sites, like bank websites, go back into Internet Properties and select the Security tab, and deselect Enable Protected Mode. When you click Apply, you will get a prompt telling you that your current security setting might put you at risk. Then try the website you were having problems with. If you can now get into it, you are all set.

The Windows features menu inside of Windows 10

There is one option that is not available to IE, and that is to uninstall and reinstall. As I stated earlier in this article, IE is integrated into the operating system as a feature and is used by other programs like Outlook and Windows Mail. The only thing you can do is turn off the IE feature in the Control panel, restart your computer and turn it back on. To do this, go to the Control Panel and select Programs and Features, then Uninstall or change a program. In the left-hand column, left-click on Turn Windows features on or off.

How to speed up the boot time of your computer

Updated January 3, 2023

Does it seem like your computer takes forever to boot up? Waiting for your Windows-based computer to boot can be quite frustrating. But there are a few things you can do. Here is how to speed up the boot time of your computer.
How to speed up the boot time of your computer

Check the drive for errors

If your computer has a Hard Disk Drive (HDD), this is the first thing you want to do. HDD's are notorious for not writing data back to the exact place where the data was read. Little known fact, but Microsoft didn't invent the Disk Operating System (DOS). It bought Quick and Dirty Operating System (QDOS) in the early '80s and renamed it MS-DOS. If you have a Solid State Drive (SSD), you can bypass this step, as SSD's don't have moving parts.

Check for hardware issues first with the software provided by the manufacturer of your HDD. The Ultimate Boot CD (UBCD) has all of the significant drive manufacturer's diagnostics software built-in, so this is always the right place to start.

Diagnose computer hardware issues with the Ultimate Boot CD

Then check for software issues with Windows built-in CHKDSK.

Check your hard disk for errors in Windows Vista / Windows 7

Check your hard drive for errors in Windows 8

Check your hard drive for errors in Windows 10

How to check your drive for errors in Windows 11

Uninstall any unwanted programs

This one is a no-brainer. Allot of adware/junkware will load itself up at boot, causing an increase in boot time. It also takes away resources that could be used by programs you want to run. The first thing to do is to go to the Control Panel > Programs > Programs and Features. Then go through the list of programs to see which ones can be uninstalled. Remember that you can change the way the programs are listed just by clicking on the column name. I like to know when a program was installed because you can find many unwanted clutter installations that way.

Remove unwanted items from startup
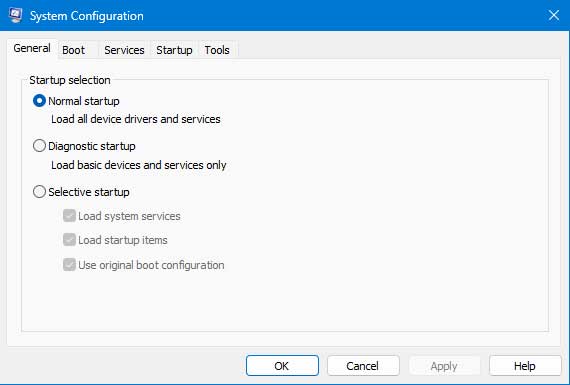
MSCONFIG inside of Windows 11

You can temporarily disable programs and services that start up with Windows using MSCONFIG. MSCONFIG is a diagnostic tool built into Windows that allows you to troubleshoot boot issues. You can enable and disable various boot settings, including programs and services that startup with Windows. Just open an Administrator Command Prompt and type MSCONFIG.

How to open a Command Prompt with Administrator privileges in Windows Vista and Windows 7

How to open a Command Prompt with Administrator privileges in Windows 8

How to open a Command Prompt with Administrator privileges in Windows 10

How to open a Command Prompt with Administrator privileges in Windows 11

Once you have your system fine-tuned with MSCONFIG, you could leave your system running in diagnostic mode by having MSCONFIG not displayed at startup. That's one of the first things I check for on systems I work on. It just too easy to let it go. But if you want to permanently remove the items you have disabled in MSCONFIG, here's how to do it.
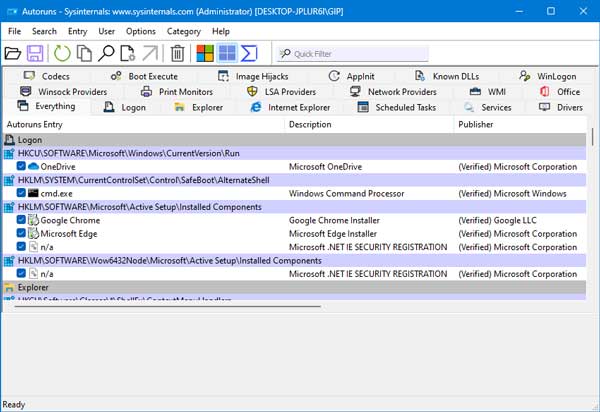
The Autoruns Everything tab inside of Windows 11
The Everything tab inside of Autoruns

  1. Download and extract the latest version of Autoruns from Microsoft.
  2. Open MSCONFIG and make a note of each item you have disabled.
  3. On the General tab of MSCONFIG, select Normal startup, then left-click Apply and OK. When prompted, close MSCONFIG and do not restart the computer. Yes, this will enable all of the items you have disabled, but we will delete them next.
  4. Open the folder where you saved Autoruns.exe, right-click on it and select Run as Administrator.
  5. Once it is done scanning, you need to find the items you had disabled with MSCONFIG. Check the Services and the Logon tabs first. Remember that you can check the logon items for each user with the User pull-down menu. Once you find your things, you can 1) disable it with the checkbox on the left or 2) you can right-click on it and select Delete.

Clean up the drive

It's time to clean up some of the clutter that seems to pile up. Using Windows built-in Disk Cleanup tool (cleanmgr.exe) will quickly clean out all sorts of crap, like user temp files and temporary Internet files. If you want to go a little further with cleaning your drive, download a copy of CCleaner.

Free up more disk space with Windows Vista / Windows 7 Disk Cleanup

Clean up your hard drive in Windows 8 with Disk Cleanup

Clean up Windows 10 with Disk Cleanup

Clean up your Windows 10 computer using the Storage feature

Clean up Windows 11 with Storage Sense and Disk Cleanup

Clean up and optimize your computer for free with CCleaner

Defragment your HDD

This is another step that only pertains to HDD's since SSD's don't get fragmented. If your HDD is fragmented, it takes it longer to find and load files. Optimizing the HDD structure will always give you a little more speed. You can use Windows built-in Optimize and Defragment drive tool or another disk utility like Defraggler from Piriform.

Geek Tip: If you use run the Disk Defragmenter from an Admin Command Prompt, you can use the /B switch to optimize the boot performance. For example, if you want to optimize booting on the C: drive, you would use the following:

Defrag C: /B

Using Disk Defragmenter in Windows Vista

Using Disk Defragmenter in Windows 7

Defragment and Optimize your hard drive in Windows 8

How to defragment and optimize your drive in Windows 10

How to defragment and optimize your drive in Windows 11

Perform advanced disk defragmentation with Defraggler from Piriform

If you want to go the extra mile with optimizing your HDD, remove the swap file before you defrag and restore it after you're done. And when you restore it, go ahead and use the following calculations.

The minimum pagefile size is one and a half (1.5) x the amount of memory. The maximum pagefile size is three (3) x the minimum pagefile size. Let's say you have 2 Gb (2,048 Mb) of memory. The minimum pagefile size would be 1.5 x 2,048 = 3,072 Mb and the maximum pagefile size would be 3 x 3,072 = 9,216 Mb.

Speed up your Windows 8 computer with ReadyBoost

Does your Windows 8 computer take a long time to boot up or open programs? Does it seem like the hard drive light is always on? Then you might be able to speed up your computer by using ReadyBoost inside of Windows 8 and Windows 8.1.

ReadyBoost testing a USB flash drive for capability in Windows 8

ReadyBoost is a disk caching software that allows you to use a compatible storage device (USB flash drive, SD card) as a hard drive cache for increasing the read access time to the hard drive. ReadyBoost will work with Hard Disk Drives (HDDs) and not Solid State Drives (SSD's), as SSD's already have fast read access times.

ReadyBoost options for a USB flash drive inside of Windows 8

You can use USB flash drives, SD cards, flash memory, or SSD's with ReadyBoost. Keep in mind that you will need to keep the storage device attached to the computer at all times. For desktops, think about using a spare USB port or two on the back of your system. ReadyBoost supports USB 2.0 or higher, so USB 3.0 port(s) would be preferred. For laptops, think SD card (if you have an SD reader built-in).

You will also need to format your storage device in NTFS or exFAT to get a ReadyBoost cache file larger than 4GB. The maximum ReadyBoost cache size is 32GB, and you can have up to eight (8) storage devices on one (1) system for a maximum total of 256GB. The recommended ratio of ReadyBoost memory to system memory is 1:1 to 2.5:1

Here are some tips for selecting a storage device from Microsoft's website:

The minimum amount of available space recommended for ReadyBoost to effectively speed up your computer is 1 GB.

For best results, use a flash drive or flash memory card with available space of at least double the amount of memory (RAM) in your computer, and preferably four times as much memory. For example, if your computer has 1 GB of RAM and you plug in a 4 GB USB flash drive, set aside at least 2 GB on the flash drive to get the best performance gain from ReadyBoost, and preferably the entire 4 GB. How much memory you need depends on how you use your computer. Keeping a lot of programs open at once uses more memory.

Give ReadyBoost 2 GB to 4 GB of space for the best results on most computers. You can reserve more than 4 GB of space for ReadyBoost on most flash drives and flash memory cards. (Storage devices formatted with the older FAT32 file system can't store more than 4 GB.) You can use a maximum of 32 GB of available space on any single removable storage device with ReadyBoost and up to 256 GB total per computer (by inserting up to eight USB flash drives or flash memory cards into the same computer).

To work with ReadyBoost, a USB flash drive must support USB 2.0 or higher. Your computer must have at least one free USB 2.0 port where you can plug in the flash drive. ReadyBoost works best if you plug the flash drive into a USB port directly on the computer, rather than into an external USB hub shared with other USB devices.

If you want to be sure a USB flash drive works with ReadyBoost, look for a note from the manufacturer that the flash drive is "Enhanced for ReadyBoost." Not all manufacturers list this on their packaging. If there is no mention of ReadyBoost compatibility, the flash drive still might work with ReadyBoost.

There are many different kinds of flash memory cards, such as CompactFlash and Secure Digital (SD) memory cards. Most memory cards work with ReadyBoost. Some SD memory cards don't work well with ReadyBoost due to issues with the SD card interface. ReadyBoost will display a warning message if you attempt to use one of these cards.

How to turn on ReadyBoost in Windows 8 / Windows 8.1

  1. Insert the storage device.
  2. Open the File Explorer:
    A. Swipe in from the screen's right edge or press the Windows logo key Windows logo key + C to bring up the Charms bar and then tap or left-click Search. Enter File Explorer in the search box, and then tap or left-click Apps. Tap or left-click File Explorer in the search results.
    B. On the Desktop, left-click on the File Explorer (manila folder) icon on the Taskbar.
    C. Press the Windows logo key Windows logo key + E.
  3. Right-click on the storage device you want to use with ReadyBoost and select Properties.
  4. From the Properties dialog box, select the ReadyBoost tab.
  5. Select your choice of options and click on Apply.

Creating panoramic images with Image Composite Editor 2

One of the things I like to do when I go on vacation is taking panoramic photos. Since my camera doesn't take panoramic photos, I have to use software to stitch images together. One of the best image stitchers I have found yet is Image Composite Editor 2 from Microsoft Research Computational Photography Group.

Image Composite Editor 2

Image Composite Editor (ICE) can take photos taken from a single location that overlap and create stunning panoramic images from them. Using techniques from the field of computer vision, ICE scans the images for similarities to each other and then estimates the vantage point for each photo. ICE can even create panoramic images from videos too.

Sample ICE 2 panoramic image without auto complete
Sample ICE 2 panoramic image without autocomplete
Sample ICE 2 panoramic image with auto complete
Sample ICE 2 panoramic image with autocomplete

Microsoft Research Computational Photography Group recently released a new version of ICE. The following is a quote from the ICE website of changes included in ICE 2:

  • Redesigned user interface
    ICE has a new look that makes all the features more understandable and easier to use.
  • Automatic image completion
    ICE can now fill in any missing pixels around the edges of your panorama, making a smooth boundary even in cases where you missed a shot.
  • Improved workflow
    ICE now guides you through the steps required to make a great panorama. And you can back up a step to change settings, then see the effects of those changes without having to start over from scratch.
  • Full-resolution preview
    Panorama previews are no longer limited by your screen resolution. ICE now allows you to zoom in to see every detail of your stitched panorama, no matter how big, before you export.
  • Built-in Photosynth uploader
    ICE no longer requires the installation of a separate application to upload a panorama to the Photosynth web site. You can now upload and share your panorama directly from within ICE.

ICE will work on 32-bit or 64-bit versions of Windows Vista SP2, Windows 7, Windows 8.1, and Windows 10. For more information on Image Composite Editor from Microsoft Research Computational Photography Group, follow the links below:

ICE Homepage
ICE Support Forums

Free computer diagnostics

Repairing a PC can sometimes be expensive, and that is why we offer free basic in-shop diagnostics. Give one of our professional and experienced technicians a call at (602) 795-1111, and let's see what we can do for you.

Check out our reviews

Geeks In Phoenix LLC, BBB Business Review

Customer service is #1

Here at Geeks in Phoenix, we take pride in providing excellent customer service. We aim to give the highest quality of service  from computer repair, virus removal, and data recovery.

Bring your computer to us and save

Repairing a computer can be time-consuming. That is why we base our in-shop service on the time we work on your computer, not the time it takes for your computer to work! From running memory checking software to scanning for viruses, these are processes that can take some time.

Contact us

If you have any questions, please feel free to give us a call at (602) 795-1111  and talk with one of our Geeks. Or you can send us a message from our contact page contact page , and one of our Geeks will get back to you as soon as possible. Or you can stop by and see us. Here are our hours and location.

Like Geeks in Phoenix on Facebook

Follow Geeks in Phoenix on Twitter

Watch Geeks in Phoenix on YouTube