Geeks in Phoenix

Geek Blog


Security and your computer

Updated June 19, 2024

With the recent outbreak of data-encrypting malware, keeping your computer secure is a significant issue. There isn't just one thing you can do to secure your computer, but multiple. So here are a few ways to make sure your computer is as secure as possible.

Security and your computer

Operating system security

Is your device up to date?

Keeping your operating system up to date is essential for security. Microsoft does an excellent job of issuing patches and updates for Windows, especially when they discover a new vulnerability.

But if you do not keep your OS up to date with patches and updates, you could be making your computer vulnerable to current or future exploits. If you are still using an OS like Windows 7 or Windows 8.1 that does not have support from Microsoft anymore, you need to upgrade your OS.

If you have turned off Windows Update, turn it back on. And if Windows Update is not working correctly, here is how to fix it.

Troubleshooting Windows Update problems

Anti-virus security

Is your anti-virus up to date?

A good anti-virus program is essential for security. You can get an anti-virus program with all the bells and whistles (firewall, identity protection, custom browser, etc.). Or you can get one with just a virus scanner. Either way, you have to have some form of protection.

Now, Microsoft has an anti-virus program inside Windows (Windows Defender), which works reasonably well. But there are plenty of other anti-virus programs out there, including a security suite your Internet Service Provider (ISP) may provide.

But if you want to know how they all stack up, go over to the independent IT security institute AV-Test. They test all of the most popular anti-virus programs regularly. They cover multiple platforms (Windows, Mac, and Android).

AV-TEST | Antivirus & Security Software & AntiMalware Reviews

I like using a layered approach to my computer security, using different programs that complement each other.

How to use layered security to protect your computer

Web browser security

Is your web browser up to date?

In my book, having a secure web browser is mandatory. Since web browsers have become targets for online exploits, you must know your browser is safe and secure. I like the fact that Google Chrome, Mozilla Firefox and Microsoft Edge check for updates when you start them up.

There is one thing I like to do to my browsers to improve their security, and that is integrate my anti-virus program into them using an extension or add-on. And since ads are also becoming an issue, I suggest using an ad blocker like Adblock Plus. There is a version for almost every browser.

E-mail security

Is your e-mail secure
Is your e-mail secure?

E-mail is currently one of the most popular ways to spread malware. You have to be very careful with what e-mail attachments you open. Knowing how to spot a piece of spam e-mail is essential.

How to spot a piece of spam e-mail

I use the anti-spam program Mailwasher to filter out the junk and spam from my e-mail. I also have configured my anti-virus program to monitor Mailwasher for viruses, even though Mailwasher, by default, renders all mail in text format and cannot open attachments.

But when Mailwasher downloads a suspicious attachment, my anti-virus program scans it and flags it as such. I use the Pro version, but Mailwasher has a free version sponsored by advertising.

Eliminate spam from your inbox with MailWasher

Password security

Are your passwords secure?

Reusing passwords is a big security no-no. It's nice to remember your passwords easily, but it can be a nightmare if someone can guess them. That is why you do not want to use the same password repeatedly.

If you are like me, creating a unique password for every different place you log into can be challenging. Luckily, there are password generators that can make it easy to create secure passwords. One of my favorites is the Norton Identity Safe Password Generator.

Norton Identity Safe Password Generator

Using the Norton Identity Safe Password Generator, you can create passwords up to 32 characters long that have mixed case letters, numbers, and punctuation with no similar characteristics.

Now that you have generated a secure password, why not test it out? Gibson Research Corporation (GRC) has a bunch of cool security tools on its website, one of which is Password Haystack.

Password Haystack

Password Haystack is a brute-force password calculator that will tell you how long it will take to guess any password. Go ahead and enter your chosen password and see how long it can take to hack it. You may be surprised at how little time it can take to crack it.

Use the Microsoft Update Catalog to find and install Windows drivers and updates

Updated March 12, 2024

Are you having problems finding Windows drivers for your older hardware? Or have you had an update to Windows recently fail to install and want to install it manually? Then the Microsoft Update Catalog may be just what you need.

Using the Microsoft Update Catalog to find Windows drivers and updates

Sometimes repairing Windows computers can be hard, especially when it comes to drivers and updates. Usually, using the standard means of obtaining drivers (Device Manager / manufacturer website) and updates (Windows Update) is relatively easy.

But there are times when I cannot find a device driver or an update to Windows fails to install. That is when I go over to the Microsoft Update Catalog and see what I can find.

The Microsoft Update Catalog is a collection of Microsoft drivers, hotfixes and software updates like Windows Update. They are the same files you receive through Windows Update.

Just like Windows Update, there are three (3) types of updates: Important, Recommended, and Optional (drivers). The only difference is that you can choose what version you download.

Searching the catalog is relatively straightforward. For failed updates, I use the Knowledge Base (KB???????) number. For drivers, I use manufacturer/model number or the hardware id from Device Manager.

Finding and installing Windows Updates

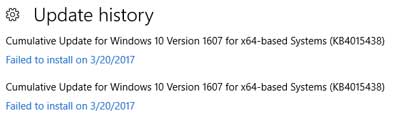
Now before downloading updates, make sure that Windows Update is working correctly. Check the Windows Update history and see if all updates are failing to install or if it is just one.

If all updates are failing, take a look at this article, Troubleshooting Windows Update problems. If it is only one particular update that is failing, then I would go ahead and download it then manually install it.

First, you will need the Knowledge Base number from the Windows Update history to use for the search query.
Finding and installing Windows Updates 1
Once you have it, type it into the search field and click on Search.

The second thing you will need to know is what version of Windows you have and if it is 32-bit or 64-bit for the search results.
Finding and installing Windows Updates 2
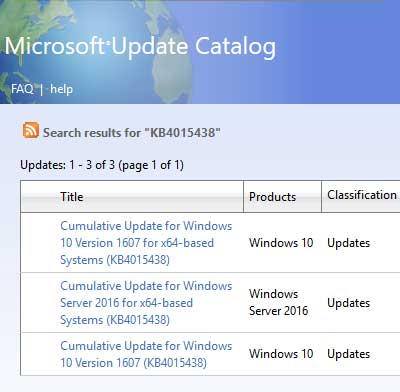
Some updates are specific to one version of Windows. Some are general, across the board, every version of Windows.

Once you find the update you need, click on the Download button. A separate window will open with the update name and link to it. Just left-click on the link and choose whether you want to open it or save it. Since some of these can be rather large, I like to download them to my computer first, then install them.

Finding and installing Windows device drivers

Usually, the Device Manager inside of Windows works great for finding device drivers. If there is a driver for your version of Windows, it can automatically download and install it.

But what happens when there is not a device driver for your version of Windows? That is when you need to look for one for a previous version of Windows. Let me explain.

For example, you find that Windows 10 doesn't have a driver for your older hardware. You check the manufacturer's website, and they do not have one either. Or worse, they have gone out of business.

For this exercise, I will use a Windows 10 computer and a brand-new RAID controller I have had sitting here for around eight (8) years or so. The box indicates the last operating system that was supported was Microsoft Vista, so it is safe to say that Windows 10 will not have a driver.

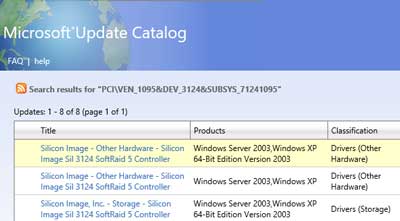
Usually, the first thing I do is psychically check the device for any manufacturer name or model number. If I can find a model name or number, I use it as the search query in the Microsoft Update Catalog.

If I cannot find anything on the device that identifies it, I install it a computer and start it up.
Finding and installing Windows device drivers 1
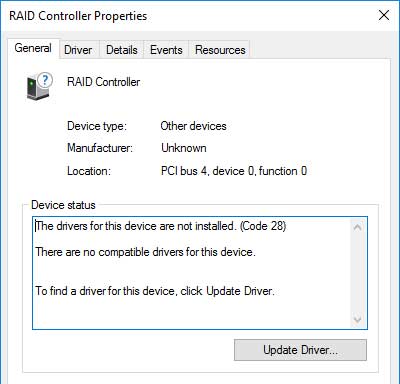
I then go into Device Manager and let it try to find a driver. If Device Manager cannot find a driver, I use the hardware id
Finding and installing Windows device drivers 2
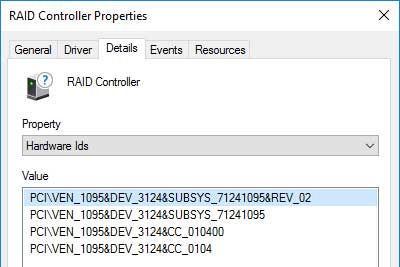
as a search query in the Microsoft Update Catalog.

Now I know that there are no drivers for Windows 10, so I have to find one for an earlier version of Windows. I will first look for a Windows 8.1 driver, then a Windows 7 driver, then a Windows Vista, and then a Windows XP driver.
Finding and installing Windows device drivers 3
As long as it is the right platform (32-bit or 64-bit), I should be able to use it.

Once I find a driver, in this case, it's for Windows XP 64-bit, I download it to a folder on my local drive. Now the downloaded driver file will have a .CAB extension, so before I can use it, I will need to extract the data from it.

Once I get the files/folders extracted, I go into Device Manager and select Update Driver. I then select Browse my computer for driver software. From there, I browse over to and select the folder where I extracted the driver files. I also check the Include subfolders checkbox. I then click on Next,
Finding and installing Windows device drivers 4
and Windows 10 installs the driver.

For more information on the Microsoft Update Catalog, follow the links below.

Microsoft Update Catalog
How to download updates that include drivers and hotfixes from the Windows Update Catalog

How to create ISO files from your software disks

Updated October 14, 2024

So, over the years, you've been purchasing software on CDs / DVDs and now have quite the collection. So what do you do with all the media you no longer use? How about creating ISO files from them? Here's how to create ISO files from your software CDs / DVDs.

After working with computers for over twenty years, I've managed to amass quite the collection of software disks. One of my biggest problems is that I'm not particularly eager to throw away software disks. You never know when you might need them again.

Now, in my book, there are two kinds of disks: Keepers and Tossers. Software that you paid for is a Keeper; software that comes in the mail/paper is usually a Tosser.

I'm old enough to remember the AOL disks used to come in the newspaper (1 gazillion free hours!). The AOL disks were always quite colorful and made a great wall collage or mobile.

Now I realize that properly stored CDs/DVDs can last quite a long time. I have some CDs that are around 20 years old, and I can still read them with my Windows 11 computer. So why would you want to change?

Well, first off, disks can get damaged. You can use a unique tool to buff it out if you scratch the bottom of a disc. But if you scratch the top of a disc, you can damage the data storage layer. Geek Tip: To destroy the data on a CD / DVD before throwing it away, scratch off all of the top layer of the disk with a sharp object, like a nail.

Second, not all devices nowadays have CD / DVD drives (tablets, netbooks, and ultra-thin laptops). Not having an optical disc drive can make installing older software on a newer computer a bit of a problem. So what is the solution? ISO (International Organization for Standardization) files.

ISO (.iso) files are an archive format for optical disks, like CDs and DVDs. They contain an exact sector-by-sector, non-compressed copy of a disc. All you need is a computer with a CD/DVD drive, your original disc(s), a program that creates ISO files, and plenty of free space on your hard drive.

Here's a list of a few free programs that create ISO files.

AnyBurn

Casper ISO Creator - CMM Solutions

The Official ImgBurn Website

CDBurnerXP: Free CD and DVD burning software

Once you have created your ISO files, you can do some cool things with them. Archiving your ISO files is the first thing you want to consider. External drives (flash, portable, or desktop) are great for storing ISO files. I've taken several small ISO files and burned them onto DVDs for off-site storage.

Now, what can you do with an ISO file? Sure, you can make a new CD / DVD using an ISO file. This feature is built into Windows 11, Windows 10, Windows 8, and Windows 7. You can use a program like Rufus to burn an ISO file to a USB drive. And if you're using Windows 11, Windows 10, or Windows 8, you can even mount (open as a virtual drive) an ISO file and install directly from it. Great for when you don't have a CD/DVD drive.

How to burn an ISO file to disk inside of Windows 11, Windows 10, Windows 8, and Windows 7

  1. Open File Explorer
    • Windows 11: From the desktop, left-click on the File Explorer icon (manilla folder) on the Taskbar, press the Windows logo key Windows logo key + E, left-clicking the Start button > All apps > File Explorer or right-click on the Start button and left-click on File Explorer from the Power User menu.
    • Windows 10: From the desktop, left-click on the File Explorer icon (manilla folder) on the Taskbar, press the Windows logo key Windows logo key + E, left-clicking the Start button > All apps > Windows System > File Explorer or right-click on the Start button and left-click on File Explorer from the Power User menu.
    • Windows 8: From the desktop, left-click on the File Explorer icon on the Taskbar, press the Windows logo key Windows logo key + E or right-click on the Start button and left-click on File Explorer from the Power User menu.
    • Windows 7: From the desktop, left-click on the File Explorer icon on the Taskbar or press the Windows logo key Windows logo key + E.
  2. Locate the ISO file you want to create a disk from.
    The ISO file context menu with burn disc image highlighted
  3. Right-click on the ISO file and then left-click on Burn disc image.
  4. Insert a blank disk into the CD / DVD drive.
  5. Left-click on Burn.

How to mount an ISO file as a virtual drive inside of Windows 11, Windows 10, and Windows 8

  1. Open File Explorer
    • Windows 11: From the desktop, left-click on the File Explorer icon (manilla folder) on the Taskbar, press the Windows logo key Windows logo key + E, left-clicking the Start button > All apps > File Explorer or right-click on the Start button and left-click on File Explorer from the Power User menu.
    • Windows 10: From the desktop, left-click on the File Explorer icon (manilla folder) on the Taskbar, press the Windows logo key Windows logo key + E, left-clicking the Start button > All apps > Windows System > File Explorer or right-click on the Start button and left-click on File Explorer from the Power User menu.
    • Windows 8: From the desktop, left-click on the File Explorer icon on the Taskbar, press the Windows logo key Windows logo key + E or right-click on the Start button and left-click on File Explorer from the Power User menu.
  2. Locate the ISO file you want to mount as a virtual drive.
    The ISO file context menu with mount highlighted
  3. Right-click on the ISO file and then left-click on Mount.
  4. Locate the new drive inside of File Explorer and use it as an actual CD/DVD drive.

Manage your Windows computer with the Microsoft Management Console

Updated October 5, 2022

Have you ever had a problem finding some of Windows' built-in administrative tools? Don't you wish you could have them in one easy-to-find location? You can do just that and more with the Microsoft Management Console.

Manage your Windows computer with the Microsoft Management Console

The Microsoft Management Console (MMC) is a program you can use to create and save collections of administrative tools called Consoles. Consoles contain items such as snap-ins, extension snap-ins, monitor controls, tasks, wizards, and documentation required to manage many of the hardware, software, and networking components of your Windows system.

Microsoft Management Console inside of Windows 11
The Microsoft Management Console inside of Windows 11

Here is a list of some of the more useful MMC Snapins:

  • Computer Management
  • Device Manager
  • Disk Management
  • Event Viewer
  • Link to Web Address
  • Performance Monitor
  • Print Management
  • Services
  • Shared Folders
  • Task Scheduler
  • Windows Defender Firewall

Using the Run dialog box to start the Microsoft Management Console

All versions of Windows:
On the keyboard, press the Windows logo key Windows logo key + R

Windows 8.1, Windows 10, and Windows 11:
Right-click on the Windows logo Windows logo key on the Start Menu or press the Windows logo key Windows logo key + X and then select Run

For all the different ways you can bring up the Run dialog box, check out How to get to and use the Run dialog box in Windows.

In the Run dialog box that appears, type mmc and select OK. If you're prompted for an administrator password or confirmation, type the password or provide confirmation. When the Microsoft Management Console appears, it is time to add some content.

How to add or remove Microsoft Management Console snap-ins

  1. Left-click on the File pull-down menu and select Add/Remove Snap-in
  2. In the list of snap-ins that appear, left-click the snap-in you want to add to your console and then left-click on the Add button
  3. If prompted, select either Local computer or Another computer. If you choose Another computer, you will have to browse your network for that computer. Be sure to select the checkbox for Allow the select computer to be changed when launching from the command line.
  4. Then left-click on Finish. This will bring you back to the Add/Remove Snapin screen. When you finish adding snap-ins, left-click on the OK button in the screen's lower right-hand corner.

How to add, edit, or remove a Microsoft Management Console Taskpad View

  1. Open a previously saved console, right-click on the console name and left-click either New Taskpad View, Edit Taskpad View, or Delete Taskpad View from the dialog menu that appears. If you do not have any Taskpad Views already inside the console, the only option that will appear is New Taskpad View.
  2. If you are creating a new Taskpad View, the New Taskpad View Wizard will appear. Just follow the prompts and choose the Taskpad default settings. If you don't like how it looks, you can always go back and edit the layout later. If you select a Taskpad View, the general settings and associated tasks will appear.
  3. When you finish creating a new Taskpad View, you can create a new task to go inside it. If you edit an existing Taskpad View, you can go to the Tasks tab and select the current Tasks.
  4. When adding new tasks, the New Task Wizard will appear. Just follow the prompts and select the command type you want to use. You can run a command from a menu, run a script or program, open a web page, or open a tree item from your MMC favorite list.

When you are finished setting up your console, don't forget to save it in a place where you can quickly access it, like your Desktop.

Using special font characters in Windows with Character Map

Updated October 23, 2022

Have you ever wanted to insert a letter or symbol into a Windows document that you could not find on your keyboard? Maybe a copyright, trademark, or tolerance symbol? You can do just that and more with Windows built-in Character Map.

Believe it or not, but Windows fonts can have more characters than your keyboard has keys. Most Windows fonts do have more characters than your keyboard can create. And that doesn't even include the unique font characters you can create with Private Character Editor. So how do you access and insert these characters? By using Character Map.

Character Map inside of Windows 11

Character Map is one of those hidden gems inside Windows, that once you find it, you wonder how you lived without it. I remember first using Character Map inside Windows 3.1 and was amazed at what font characters I could insert into a Microsoft Word document. And the cool thing is you can add them to almost any Windows program (HTML editors excluded).

Character Map inside of Windows 3.11

How to start up Character Map

You can start Character Map in two different ways: Windows built-in shortcut or from the Run dialog box.

Character Map in Windows 11

  1. Left-click on the Start menu
  2. Left-click on All Apps
  3. Scroll down and left-click on Windows Tools
  4. Left-click on Character Map

Character Map in Windows 10

  1. Left-click on the Start menu
  2. Left-click on All Apps
  3. Scroll down and left-click on Windows Accessories to expand it
  4. Left-click on Character Map

Character map in Windows 8 and Windows 8.1

  1. Swipe in from the right side of the screen or press the Windows logo key Windows logo key + C to bring up the Charm bar
  2. Left-click on Search button in Charm Bar.
  3. Left-click on Apps in Search.
  4. Type Character Map in the Search field on the Search pane
  5. In the results on the left-hand side, left-click on Character Map.

Character Map in Windows 7 and Windows Vista

  1. Left-click on the Start menu
  2. Left-click on All Programs
  3. Scroll down and left-click on Accessories to expand it
  4. Left-click on System Tools to expand it
  5. Left-click on Character Map

Using the Run dialog box to start Character Map

All versions of Windows:
On the keyboard, press the Windows logo key Windows logo key + R

Windows 8, Windows 8.1, Windows 10, and Windows 11:
Right-click on the Windows logo Windows logo key on the Start Menu or press the Windows logo key Windows logo key + X and then select Run

In the Run dialog box that appears, type charmap and select OK.

How to insert a special character into a document

  1. Left-click the Font pull-down menu and left-click the name of the font you want to use.
  2. Left-click on the special character you want to insert into the document.
  3. Left-click Select and then left-click Copy.
  4. Open/switch to your document and left-click the location in the document where you want the special character to appear.
  5. Left-click the program's Edit menu or right-click the location where you want the character to appear and select Paste.
  • Many programs allow you to drag and drop special characters into documents. To do this, click the character you want to copy. When the character appears enlarged, drag and drop it into the open document.
  • If you do not delete previously copied characters in the Characters to copy box, they are copied along with any new characters you select.
  • If a private character does not appear correctly in a document, select the character in the document, and change its font to match the font you chose in Character Map.

Free computer diagnostics

Repairing a PC can sometimes be expensive, and that is why we offer free basic in-shop diagnostics. Give one of our professional and experienced technicians a call at (602) 795-1111, and let's see what we can do for you.

Check out our reviews

Geeks In Phoenix LLC, BBB Business Review

Customer service is #1

Here at Geeks in Phoenix, we take pride in providing excellent customer service. We aim to give the highest quality of service  from computer repair, virus removal, and data recovery.

Bring your computer to us and save

Repairing a computer can be time-consuming. That is why we base our in-shop service on the time we work on your computer, not the time it takes for your computer to work! From running memory-checking software to scanning for viruses, these are processes that can take some time.

Contact us

If you have any questions, please feel free to give us a call at (602) 795-1111  and talk with one of our Geeks. Or you can send us a message from our contact page , and one of our Geeks will get back to you as soon as possible. Or you can stop by and see us. Here are our hours and location.

Like Geeks in Phoenix on Facebook

Follow Geeks in Phoenix on Twitter

Watch Geeks in Phoenix on YouTube