Updated June 21, 2023
For most people, there is nothing better than a brand-new computer. But of course, you cannot get a new computer every few months. But you can get that same feeling. Here is how to make your computer look and run like brand-new.

For most of us, getting a brand-new computer every year is not financially possible. It would be nice, but realistically it is out of the question. But with a little work, you can get that brand-new feeling from your existing computer.
Looking brand-new
Perception is everything. If it looks new to you, it will feel new to you. And with a little cleaning and maybe a couple of hardware changes, it can look brand-new.
The first place to start is with the keyboard. Most keyboards are black and will show dirt and grim like no tomorrow. You will be amazed at how a good cleaning will make it appear brand new.

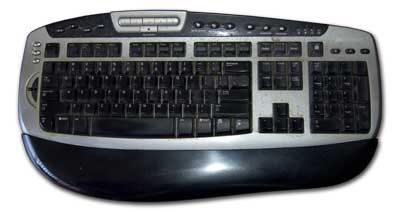
A filthy keyboard before cleaning
Now when cleaning your keyboard, you will need to turn off your computer. That way, you do not accidentally press the wrong keys. I have seen it happen, especially with laptops with FN keys.
Since most of us eat while we work, compressed air can help dislodge anything that may have gotten in between or under the keys. A good spray of compressed air should get rid of the massive debris.
When it comes to psychically cleaning the keyboard, remember that liquid and electronics do not mix. Never spray a cleaning solution directly on your keyboard. Always apply it to the cleaning material (cotton swab, paper towel, etc.) first.
Lightly dampen a cotton swab or paper towel with a cleaning solution and ring out any excess liquid before cleaning. It may take some time to clean all of the keys, but remember how long it took to get them dirty (months? years?).

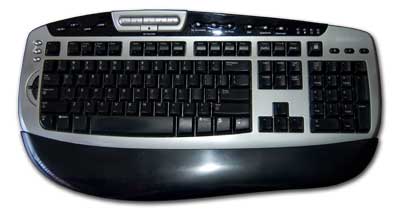
That same dirty keyboard after being cleaned
Now, if the printing has faded or worn off, maybe it is time to go ahead and replace the keyboard. Desktop keyboards are easy to replace; laptop keyboards can be a little harder. For new laptop keyboards, I recommend LaptopKeyboard.com.
When it comes to your mouse, the body will get dirty, and the buttons get looking worn. The same cleaning technique used for your keyboard applies to your mouse.
If it is a wired mouse, turn off the computer. If it is wireless, turn it off. Clean both the top and bottom with a lightly dampened paper towel. Use a lightly damped cotton swab to clean the optical lens on the bottom.
The next thing you might want to clean is the monitor. As with the keyboard and mouse, you will want to turn it off, unplug it and let it cool down. Once it is cooled down, you can start to clean it.
Just like with your keyboard, you want to start cleaning your monitor with some compressed air. If your monitor is dusty, you may want to take it outside before clean it with compressed air.
Use the compressed air to clean out all of the ventilation holes in the case. Make sure you get as much of the grime out as you can, as dust does conduct electricity.
Now lightly dampen a paper towel with a cleaning solution and wipe the outside of the case. When you get done with that, it is time to clean the screen.
To clean the screen, I recommend using a soap-based, not ammonia-based, glass cleaner, and microfiber towels to protect the finish. Never directly apply the glass cleaner to the screen to prevent damage to it.
Lightly dampen a microfiber towel with glass cleaner and thoroughly wipe the screen. Now before it has a chance to dry, wipe the screen off with a dry micro-fiber towel to remove any streaks that may have appeared.
The last thing to clean is the outside of the computer case itself. Please make sure you turn it off and unplug the power cord (desktop computer) or ac adapter (laptop computer) before you start to clean it.
Lightly dampen a paper towel with a cleaning solution and wipe down the outside (front, sides, top, bottom, and back). If you have any old and faded stickers, this would be a great time to remove them.
To remove stickers, I recommend using an adhesive remover like Goof Off. Just make sure the area with the label is laying completely horizontal, so you can let the adhesive remover sit on it for a little while.
Once you have let the adhesive remover soak in, use a plastic razor blade or plastic putty knife to scrape the label off. If the sticker has been on there for a while, it may take a few passes to get it removed.
When all of the labels are gone, go ahead and clean it with a paper towel with a cleaning solution. You want to get any residue from the adhesive remover off.
The next thing we want to do is clean the inside of the computer with some compressed air. For this step, we will need to disconnect all cables attached to the computer and take it outside.
Now the procedure is about the same for desktop and laptop computers. For desktop computers, here is a detailed article we did a little while back on how to clean the dust out of your computer.
The same procedures in the article above apply to laptops as well. All you have to do for a laptop computer is to locate the air intake for the cooling fan(s). But instead of using a nonmetallic rod to hold the cooling fan(s), use a straightened-out paper clip.
Running like brand-new
Now that you have the outside and inside clean, maybe it is time to get the operating system and programs cleaned up. Using the Windows built-in Disk Cleanup tool is an excellent place to start.
Windows 7 Disk Cleanup
Windows 8.1 Disk Cleanup
Windows 10 Disk Cleanup
Windows 11 Disk Cleanup
Once you have used the Disk Cleanup program, you can now look at getting rid of some of the programs you no longer need. You will need to get to the Control Panel to do this. The quickest way to get to the Control Panel is by using the Run dialog box.
How to get to and use the Run dialog box in Windows
My favorite (and the fastest way) to bring up the Run dialog box is to press the Windows logo key  + R keys simultaneously. When it appears, type control and then select OK.
When the Control Panel appears, select either Uninstall a program (category view) or Programs and Features (icon view). You can then start to uninstall the programs you no longer use.
Now, if you want your computer to have that brand-new feeling, you can reset Windows 8.1, Windows 10 and Windows 11. The procedure is similar for Windows 8.1, Windows 10 and Windows 11.
How to reset Windows 10
How to reset Windows 11
But if you want that brand-new feeling, a clean installation of Windows is the way to go. Follow the instructions in the following article to perform a clean installation of Windows 10 or Windows 11.
How to perform a clean Windows 10 installation
How to perform a clean Windows 11 installation
You can use the same procedures listed in the article above for Windows 8.1, but you will have to download the Windows 8.1 Disc Image.
Windows 8.1 Disc Image
What you can do with an ISO file