Geeks in Phoenix

Geek Blog


Upgrading to Windows 7 from Windows XP

Windows XP is currently the most popular operating system, with Windows 7 quickly catching up. As more and more people are moving from Windows XP to Windows 7, I thought I would spotlight a series of articles that I wrote a little while back. My move from Windows XP to Windows 7 was a 'side-by-side' migration, with two separate systems.

I, believe it or not, never used Windows Vista on any of my production systems. I ran Windows XP up until Windows 7 was released. I did run Windows 7 Release Candidates on a test system for several months before its release and was very happy with it. I even wrote a series of articles about it too. Here they all are.

Upgrading to Windows 7 from Windows XP

Upgrading from Windows XP to Windows 7 (Part 1)

Upgrading from Windows XP to Windows 7 (Part 2 - Drive Imaging)

Upgrading from Windows XP to Windows 7 (Part 3 - Hardware / Software Inventory)

Upgrading from Windows XP to Windows 7 (Part 4 - Windows 7 Installation)

Upgrading from Windows XP to Windows 7 (Part 5 - Applications and Settings)

Upgrading from Windows XP to Windows 7 (Part 6 - Epilogue)

Beta testing Windows 7

Beta testing Windows 7 - Part 1

Beta testing Windows 7 - Part 2

Beta testing Windows 7 - Part 3

Beta testing Windows 7 - Part 4 (Antec cases)

Beta testing Windows 7 - Part 5 (BIOS and installation)

Beta testing Windows 7 - Part 6 (software overview) (Video)

Beta testing Windows 7 - Part 7 (Photoshop Benchmark)

Resetting your network adapter in Windows 7

Network shell (Netsh) is a tool an administrator can use to configure and monitor network devices on Windows based computers at a command prompt. A common use of Netsh, is to reset the TCP/IP stack back to default settings.

But not only will Netsh reset the TCP/IP stack, but it can also completely reset your network adapter(s). It will reset the Windows Firewall in Windows 7 too.

Using Netsh in Windows 7

To use Netsh, you will need to open a Command Prompt as an administrator. There are two ways to do this:

  • Click the Start button, then All Programs, then Accessories, then right-click Command Prompt, and then click Run as administrator. If you're prompted for an administrator password or confirmation, type the password or provide confirmation.
  • or

  • Click the Start button. In the search box, type Command Prompt, and then, in the list of results, right-click Command Prompt, and then click Run as administrator. If you're prompted for an administrator password or confirmation, type the password or provide confirmation.

Netsh commands in Windows 7

The following is a list of the Netsh commands you can use to reset your Windows 7 network adapter:

Restores the Windows Firewall with Advanced Security policy to the default policy. The current active policy can be optionally exported to a specified file. This command returns all settings to not configured and deletes all connection security and firewall rules in a Group Policy object.netsh advfirewall reset

Resets the BranchCache service. Flushes the local cache. Every configuration parameter of BranchCache will be reset to its default value.netsh branchcache reset

Resets TCP/IP and related components to a clean state.netsh int ip reset c:\resetlog.txt

Resets IPv6 configuration state.netsh int ipv6 reset

Resets Winsock Catalog to a clean state. All Winsock Layered Service Providers which were previously installed must be reinstalled. This command does not affect Winsock Name Space Provider entries.netsh winsock reset

Managing Virtual Memory / Pagefile in Windows 7

Updated October 15, 2020

Your computer has two types of memory, Random Access Memory (RAM) and Virtual Memory. All programs use RAM, but when there isn't enough RAM for the program you're trying to run, Windows temporarily moves information that would usually be stored in RAM to a file on your hard disk called a Paging File. The amount of data temporarily stored in a paging file is also referred to as virtual memory. Using virtual memory, in other words, moving information to and from the paging file, frees up enough RAM for programs to run correctly.

The more RAM your computer has, the faster your programs will generally run. If a lack of RAM is slowing your computer, you might be tempted to increase virtual memory to compensate. However, your computer can read data from RAM much more quickly than from a hard disk, so adding RAM is a better solution.

If you receive error messages that warn of low virtual memory, you need to either add more RAM or increase your paging file size so that you can run the programs on your computer. Windows usually manages this automatically, but you can manually change the virtual memory size if the default size isn't large enough for your needs.

Change the size of virtual memory

If you receive warnings that your virtual memory is low, you'll need to increase your paging file's minimum size. By default, Windows creates a paging file that can be smaller than the amount of random access memory (RAM) installed on your computer. The recommended minimum page file size should be 1.5X the current amount of RAM, and the maximum size should be 3X the minimum (see custom size below). If you see warnings at these recommended levels, then increase the minimum and maximum sizes.

To open the System Properties, press Windows logo key + Pause

Windows 7 Pagefile Settings 1

In the left pane, click Advanced system settings. If you're prompted for an administrator password or confirmation, type the password or provide confirmation.
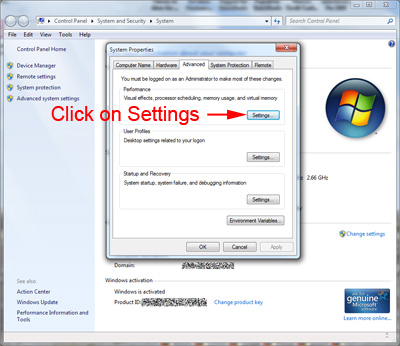
Windows 7 Pagefile Settings 2

On the Advanced tab, under Performance, click Settings.
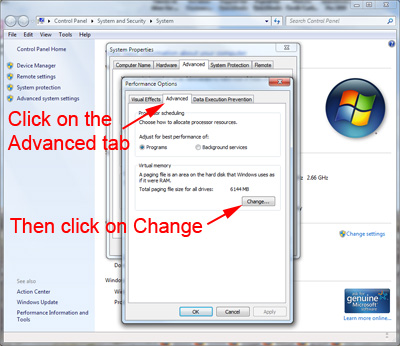
Windows 7 Pagefile Settings 3

Click the Advanced tab, and then, under Virtual memory, click Change.
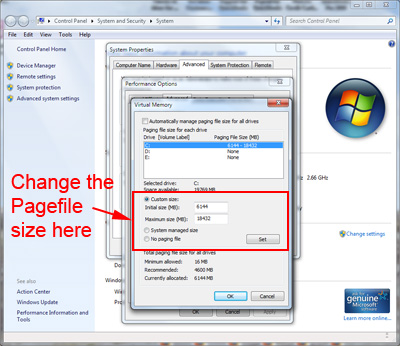
Windows 7 Pagefile Settings 4

Clear the Automatically manage paging file size for all drives check box.

Under Drive [Volume Label], click the drive that contains the paging file you want to change.

Click Custom size, type a new size in megabytes in the Initial size (MB) or Maximum size (MB) box, click Set, and then click OK. There is a formula for calculating the correct pagefile size. Minimum pagefile size is one and a half (1.5) x amount of memory. Maximum pagefile size is three (3) x minimum pagefile size. Say you have 4 Gb (4,096 Mb) of memory. 1.5 x 4,096 = 6,144 Mb would be the min. pagefile size and 3 x 6,144 = 18,432 Mb would be the max. pagefile size.

Note:
Size increases usually don't require a restart for the changes to take effect, but you'll need to restart your computer if you decrease the size. It is recommended that you don't disable or delete the paging file.

My five favorite Windows tips for maintaining your computer

Updated October 14, 2020

In this article, I am going to share my five favorite tips for maintaining Microsoft Windows.

  1. Checkdisk. This is the first thing I do when I get a system here in the shop. Errors do occur, and files do get damaged. Best to take care of this first thing. And yes, this can take a while, so I always recommend leaving your system on and let Checkdisk run overnight. That way, your computer is ready to go first thing in the morning.

    For more information on how to perform a Checkdisk, select your operating system below:

    Windows 10 Checkdisk

    Windows 8.1 Checkdisk

    Windows 7 / Windows Vista Checkdisk

    Windows XP Checkdisk

  2. Delete Temporary files. This is the first place to look when you need to free up some hard disk space. These files served their purpose at one time, but the program that used them did not delete them for some unknown reason. When deleting temporary files, some may still be in use. I recommend deleting all files/folders that are over a week old. See below for the location of the temporary files folder on your version of Windows:

    Windows Vista / 7 / 8.1 / 10 - C:\Users\username\AppData\Local\Temp
    Windows XP - C:\Documents and Settings\username\Local Settings\Temp

  3. Delete the Internet Explorer cache. This is the second place to look when you need to free up some hard disk space. I have seen systems with over 9 Gb of temporary files. Open Internet Explorer and go to Tools > Internet Options and change the following settings:

    Internet Explorer Temporary Files
    Internet Explorer Temporary Files

  4. Pagefile optimization. This one often gets overlooked. There is a formula for calculating the correct pagefile size. Minimum pagefile size is one and a half (1.5) x amount of memory. Maximum pagefile size is three (3) x minimum pagefile size. Say you have 4 Gb (4,096 Mb) of memory. 1.5 x 4,096 = 6,144 Mb would be the min. pagefile size and 3 x 6,144 = 18,432 Mb would be the max. pagefile size.

    Windows Pagefile Settings

    To change the pagefile size, you need to access the System Properties dialog box. Press Windows logo key + Pause (Windows Vista / 7 / 8.1 / 10 users select 'Advanced' system settings). Then select the 'Advanced' tab and under 'Performance' click on Settings. Then select the 'Advanced' tab and under 'Virtual memory' click on Change.

    For more information on how to change the pagefile size, select your operating system below:

    Windows 10 Pagefile Settings

    Windows 8.1 Pagefile Settings

    Windows 7 Pagefile Settings

    Windows Vista Pagefile Settings

    Windows XP Pagefile Settings

  5. Disk Defragmenter. Probably the best single thing you can do to speed up your computer. Imagine a filing cabinet where all of the folders were out of order, and files were misplaced throughout the cabinet. How could you find anything? Same thing with your hard drive. Disk Defragmenter takes care of that for you. And you can run it as a scheduled task too.

    For more information on how to use Disk Defragmenter, select your operating system below:

    Windows 10 Disk Defragmenter

    Windows 8.1 Disk Defragmenter

    Windows 7 Disk Defragmenter

    Windows Vista Disk Defragmenter

    Windows XP Disk Defragmenter

Simple security with Microsoft Security Essentials

In this article, I am going to spotlight Microsoft Security Essentials (MSE). This is not Microsoft's first venture into the ant-virus market, but it is probably the best. Having used some of the more well-know anti-virus software (Norton / Symantec, McAfee, etc.) for over a decade, I decided to give MSE a try.

Microsoft Security Essentials

All of the articles I had read on Microsoft Security Essentials were quite positive, so I installed it on my netbook running Windows 7 in June. Since then, I have taken the netbook on several on-site service calls and vacation. I am happy to report that the netbook remains virus-free. What I like is the small footprint the software has. It does not take five minutes to start up Windows, as can happen on systems with limited resources (such as netbooks).

MSE works quite well with Windows 7 built-in firewall. The interface is clean and easy to use, unlike some of the anti-virus software out there. It's easy enough for a novice user to navigate. It also integrates into Windows Update. Here's a quote from Microsoft's website:

Microsoft Security Essentials provides real-time protection for your home PC that guards against viruses, spyware, and other malicious software.

Microsoft Security Essentials is a free* download from Microsoft that is simple to install, easy to use, and always kept up to date so you can be assured your PC is protected by the latest technology. It’s easy to tell if your PC is secure — when you’re green, you’re good. It’s that simple.

Microsoft Security Essentials runs quietly and efficiently in the background so that you are free to use your Windows-based PC the way you want—without interruptions or long computer wait times.

I encourage you to take a look at Microsoft Security Essentials. It's simple and free.

Free computer diagnostics

Repairing a PC can sometimes be expensive, and that is why we offer free basic in-shop diagnostics. Give one of our professional and experienced technicians a call at (602) 795-1111, and let's see what we can do for you.

Check out our reviews

Geeks In Phoenix LLC, BBB Business Review

Customer service is #1

Here at Geeks in Phoenix, we take pride in providing excellent customer service. We aim to give the highest quality of service  from computer repair, virus removal, and data recovery.

Bring your computer to us and save

Repairing a computer can be time-consuming. That is why we base our in-shop service on the time we work on your computer, not the time it takes for your computer to work! From running memory checking software to scanning for viruses, these are processes that can take some time.

Contact us

If you have any questions, please feel free to give us a call at (602) 795-1111  and talk with one of our Geeks. Or you can send us a message from our contact page contact page , and one of our Geeks will get back to you as soon as possible. Or you can stop by and see us. Here are our hours and location.

Like Geeks in Phoenix on Facebook

Follow Geeks in Phoenix on Twitter

Watch Geeks in Phoenix on YouTube