Updated March 26, 2024
In doing computer repair, I often get asked, "Why does my computer take so long to start up?". Quite frequently, it turns out there are items set to auto-start that don't need to or don't exist anymore. Here's how to disable programs, drivers, and services that auto-start in Windows 10 and Windows 11.
Now, this one doesn't cost any money and can dramatically improve the time it takes for your computer and programs to start up. By minimizing the number of applications that launch at startup, you can also free up memory.
Now, there are three (3) programs I use to enable or disable programs, drivers, or services that start up in Windows 10 and Windows 11. The built-in programs (Task Manager and System Configuration) are pretty safe to use but still can degrade performance if not used properly. The third program (Autoruns / Autoruns64) can be dangerous because not only can it enable or disable entries, but it can also delete them.
Note: I recommended that you make changes one at a time and restart between them. That way, you can find out if you need that program or service you just disabled. Yes, it's time-consuming, but sometimes you have to do it.
Task Manager (Auto-start programs)
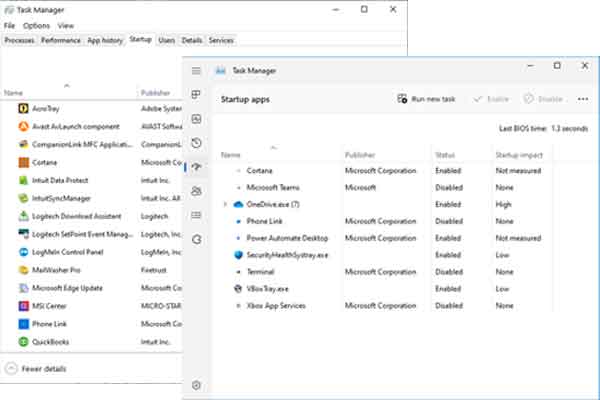
The Startup tab inside of Windows 10 / Windows 11 Task Manager
Using Task Manager is the most comfortable and safest way to enable or disable programs that auto-start with Windows 10 and Windows 11. None of the programs listed here are going to prevent your computer from starting if disabled. You will not find any program listed here that Windows 10 or Windows 11 requires to operate.
Now, for those of you who are not familiar with Task Manager, it's a built-in program that does a lot of different things. It monitors running programs, system performance, and active processes. And it also manages programs that auto-start with Windows.
How to start Task Manager in Windows 10 and Windows 11
- Right-click on the Start
 button to bring up the Power User menu.
- Left-click on Task Manager.
or
- Press CTRL + ALT + DEL all at the same time.
- From the security screen that appears, left-click on Task Manager.
or
- Right-click on an empty area of the Taskbar.
- On the context menu that appears, left-click on Task Manager.
Sometimes, the first time you run Task Manager, it will only display running apps. You have to left-click the More details arrow to view all the tabs. The location of the tabs varies from Windows 10 (across the top) to Windows 11 (down the left side).
Once the tabs are displayed, left-click on Startup (Windows 10) or Startup apps (Windows 11). From here, all you have to do is highlight the program name and select the Enable / Disable button.
System Configuration (Auto-start services)
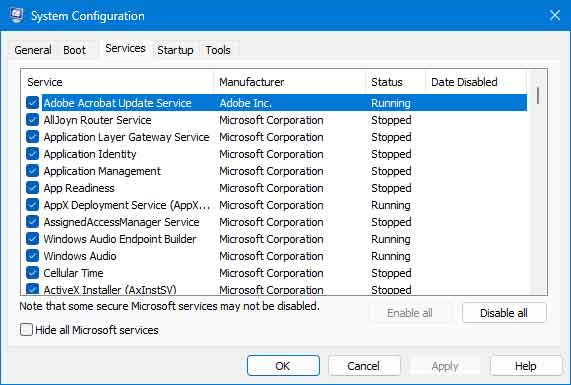
The Services tab inside of System Configuration
This program is used mainly for diagnostics, so there are no splashy graphics. With System Configuration, you can change the services that auto-start with Windows. Be careful about making changes here, as they can have a significant impact on system performance.
How to start System Configuration in Windows 10
- Left-click on the Start button and scroll down the list of applications to Windows Administrative Tools.
- Left-click on Windows Administrative Tools to expand the contents.
- Scroll down and left-click on System Configuration.
How to start System Configuration in Windows 11
- Left-click on the Start button to bring up the Start menu.
- In the upper right-hand corner of the Start menu, left-click on All apps.
- Scroll down the list of programs and left-click on Windows Tools.
- Left-click on System Configuration.
How to start System Configuration in both Windows 10 and 11
- Press the Windows logo key + R to bring up the Run dialog box.
- Type in MSCONFIG and left-click on OK.
From the default dialog box, select the Service tab. There, you will find all the services that auto-start with Windows. Remember that some of the Microsoft services listed cannot be disabled, so it's always best to select the Hide all Microsoft services checkbox at the bottom of the services section.
Once you have made your changes left-click on the Apply button, then left-click on the OK button. You will get a dialog box prompting you to either Restart or Exit without restart. Left-click on Restart, and you're ready to go. Remember to make changes one at a time and restart in between changes.
Autoruns / Autoruns64 (Auto-start programs, drivers, and services)
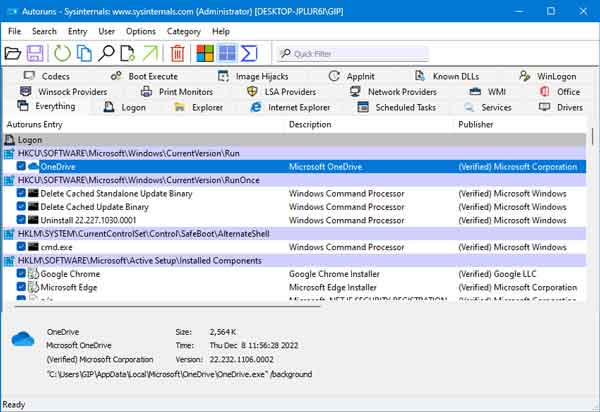
The Everything tab inside Microsoft Autoruns
Autoruns.exe (32-bit) and Autoruns64.exe (64-bit) are part of Microsoft's Sysinternals Suite of troubleshooting utilities and do not come with Windows 10 or Windows 11. But they are free, require no installation, and can be downloaded separately or with the complete suite (see links below).
Now Autoruns.exe will only run on 32-bit versions of Windows 10, and Autoruns64.exe will only run on 64-bit versions of Windows 10 and Windows 11. Windows 11 does not come in a 32-bit version. Most versions of Windows 10 are 64-bit, so if you have any doubt about what version of Windows 10 you have, download Autoruns64.exe first.
This program is the most complex of them all. And the most dangerous! Why do you ask? Besides being able to disable programs, drivers, and services that auto-start, you can also delete their load points altogether. So be careful!
Once you have downloaded the files and extracted them to a permanent location, open that folder with File Explorer. Locate either Autoruns.exe or Autoruns64.exe (depending on your version of Windows 10). Right-click on the release of Autoruns for your version of Windows 10 / Windows 11 and select Run as administrator from the context menu.
When you start Autoruns, it automatically scans your computer for auto-start programs, drivers, and services. Autoruns has multiple tabs for the different Windows auto-start locations (logon, services, drivers, etc.), including one called Everything. And if you select the User pull-down menu on the toolbar on top of the program, you can also select the different user profiles.
If you want to disable/enable a program or driver, left-click on the checkbox on the left-hand side of the entry. You can also delete an entry, but I recommend that you back it up first, just in case. If you find you don't need the backup, you can delete the file later.
To back up an entry in Autoruns, you right-click on it, and a context menu will appear. Left-click on Jump to entry ... and the Registry Editor opens to the location in the registry of that entry. Right-click on the selected entry in the Registry Editor, and a context menu appears. Left-click on Export and select a location and file name for your backup file.
Autoruns
Sysinternals Suite