Updated March 4, 2024
Microsoft developers have always liked to create handy system utilities that add more functionality to the Windows operating system. They call them PowerToys and are released as a stand-alone program with File Explorer add-ons. And as always, these programs are entirely free.
It is kind of like Déjà vu for me with the PowerToys for Windows 10 / Windows 11. I hate to admit it, and I'm going to show my age here, but I have used the two (2) previous versions of PowerToys. The first version was PowerToys for Windows 95. The second version was PowerToys for Windows XP. TweakUI (Windows 95 / Windows XP) and Command Prompt Here (Windows 95) / Open Command Windows Here (Windows XP) were two (2) of my favorites.
PowerToys have always been a cool collection of handy utilities that you wonder why they were not part of Windows to begin with. In fact, some of the functionality of the PowerToys do get built into later releases of Windows.
The latest version, PowerToys for Windows 10 / Windows 11, currently has twenty-five (25) utilities (as of 3/4/24) included, and there are plans to add even more. As more features are added, I will update this article.
Note: Microsoft PowerToys requires Windows 11 or Windows 10 20H1 (version 2004).
And since the Windows 10 / Windows 11 PowerToys are all inside one program, updates, and new features will be easy to install. There is even an update button that takes you to the website so you can check for new releases.
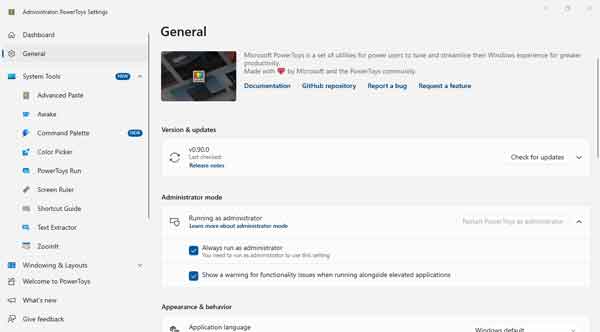
The PowerToys General Settings includes all the options for all the actual PowerToys. This means there is only one place to enable/disable and configure the settings for the various programs.
Now you have to keep in mind that the PowerToys is an open-source project, and the code is freely available. That is why the installer is over on the developer website GitHub, which, by the way, Microsoft owns.
The following is a list of the PowerToys for Windows 10 versions, the date released, and the utilities included. They are:
v0.12 - Released on 10/29/19
FancyZones - This is a utility that allows you to create zones (predefined areas for program windows) on your desktop for the various programs you run.
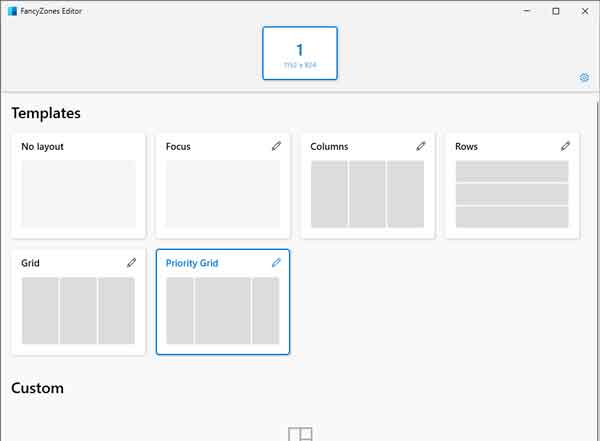
For example, you can create a layout that has a separate zone for your e-mail program, word processor, and spreadsheet, all neatly arranged on your desktop. This program is beneficial if you have multiple monitors and want to keep all of your running programs organized.
PowerRename - This utility does just what its name implies; it renames files. But it has so many options that it can be used in so many different ways.
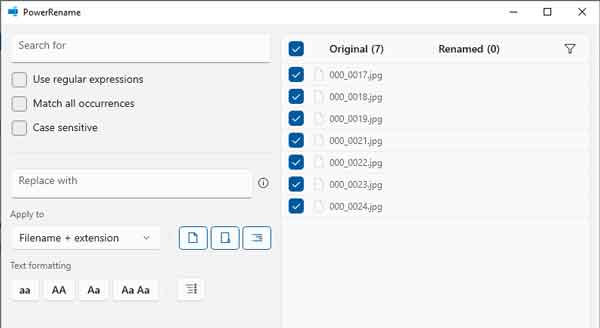
You change just the file names or only the file extensions. You can exclude files, folders, and sub-folders. It is the swiss army knife of file renaming.
Shortcut Guide - This cool little utility shows you what Windows logo key  shortcuts you can use at any given time.
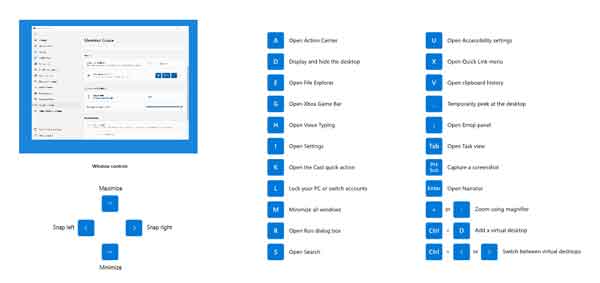
You just hold down the Windows logo key for a preset amount of time, and the screen appears with the available shortcuts you can use. If you find these shortcuts handy, we have a complete list of Windows logo key shortcuts for Windows 10.
v0.16 - Released 3/31/20 - Revised 12/4/23
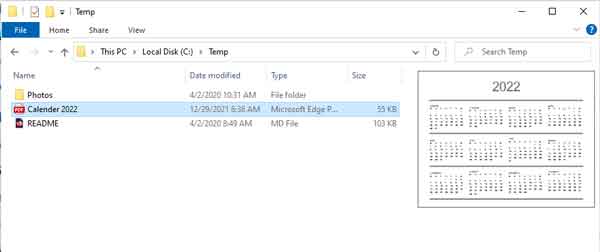
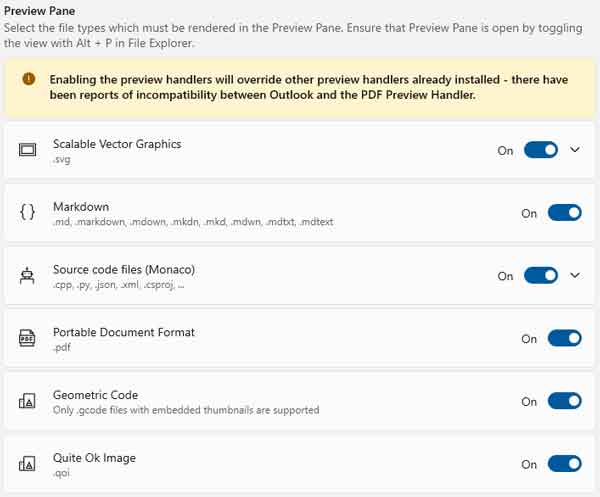
File Explorer add-ons - This is a collection of valuable add-ons for File Explorer that extends the functionally of the Preview Pane and Icon Preview. There are currently six (6) Preview Pane and five (5) Icon Preview File Explorer add-ons.
The current file types that can be rendered in the Preview Pane are: Markdown (.md), SVG (.svg), Developer files (.cpp, .py. etc.), PDF (.pdf), G-code (.gcode) and QOI (.qoi).
The current file types that can have Icon thumb previews are: SVG (.svg), PDF (.pdf), G-code (.gcode), STL (.stl) and QOI (.qoi).
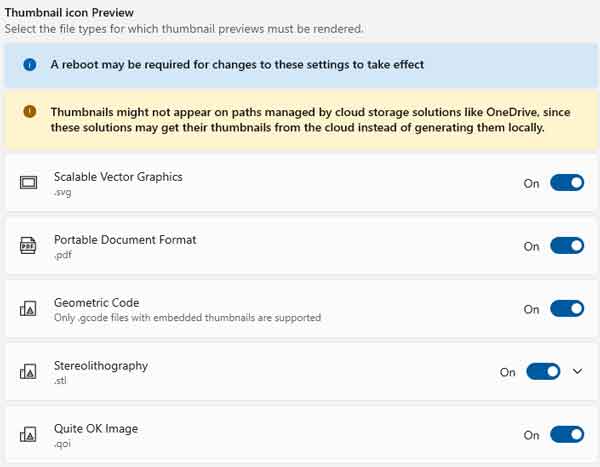
Image Resizer - This utility is similar to the one for Windows XP, but this version has way more features. Right-click on one or more images, and you will get a context menu. Left-click on Resize pictures, and you get the Image Resizer screen.

There are several picture sizes to choose from, or you can create a custom size. Left-click on the Settings link, and you get even more options for resizing your images. A must-have for anybody that does photo editing.
v0.18 - Released 5/19/20
Keyboard Manager - This utility allows you to remap a single key on your keyboard to another. You can also map current keyboard shortcuts to different key combinations.
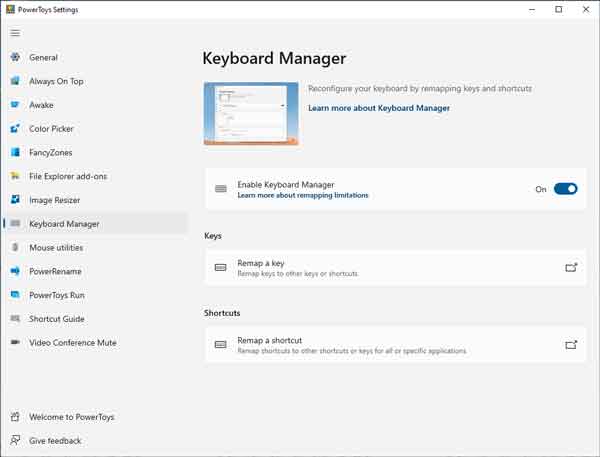
Keep in mind that when remapping keyboard shortcuts, you are limited to a combination of two keys.
PowerToys Run - This utility can perform all sorts of different functions. Type a couple of letters, and PowerToys Run will display a list of programs, folders, and files with the letter(s) in their name(s).
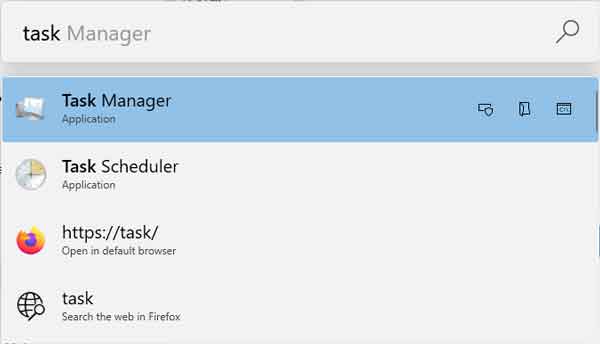
It can also search for running processes, run shell commands, and do simple math calculations.
v0.20 - Released 7/31/20
Color Picker - This utility will display the color of anything you place your mouse cursor over in both HEX and RGB values. You can copy the color value to the clipboard by left-clicking on the object.

You can change the hotkey shortcut used to bring up Color Picker, and the values (HEX or RGB) copied to the clipboard. And if you have a scroll wheel on your mouse, you can use it to bring up a magnifier window to get an even more detailed color pick.
v0.41.2 - Released 6/28/21
Awake - This utility will keep your Windows 10 computer from going asleep. This is really handy when you are doing updates and upgrades. No more do you have to create a special power plan to keep your computer awake.

Remember that if your computer goes to sleep, anything it was doing, like performing a Windows 10 Feature update, will be paused. So when you need to prevent your computer from going asleep, Awake can be the perfect solution.
v0.49.0 - Released 10/28/21
Video Conference Mute - This utility lets you turn off your camera and mute your microphone with a single keystroke. This utility has finally made it to the stable release of PowerToys, as it was previously categorized as experimental in previous releases.

There are three (3) keyboard shortcuts that the Video Conference Mute utility uses. The first one will mute the camera and microphone, the second will mute just the microphone, and the third will mute just the camera. And these shortcuts can be customized to a user's preference.
Mouse utilities - This is a collection of useful apps that extends and enhance the functionality of the mouse and cursor in Windows 10 / Windows 11. Currently, there are two (2) utilities in the collection: Find My Mouse and Mouse Highlighter.

Find My Mouse is a simple utility that displays a spotlight on the mouse cursor when the left control key is pressed twice. Quite handy when you are using multiple screens.

Mouse Highlighter is another simple utility that highlights the mouse cursor when clicking either mouse button. You can choose which color is displayed for each mouse button (left or right), the opacity, radius, fade delay, and fade duration.

Mouse Pointer Crosshairs is another simple utility that, when activated, shows crosshairs across the entire screen to indicate the mouse pointer's location.
v0.53.1 - Released 1/6/22
Always on Top - This utility will keep a program that is running on top of all of the rest of the open program windows. This PowerToy can be helpful if you have a program that you want to always be in front of all other app windows.
Along with putting a particular app window in front of the others, you can also have a border around that window. You can select the color and thickness of the border. You can also have Always on Top play a sound when you activate it.
v0.62.0 - Released 9/6/22
Quick Accent - This utility makes inserting accented characters simple. Once you activate this PowerToy, you must press the character key to which you want to add an accent and the Activation Key (either the space key, left/right arrow, or both).
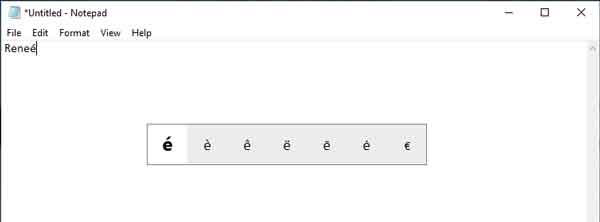
If you hold down the keys for more than 200 milliseconds, an overlay appears that allows you to scroll through all of the available accents. You can select which keys you want to use for Activation Keys and the default input delay that triggers the accent overlay.
Screen Ruler - This utility allows you to measure any place on your screen in pixels. Just activate Screen Ruler with the shortcut keys, and you can measure anything you can display on your screen.
Some advanced features include changing the color of the measured lines, changing the edge detection tolerance, and customizing the activation shortcut. If you do any graphic design, this is a must-have app!
Text Extractor- This utility can extract text from any legible text on your screen. Similar to the Snipping Tool, this program captures a selected area on your screen, uses OCR (Optical Character Recognition) to convert any text it recognizes, and then puts the output to the Clipboard.

From there, you paste the output from the Clipboard into a word processor, spreadsheet, email, etc. This utility is so handy that you will wonder how you were ever able to work without it.
v0.64.0 - Released 11/2/22
File Locksmith - This utility is a shell extension that allows you quickly find out what process is using a particular file. This can be useful when you want to close a file, and get a warning about it being used by another program.
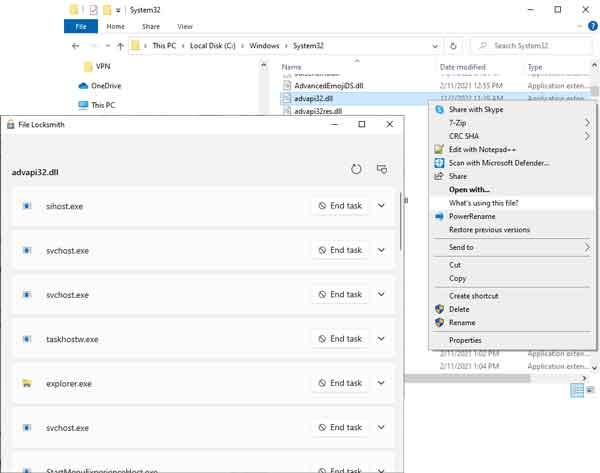
Once you enable File Locksmith, all you have to do is right-click on the file in question in File Explorer and left-click on What's using this file? from the context menu that appears. File Locksmith then appears with a list of programs that are currently accessing the file. It gives you the option of ending that particular task.
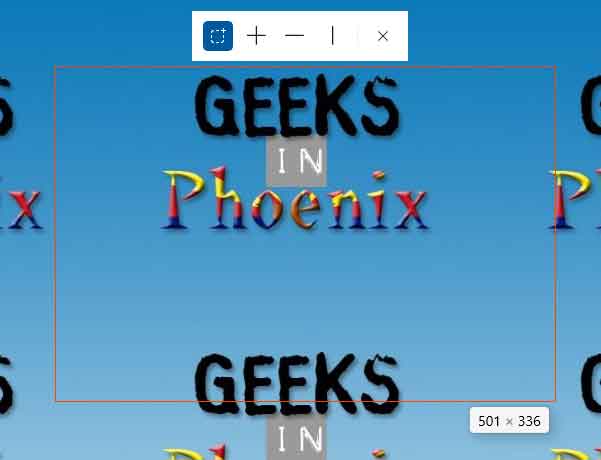
Hosts File Editor - This utility allows for easy editing of Hosts file inside of Windows. The Hosts file is the first place Windows goes to resolve domain names, like geeksinphoenix.com, to IP (Internet Protocol) addresses.

The Hosts File Editor can come in handy when you want to test out a new website. All you have to know is the Host (domain) name and the IP address, and you can redirect your network traffic to specific locations.
v0.68.0 - Released 3/1/23
Paste as Plain Text - This utility will take off the format of text placed in the Clipboard and paste just plain text. Nothing worse than pasting unwanted formatting into a document.

Paste as Plain Text can be convenient if you copy and paste text from emails or websites formatted in HTML. You will no longer have to paste text into Notepad to strip off the formatting.
Mouse jump (one of the Mouse utilities) - This utility allows you to move or jump your mouse cursor over long distances on a single or multiple screens.
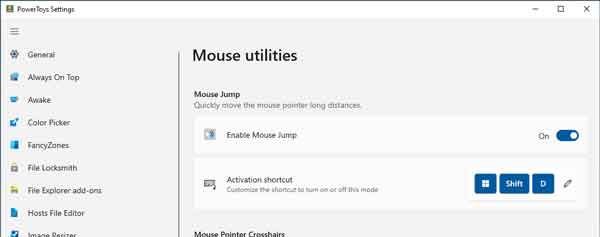
This utility can be handy if you use a large or multiple monitors and want to get your cursor across the screen(s) quickly.
v0.69.0 - Released 4/6/23
Registry Preview - This utility allows you to edit and preview Windows Registry files (.reg). It is a great way to visualize the contents of Registry files.
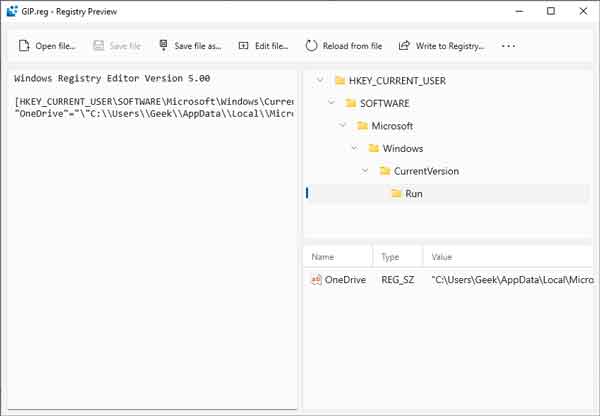
And when you are done editing your Registry file, you can save them to file or write them to the Registry.
v0.70.0 - Released 5/23/23
Mouse Without Borders - This utility allows you to use a single mouse across multiple devices. This can come in handy if you have a couple of devices next to each other.
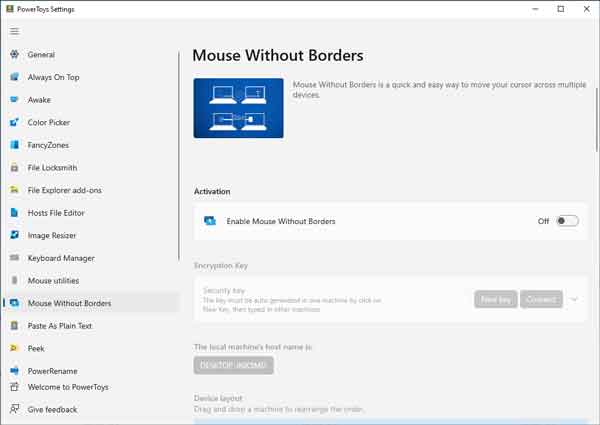
If this utility sounds familiar, it has been a project at the Microsoft Garage for some time. Glad to see it made its way into the PowerToys.
Peek - This utility lets you preview a file inside File Explorer. That way, you do not have to have the preview pane on for all file types.
Once open, you can pin the Peek window to its current location or open the file with the program associated with the file type.
v0.72.0 - Released 8/1/23
Value Generator - This handy plug-in for the PowerToys Run utility can generate a GUID (Globally Unique Identifier) for a URL namespace.
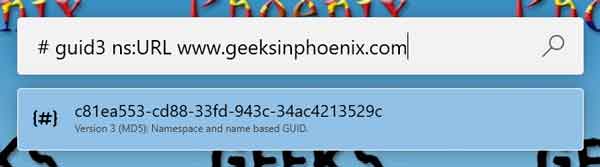
It can also generate SHA1 (Secure Hash Algorithm 1) hash strings and encode text strings to Base64.
v0.73.0 - Released 8/31/23
Crop And Lock - This handy utility allows you to crop a running app into a smaller window or thumbnail. This can be helpful if you run multiple programs at the same time.
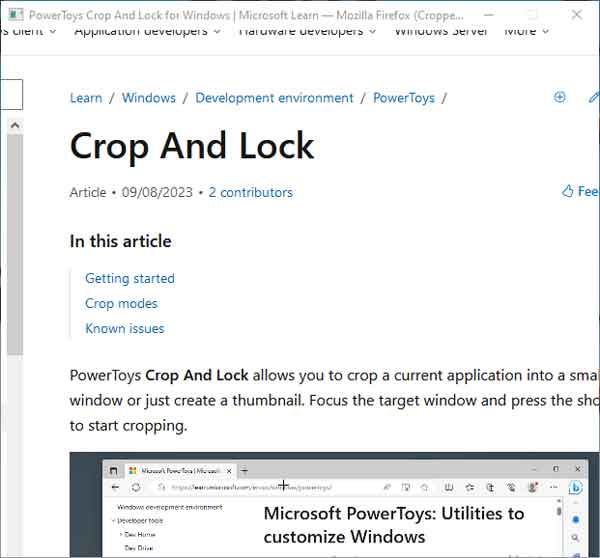
You can control an app inside a window but not with a thumbnail. Some apps will not work correctly with Crop And Lock, so I recommended testing a program before trying to use Crop And Lock with it.
v0.75.0 - Released 10/30/23
Environment Variables - This handy utility allows you to manage user and system environmental variables easily. You no longer have to go through multiple screens to get to the environmental variables.
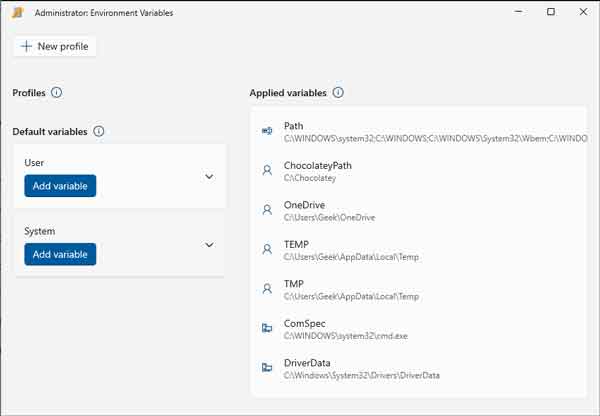
With the Environment Variables utility, you can also create profiles so that you can quickly apply a set of preconfigured variables. But remember that you can only use one profile at a time.
v0.77.0 - Released 1/9/24
Command Not Found - This handy PowerShell module detects an error thrown by a command-line and suggests relevent available WinGet package(s) to install.
This utility requires PowerShell 7.4 or greater and WinGet Client PowerShell Client module to be installed. If they are not installed, you can easily install them using the buttons on the Command Not Found page of the PowerToys settings.
v0.79.0 - Released 3/4/24
Keyboard Manager - This handy utility allows you to customize your keyboard by remapping the keys. You can also create your own keyboard shortcuts too.
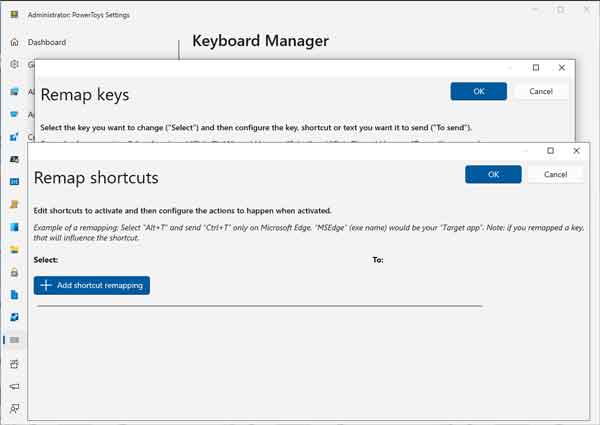
For example, you can remap the letter A key so that when you press it, it inserts the letter Z. But there are a few system key combinations you cannot modify, like the Ctrl + Alt + Del.
If you would like to give the PowerToys a try, I include two (2) links at the bottom of this article. The PowerToys are only available for the 64-bit versions of Windows 10 and Windows 11. As I told you before, the PowerToys download is on GitHub, and for an average Windows user may be kind of hard to find.
The first link is to the PowerToys project description page. It has an overview of all of the programs included in the PowerToys.

The second link is to the PowerToys releases page. The link to download PowerToys is in the Assets section at the bottom of each release.
Windows 10 / Windows 11 PowerToys on GitHub - Description page
Windows 10 / Windows 11 PowerToys on GitHub - Download page