Geeks in Phoenix

Geek Blog


How to enable automatic registry backups in Windows 10 and Windows 11

Updated January 15, 2024

When it comes to repairing Windows-based computers, the one thing that will positively stop Windows from starting up is a corrupt registry. Having a backup of the registry is essential for quickly getting a system back up and running. So here is how to enable automatic registry backups in Windows 10 and Windows 11.

How to enable automatic registry backups in Windows 10 and Windows 11

In previous versions of Windows, the operating system would automatically backup the registry. In fact, Windows did automatically back up the registry until Windows 10 version 1803.

With Windows 10 version 1803, Microsoft disabled the automatic registry backup to help reduce the overall footprint of Windows. Microsoft would prefer you to use the System Restore feature.

But considering that Windows 10 and Windows 11 can take up to 40GB or more of disk space, the folder that contains the registry backup (Windows\System32\config\RegBack) only takes up roughly 100MB or so of disk space. I do not see a problem with having a backup of the registry.

Now over the past couple of years, I have seen an increase in Windows computers that do not have System Protection enabled. System Protection is the feature that creates and manages the System Restore feature.

So when I get a computer in the shop with a corrupted registry, and there are no System Restore points, then the only thing I can do is reformat the drive and reinstall Windows. But you can re-enable the automatic registry backup with a simple registry edit.

Note: If you are not comfortable editing the registry, don't hesitate to contact a local computer technician to assist you.

From my experience, getting the registry backups going again is a two-step process. First, you create the registry key and restart your computer to take effect. Then you run the built-in task inside of Task Scheduler. Let's start with the registry editor.

How to open the Registry Editor in Windows 10 / Windows 11

  1. Open the Registry Editor by either
  2. Navigate to HKLM (HKEY_LOCAL_MACHINE) > System > CurrentControlSet > Control > Session Manager > Configuration Manager
    Registry Editor open to Configuration Manager entry
  3. In the left-hand column, right-click on Configuration Manager and select New > DWORD (32-bit) Value.
    Creating the new DWORD value EnablePeriodicBackup
  4. Name the new DWORD value EnablePeriodicBackup.
    Registry Editor open to EnablePeriodicBackup value
  5. Right-click on the EnablePeriodicBackup value and select Modify.
    Modifying the EnablePeriodicBackup value
  6. Change the Value data from 0 to 1 and left-click on OK.
    Changing the default EnablePeriodicBackup value from 0 to 1
  7. Restart your computer.

Using File Explorer, navigate to the Windows\System32\config\RegBack folder and see if the registry files are backed up. If you encounter a couple of dialog boxes that tell you that you do not have permission to access this folder, left-click on Continue.

You should see five (5) files in this folder; DEFAULT, SAM, SECURITY, SOFTWARE, and SYSTEM. And more than likely, they will be only 0KB in size. If that is the case, we will need to run the task that backups the registry.

Now we need to run the built-in task RegIdleBackup to get the Windows to start backing up the registry. Once you run the RegIdleBackup task, you should restart your computer again to get it fully functional.

How to open the Task Scheduler in Windows 10 / Windows 11

  1. Open the Task Scheduler by either
  2. When Task Scheduler appears, navigate down the left-hand column to Task Scheduler Library > Microsoft > Windows > Registry.
    The RegIdleBackup task inside of Task Manager
  3. In the center column, highlight the RegIdleBackup task and select Run in the right-hand column.
  4. There is no set schedule for this task. If you right-click on the RegIdleBackup task and select Properties from the context menu, you can create a new Trigger for it.
  5. When you are all done, restart your computer.

Windows will now be backing up the registry regularly. Now that you enabled automatic registry backups let's check and see if they are working.

Let's use File Explorer again to navigate to the Windows\System32\config\RegBack folder and see if the registry files have increased in size. You should now see they are no longer 0KB.

Clean up your Windows 10 computer using the Storage feature

Have you ever gotten a low disk space warning on your Windows 10 computer? Do you wish you could quickly and easily clean up the unwanted temporary files and the recycle bin? If so, look no further than the Storage feature inside of Windows 10.

Clean up your Windows 10 computer using the Storage options

For years now, I have been using the Disk Cleanup program inside of each version of Windows. It has been an easy way to clean up the junk (temporary files, Internet cache, recycle bin, etc.) that can build up in Windows.

But finding the Disk Cleanup program to run it can be a little tricky. There are multiple ways to run it when you find it, which can get confusing for a novice computer user.

Thankfully, Microsoft has integrated most of the functionality of Disk Cleanup into the Storage feature inside the Windows 10 Settings program. And getting to the Storage feature could not be any easier.

The Storage feature inside of Windows 10 Settings

How to get to Storage feature in Windows 10

  1. Left-click on the Start Windows logo menu and left-click on the Gear (Settings) icon. It should be the second icon up from the bottom.
  2. Left-click on the System category
  3. In the left-hand column, left-click on Storage. All of the storage options will appear in the right-hand column.

Note: All files removed using the Storage feature are permanently deleted, so be careful what files you choose to delete. Remember that once you delete a file, it is gone for good.

There are two (2) sections under the Storage area. The first is Storage Sense, with only a slider switch to turn it on or off and a button to bring up the configuration page.

Introduced in Windows 10 version 1809, Storage Sense is a simple 'Set and Forget' utility that can automatically clean out files you do not need anymore, like files in your Downloads folder and the recycle bin.

Storage Sense can automatically clean out a user's Downloads folder and recycle bin on a preset schedule. You can set it up to run automatically every day, every week, every month, or only when you start to run out of free disk space. You can also run it manually whenever you need to free up some disk space quickly.

The second section is part of the Storage Reserve. Storage Reserve allocates space to facilitate proper performance and successful updates to Windows 10. This section lists the drives currently attached to your computer and how that storage is being distributed. That includes all fixed or removable HDDs, SSDs, and USB external drives.

Every drive has a status bar that shows the used / free space. Below the drive status bar, you will find the categories of different types of files that can be safely deleted. You may have to click on the 'Show more categories' button to view all available categories.

The list of categories is pretty extensive, so it may take some time to go through each one. The categories range from system & reserved, apps & features, and all of the special folders (Desktop, Documents, Downloads, Music, Pictures, and Videos).

Each category has also has a status bar that shows how much space those particular files are taking up. When you click on a category listed under a drive, you will be taken to another page with more options for that category.

Now when you click on the Temporary files category, you will be presented with a selection of options of which files you want to clean up. These are similar to the categories used in Disk Cleanup.

Remember that the majority of the items listed under Temporary files can be safely deleted. You may not want to remove all the files you have in your Downloads folder, so you might think about cleaning that folder up manually with File Explorer.

Also, if you choose the Windows Update Cleanup option, the clean-up process will happen the next time you reboot your computer. So be prepared for a longer boot time the next time you restart your computer.

Get better search results by setting your precise location in Windows 10

Have you ever used your favorite browser to search for a business close to you, only to have it return a list of business miles away from you? If so, then you may want to set your precise location in Windows 10.

Get better search results by setting your precise location in Windows 10

Usually, Windows 10 can get close to your relative location using a combination of various sources. These include the IP address your ISP (Internet Service Provider) provides, GPS (Global Positioning Service), wireless access points, and cell towers.

Despite all of these resources, there will be times when Windows 10 cannot determine your exact location. That is when you will need to set your precise location manually.

Setting your location manually can also help in planning business and personal trips, like vacations. For example, you can manually set your location to the address of a hotel you will be staying at and find restaurants close to that location.

Now you have to remember that Windows 10 has two (2) different types of programs, UWP (Universal Windows Platform) and Desktop, and they both have different ways of determining location.

UWP apps will typically ask for permission to access your location. These are the programs that use GPS and wireless access points to triangulate your location. You will find them listed in the Choose which apps can access your precise location section of the Location category of Windows Settings.

Desktop apps do not ask for permission to access your location and do not appear in the allowed access list. These programs include all of your browsers, including Google Chrome, Mozilla Firefox, Microsoft Edge, etc.

And since the majority of searches are performed using a web browser, setting your location manually will be the only way to get precise search results for your location.

How to manually set your location in Windows 10

  1. Open Windows Settings by either:
    • Left-click on the Start Windows logo key button and then left-click on the gear icon (Settings).
    • or
    • Right-click on the Start Windows logo key button and then left-click on Settings from the Power User menu.
  2. Left-click on Privacy.
    Default view of the Windows 10 Settings app with the Privacy category outlined
  3. Scroll down the left-hand column and left-click on Location.
    The Location section inside of the Windows 10 Settings
  4. Scroll down the right-hand column until you find Allow desktop apps to access your location and make sure it is switched on.
    Allow desktop apps to access your location switch inside of the Windows 10 Settings
  5. Scroll back up the right-hand column and left-click on the Set default button under Default location. The Windows Maps program will then open.
    Set default location button inside of the Windows 10 Settings
  6. In Windows Maps, left-click on the Set default location button.
    Set default location button inside of the Windows Maps
  7. Type in the address you want to use as your location. Windows Maps will display a list of addresses that it feels are a match.
    The default location form inside of the Windows Maps
  8. Left-click on the correct address.
    Select default location inside of the Windows Maps
  9. Close Maps and Settings, and you will be all set.

If you are using a laptop and your location changes regularly, you can always go back into the Windows 10 Settings and modify it as needed.

How to reuse a HDD or SSD

So you upgraded the drive in your computer and now have an extra drive that you do not know what to do with. There are a couple of things you can do with it. So here is what you can do with your old drive.

How to reuse a HDD or SSD

I have written several articles on how to clone the drive in your Windows-based computer. But I have never written an article on what to do with the drive that you replaced.

When it comes to the old drive, there are two options; reuse it or recycle it. Either way, you will need some additional hardware to utilize the old drive.

To reuse it inside of your computer, you will need a spare drive carriage, mounting screws, a 7-pin SATA data cable, and a spare 15-pin SATA power connection. If you want to connect it externally, you will need a drive enclosure (2.5" or 3.5").

To recycle it, you will need to erase all of the data on the drive. I like to encrypt the drive with BitLocker first, then perform a seven-pass DoD (Department of Defense) disk wipe. So even if someone were able to recover any data, it would still be encrypted.

Now, was the old drive bootable (contained the operating system)? If so, then there will be a boot record that needs to be deleted before you can reuse it.

If you plan on reusing the drive, simply erasing all of the data on the drive should work. If you plan on recycling it, then you will need to securely erase all of the data so no one can successfully recover anything from it.

If the drive was used only for storage, then erasing all of the data will work. If it was the boot drive in your computer, we have to erase all of the data and delete the boot record so that any computer that it is connected to does not accidentally boot up onto it.

Time to erase the drive

The first thing you have to do is attached the drive to your computer, either by turning the computer off and installing the drive inside of your computer. Or by connecting it externally using a drive case, docking station, or a USB adapter.

Remember that if the drive was originally a boot drive and you install it inside of your computer, your system may try and boot on that drive. It is recommended that you wipe the drive of any boot record and boot partition before installing it inside your computer.

Several drive manufacturers have software that can erase the data from one of their drives. Western Digital, Seagate, and Samsung are a few that have that type of software. In fact, Seagate's Seatools for Windows will work on any manufacturer's drive.

There is also third-party software that can perform DoD (Department of Defense) disk erasing. The UBCD (Ultimate Boot CD) has several programs that can perform a DoD disk wipe (I like using Darik's Boot and Nuke). If you are planning on recycling the drive, a DoD wipe is recommended.

There have been times when I have seen a manufacturer's software fail when it comes to erasing data from a drive. It usually happens when the drive in question was originally a boot drive.

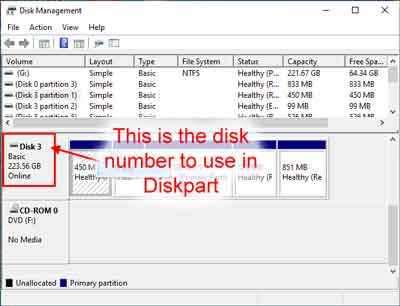
As you can see from the following screen capture,
The properties of a hidden partition in Windows 10 Disk Management
the original boot/recovery partition can not be deleted in Windows 10 Disk Management application.

In cases like that, I have found using the Windows Diskpart application works great. It is a command-line-only program, but you can use it to delete any type of partition if you are very careful.

Using Diskpart to erase a drive

Note: Misusing Diskpart can erase a disk that you may not want to be wiped, so be extra careful and double-check the disk number before proceeding.

To ensure that you erase the correct drive, let's open Windows 10 Disk Management and verify the disk number.

  1. Open Disk Management by either:
    • Right-clicking on the Start Windows logo key button and select Disk Management from the context menu
    • or
    • Left-clicking on the Start Windows logo key button, scroll down the application list and expand the Windows Administrative Tools folder. Then left-click on Computer Management. Then under Storage, you will find Disk Management.
  2. Locate the disk in question. It will be labeled Disk #.
    The disk number of a drive in Windows 10 Disk Management
  3. Open a Command Prompt with Administrative permissions (click here for more details).
  4. Type diskpart and then press enter.
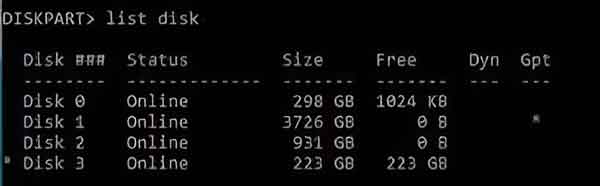
  5. Type list disk and press enter.
    The list disk command in diskpart
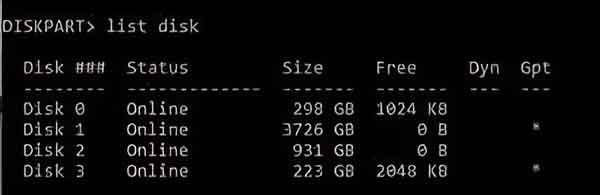
  6. Type select disk #, replacing the # with the disk number found in Disk Management.
    The select disk command in diskpart
  7. Type clean and press enter.
    The clean command in diskpart
    The list disk command in diskpart showing a the empty disk
  8. Type exit to close Disk Management.
  9. Type exit again to close the Command Prompt.

Time to format the drive

All partitions will now be gone, and the drive is ready to be reformatted. Let's go back into Disk Management and reformat the drive. When you open Disk Management, you should be prompted to initialize the disk.

The initialize disk dialog box in Windows 10 Disk Management

If the drive is smaller than 2 Terabytes, use the MBR (Master Boot Record) partition style. Any drive larger than 2 Terabytes will need to use the GPT (GUID Partition Table) partition style.

Once you initialize the disk, just right-click on the unallocated space and select New Simple Volume.
The create a new volume dialog box in Windows 10 Disk Management
You will be prompted for the volume size, assigning a drive letter or path, and what format you want the partition. Using the selected defaults is recommended.

Everything you wanted to know about Windows 10 shortcuts

When it comes to using a Windows-based computer, accessing programs, folders, and files quickly is essential for productivity. This is where shortcuts come in handy. Let's take a closer look at the different types of shortcuts you can have on your Windows 10 computer.

Everything you wanted to know about Windows 10 shortcuts

Before we proceed any further, let's take a look at the history of shortcuts in Windows. All three types of shortcuts I will be discussing in this article were introduced in 1995 with the release of Windows 95.

Windows 95 had a new graphical user interface called Windows Explorer (now named File Explorer). When you hear File Explorer, you probably think of the file manager program you navigate to find your documents, pictures, and music. And you would be right.

But File Explorer is also responsible for displaying the Start Menu, Taskbar, and Desktop. All of the shortcuts I will be discussing are directly related to File Explorer.

Geek Tip: If you ever start Windows 10 and get to a black screen with just a white cursor arrow, that is a sign that File Explorer did not start. You can manually start File Explorer and here is how to do it.

How to fix the Windows 10 black screen with a white mouse cursor

The different types of Windows 10 shortcuts

Now, there are three (3) kinds of shortcuts in Windows 10;

  • File - which contains a link to a program, file, or folder.
  • Internet - which contains a link to a file or website on the Internet.
  • Keyboard - which is when you press two (2) or more keys on the keyboard simultaneously.

The first two types of shortcuts (File and Internet) are small files that contain a link to a specific file, folder, or website. You can spot one of these types of shortcuts by the curled arrow overlay in the lower left-hand corner of the shortcut's icon on the Desktop or File Explorer. Shortcuts on the Start Menu do not have the curled arrow.

The third type of shortcut (Keyboard) is when you use a combination of keys on your keyboard to start a program or action. Usually, these are applications or actions that you use frequently. You can even add keyboard shortcuts to File shortcuts on your Desktop.

File and Internet shortcuts

As I said before, File and Internet shortcuts are just files with different extensions. File shortcuts have a .lnk extension, Internet shortcuts use .url extensions.

File and Internet shortcuts on the Desktop, Taskbar, and the Tiles section of the Start menu are relatively easy to create. To learn how to create File and Internet shortcuts quickly, check out the following article.

How to create a shortcut in Windows 10

Creating shortcuts in the Start menu's application list can be challenging only because the location where Start menu shortcuts is hidden by default. But if you want to learn more on how to customize the Start menu, check out the following article.

How to customize the Start menu in Windows 10

Keyboard shortcuts

When it comes right down to it, Keyboard shortcuts are the fastest way to open various programs and settings in Windows 10. You do not have to go hunting for a Desktop icon or open the Start menu.

Just by pressing two or more keys simultaneously on your keyboard, you can bring up File Explorer or the Run dialog box. Using the Clipboard, you can also copy, cut or paste text or images too.

There are so many Keyboard shortcuts in Windows 10 that I cannot list them all here. So the following articles cover almost all Keyboard shortcuts there are.

Windows logo key shortcuts for Windows 10

General keyboard shortcuts

Accessibility keyboard shortcuts

Dialog box keyboard shortcuts

My favorite left hand Windows keyboard shortcuts

How to use all of the Clipboard features in Windows 10

Now the only Keyboard shortcut not covered in all of these articles are the ones you create yourself. Desktop shortcuts can also have Keyboard shortcuts associated with them too.

When it comes to shortcut keys in Desktop shortcuts, you have to remember that you can use a combination of keys and numbers on the keyboard or just numbers on the numeric keypad.

The Desktop keyboard shortcut keys use a combination of three (3) keys, with the first two keys having to be Ctrl + Alt. Desktop numeric keypad shortcut keys are a single digit.

  1. Right-click on the Desktop shortcut you want to modify and select Properties from the context menu that appears.
    The properties form of a Desktop shortcut
  2. Left-click on the Shortcut tab and left-click on the Shortcut key field.
    Keys that can be used for Desktop shortcuts
  3. Press the desired key you want to associate with the Desktop shortcut. Remember that any key you press on the keyboard will automatically add Ctrl + Alt to the key you pressed. Numeric keys have Num before the actual number key.

See the video below for more details.

Free computer diagnostics

Repairing a PC can sometimes be expensive, and that is why we offer free basic in-shop diagnostics. Give one of our professional and experienced technicians a call at (602) 795-1111, and let's see what we can do for you.

Check out our reviews

Geeks In Phoenix LLC, BBB Business Review

Customer service is #1

Here at Geeks in Phoenix, we take pride in providing excellent customer service. We aim to give the highest quality of service  from computer repair, virus removal, and data recovery.

Bring your computer to us and save

Repairing a computer can be time-consuming. That is why we base our in-shop service on the time we work on your computer, not the time it takes for your computer to work! From running memory checking software to scanning for viruses, these are processes that can take some time.

Contact us

If you have any questions, please feel free to give us a call at (602) 795-1111  and talk with one of our Geeks. Or you can send us a message from our contact page contact page , and one of our Geeks will get back to you as soon as possible. Or you can stop by and see us. Here are our hours and location.

Like Geeks in Phoenix on Facebook

Follow Geeks in Phoenix on Twitter

Watch Geeks in Phoenix on YouTube