Geeks in Phoenix

Geek Blog


Inside the Windows 10 Technical Preview

Note: the Windows 10 Technical Preview program expired on 4/15/15 and is no longer available.

Coming on the heels of the Windows 8.1 Update, Microsoft recently released the Windows 10 Technical Preview. With this new Windows version, Microsoft combines elements from Windows 7 and Windows 8.1 to enhance the keyboard/mouse user experience better. Let's take a look at what's new in the Windows 10 Technical Preview.

The Start menu returns in the Windows 10 Technical Preview

With this Windows version, we see a shift in the focus from touch-based devices to keyboard/mouse systems. The most significant change by far is the return of the Start menu. And it is a hybrid now, with elements from Windows 7 (Start menu (left-side)) and Windows 8.1 (Start screen Tiles (right-side)). But if you like using the Start screen, it's still there too. It's just a checkbox and a restart away.

You can switch in between the Start menu and the Start screen in the Windows 10 Technical Preview

But let's be honest, the Start screen concept might work on a tablet or phone, but it fails miserably on a laptop or desktop computer without a touch screen. Customers have even told me that they had returned brand new Windows 8 systems because they could not stand the Start screen.

Using multiple instances of the Desktop with Task view inside the Windows 10 Technical Preview

Along with the Start menu's return, Microsoft has also built-in the ability to run multiple instances of the Desktop called Task view. With Task view, you can have different sets of programs running in separate desktops. This feature is kind of cool if you're using a single display.

The Windows RT / Metro apps from Windows 8 / 8.1 also have undergone some changes. Their name has been changed to Universal apps, and they now run in completely re-sizable windows. You need to use the Store to install universal apps and can sync them across multiple devices using a Microsoft account.

There is a small change here and there too. One difference is with the way you copy and paste with the Command Prompt. You can now use the Windows keyboard shortcuts (Ctrl + C for copy, Ctrl + V for paste) for these tasks.

The Windows 10 Technical Preview is available for anyone who wants to give it a try. Remember; do not install the Windows 10 Technical Preview on a production system. Use only a system that can be reformatted after the preview expires (4/15/15). For this article, I used an Oracle VirtualBox virtual machine.

The correct ways to shut down your Windows based computer

Updated March 29, 2023

Doing computer repair, I see a lot of different issues. But there is one problem I see over and over again, start-up corruption. This most commonly occurs when the computer is not turned off properly. And laptops appear to be more prone to this issue than desktops. So here's how to properly shut down your Windows-based computer.

Which power button do you use to shut down your computer?

Logic dictates that if you use a button to turn on a device, you should also use it to turn it off (button on / button off). You use a button to turn your TV, audio/video components, and smartphone on and off. But this is only sometimes the case when it comes to your computer. It is always recommended that you allow the operating system to close down all applications and turn the computer off itself.

Using the Start menu / Start screen to shut down Windows

This may seem like a no-brainer, but you would be amazed at how many people don't use this method. It's mainly laptop users who instinctively close the lid or reach for the power button. But if you don't watch how long you hold the power button down, you could perform a hard shutdown. It's simpler and recommended to use the shut down button on the Start menu / Start screen.

Windows Vista

Shut down button location in Windows Vista
Start button > Power button > Shut down

Windows 7

Shut down button location in Windows 7
Start button > Shut down

Windows 8

Sign out button location in Windows 8
1. Start screen > Sign out
Shut down button location in Windows 8
2. Sign in screen > Power button > Shut down

Windows 8.1

Shut down button location in Windows 8.1
Start screen > Power button > Shut down

Or

Power users shut down button location in Windows 8.1
Power users menu (Windows logo key Windows logo + X) > Shut down or sign out > Shut down

Windows 10

Shut down button location in Windows 10
Start button > Power button > Shut down

Or

Power users shut down button location in Windows 10
Power users menu (Windows logo key Windows logo + X) > Shut down or sign out > Shut down

Windows 11

Shut down button location in Windows 11
Start button > Power button > Shut down

Or

Power users shut down button location in Windows 11
Power users menu (Windows logo key Windows logo + X) > Shut down or sign out > Shut down

Using the power button on the computer to shut down Windows

This method is acceptable for turning off your computer, as it performs the same command as the shut down button on the Start menu / Start screen. But you have to check and ensure that the power options inside the operating system are configured to shut down the system when the power button is pressed.

Power button options inside of Windows 8.1
Power button options inside of Windows 8.1 / Windows 10

The power button can be configured to put the system into sleep or hibernate. And if your system loses power while it's asleep, you will get an error when you restart it. This happens quite often with laptops when they are not using the ac adapter and the battery runs out.

Using the power button on the computer to force it to shut down

How do you turn off your computer when it freezes and has no reset button? This is where the Advanced Configuration and Power Interface (ACPI) specification comes into play. This spec has been built into every computer for well over a decade now. It mandates that when the power button is held down for 10 seconds or longer, the system performs a hard shutdown, turning off power to all components. This will most likely cause an error upon restart.

How to safely optimize your solid state drive

Updated September 20, 2020

When it comes to getting the best performance out of your computer, nothing can beat a Solid State Drive (SSD). Right out-of-the-box, they are significantly faster reading / writing data than a Hard Disk Drive (HDD). But there are a few things that you have to do differently with an SSD. Here's how to safely optimize your solid state drive.

The definition of tweak

There are plenty of articles out there that will give you a ton of different tweaks you can use to speed up the SSD access time, from turning off disk indexing to disabling Prefetch and Superfetch. Some may work for you; some may not. Generally speaking, if you're running Windows 7 or higher, the operating system should recognize the SSD and modify its behavior accordingly. The following tweaks are entirely safe and will not harm your system in any way.

General SSD maintenance

SSDs operate differently from HDDs, and there are a couple of things you should never do to an SSD. Since SSDs have limited read/write cycles, any program that intensively accesses the SSD could shorten the drive's life span. Running a disk defragment program on an SSD is not recommended. And as far as Check Disk (CHKDSK) is concerned, you'll need to contact the manufacturer of your SSD to find out if they recommend it or not.

Microsoft started building in support for SSDs in Windows 7 / Windows Server 2008 R2 and has expanded on it in Windows 8 / 8.1 & Windows Server 2012. Since the low-level operation of SSDs is different from HDDs, the Trim command was introduced to handle delete/format requests. To verify that Trim is on, you'll need to open an Administrative Command Prompt.

How to open a Command Prompt with Administrator privileges in Windows 7

How to open a Command Prompt with Administrator privileges in Windows 8

How to open a Command Prompt with Administrator privileges in Windows 10

You can verify that Trim is enabled by typing the following into an Administrative Command Prompt:

fsutil behavior query DisableDeleteNotify

If the command returns a 0, then Trim is enabled. If it returns a 1, then it is not. To enable Trim, type the following into the Admin Command Prompt:

fsutil behavior set DisableDeleteNotify 0

SSD free space maintenance

SSDs do have one downside; their capacity can be smaller than HDDs. The capacity of SSDs is getting closer to HDDs every day, but the price for a 1 to 2TB SSD can be kind of expensive. If you have a smaller capacity SSD, maintaining an adequate amount of free space is necessary.

Now there are two scenarios for setting up computers with SSDs: Single-drive (SSD only) and Multiple drives (SSD + HDD). Laptops are usually single-drive, and desktops are almost always multiple-drive. Here are a few ways to maintain free space.

Single-drive (SSD only)

The options here are limited. You could store your files like documents, photos, and music to an external drive or the cloud to free up space. Here are a few more ideas.

Turn off Hibernation.
With the speed of an SSD, boot times will be relatively faster than with an HDD. You'll find that you can boot your computer just as fast as if you brought it out of hibernation. And since hibernation writes the system memory to disk, you'll free up the same amount of disk space equal to the total system memory. And if you have a lot of memory, this can free up a big chunk of space on your SSD.

Disable Windows hibernation and free up disk space

Turn off the virtual memory/pagefile.
Use this with caution! Technically, virtual memory is used when all of the system memory is full. If you have a large amount of system memory (16GB or more) and you don't run memory hog software like Photoshop, you should be alright disabling it. And you'll free up a few GB's of drive space in the process.

Managing Virtual Memory / Pagefile in Windows 7

Managing Virtual Memory / Pagefile in Windows 8

Managing Virtual Memory / Pagefile in Windows 10

Clean up the drive regularly.
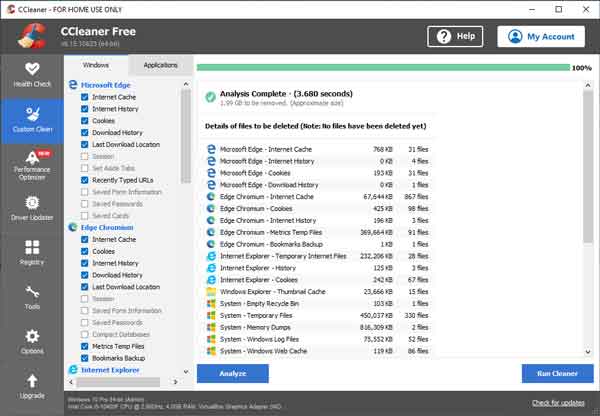
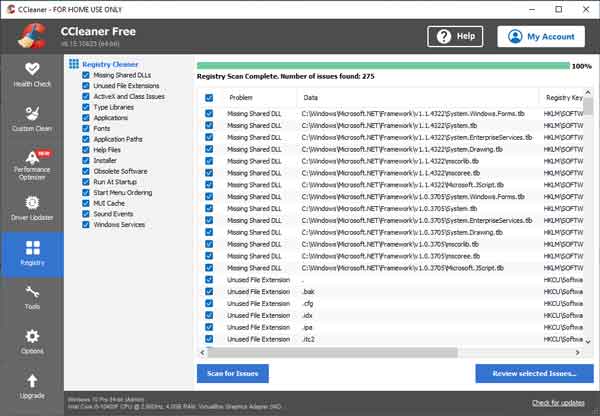
Temporary files and browser caches are a few items you'll need to keep an eye on. Using a program like Piriform's CCleaner or Disk Cleanup that comes with Windows will take care of these files. Disk Cleanup can also be run as a scheduled task.

Free up more disk space with Windows 7 Disk Cleanup

Clean up your hard drive in Windows 8 with Disk Cleanup

Clean up Windows 10 with Disk Cleanup

Clean up and optimize your computer for free with CCleaner

Multiple-drive (SSD + HDD)

This is the optimal setup. Everything under a single-drive scenario applies here. Windows and program files need to be on the SSD. Almost anything else that Windows doesn't require for regular operation can go over to the HDD.

Move the virtual memory/pagefile.
Instead of turning it off, move it to the HDD (see link above).

Move personal files to HDD.
Your documents, photos, and music can take up a large amount of space on your drive. Get them off of the SSD and over to the HDD.

Modifying the default locations of user files and library properties in Windows 7

Modifying the default locations of user files and library properties in Windows 8

Modifying the default locations of user files and library properties in Windows 10

There are plenty of other tweaks you can do, like moving the location of your browser cache and temp folders to the HDD. You can find all of that information and more with a quick search on Google.

Create great graphics with Paint.NET 4.0

Updated August 29, 2023

Note: This article was based on Paint.NET version 4. Since this article was written, Paint.NET version 5 has been released. Click here to read the newer Paint.NET 5 article.

One of the things I like to do besides repairing computers is creating graphics. Over the years, I have used many different image editing programs, including Photoshop and CorelDraw. But for free graphics programs, you just cannot beat Paint.NET.

Lately, I have been back through some of my older articles and updating the content. Even though I wrote this article a few years ago, Paint.NET is still one of my favorite graphics programs. And it just keeps getting better all of the time.

The user interface inside of Paint.NET 4

Paint.NET was initially created to replace the Paint program included in Windows but has evolved in to so much more since then. It includes such features as layers, effects, transparency, blending, and best of all, plugins.

With hundreds of plugins available, you can expand on the out-of-the-box graphic capabilities of Paint.NET. Since I have a digital camera that will take photos in RAW format, I found a plugin that opens that type of file. I also use Photoshop and have found a plugin to open those files too.

Paint.NET uses an asynchronous, fully multithreaded rendering engine and supports hardware acceleration via the GPU (Graphics Processing Unit). Selections are anti-aliased, and selected outlines rendered with 'dancing ants' animation, significantly improving the contrast between the sample and image. And the user interface is clean and straightforward to use.

The Settings dialog box inside of Paint.NET 4

There are now two (2) versions of the Paint.NET program. The original Windows desktop version and the UWP (Universal Windows Platform). The Windows desktop version is available for download for free from the dotPDN website. The UWP version is available for purchase from the Microsoft Store.

Paint.NET system requirements

  • Windows 10, Windows 8.1, or Windows 7 SP1 with platform update
  • .NET Framework 4.7.2
  • 1 GHz processor (dual-core recommended)
  • 1 GB of RAM

For more information on Paint.NET, follow the links below:

Get Paint 4
What's new in Paint.NET

How to upgrade your computers hard disk drive to a solid state drive

Updated September 10, 2024

There are some computers out there that still use a Hard Disk Drive (HDD) for storage and could be upgraded to a Solid State Drive (SSD). Each drive type has pros and cons: HDDs are cheaper and have more storage, but SSDs are extremely fast (especially when connected to an M.2 slot). So, if your existing computer has an HDD, odds are you could replace it with an SSD. Here's how to upgrade your computer's hard disk drive to a solid-state drive.

How to upgrade your computer's hard disk drive to a solid state drive

I wrote an article not long ago on how to upgrade the hard drive in your computer and refer back to it often. It describes how to clone a smaller drive to a larger one of the same type. Since SSDs typically have less storage than HDDs, this time, I'll have to shrink the existing HDD partition(s) down below the capacity of the target SSD before I can clone it.

As in the article mentioned above, the first thing to do is check the existing HDD. Doing this will ensure there are no errors that may prohibit the cloning of the drive.

How to check your drive for errors in Windows 11

How to check your drive for errors in Windows 10

Now we have to start cleaning up the drive. Windows has a built-in tool called Disk Cleanup (cleanmgr.exe) that works well at getting out the clutter. Try using it from an admin command prompt; that way, you'll get more options.

Clean up Windows 11 with Disk Cleanup

Clean up Windows 10 with Disk Cleanup

Since we are trying to get the maximum amount of free space we can, we will have to delete some files, including documents, photos, videos, etc. Doing a backup right now will ensure we have a copy of all the files if we need to recover some later.

How to backup your Windows 11 computer using Windows Backup

How to backup your Windows 10 computer using Windows Backup

The next thing we have to do is find out what is taking up space on the existing HDD. For this, I'll use a copy of Space Sniffer. After a quick look, I see that I can free up several gigabytes of space by permanently removing the hibernation file and temporarily deleting the swap file. Windows will warn you about having no swap file, but we will be recreating the swap file once the drive cloning is complete.

Disable Windows hibernation

How to manage Windows 11 Virtual Memory

How to manage Windows 10 Virtual Memory

The next thing we need to do to the drive is to defragment it. For this task, I'll use the built-in Defrag and Optimize Drive app.

How to defragment and optimize your drive in Windows 11

How to defragment and optimize your drive in Windows 10

If the capacity of your drives match

If the capacity of your old drive and new drive are the same capacity, you are ready to clone your drive. The following link has instructions and links to the software to do it.

How to clone the drive in your Windows computer

Once you have your old drive cloned to the new one and you have swapped them out, go ahead and re-enable the swap file. Re-enabling hibernation is a personal choice.

If the capacity of your drives do not match

If the capacity of your old and new drive differ, you will have to manually resize the Boot partition (C: drive). Right-click on the Start Windows logo button to bring up the Power User menu and select Disk Management. Here you will find all of the drives currently attached to your computer.

If you have more than one drive attached to your computer, you will need to determine which drive has the operating system. This drive will usually have three partitions: EFI System Partition, Boot Partition and Recovery Partition.

Once you have located the correct drive, you need to check the partition structure. The EFI System Partition is always the first partition (the start of the drive) on the left side of the graphical view of the drive, with the Boot Partition in the middle and the Recovery Partition on the right side (the end of the drive). If you have more than one partition behind the Boot Partition, you will need to contact a computer technician to assist with the upgrade.

Since we need to resize the Boot Partition (C:\ drive), you will need to disable and remove the Recovery Partition and recreate it after the drive has been upgraded. This can only be done using an Administrative Command Prompt.

How to open a Command Prompt with Administrator privileges in Windows 11

How to open a Command Prompt with Administrator privileges in Windows 10

When you have an Admin Command Prompt open, type the following to find the location of the Windows Recovery Environment (WindowsRE) boot image and press Enter.

reagentc /info

Take note of the harddisk# and partition#. Then, type the following to disable the WindowsRE boot image and press Enter.

reagentc /disable

Then type the following and press Enter. This will bring up the command-line version of Disk Management.

diskpart

Then type the following to list all of the disks attached to your computer and press Enter.

list disk

To select the disk with the Recovery Partition, type the following and press Enter. This should be the same harddisk number that you made note of earlier.

sel disk #

To select the Recover Partition, type the following and press Enter. This should be the same partition number that you made note of earlier.

sel part #

To delete the WinRE partition, type the following and press Enter.

delete partition override

If your old drive is larger than your new drive, you will need to shrink the Boot Partition. To do this, open Computer Management, expand the Storage section in the left column and select Disk Management. In the right column, right-click on the partition marked as Boot (usually C:) and select Shrink. Remember to take the size down at least 10-15% below the capacity of the new SSD.

Shrinking a partition down in Windows

Once the partition has been resized, it's time to clone the drive. The following article details how to clone your hard drive, including links to the cloning software.

How to upgrade the hard drive in your computer

Note: An issue not addressed in the article above is the form factor; the existing SATA HDD is 3.5" form factor, and SATA SSDs are 2.5" form factor.
A SATA SSD installed into a desktop adapter bracket
This can easily be resolved by using a 2.5" to 3.5" adapter bracket.

Once the drive cloning is complete, and the system is running again, we need to expand the boot partition to use any free space available. Open Computer Management, expand the Storage section in the left column and select Disk Management. In the right column, right-click on the partition mark as Boot (usually C:) and select Expand. Make sure to leave 1GB of space at the end for the Recovery Partition.

To recreate the Recovery Partition, you will need to open an Admin Command Prompt. At the prompt, type the following and press Enter.

diskpart

First thing you need to do is check if the disk partition style is a GUID Partition Table (GPT) or a Master Boot Record (MBR). To do that, type the following and press Enter. Check if there is an asterisk character (*) in the Gpt column. If there is an asterisk character (*), then the drive is GPT. Otherwise, the drive is MBR.

list disk

If your disk is GPT, type the following and press Enter.

create partition primary id=de94bba4-06d1-4d40-a16a-bfd50179d6ac

Then type the following and press Enter.

gpt attributes =0x8000000000000001

If your disk is MBR, type the following and press Enter.

create partition primary id=27

Once the partition has been created, you will need to format it. Type the following and press Enter.

format quick fs=ntfs label=”Windows RE tools”

To confirm that the WinRE partition is created, type the following and press Enter.

list vol

To exit from diskpart, type the following and press Enter.

exit

To re-enable WinRE, type the following and press Enter.

reagentc /enable

If for any reason the WindowsRE fails to re-enable the Recovery Partition, an in-place upgrade will rebuild the Recovery Partition.

How to perform a repair upgrade of Windows 11

How to perform a repair upgrade of Windows 10

Once the boot partition has been resized, you can enable the Windows swap file. For more information on upgrading computer drives, click on the following links.

How to clone the drive in your Windows computer

How to upgrade the hard drive in your computer

Free computer diagnostics

Repairing a PC can sometimes be expensive, and that is why we offer free basic in-shop diagnostics. Give one of our professional and experienced technicians a call at (602) 795-1111, and let's see what we can do for you.

Check out our reviews

Geeks In Phoenix LLC, BBB Business Review

Customer service is #1

Here at Geeks in Phoenix, we take pride in providing excellent customer service. We aim to give the highest quality of service  from computer repair, virus removal, and data recovery.

Bring your computer to us and save

Repairing a computer can be time-consuming. That is why we base our in-shop service on the time we work on your computer, not the time it takes for your computer to work! From running memory checking software to scanning for viruses, these are processes that can take some time.

Contact us

If you have any questions, please feel free to give us a call at (602) 795-1111  and talk with one of our Geeks. Or you can send us a message from our contact page , and one of our Geeks will get back to you as soon as possible. Or you can stop by and see us. Here are our hours and location.

Like Geeks in Phoenix on Facebook

Follow Geeks in Phoenix on Twitter

Watch Geeks in Phoenix on YouTube