In this article, I am going to spotlight Microsoft Security Essentials (MSE). This is not Microsoft's first venture into the ant-virus market, but it is probably the best. Having used some of the more well-know anti-virus software (Norton / Symantec, McAfee, etc.) for over a decade, I decided to give MSE a try.
All of the articles I had read on Microsoft Security Essentials were quite positive, so I installed it on my netbook running Windows 7 in June. Since then, I have taken the netbook on several on-site service calls and vacation. I am happy to report that the netbook remains virus-free. What I like is the small footprint the software has. It does not take five minutes to start up Windows, as can happen on systems with limited resources (such as netbooks).
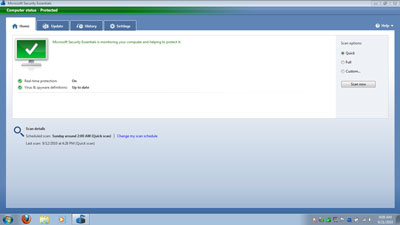
MSE works quite well with Windows 7 built-in firewall. The interface is clean and easy to use, unlike some of the anti-virus software out there. It's easy enough for a novice user to navigate. It also integrates into Windows Update. Here's a quote from Microsoft's website:
Microsoft Security Essentials provides real-time protection for your home PC that guards against viruses, spyware, and other malicious software.
Microsoft Security Essentials is a free* download from Microsoft that is simple to install, easy to use, and always kept up to date so you can be assured your PC is protected by the latest technology. It’s easy to tell if your PC is secure — when you’re green, you’re good. It’s that simple.
Microsoft Security Essentials runs quietly and efficiently in the background so that you are free to use your Windows-based PC the way you want—without interruptions or long computer wait times.
I encourage you to take a look at Microsoft Security Essentials. It's simple and free.
b9e7a42a-60bb-414b-8e00-b10ae14f20bc|0|.0|96d5b379-7e1d-4dac-a6ba-1e50db561b04
When I changed over to the Android, one of the functions I wanted was to use its 3G data connection with my netbook. I found this great program from June Fabrics Technology called PdaNet. It allows you to tether your Android's 3G without having to do any hacking.

Once the installation is complete on both PC and Android, you will find connecting to be easy. Just connect the USB cable from the Android to the PC, start the PdaNet app on your Android and then use the tray icon in Windows to connect. Here's a quote from their website:
PDA.net has been one of the most popular software for Windows Mobile phones, Palm OS phones, and iPhones. It is now ported to the Android system! PdaNet provides you with FULL Internet access, so all your email, instant message programs will work without any setting changes. Supports both USB Tether and Bluetooth DUN.
PdaNet does NOT require root access or hacking your phone's firmware in order to work. It is just a regular Android application that works on all Android phones as-is. Tethering is fast, secure, and USB mode will also charge your phone at the same time. Your phone can either connect to 3G data, WiFi, or even through VPN, and PdaNet will share the connection with your computer.
If you are looking to connect to the internet on your computer through your smartphone, I recommend you go over to June Fabrics site and take a look at their line of PdaNet products. BTW: If you use Windows 7, you can create a WiFi hot spot with PdaNet and Virtual Router.
1e64a7fb-89bb-4027-9a56-23d5bb39d7aa|0|.0|96d5b379-7e1d-4dac-a6ba-1e50db561b04
In my recent change to the Google Android from a Palm, I required two main functions. The second one was to be able to synchronize my Android to Microsoft Outlook. I have been using Outlook as a PIM (Personal Information Manager) for years now, as it's the 'de facto' standard in the corporate world. I was pleasantly surprised to find DejaOffice by CompanionLink.
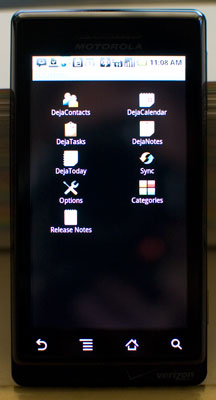
Being on the Palm platform for years, I became kind of pampered when synchronizing data with Outlook. This really was one of Palm Pilot's strong points. So when I found DejaOffice, it was just the perfect replacement for the conduits from Palm. With the ability to sync Contacts, Tasks, Calendar, and Notes, this is a 'must-have' if you use Outlook. Here's a quote from their site:
Data from the PC sync to DejaOffice, a mobile office application suite for Android. DejaOffice features robust contacts, calendar, tasks, and notes apps that provide enhanced functionality over the native Android applications. Contacts and calendar automatically sync with the native Android databases to allow for full functionality with other apps.
I highly recommend you give this program a try. It's available from the Android page at CompanionLink.
dcc7f093-f604-4116-bd84-af4184e588c0|0|.0|96d5b379-7e1d-4dac-a6ba-1e50db561b04
In my recent change to the Google Android from a Palm, I required two main functions. The first one was the ability to create, edit, and view Microsoft Office documents on the Android. I was pleased to see that DataViz, the creators of Documents To Go, had a version for the Android platform.

I have used Documents To Go for around a decade now on the Palm platform. The basic features are the same between the platforms, with a few minor changes. There is Word To Go (Microsoft Word), Sheet To Go (Microsoft Excel), Slideshow To Go (Microsoft PowerPoint), and PDF To Go (Adobe Acrobat). I like to create documents on my workstation, sync them with SyncToy to my Android and then be able to view/edit them when I am away from the office. Plus, you can also open up documents you have downloaded too. (like PDFs). Here's a quote from their web site:
Whether you’re an organization looking to mobilize your sales professionals or an individual looking to increase personal productivity, leaving your office or laptop behind does not have to mean leaving your crucial files and work behind.
Now you can get your work done no matter where you are by using Documents To Go to view, edit and create Microsoft Word, Excel, and PowerPoint files as well as view Adobe PDF files on your Android-powered smartphone. And since it is full-featured yet easy to use, Documents To Go is one mobile office suite that makes good business sense.
There is a free version of Document To Go, and it's available on the Android page at DataViz.
88380989-ddc3-483b-b684-8da7d5f66984|0|.0|96d5b379-7e1d-4dac-a6ba-1e50db561b04
Updated January 31, 2021
Note: SyncToy is no longer available for download from Microsoft's servers. The links at the bottom of this article have been revised to third party downloads. For an alternative file synchronization software, take a look at Allway Sync.
I recently migrated to a Google Android and needed a program to sync files between it and my workstation. I had used SyncToy 2.0 from Microsoft on Windows XP (32-bit), so I decided to give SyncToy 2.1 a try on Windows 7 (64-bit).

Once the installation was complete, I created a new folder on my computer to synchronize with the Android. I then opened up SyncToy and made a Folder Pair between the memory card on the Android (via USB cable) and the new folder on my computer.
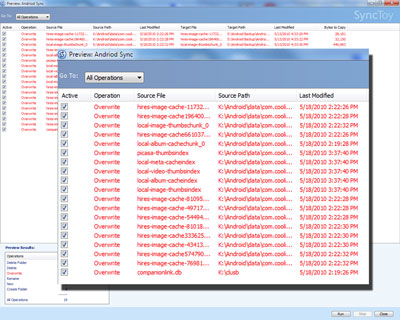
Clicking on the Preview button will show what files and folders are synchronized, type of operation, last modified, etc. Here's a quote from the SyncToy page:
There are files from all kinds of sources that we want to store and manage. Files are created by our digital cameras, e-mail, cell phones, portable media players, camcorders, PDAs, and laptops. Increasingly, computer users are using different folders, drives, and even different computers (such as a laptop and a desktop) to store, manage, retrieve and view files. Yet managing hundreds or thousands of files is still largely a manual operation. In some cases it is necessary to regularly get copies of files from another location to add to primary location; in other cases there is a need to keep two storage locations exactly in sync. Some users manage files manually, dragging and dropping from one place to another and keeping track of whether the locations are synchronized in their heads. Other users may use two or more applications to provide this functionality.
Now there is an easier way. SyncToy, a free PowerToy for Microsoft Windows, is an easy to use, highly customizable program that helps users to do the heavy lifting involved with the copying, moving, and synchronization of different directories. Most common operations can be performed with just a few clicks of the mouse, and additional customization is available without additional complexity. SyncToy can manage multiple sets of folders at the same time; it can combine files from two folders in one case, and mimic renames and deletes in another case. Unlike other applications, SyncToy actually keeps track of renames to files and will make sure those changes get carried over to the synchronized folder.
I have used SyncToy over the years without any issues and recommend it to anyone who needs to synchronize files between devices. SyncToy runs on Windows XP, Windows Vista, Windows 7, Windows 8.1, Windows 10 and comes in 32-bit and 64-bit versions. For more information on SyncToy, follow the links below.
SyncToy - 32-bit version
SyncToy - 64-bit version
593eede3-02b9-45ff-aaa1-d09f8d011209|0|.0|96d5b379-7e1d-4dac-a6ba-1e50db561b04