Geeks in Phoenix

Geek Blog


The different ways to navigate Windows 11

Updated January 27, 2025

If you have used Windows before, you are well versed with the Start menu. But did you know there are other ways to get around inside Windows 11? Let's take a look at the different ways to navigate Windows 11.

The different ways to navigate Windows 11

In the early versions of Windows, you only had the Program Manager to make your way around Windows. But in 1995, Microsoft released Windows 95 with a new way of navigating Windows, the Start menu.

Over the years, the look of the Start menu has changed. It has had several different Windows logos and flat/rounded/beveled edges, but it always worked the same way.

Then came Windows 8, and Microsoft changed the Start menu. The Start menu was replaced with the Start screen, and navigating Windows would never be the same.

When Windows users complained about the Windows 8 Start screen, Microsoft introduced the Power User menu in Windows 8.1. That made finding the more popular features easier, like Settings, System, and Computer Management.

So when Windows 10 was released, the Start menu came back along with the Power User menu. A few other cool features were added to the Start menu, including the ability to change the accent color of the Start menu.

With Windows 11, Microsoft changed the look and feel of the Start menu, but all of the essential functions are still there. The Start menu layout changed, but the learning curve is mild.

Windows 11 Start menu

The Start menu is the traditional way of getting around Windows 11. As with every version of Windows, Microsoft has made some changes to its appearance.

With Windows 11, you can change the location of the Start menu to either the center or the left side of the Taskbar. Sadly, you can not change the Taskbar's position to the left, right, or top of the screen.

You can change the same Start menu features in Windows 11 as in Windows 10. The only thing you cannot do is to change the Start menu's color. You can only change the color mode, light or dark.

All Start menu customizations can be found by going to Settings > Personalization. Here is a list of the features and areas on the Windows 11 Start menu.

The different features and areas of the Windows 11 Start menu

  • Search box: Type in the name of the app or file you are looking for.
  • Pinned apps: This is a collection of shortcuts to your favorite programs.
  • All apps: Here, you will find all of the shortcuts to the installed programs.
  • Recommended: This is a list of the most recently used files.
  • Folders: These are the shortcuts that you select to appear next to the Power button. You can choose which folders appear by going to Settings > Personalization > Start > Folders.

Here is a list of the folders you can have to appear next to the Power button.

  • Settings
  • File Explorer
  • Document
  • Music
  • Pictures
  • Videos
  • Network
  • Personal folder

Windows 11 Power User Menu

The Power User menu appeared in Windows 8.1 to appease users who were upset with the replacement of the Start menu with the Start screen. Windows 8 was a nightmare to navigate using the Start screen, and the Power User menu made it easier.

The Power User menu has shortcuts to the most used features inside of Windows, including System, Settings, and Computer Management. And the cool thing is that you can bring up the Power User menu in two (2) different ways.

  • Right-click on the Start button Windows logo

or

  • Press the Windows logo key Windows logo + X at the same time.

Windows 11 Power User menu

If you use your keyboard to bring up the Power User menu, the different programs and features will have a letter underlined in their name. If you press the corresponding letter, that program or feature opens.

Windows 11 Windows Logo keyboard shortcuts

Back when the Start menu was introduced, Microsoft also added a feature to help navigate Windows using the keyboard. That Windows logo key on your keyboard can do much more than bring up the Start menu.

Windows 11 Windows logo keyboard shortcuts

The Windows logo key can open more than seventy (70) Windows 11 programs and features when used with other keys. Some of my personal favorites are:

  • Windows logo key Windows logo + E opens File Explorer
  • Windows logo key Windows logo + R opens the Run dialog box
  • Windows logo key Windows logo + X opens the Power User menu

What makes these Windows logo keyboard shortcuts special to me is that you can use only your left hand. That way, I can keep my right hand on my mouse. Follow the link below for a complete list of the Windows logo key shortcuts for Windows 11 (it opens in a new window).

Windows logo key shortcuts for Windows 11

My first look at Windows 11

Microsoft recently announced that they are releasing a successor to Windows 10, aptly named Windows 11. So join me as I take a look at Windows 11.

My first look at Windows 11

When Microsoft announced the next version of Windows, I went looking for a beta or technical preview of Windows 11. I soon found out that the only way to get a version of Windows 11 is through their Insider Program.

Well, it just so happens that I had created a Virtual Machine (VM) a couple of years ago for the Windows 10 Insider Program. I started it, and sure enough, Windows informed me that I need to download a new build of Windows.

I went through the upgrade process, and when all was said and done, I had Windows 11 Insider Preview running inside a VM. So let's take a look at Windows 11.

Note: This build of Windows 11 that I am using for this article is just a beta, so the look and the way it operates may and probably will change before the final release of Windows 11.

Login Screen

The Windows 11 Logon Screen

Not much different here from Windows 10. The default font has changed, but other than that, it looks and feels like Windows 10.

Taskbar

The Windows 11 Taskbar

The first thing you will notice when the Desktop appears is that the Start button and pinned programs are centered in the Taskbar. Is this by default, and can it be easily changed back to left-justified.

Start Menu

The Windows 11 Start Menu

The Start Menu has gotten a makeover, with a new cleaner looking layout. All the same features are available, but they are arranged completely different.

Power User menu

The Windows 11 Power Users menu

It is still there, The only component of Windows 8.1 to still be inside of Windows. Don't remember Windows 8.1? That is one version of Windows I would love to forget.

Settings

The Windows 11 Settings app

As with the Start Menu, the Settings app has also received a makeover, getting broken into two (2) columns. The categories are now listed in the left-side column, and sub-categories are listed in the right-hand column.

Control Panel

The Windows 11 Control Panel

Microsoft has been trying to eliminate the Control Panel for a while now, but it still exists in the preview build I am running. Who knows if it will make it to the final build of Windows 11.

File Explorer

The Windows 11 File Explorer

File Explorer has gotten a small makeover too. The Ribbon appears to be gone, and a simple toolbar with the most commons functions has taken its place. We will have to wait until the final build to see if the Ribbon is truly gone.

The overall look and feel of Windows 11 is smoother than Windows 10. With rounded corners on dialog boxes and newer icons, Windows 11 looks like an excellent successor to Windows 10.

But of course, we will have to wait and see how the final build of Windows 11 looks and feels. For a more in-depth look at this version of Windows 11, check out the video below.

Navigating Windows 10

Updated October 22, 2024

Nowadays, it seems everyone is looking for ways to get things done more quickly. The same holds for your computer. The faster you can open a program or document, the better. So here are my favorite tips for navigating Windows 10.

Navigating Windows 10

Since I do computer repair for a living, I've had to find ways to navigate Windows' different versions. With Windows 10, Microsoft keeps some of the cooler features while adding some new ones. And they even brought back one feature from previous versions. Let's take a look at my favorite ways to get around inside Windows 10.

Power User menu

This little pop-up menu is a fast way to find some of the core features inside of Windows 10. It first appeared in Windows 8 to supplement the loss of the Start Menu. It never got the publicity it deserved; only real geeks knew it existed. My customers are still amazed the first time I use it in front of them.

Lucky for us, Microsoft decided to keep the Power Users menu in Windows 10. It is still the fastest way to access features like Apps and Features, Network Connections, and Computer Management. Here's how to display the Power User menu in Windows 10.

Windows 10 Power User menu

There are two (2) ways of displaying the Power User menu in Windows 10: Mouse or Keyboard.

Using your mouse to display the Power User menu in Windows 10

Right-click on the Windows logo Windows logo key on the Start Menu

Using your keyboard to display the Power User menu in Windows 10

Press the Windows logo key Windows logo key + X

If you use the keyboard to bring up the Power User menu, you'll find that the programs/features listed have underlined a single letter in their name. These are also keyboard shortcuts to that particular program/feature. Here's a link to the complete list of the Power User menu keyboard shortcuts for Windows 10.

Power User menu keyboard shortcuts

Windows logo key shortcuts for Windows 10

Another handy feature that nobody knows about is the Windows logo key. I have customers ask me, "What does that key with the Windows logo do?". Its primary use is to bring up the Start Menu, but it does more. Allot more.

The Windows logo key was introduced almost thirty years ago alongside Windows 95 and the new Start Menu. There were only a handful of Windows logo key shortcuts then, and you had to purchase a Windows 95 compatible keyboard to use them. Now, you can't find a Windows-compatible keyboard without it.

There are now nearly forty Windows logo key shortcuts in Windows 10. Once you try them out, you'll wonder how you lived without them for so long. Here's a link to the complete list of Windows logo key shortcuts.

Windows logo key shortcuts for Windows 10

Shortcut keys in Windows 10

Here is one of those 'old school' features that I love using. Did you know that you can open almost any Desktop shortcut with just your keyboard? By simply editing a shortcut, you open it with a combination of three (3) keys.

If you have used Windows for a while, you know what a shortcut is. And if not, no biggie. Here's how to create a shortcut in Windows 10.

Many of people don't know that they can edit a shortcut and change how it works, including adding a keyboard shortcut to it. The keyboard shortcut for your shortcut needs to be a combination of three (3) keys, and the first two (2) keys have to be CTRL and ALT. The third key is your choice, but I try to use either the first letter of the program/file or a letter close to the CTRL and ALT keys.

The shortcut key field inside of the properties a shortcut
The shortcut key field inside of the properties of a shortcut

How to add a keyboard shortcut to an existing shortcut

  1. Right-click on the shortcut you want to modify and select Properties from the context menu that appears.
  2. When the properties dialog box appears, make sure the Shortcut tab is selected.
  3. Go down to the Shortcut key field and left-click inside the area (the cursor will blink).
  4. Press the CTRL key and the key you want to be assigned to the shortcut simultaneously (Windows will automatically add the ALT).
  5. Left-click on Apply, and you are done.

Start Menu

And last but not least is the Start Menu. After a brief disappearance in Windows 8, Microsoft decided to bring it back. It's now got a slightly different look and feel, but it still does what it should: Navigate.

How to customize the Start menu in Windows 10

Updated September 24, 2024

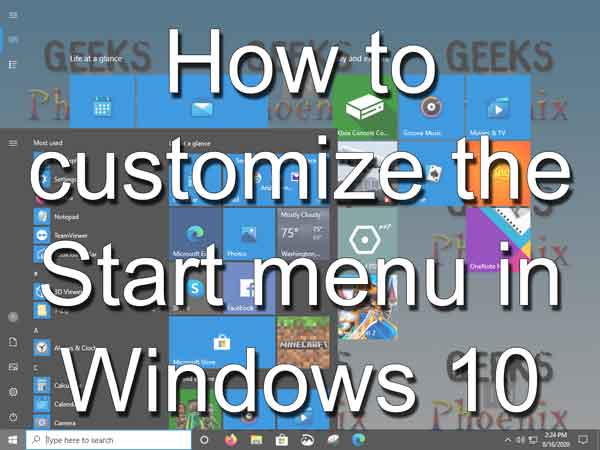
The Start menu was first included in Windows 95 and was a big part of its success. It has undergone many changes over the years but still is the primary way of navigating Windows. So here is how to customize the Start menu in Windows 10.

How to customize the Start menu in Windows 10

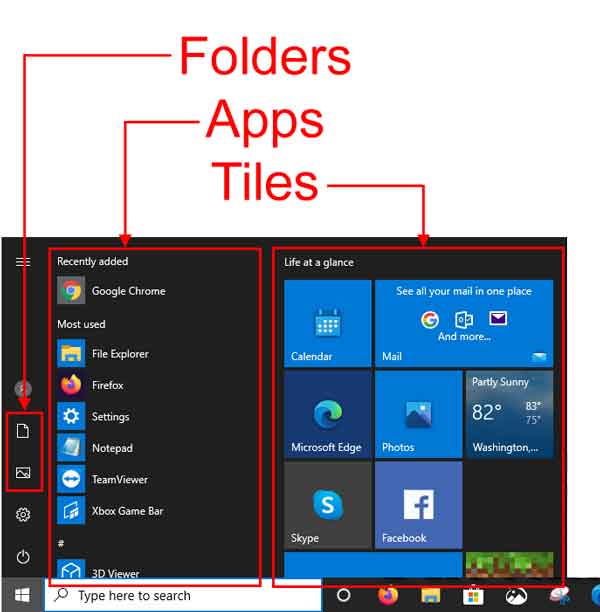
The Windows 10 Start menu is a combination of the Start menu that was in Windows 7 and the Start screen from Windows 8. You have the traditional Start menu features like folders and apps on the left and Start screen tiles on the right side.

The different areas of the Windows 10 Start menu

Now, there are four (4) main areas of the Start menu that you can customize: Appearance, Folders, App list, and Tiles. You can also change the size, color, font, and transparency of the Start menu. Changing the size is relatively simple.

Just like any other application, you can change the width and height of the Start menu. Hover your cursor over one of the Start menu edges until the sizing arrows appear, then hold the left mouse button and drag it to the size you want.

Almost all settings to customize the Start menu are located in the Personalization section of the Settings app. To find the Start menu settings in the Settings apps, just:

  1. Left-click on the Start Windows logo menu and select Settings (the gear icon).
  2. Left-click on Personalization.
  3. In the left-hand column, left-click on Start.

Appearance

This is where you can set up the way the Start menu looks and operates. In the right-hand column, you will find a list of options that you can turn on. Their functions are pretty self-explanatory.

  • Show more tiles on Start
  • Show app list in Start menu
  • Show recently added apps
  • Show most used apps
  • Show suggestions occasionally in Start
  • Use Start full screen (similar to Tablet mode)
  • Show recently open items in Jump Lists on Start or Taskbar and in Explorer Quick Access
  • Show account-related notifications. When off, required notifications are still shown

Folders

At the bottom of the list is a link labeled Choose which folders appear on Start. When you click on it, you get a list of the folders that you can toggle on or off. The folders that can be displayed on the Start menu are:

  • File Explorer
  • Settings (on by default)
  • Documents (on by default)
  • Downloads
  • Music
  • Pictures (on by default)
  • Videos
  • Network
  • Personal Folder

Tiles

Some of the Tiles are Desktop program shortcuts, and some are UWP (Universal Windows Platform) apps. All of the Tiles can be resized and unpinned. Live Tiles (tiles that display information, like the Photo app) can be turned on and off.

And there are a few that can be uninstalled directly from the Tile section of the Start menu. If you place the mouse cursor over a Tile and hold down the left mouse button, you can move a tile around. If you right-click on a Tile, you will get a context menu with different options.

You can easily pin a program to the Tile area of the Start menu. Just right-click on any application or shortcut in the App list, on the Desktop, or inside of the File Explorer, and select Pin to Start from the context menu that appears.

App list

I left this area of the Start menu for last, as it is the most complicated to change. The App list is a special folder on the drive where Windows is installed. Actually, there are two (2) App list folders: a system folder that is for all system users and a user folder that is inside of each user profile.

You can perform almost all of the regular folder and file editing inside the system App list reasonably quickly. Just right-click on an item and select an action from the context menu. Remember that the system App list is propagated into the user App list, so if you make a change here, it affects all users.

Now, adding to the system App list is hard since you can not do it directly. When I say directly, you can not just click inside and select New > Folder or Shortcut from the context menu. You have to copy/paste or drag/drop a folder or shortcut into it. I recommend leaving the system App list alone and changing only the user App list.

How to create a shortcut in Windows 10

Modifying the user App list is easier and is the recommended way of changing the App list. It will have fewer folders and shortcuts, but most of the App list comes from the system App list. Here are the different App list locations.

Just copy and paste the code below into a Run dialog box (Windows logo key Windows logo + R) and then press Enter.

The system App list location
%programdata%\Microsoft\Windows\Start Menu

The user App list location
%appdata%\Microsoft\Windows\Start Menu

How to create a shortcut in Windows 10

Updated September 24, 2024

Shortcuts are links to various types of objects, like a program, file, folder, another computer, or a webpage, and they can be placed on your Desktop, Taskbar, or Start menu. Here's how to create a shortcut in Windows 10.

In this article, we are going to look at two (2) types of shortcuts: File (.lnk) and Internet (.url). You can spot a shortcut on your Desktop or File Explorer by the curled arrow in the lower left-hand corner of the shortcut's icon. Shortcuts on the Start Menu do not have the curled arrow.

How to create File shortcuts in Windows 10

To create a shortcut to a file in Windows 10, you need to know where the object is located on your computer. Open File Explorer by left-clicking the File Explorer icon on the Taskbar or right-clicking on the Start Menu to bring up the Power User menu and select File Explorer. Then, navigate to the object you want to create a shortcut to. If you're going to create a Desktop shortcut, make sure File Explorer is not in full-screen mode.

  • For a shortcut to a file on the Desktop, press and hold the right mouse button on the object and drag it to the Desktop. From the context menu that appears, select Create shortcuts here.
  • For a shortcut to a file on the Taskbar, right-click on the object and select Pin to Taskbar.
  • For a shortcut to a file on the Start menu, right-click on the object and select Pin to Start. That will create a shortcut in the app tiles section. To create a shortcut in the list of programs, that is a little more complicated. For more information on creating a shortcut in the program section of the Start menu, check out how to customize the Start menu in Windows 10.

How to create Internet shortcuts in Windows 10

To create a shortcut to a webpage in Windows 10, you will need to open your favorite web browser and navigate to the webpage you want to create a shortcut. Make sure the browser is not maximized to full screen, as you are going to need access to your Desktop.

  • In your browser's address bar, place your mouse cursor over the icon to the left of the web page address. Then press and hold the left mouse button and drag it to an empty spot on your Desktop. If you are not sure about how to do this, watch the video below for more details.

Free computer diagnostics

Repairing a PC can sometimes be expensive, and that is why we offer free basic in-shop diagnostics. Give one of our professional and experienced technicians a call at (602) 795-1111, and let's see what we can do for you.

Check out our reviews

Geeks In Phoenix LLC, BBB Business Review

Customer service is #1

Here at Geeks in Phoenix, we take pride in providing excellent customer service. We aim to give the highest quality of service  from computer repair, virus removal, and data recovery.

Bring your computer to us and save

Repairing a computer can be time-consuming. That is why we base our in-shop service on the time we work on your computer, not the time it takes for your computer to work! From running memory checking software to scanning for viruses, these are processes that can take some time.

Contact us

If you have any questions, please feel free to give us a call at (602) 795-1111  and talk with one of our Geeks. Or you can send us a message from our contact page , and one of our Geeks will get back to you as soon as possible. Or you can stop by and see us. Here are our hours and location.

Like Geeks in Phoenix on Facebook

Follow Geeks in Phoenix on Twitter

Watch Geeks in Phoenix on YouTube