Geeks in Phoenix

Geek Blog


My Geek Notes 2

As users explore Windows 11, mastering keyboard shortcuts is crucial for boosting productivity and efficiency. With its sleek interface and advanced features, Windows 11 offers keyboard shortcuts that can streamline your workflow. In this Geek Notes, we’ll explore some of the most useful keyboard shortcuts in Windows 11 that can help you leverage the full potential of your system.

My Geek Notes 2

General

These keyboard shortcuts are simple and have been included in Windows for many versions, yet you would be surprised how many people do not know about them.

  • Ctrl + C: Copy the highlighted text or image to the Clipboard.
  • Ctrl + X: Cut the highlighted text or image to the Clipboard.
  • Ctrl + V: Paste the text or image from the Clipboard.
  • Ctrl + Z: Undo the last procedure.
  • Alt + Tab: Switch between open applications.

And if you want to store more than one item in the Clipboard, enabling the Clipboard history allows you to store multiple items and access them easily.

  • Windows logo key Windows logo key + V: This opens the Clipboard history. Once enabled, this shortcut lets you view and use items you recently copied. To enable the Clipboard history, go to Settings > System > Clipboard.

Productivity

Windows 11 features a host of shortcuts that can enhance your productivity while you work.

  • Windows logo key Windows logo key + E: This opens File Explorer.
  • Windows logo key Windows logo key + R: This launches the Run dialog box.
  • Windows logo key Windows logo key + D: This keyboard shortcut shows or hides the Desktop.
  • Legacy context menu: If you are looking for the more detailed right-click menu, hold the Shift key while right-clicking a file to bypass the simplified Windows 11 version and see all options immediately.

Accessibility

Windows 11 comes with several features designed to enhance accessibility. Use these shortcuts to improve ease of access.

  • Windows logo key Windows logo key + U: This opens the Accessibility section in Settings.
  • Windows logo key Windows logo key + + (plus): This keyboard shortcut opens Magnifier.
  • Windows logo key Windows logo key + Esc: This keyboard shortcut closes Magnifier.
  • Windows logo key Windows logo key + Ctrl + Enter: This keyboard shortcut turns on or off Narrator.

Miscellaneous

Windows 11 has some cool keyboard shortcuts that can save time and handle miscellaneous tasks.

  • Windows logo key Windows logo key + Ctrl + Shift + B: This keyboard shortcut restarts your graphics driver without requiring a full PC reboot.
  • Windows logo key Windows logo key + Ctrl + Q: This keyboard shortcut opens the built-in remote assistance app Quick Assist.
  • Windows logo key Windows logo key + Alt + R: This keyboard shortcut opens the built-in Game Bar and starts recording your screen.

Windows 11 is packed with features designed to improve efficiency, and understanding keyboard shortcuts is key to unlocking that potential. By incorporating these shortcuts into your daily routine, you can navigate the operating system more fluidly, manage your windows effectively, and even enhance your productivity. These tips are just the beginning; as you become more familiar with the shortcuts, you’ll find even more ways to work smarter, not harder.

For a complete list of all the keyboard shortcuts you can use with Windows 11, follow the links below.

Windows logo key shortcuts for Windows 11

General Windows keyboard shortcuts

Windows dialog box keyboard shortcuts

My three favorite programs for working remotely in Windows 10 and Windows 11

With the recent turn of events, COVID-19 and increasing gas prices, more and more people are looking to work remotely. So here are my three favorite programs to work remotely on Windows 10 and Windows 11.

My three favorite programs for working remotely in Windows 10 and Windows 11

TeamViewer

Screen capture of TeamViewer

When it comes to remotely connecting to another computer, you cannot beat TeamViewer. It allows you to connect to a computer and ultimately control it. You can do almost anything you usually would be able to do if you were sitting right in front of that system.

You can open and save files, send e-mail, and print to any printer connected to that computer. The only thing you cannot do is physically add or remove devices, like USB drives. For more information on TeamViewer, follow the link below.

How to remotely access your personal computers with TeamViewer

LogMeIn Hamachi

Screen capture of LogMeIn Hamachi

Let us say you have all the programs you need for work but just need to be able to access the files on a remote computer or network. This is where LogMeIn Hamachi can come in handy. It is a full-featured VPN (Virtual Private Network) that allows you to open files and folders on a remote computer or network.

The one feature that stands out is working on files on a remote system or network and printing them to a printer connected to your computer. For more information on LogMeIn Hamachi, follow the link below.

How to set up a Virtual Private Network on Windows 10 or Windows 11 using LogMeIn Hamachi

Quick Assist

Screen capture of Quick Assist

So maybe you have a coworker that needs some help formatting an Excel spreadsheet, but they are not at the exact location as you. With Quick Assist, you can easily connect to another Windows 10 or Windows 11 computer.

Since Quick Assist is built into Windows 10 and Windows 11, all you need is a Microsoft account, and you can help out that coworker with their spreadsheet. For more information on Quick Assist, follow the link below.

Provide remote assistance in Windows 10 and Windows 11 with Quick Assist

Provide remote assistance in Windows 10 and Windows 11 with Quick Assist

Updated March 17, 2022

Do you have a family member or friend who is always calling for help with their Windows 10 or Windows 11 computer? Do you wish you could easily connect to their system and take care of their problems fast? You can do just that with the Quick Assist program inside Windows 10 and Windows 11.

Provide remote assistance in Windows 10 and Windows 11 with Quick Assist

Now there is nothing new about being able to establish a remote connection from one Windows computer to another. The Remote Assistance program has been in Windows since Windows Vista, but it does require some detailed setup before you can use it.

On the other hand, Quick Assist is installed in Windows 10 and Windows 11 and is pretty much ready to go when you needed. Its requirements are pretty minimal: both computers have to be running Windows 10 or Windows 11, and the person assisting needs to have a Microsoft account.

Quick Assist does have a few great features. The first one has to be how easy and straightforward it is to use. It comes already installed, and all you have to do is start it up and follow the prompts.

The second feature that stands out is the ability to restart the remote computer you are giving assistance to and have the connection restart automatically. This feature is handy when installing and uninstalling software on the remote computer.

A couple of the other great features are the ability to view a single monitor or all of the monitors on the remote computer. You can annotate (draw) on the remote computer screen (great for illustrating how to do something). And there is even a button to start the Task Manager.

There are two (2) features that are not included that most remote connection software you pay for include. The first one is being able to transfer files between the two computers directly.

You can get around this by using cloud-based file storage like Dropbox or Google Drive. All you have to do is use a browser on the remote computer to log into your cloud storage and download files you uploaded from your computer.

The second feature that is missing is a shared clipboard. Quick Assist does include a chat window (instruction channel) that you can transfer links and text between the computers.

The downside is that the chat window gets cleared with every message that is sent. You can get around this problem by enabling the Clipboard history on the remote computer.

Then in the chat window on the remote computer, you can click on the Copy button, and have all of the pieces of text you send to the remote computer saved to the Clipboard. For more on Windows 10 Clipboard features, follow the link below.

How to use all of the Clipboard features in Windows 10

How to start a Quick Assist session

How to open Quick Assist inside of Windows 11

  1. Left-click on the Start button Windows logo to bring up the Start menu.
  2. In the upper right-hand corner of the Start menu, left-click on All apps.
  3. Scroll down the list of programs and left-click on Windows Tools.
  4. Left-click on Quick Assist.

or

  1. Left-click on the magnifying glass to the right of the Start button Windows logo to bring up the Search dialog box.
  2. In the Search dialog box, type Quick Assist.
  3. In the list of results, the Quick Assist should be highlighted.
  4. Left-click on Quick Assist.

How to open Quick Assist program inside of Windows 10

  1. Left-click on the Start Windows logo button and scroll down to Windows Accessories.
  2. Left-click on it to expand the contents.
  3. Left-click on Quick Assist.

or

  1. Using the search box on the right side of the Start Windows logo button, type in Quick Assist,
  2. Left-click on it in the search results.

Once Quick Assist is up on your screen,
The Quick Assist setup screen
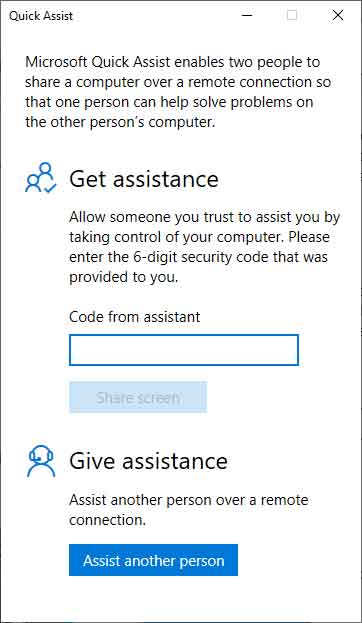
there are two choices: Get assistance and Give assistance.

If you are getting assistance

  1. Enter the 6-digit security code from the person assisting you and left-click on the Share screen button.
  2. You will be prompted to allow access to your computer.
    The Quick Assist share your screen dialog box
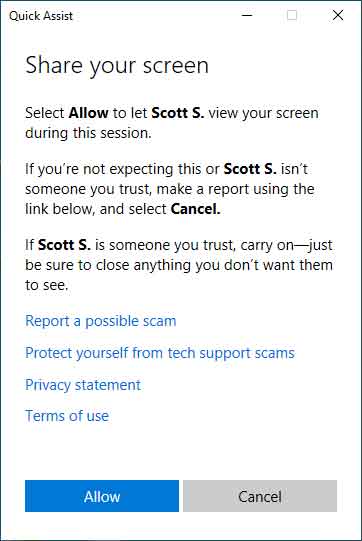
    Left-click on the Allow button to share your screen.

If you are giving assistance

  1. Left-click on the Assist another person button. You will be prompted for the email address and password associated with your Microsoft account.
  2. Once you are logged in, a security code will appear.
    The Quick Assist share security code dialog box
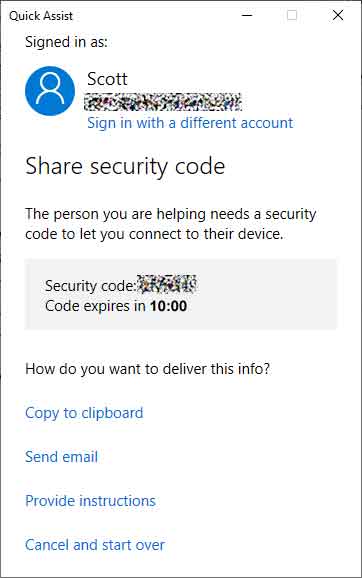
    There are some options on how to deliver the security code at the bottom of this dialog box. But the majority of the time, you will have the person you are assisting on the phone. Give them the 6-digit security code.
  3. The next screen will ask you what sharing option you want.
    The Quick Assist sharing option dialog box
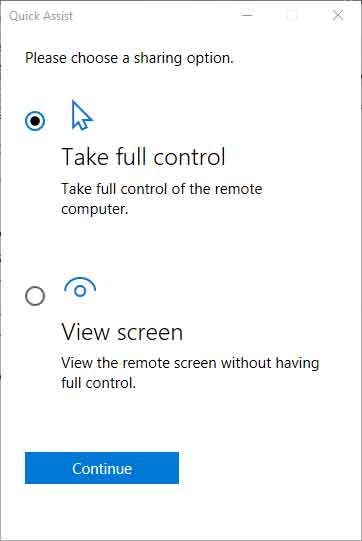
    You can choose between Take full control or View screen. Make your selection and left-click on Continue.

Free computer diagnostics

Repairing a PC can sometimes be expensive, and that is why we offer free basic in-shop diagnostics. Give one of our professional and experienced technicians a call at (602) 795-1111, and let's see what we can do for you.

Check out our reviews

Geeks In Phoenix LLC, BBB Business Review

This business is BBB Accredited

Customer service is #1

Here at Geeks in Phoenix, we take pride in providing excellent customer service. We aim to give the highest quality of service  from computer repair, virus removal, and data recovery.

Bring your computer to us and save

Repairing a computer can be time-consuming. That is why we base our in-shop service on the time we work on your computer, not the time it takes for your computer to work! From running memory-checking software to scanning for viruses, these are processes that can take some time.

Contact us

If you have any questions, please feel free to give us a call at (602) 795-1111  and talk with one of our Geeks. Or you can send us a message from our contact page , and one of our Geeks will get back to you as soon as possible. Or you can stop by and see us. Here are our hours and location.

Like Geeks in Phoenix on Facebook

Follow Geeks in Phoenix on Twitter

Watch Geeks in Phoenix on YouTube