Geeks in Phoenix

Geek Blog


Everything you need to know about Microsoft accounts

In today's digital world, a strong online identity is essential. A Microsoft account serves as a gateway to various services, including Outlook, OneDrive, Microsoft Office, and Xbox Live. In this article, I will cover everything you need to know about a Microsoft account.

Everything you need to know about Microsoft accounts

What is a Microsoft account?

A Microsoft account is an online account that connects you to Microsoft services. It serves as your username and password for services that include Windows 11, Office, and Xbox. It also enables you to synchronize your settings across devices, store files in the cloud with OneDrive, and access personalized services.

How do I get one?

Creating a Microsoft account is a straightforward process:

  1. Visit the signup page: Go to the Microsoft account sign-in page.
  2. Provide basic information: Enter your email address (you can either use an existing email or create a new Outlook.com email) and choose a password.
  3. Verify your identity: You’ll usually need to verify your identity with a code sent to your email or phone number.
  4. Fill in additional information: Include your name, country, and birthdate, then agree to the terms of service and privacy policy.
  5. Complete signup: Finish the registration process by clicking on the signup button.

Which Windows 11 features require a Microsoft account?

Here’s a list of features in Windows 11 that utilize a Microsoft account:

  • Microsoft Store: Access to apps, games, movies, and music; purchases are tied to your Microsoft account.
  • OneDrive integration: Seamless cloud storage for files, photos, and backup options that sync across devices.
  • Microsoft Teams: Integrated chat and video conferencing features that require sign-in with a Microsoft account.
  • Windows Hello: Biometric sign-in and security features that may be enhanced with a Microsoft account.
  • Sync settings: Synchronization of themes, passwords, and other settings across multiple devices using a Microsoft account.
  • Xbox Game Pass and Game Bar: Access to gaming services and features linked to your Microsoft account for game saves and achievements.
  • Family Safety: Managing family accounts, screen time limits, and location sharing through a Microsoft account.
  • Outlook and Calendar: Email and calendar services that require a Microsoft account for full functionality and integration.
  • Search integration: Personalized content and web results based on activity linked to your Microsoft account.

Using a Microsoft account enhances your experience by providing access to these features and enabling synchronization across devices.

What are the pros and cons of a Microsoft account?

Pros of a Microsoft Account

  • Access to a range of services: A Microsoft account provides access to a variety of services, including Outlook email, OneDrive for cloud storage, Office Online, and Xbox Live. This convenience allows users to centralize their online activities under one username and password.
  • Seamless integration: If you use Windows, having a Microsoft account streamlines the user experience, as it allows for automatic syncing of settings, preferences, and files across devices. Whether you're using a desktop, tablet, or smartphone, your personalized experience follows you.
  • Enhanced security features: Microsoft has invested significantly in security features to protect user data. Two-factor authentication, for example, adds an extra layer of security to your account, making unauthorized access more challenging. Furthermore, Microsoft regularly updates its security protocols to keep up with emerging threats.
  • Cloud storage with OneDrive: One of the key advantages of a Microsoft account is access to OneDrive, which provides a limited amount of free cloud storage. This service makes it easy to back up important documents, share files with others, and access your data from anywhere with an internet connection. Moreover, OneDrive integrates seamlessly with Microsoft Office applications, enhancing productivity.
  • Office suite access: With a Microsoft account, users can access Microsoft Office applications online for free via Office Online. This functionality promotes collaboration, as multiple users can work on documents simultaneously. For many users, this is a valuable feature, especially in remote work scenarios.
  • Gaming benefits: For gamers, a Microsoft account is critical for accessing Xbox Live and for syncing game data across multiple devices. Features like cloud saves and the ability to track achievements and friends enhance the overall gaming experience.
  • Personalized experience: A Microsoft account allows for a personalized user experience, including customized news feeds, personalized ads, and tailored recommendations. This level of personalization can enhance the way users interact with Microsoft services.

Cons of a Microsoft Account

  • Privacy concerns: One of the major drawbacks of having a Microsoft account is potential privacy issues. Microsoft, like many other tech companies, collects user data to improve services and personalize experiences. Some users may feel uncomfortable with the extent of data collection and how it's used for targeted advertising.
  • Account lockouts: Users may experience account lockouts, often due to security measures such as suspicious activity detection. While these measures are designed to protect users, they can also be frustrating if you need immediate access to your account and are unable to recover it swiftly.
  • Dependency on Internet access: Although you can work offline with some applications, a significant amount of functionality is tied to Internet access. This dependency may be inconvenient for users who frequently find themselves without a reliable internet connection.
  • Learning curve for new users: For those unfamiliar with Microsoft products or the concept of a centralized account, there may be a learning curve in understanding how to use everything effectively. New users might find the transition from traditional local accounts to a Microsoft account challenging.
  • Account mismanagement risks: If a user fails to manage their Microsoft account adequately, by ignoring password changes, failing to enable two-factor authentication, or not monitoring account activity, they could become vulnerable to hacking or unauthorized access.
  • Cost of premium services: While many services are free, additional features and storage on OneDrive or Office 365 require monthly or yearly subscriptions. These costs can add up over time, especially if users find themselves relying heavily on Microsoft's ecosystem.
  • Limited control over updates and features: With a Microsoft account, users may have limited control over software updates, features, and user interface changes. Microsoft frequently rolls out updates that can alter the user experience, sometimes causing frustration among users who prefer consistency.

How to remove a Microsoft account from Windows 11

Before diving into the removal process, it's important to understand what will happen when you remove a Microsoft account. By deleting it, you'll lose access to services tied to that account, such as OneDrive storage, Xbox Live, and Microsoft Store purchases associated with that account. Additionally, any personalized settings, themes, and app preferences will be lost. Therefore, if you plan to remove your account, consider backing up important data and ensuring that any needed applications are set up with a new account.

Back up your OneDrive files

Before you remove your Microsoft account, you need to take care of OneDrive first. Before uninstalling OneDrive, ensure that any files stored in your OneDrive account are backed up. If you have files that are only stored in OneDrive and you remove the application without backing them up, you risk losing access to those files. To back up your files:

  1. Open File Explorer by pressing Windows logo key Windows logo key + E.
    The OneDrive folder inside of File Explorer
  2. Navigate to the OneDrive folder.
  3. Move any essential files to another folder outside of the OneDrive folder on your local drive.
  4. You can also log into your OneDrive account online to ensure that you have another copy of your files in the cloud, if necessary.

Disconnect OneDrive

Before uninstalling the application, disconnecting your OneDrive account from your Windows 11 device ensures that your files remain safe and are not automatically synced during the removal process. Here’s how to disconnect OneDrive:

  1. Left-click on the OneDrive cloud icon in the system tray (usually located in the lower right corner of your screen).
  2. On the menu that appears, left-click on the gear icon in the upper-right-hand corner.
  3. In the drop-down menu, click on Settings.
    Unlink this PC in OneDrive settings
  4. On the Account tab, click on Unlink this PC.
  5. Confirm the action, and your computer will be disconnected from your OneDrive account.

Once you’ve unlinked your account, the synchronization process will stop, and no further changes will be sent to your OneDrive storage.

Uninstall OneDrive

With your files backed up and your account disconnected, you can proceed to uninstall OneDrive from your computer. Here's how:

  1. Left-click on the Start Windows logo key button to bring up the Start menu.
  2. In the list of pinned apps on the Start menu, left-click on Settings.
  3. In the left-hand column, left-click on Apps.
  4. In the right-hand column, left-click on Installed apps.
  5. Scroll down the list of Installed apps until you come to Microsoft OneDrive.
  6. Left-click the three horizontal dots (more options) on the right side, then select Uninstall.
  7. Confirm any prompts that appear to complete the uninstallation process.

Remove Leftovers (Optional)

Sometimes, even after uninstalling an application, residual files or settings may linger on your system. If you're an advanced user and want a clean removal, you can manually delete these leftovers:

  1. Press the Windows logo key Windows logo key + R to open the Run dialog box.
  2. Type or copy and paste %localappdata% into the Run dialog box and then click OK
  3. Scroll down the list of software manufacturers and double left-click on Microsoft to open that folder.
  4. Look for a OneDrive folder and delete it if it exists.
  5. Open up the Run dialog box again, Windows logo key Windows logo key + R.
  6. This time, type or copy and paste %programdata% and then click OK.
  7. Look for a folder named Microsoft OneDrive and delete it if it exists.

Disable OneDrive Startup (If Necessary)

In some cases, OneDrive may still attempt to start up when you turn on your computer, even after uninstallation. If you're experiencing this, you need to ensure that it’s deactivated in the startup programs:

  1. Right-click on an empty space on the Taskbar and select Task Manager.
  2. Left-click on the Startup apps tab.
  3. Look for any entries related to OneDrive, right-click, and select Disable.

Remove your Microsoft account

Removing your Microsoft account may also require you to change how you log in to Windows 11 from a Microsoft account to a local account. Changing your login from a Microsoft account to a local account can enhance your privacy and give you more control over your settings. To change your login from a Microsoft account to a local account:

  1. Left-click on the Start Windows logo key button to bring up the Start menu.
  2. In the list of pinned apps on the Start menu, left-click on Settings.
  3. In the left-hand column, left-click on Accounts.
  4. In the right-hand column, left-click on Sign-in options.
  5. Look for the option to sign in with a local account instead.
  6. Follow the prompts to create a username and password for your local account.

Once completed, you'll sign in using your new local credentials, and the transition will provide a more personalized experience without relying on cloud features. Just remember to back up any files and settings associated with your Microsoft account before making the change.

A Microsoft account is a powerful tool that centralizes access to a range of Microsoft products and services. Whether you are using it for personal tasks, cloud storage, or gaming, understanding how to create, manage, and secure your account is essential. With the right knowledge, you can maximize the benefits of your Microsoft account and enjoy an integrated digital experience.

By taking advantage of security features, managing your profile effectively, and knowing how to troubleshoot problems, you can ensure that you get the most out of your Microsoft account. So, whether you’re new to Microsoft services or looking to optimize your usage, this guide provides essential information to help you navigate your Microsoft account confidently.

How to install Windows 11 without a Microsoft account

When it comes to Windows 11, one question always seems to come up: "Can I install Windows 11 with a local account like I have done in previous versions of Windows?" The answer is yes, you can, and I am going to show you how to install Windows 11 without a Microsoft account.

How to install Windows 11 without a Microsoft account

When it comes to installing Windows 11 without a Microsoft account, the process is relatively straightforward. However, there are a couple things you have to due during the installation to be able to create a local user account.

First and foremost, it's important to note that Microsoft strongly encourages users to sign in with a Microsoft account. While this provides access to additional features and seamless integration with Microsoft services, it is not mandatory.

Keep in mind that most Windows 11 systems come with Bitlocker drive encryption enabled and using a Microsoft account to login will place the Bitlocker decryption key inside of your Microsoft account online. If you like, you can always turn off Bitlocker after the installation is complete.

Now, the stage in the installation of Windows 11 that you need to make changes is called the Out-Of-Box-Experience (OOBE). This is when Windows 11 prepares for the first use. So, you can use this procedure on brand-new Windows 11 systems or clean installations of Windows 11.

This process will usually work flawlessly, but I have had issues with new computers that have Windows 11 in S mode. For more information about performing a clean installation of Windows 11, follow the link below.

How to perform a clean installation of Windows 11

As I mentioned before, the stage in the Windows 11 installation we need to modify is the OOBE. The one thing you will need to do is make sure you do not have an ethernet cable plugged into your computer.

Your computer cannot access the Internet until after you create the local user account. If Windows 11 detects Internet access, it will not allow you to bypass the network requirement, which is what you have to do to finish the installation using a local user account.

When you start your new Windows 11 computer for the first time or finalize a clean installation of Windows 11, the first screen that appears in the OOBE is the Is this the right country or region screen.
The Is this the right country or region screen in the Windows 11 setup
This is where we need to modify the OOBE.

Using your keyboard, press Shift + F10. If your laptop has an FN (Function) button, you may have to also hold it down to toggle the F10 key.
An Administrative Command Prompt running on top of the country or region screen
This will bring up an Administrative Command Prompt.

In the Command Prompt type:

OOBE\BYPASSNRO

and then press enter.
An Administrative Command Prompt with OOBE\BYPASSNRO in the prompt
This will restart the OOBE stage again using the BYPASSNRO (BYPASS Network Requirement Option) switch. You will now have the ability to skip using a Microsoft account to logon. Once the OOBE stage restarts, you return to the first screen (country and region).

Proceed through the screens until you reach the Let's connect you to a network screen.
The Let's connect you to a network screen in the Windows 11 setup
Left-click on the I don't have internet link at the bottom of the screen.

The next screen is the Connect now to quickly get started on your device screen.
The Connect now to quickly get started on your device screen in the Windows 11 setup
Left-click on the Continue with limited setup link. The next screen is the Who's going to use this device screen. Enter a name and left-click on the Next button.

Now you come to the Create a super memorable password screen. If you leave the password blank/empty and left-click on the Next button, your computer will automatically log in to your desktop. This is how to create a local user with no password.

In conclusion, installing Windows 11 without a Microsoft account is entirely feasible and allows users to maintain a local account on their system. Following the steps outlined in this article, you can successfully set up Windows 11 without needing a Microsoft account, giving you more control over your operating system.

How to setup Family Safety for Windows using Microsoft accounts

Updated June 10, 2024

I don't know about you, but keeping my family safe on their Windows computers is priority number one. Sure, you can install anti-virus software and browser extensions, but what about the kids under 18? Here's how to set up Family Safety using Microsoft accounts.

How to setup Family Safety for Windows 10 using Microsoft accounts

Years ago, the only way I found to lock down my kid's computers was to add it to a domain and restrict the user permissions. And it did work. However, not everyone has a server/domain controller. So, what does a parent do?

Well, back in Windows 7 and Windows 8.1, Microsoft had a product called Family Safety. It was part of Windows Essentials, which was a separate download. It worked pretty well, but Microsoft dropped support for Windows Essentials, and it is no longer available for download.

So, if you think that Family Safety just faded away, you would be wrong. Microsoft has taken all of the original program features and added them to its Microsoft account interface.

All of the same great features are there. You can still filter what websites your kids can visit and restrict access to certain apps and games. You can also set what time(s) your kids can use their Windows computer. You can even set the appropriate age for the apps and games that can be accessed.

Now, there are some requirements for using Family Safety in Windows that may be a bit disturbing. Everyone, you and your child, need to have a Microsoft account. That, in itself, is no biggie. However, your child will need an email address to create a Microsoft Account.

I don't know many five-year-old kids that have an email address, but if you create and monitor it yourself, you should be all right. You don't have to let them have access to it. They only need the Microsoft account email address and password to log into Windows.

If you are looking for ways to protect your family when they are online, using Microsoft accounts is one option. When used in combination with a Windows computer running in S Mode, you can be assured of the maximum amount of safety.

How to set up Family Safety in Windows using Microsoft accounts

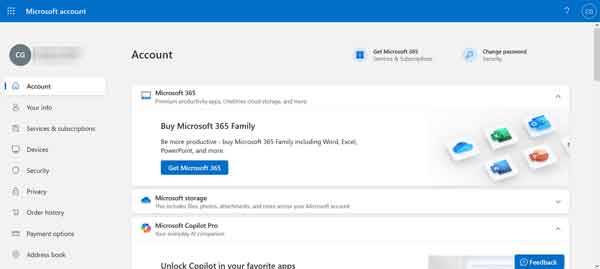
  1. Log into your personal Microsoft account. If you don't have one, then you will need to create one.
  2. Once you log in, scroll down your account information until you come to the Family section, and then click on View your Family.
  3. Under Your family, click on Add a family member.
  4. Enter your child's phone number or email address and click on Next. If they don't have one, create one by clicking Create an account. If you do that, then you'll be creating a Microsoft account at the same time. When you have your child's account all setup, you will still need to send them an invite. To protect your child's privacy, Microsoft may charge a small one-time fee to verify your identity.
  5. Once they (or you) accept the email invite, then you can start configuring their online settings.

What your child sees and can do when they log into their Microsoft account

What your child sees and can do when they log into their Microsoft account

  • Manage sign-in preferences, just like a standard Microsoft account.
  • Edit personal information like gender, State, ZIP Code, and time zone.
  • Edit payment information. It only applies to their account, not yours. You can add funds to their Microsoft account through your account. They can also redeem codes and gift cards.
  • Edit their Xbox profile if they have an Xbox account. If not, they can create one.
  • Edit their Skype profile if they have a Skype account. If not, they can create one.

What you see and can do when you log into your Microsoft account

What you see and can do when you log into your Microsoft account

Windows section

  • Screen time: This section is where you set up when your kid is allowed on the PC. There is a list of days, a time limit and the available times. Just click on a day, and you can adjust the hours accordingly. When you activate the time limits, the default time periods are triggered (7:00 AM to 10:00 PM). You can manually add, remove, or modify any of the periods, and you can have multiple periods per day.
  • Devices: This is where you can set time limits on all of your child's connected devices.
  • Apps and games: Here, you can block inappropriate apps and games. This section applies not only to Windows but also to Xbox. There is a pull-down menu that allows you to select the appropriate age for your child. This section will dictate some pre-configured settings that will enable or disable certain features. You can also view the list of blocked apps and games. If you want, you can also remove any program you feel should not be on the list.
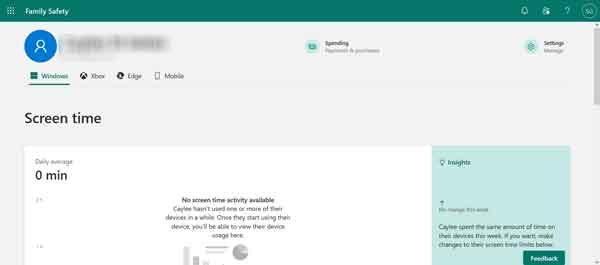
Xbox section

  • Screen time: This section is where you set up when your kid is allowed on the Xbox. There is a list of days, a time limit and the available times. Just click on a day, and you can adjust the hours accordingly. When you activate the time limits, the default time periods are triggered (7:00 AM to 10:00 PM). You can manually add, remove, or modify any of the periods, and you can have multiple periods per day.

Edge section

  • Web browsing: You can turn on or off the blocking of inappropriate websites. You can create a (white) list of allowed websites and a (black) list of blocked websites. You can also only enable websites on the allowed list. Safe Search is turned on, and InPrivate browsing is turned off by default. Now, all of these web filters require that your child only uses Microsoft Edge. You can turn off the use of Firefox and Chrome under Apps and games.

Mobile section

  • Screen time: This section is where you set up when your kid is allowed to play on their smartphone. There is a list of days, a time limit and the available times. Just click on a day, and you can adjust the hours accordingly. When you activate the time limits, the default time periods are triggered (7:00 AM to 10:00 PM). You can manually add, remove, or modify any of the periods, and you can have multiple periods per day.

Spending section

  • Spending: This section is where you can add funds or credit cards to your child's Microsoft account for use at the Microsoft and Xbox stores. With credit cards, you can require approval for every purchase. You can also turn on or off receiving an email when your child gets a new app or game.

Settings section

  • Account settings: This is where you set your child's age, turn web safety on or off, ask to buy, and weekly email features.

There is also a smartphone app, the Microsoft Family Safety app, that allows you to make changes to your child's Microsoft profile.

Microsoft Family Safety - Google Play

Microsoft Family Safety - iPhone App Store

Free computer diagnostics

Repairing a PC can sometimes be expensive, and that is why we offer free basic in-shop diagnostics. Give one of our professional and experienced technicians a call at (602) 795-1111, and let's see what we can do for you.

Check out our reviews

Geeks In Phoenix LLC, BBB Business Review

This business is BBB Accredited

Customer service is #1

Here at Geeks in Phoenix, we take pride in providing excellent customer service. We aim to give the highest quality of service  from computer repair, virus removal, and data recovery.

Bring your computer to us and save

Repairing a computer can be time-consuming. That is why we base our in-shop service on the time we work on your computer, not the time it takes for your computer to work! From running memory-checking software to scanning for viruses, these are processes that can take some time.

Contact us

If you have any questions, please feel free to give us a call at (602) 795-1111  and talk with one of our Geeks. Or you can send us a message from our contact page , and one of our Geeks will get back to you as soon as possible. Or you can stop by and see us. Here are our hours and location.

Like Geeks in Phoenix on Facebook

Follow Geeks in Phoenix on Twitter

Watch Geeks in Phoenix on YouTube