Geeks in Phoenix

Geek Blog


How to repair Windows 10 by doing an in-place upgrade

Updated May 14, 2020

Are you getting lots of errors when you log into Windows 10? Are you not able to get the Start menu or File Explorer to open? If so, it may be time to repair Windows 10 by doing an in-place upgrade.

Sometimes repairing Windows 10 can be a challenging endeavor. One time I had a Windows 10 system that the right-click mouse function would only work in certain situations.

Another time, I had a Windows 10 system that File Explorer and the Start menu would not work. This was one of those times when you think that you are going to just have to wipe the drive and do a clean installation of Windows 10.

But in both cases, I was able to repair Windows 10 while keeping all of the user's documents, settings, and installed programs. I just performed an in-place upgrade of Windows 10.

Remember that if you start the in-place upgrade by booting your computer up on the Windows 10 installation media, you will only get the option of saving your documents. To also preserve the installed programs, you need to start the in-place upgrade from inside of Windows 10.

Now performing an in-place upgrade is not hard. The only thing you need to do is make the Windows 10 installation media. If you can access the Internet and download the Windows 10 Media Creation Tool, great, if not, you will need to use another computer to make the Windows 10 installation media.

You do not have to be upgrading to a newer version of Windows 10 (1809 to 1903, 1903 to 1909) for this to work. You can perform an upgrade to the same version (1909 to 1909).

Now you never want to use an older version of the Windows 10 media, like the one you created a couple of years ago, to do an in-place upgrade. You will always want to download the latest version directly from Microsoft using the Windows 10 Media Creation Tool.

To make the media, you will need either a blank DVD or a USB flash drive that is at least 8GB in size. Remember that if you use a USB flash drive, it will be reformatted and everything on it will be erased. So, if you have used the USB drive for anything else, you may want to copy the data off of it before using it for the Windows 10 installation media.

Once you get the Windows 10 Media Creation Tool downloaded, all you have to do is double-click the file to run it. It is a stand-alone program, and it does not require any installation.

The first screen that comes up is the legal stuff, just click on Accept. On the next screen, you will have to choose what you want to do.
Windows 10 installer what do you want to do screen
Select Create installation media for another PC and click on Next.

On the next screen, you will select the language, architecture, and edition.
Windows 10 installer select language and edition screen
Since you are creating the media for another computer, make sure the Use the recommended options for this PC checkbox is deselected. The majority of users in the US will select the following settings:

  • Language: English (If you use a different language, select it from the pull-down menu)
  • Edition: Windows 10
  • Architecture: 64-bit (x64)

When you are finished selecting the language, architecture, and edition, click on Next. The next screen will ask you what media do you want to use.
Windows 10 installer choose which media to use screen
If you select the USB flash drive option, make sure you have the USB flash drive inserted into a USB port on the computer.

If you want to make a DVD, you will need to choose the ISO file option and then burn it onto a blank DVD. Here is how to go about burning the ISO file to a DVD.

Once you have the media created, either a DVD or USB flash drive, you will need to insert it in the computer that you want to repair.
Windows 10 setup program in File Explorer
Then just open File Explorer, navigate to the DVD or USB flash drive, and right-click on the setup.exe program and select Run as administrator.
Windows 10 installation start up screen
The Windows 10 installer will then startup.

You will be prompted to download Windows 10 updates, drivers, and optional features. Since you are doing an in-place upgrade, I recommend waiting until the installation is finished before doing any updates.

The next screen you will get is the license agreement. Just click Accept in the lower right-hand corner and continue with the in-place upgrade. Finally, you will get to the screen that asks what you want to keep. Make sure that Keep personal files and apps are selected and then select Install in the lower right-hand corner.

The in-place upgrade will take some time, and your computer could restart a few times before it is complete. When it is done, your version of Windows 10 should be completely repaired and good as new.

Now in the examples I talked about earlier, I could not get either the right-click function to work or could not get the Start menu or File Explorer to open at all. But there is another way of starting the in-place upgrade using Task Manager.

How to start a program using Task Manager

Sometimes the only way to run a program is to use Task Manager. It is a simple, down, and dirty way of running a program with administrative privileges. And we want to use admin privileges to run the setup.exe program.

  1. Press the Ctrl + Alt + Delete keys all at the same time (the 3-finger salute).
    The Windows 10 Ctrl Alt Delete screen
    You will get a screen that has several selections on it. Click on Task Manager.
  2. The Task Manager program will appear next.
    The basic Windows 10 Task Manager screen
    If it shows says There are no running apps, click on the More details arrow in the bottom left-hand corner. This will bring up all of the running processes.
  3. Click on the File drop-down menu in the upper left-hand corner of Task Manager
    The advanced Windows 10 Task Manager screen with Run new task
    and select Run new task.
  4. The Create a new task dialog box will appear.
    The Windows 10 Create new task dialog box
    Click on the Browse .. button in the lower right-hand corner.
  5. Using the Browse dialog box, navigate to the drive with the Windows 10 installation files (either DVD or USB flash drive),
    The Windows 10 Task Manager Browse screen
    select setup.exe and then click Open.
  6. This will bring you back to the Create new task dialog box, and the path to the setup.exe program will be in the Open field.
    The Windows 10 Create new task dialog box with file path
    Make sure that the Create this task with administrative privileges checkbox is selected. Then click on OK.
  7. The Windows 10 installer will now start. Just follow the steps outlined previously in this article for the rest of the in-place upgrade.

How to get a free Windows 10 upgrade for Windows 7 and Windows 8.1

Updated May 15, 2020

Many people took advantage of the Get Windows 10 upgrade promotion, and some did not. If you are one of those who did not get your version of Windows 7 / Windows 8.1 upgrade for free, you still have an opportunity to do so. Here is how to get a free Windows 10 upgrade for Windows 7 and Windows 8.1.
How to get a free Windows 10 upgrade for Windows 7 and Windows 8.1

It has been a few years since Microsoft ran the Get Windows 10 promotion, and now you think you might like to get your version of Windows 7 or Windows 8.1 upgraded to Windows 10. The question is now, should you upgrade your computer to Windows 10?

If you think so, I will let you know a little secret. You can still get the upgrade for free. But there is a particular way you have to go about doing it. And there are some prerequisites you have to meet first.

First, your computer needs to be running a legally licensed, not pirated version of Windows 7 Service Pack 1 or Windows 8.1. The key here is running, as you will need to start the upgrade process from inside of Windows. In essence, you will perform what we call an in-place upgrade.

And since this is an in-place upgrade, you will need to know what edition of Windows you have. Just open a Run dialog box, type Winver and left-click on OK. It will list the Windows edition in the About Windows screen that appears. Here are the upgrade paths.

  • If you have Windows 7 Starter, Windows 7 Home Basic, Windows 7 Home Premium, or Windows 8.1 Home Basic, you will upgrade to Windows 10 Home.
  • If you have Windows 7 Professional, Windows 7 Ultimate, or Windows 8.1 Professional, you will upgrade to Windows 10 Professional.
  • If you have Windows 7 Enterprise or Windows 8.1 Enterprise, you will upgrade to Windows 10 Enterprise.

Second, your computer needs to meet the hardware requirements for Windows 10. Most computers running Windows 7 / 8.1 already meet the requirements, but there are exceptions. There are specific graphics processors known to be incompatible.

But the only way you will find out is by starting the upgrade process. The Windows 10 installer will run a check for hardware that will not work with Windows 10 and will allow you to stop the upgrade or continue.

If it turns out that the on-board graphics processor in your desktop computer is incompatible, you can always install an inexpensive (under $50) PCI-e graphics card (if you have an open PCI-e slot). Here is how to add an expansion card to your desktop computer. If your laptop has an incompatible graphics processor, you cannot upgrade it to Windows 10.

But there are a few things I recommend doing before starting the upgrade process. Checking for drive errors, cleaning up your drive, and uninstalling third-party anti-virus/malware software are just a few. And I recommend creating a full backup only in case something goes wrong. Just follow steps #2 through #6 in this article, seven things to do before and after upgrading to Windows 10.

Now there is a dirty little secret about upgrading to Windows 10 that nobody ever talks about, and that is the recovery media. Almost every computer comes with a hidden partition that has the original software that came pre-loaded with the machine.

When you perform an upgrade to Windows 10, the setup program will replace it with a copy of Windows 10. So, if you ever want to go back to the Windows version that came with your computer, you will need to create the recovery media before doing the upgrade. Check out the section 'Make the recovery media' in the following article, five things you should do first when you get a new computer.

Now, you have everything you need to take care of, and you are ready to start the Windows 10 upgrade. Since this will be an 'in-place upgrade', you will need the Windows 10 installation media. Let's make it.

The first thing you have to do is download and run the Windows 10 Media Creation Tool. This program can do a direct upgrade or create the Windows 10 media (USB or ISO file).
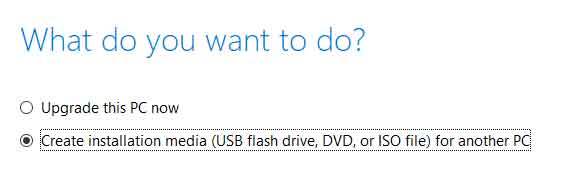
Windows 10 installer what do you want to do screen
I recommend creating the media (either USB or ISO). That way, you will have a copy of Windows 10, just in case you need it in the future.

The next thing you need to do is select what language, architecture, and edition you want to install.
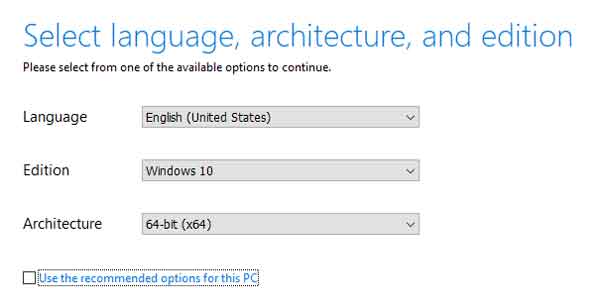
Windows 10 installer select language and edition screen
If the Use the recommended options for this PC checkbox is on the bottom, make sure it has a checkmark inside it. If not, refer to the edition information you collected earlier.

You will need either a blank DVD or a USB drive that is 8GB or larger. The Windows 10 Media Creation Tool will format a USB drive and make it ready to use.
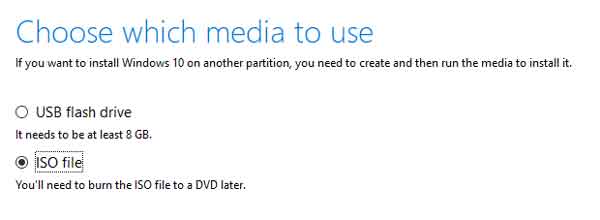
Windows 10 installer choose which media to use screen
If you download an ISO file, you will need to burn it to a DVD. Here is how to burn an ISO file to a disk.

There are a couple of reasons to install from media (USB or DVD) and not the Windows 10 Media Creation Tool. The #1 reason is you can always restart the installation if you need to take care of an issue or two.

Once you have the installation media created, you will have to start the upgrade by running the setup program located at the root of the installation media.
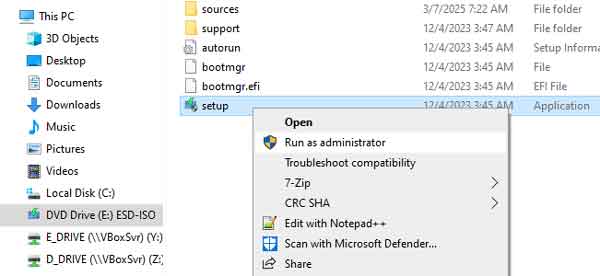
Windows 10 setup program in File Explorer
I recommend opening File Explorer and right-clicking on setup.exe and selecting Run as administrator.

The first screen that appears tells you that Windows 10 is going online to get updates, drivers, and optional features.
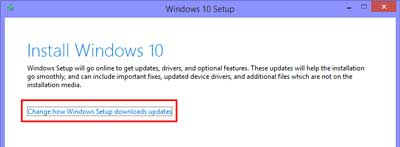
Windows 10 setup program prompting to download updates
If you click on the Change how Windows Setup downloads updates link, you can choose to download the updates or wait until later.
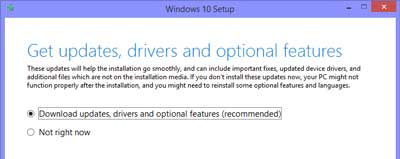
Windows 10 setup program update download options
You will be downloading the updates either way, so it is strictly your call. But I have found that a lot of the errors associated with the upgrade process can be avoided by waiting until the upgrade is complete before downloading and installing updates.

At some point, the installation will check the hardware and software installed. If it finds any incompatible software, like an anti-virus program, you may have to cancel the upgrade and remove the software.

If the installation finds incompatible hardware, you may have to cancel the upgrade to resolve the issue. Either way, you may be able to continue the update, but that depends on how critical the Windows 10 installer finds the software/hardware issue to be.

Once the upgrade is in process, it may take a couple of hours to complete. When the Windows 10 upgrade is complete, the original product key for your old version of Windows will be converted and uploaded to the cloud. It is called digital entitlement.

And if you ever need to reinstall Windows 10, all you have to do is download the latest version using the Windows 10 Media Creation Tool. It is the one Windows 10 feature you hope you never have to use.

Free computer diagnostics

Repairing a PC can sometimes be expensive, and that is why we offer free basic in-shop diagnostics. Give one of our professional and experienced technicians a call at (602) 795-1111, and let's see what we can do for you.

Check out our reviews

Geeks In Phoenix LLC, BBB Business Review

Customer service is #1

Here at Geeks in Phoenix, we take pride in providing excellent customer service. We aim to give the highest quality of service  from computer repair, virus removal, and data recovery.

Bring your computer to us and save

Repairing a computer can be time-consuming. That is why we base our in-shop service on the time we work on your computer, not the time it takes for your computer to work! From running memory checking software to scanning for viruses, these are processes that can take some time.

Contact us

If you have any questions, please feel free to give us a call at (602) 795-1111  and talk with one of our Geeks. Or you can send us a message from our contact page contact page , and one of our Geeks will get back to you as soon as possible. Or you can stop by and see us. Here are our hours and location.

Like Geeks in Phoenix on Facebook

Follow Geeks in Phoenix on Twitter

Watch Geeks in Phoenix on YouTube