So you upgraded the drive in your computer and now have an extra drive that you do not know what to do with. There are a couple of things you can do with it. So here is what you can do with your old drive.

I have written several articles on how to clone the drive in your Windows-based computer. But I have never written an article on what to do with the drive that you replaced.
When it comes to the old drive, there are two options; reuse it or recycle it. Either way, you will need some additional hardware to utilize the old drive.
To reuse it inside of your computer, you will need a spare drive carriage, mounting screws, a 7-pin SATA data cable, and a spare 15-pin SATA power connection. If you want to connect it externally, you will need a drive enclosure (2.5" or 3.5").
To recycle it, you will need to erase all of the data on the drive. I like to encrypt the drive with BitLocker first, then perform a seven-pass DoD (Department of Defense) disk wipe. So even if someone were able to recover any data, it would still be encrypted.
Now, was the old drive bootable (contained the operating system)? If so, then there will be a boot record that needs to be deleted before you can reuse it.
If you plan on reusing the drive, simply erasing all of the data on the drive should work. If you plan on recycling it, then you will need to securely erase all of the data so no one can successfully recover anything from it.
If the drive was used only for storage, then erasing all of the data will work. If it was the boot drive in your computer, we have to erase all of the data and delete the boot record so that any computer that it is connected to does not accidentally boot up onto it.
Time to erase the drive
The first thing you have to do is attached the drive to your computer, either by turning the computer off and installing the drive inside of your computer. Or by connecting it externally using a drive case, docking station, or a USB adapter.
Remember that if the drive was originally a boot drive and you install it inside of your computer, your system may try and boot on that drive. It is recommended that you wipe the drive of any boot record and boot partition before installing it inside your computer.
Several drive manufacturers have software that can erase the data from one of their drives. Western Digital, Seagate, and Samsung are a few that have that type of software. In fact, Seagate's Seatools for Windows will work on any manufacturer's drive.
There is also third-party software that can perform DoD (Department of Defense) disk erasing. The UBCD (Ultimate Boot CD) has several programs that can perform a DoD disk wipe (I like using Darik's Boot and Nuke). If you are planning on recycling the drive, a DoD wipe is recommended.
There have been times when I have seen a manufacturer's software fail when it comes to erasing data from a drive. It usually happens when the drive in question was originally a boot drive.
As you can see from the following screen capture,

the original boot/recovery partition can not be deleted in Windows 10 Disk Management application.
In cases like that, I have found using the Windows Diskpart application works great. It is a command-line-only program, but you can use it to delete any type of partition if you are very careful.
Using Diskpart to erase a drive
Note: Misusing Diskpart can erase a disk that you may not want to be wiped, so be extra careful and double-check the disk number before proceeding.
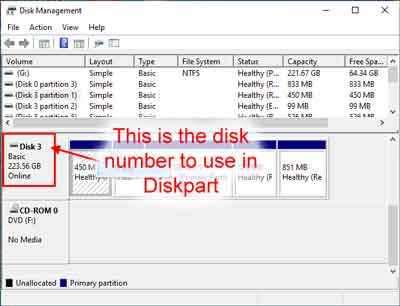
To ensure that you erase the correct drive, let's open Windows 10 Disk Management and verify the disk number.
- Open Disk Management by either:
- Right-clicking on the Start
 button and select Disk Management from the context menu
or
- Left-clicking on the Start
 button, scroll down the application list and expand the Windows Administrative Tools folder. Then left-click on Computer Management. Then under Storage, you will find Disk Management.
- Locate the disk in question. It will be labeled Disk #.

- Open a Command Prompt with Administrative permissions (click here for more details).
- Type diskpart and then press enter.
- Type list disk and press enter.

- Type select disk #, replacing the # with the disk number found in Disk Management.

- Type clean and press enter.


- Type exit to close Disk Management.
- Type exit again to close the Command Prompt.
Time to format the drive
All partitions will now be gone, and the drive is ready to be reformatted. Let's go back into Disk Management and reformat the drive. When you open Disk Management, you should be prompted to initialize the disk.

If the drive is smaller than 2 Terabytes, use the MBR (Master Boot Record) partition style. Any drive larger than 2 Terabytes will need to use the GPT (GUID Partition Table) partition style.
Once you initialize the disk, just right-click on the unallocated space and select New Simple Volume.

You will be prompted for the volume size, assigning a drive letter or path, and what format you want the partition. Using the selected defaults is recommended.
05a67af2-31ff-4978-85b8-c63ae447cf4b|1|3.0|96d5b379-7e1d-4dac-a6ba-1e50db561b04