Geeks in Phoenix

Geek Blog


How to create a shortcut in Windows 10

Updated February 10, 2021

Shortcuts are links to various types of objects, like a program, file, folder, another computer, or a webpage, and they can be placed on your Desktop, Taskbar, or Start menu. Here's how to create a shortcut in Windows 10.

In this article, we are going to look at two (2) types of shortcuts, File (.lnk) and Internet (.url). You can spot a shortcut on your Desktop or File Explorer by the curled arrow in the lower left-hand corner of the shortcut's icon. Shortcuts on the Start Menu do not have the curled arrow.

How to create File shortcuts in Windows 10

To create a shortcut to a file in Windows 10, you need to know where the object is located on your computer. Open File Explorer by left-clicking the File Explorer icon on the Taskbar or right-clicking on the Start Menu to bring up the Power User menu and select File Explorer. Then navigate to the object you want to create a shortcut to. If you're going to create a Desktop shortcut, make sure File Explorer is not in full-screen mode.

  • For a shortcut to a file on the Desktop, press and hold the right mouse button on the object and drag it to the Desktop. From the context menu that appears, select Create shortcuts here.
  • For a shortcut to a file on the Taskbar, right-click on the object and select Pin to Taskbar.
  • For a shortcut to a file on the Start menu, right-click on the object and select Pin to Start. That will create a shortcut in the app tiles section. To create a shortcut in the list of programs, that is a little more complicated. For more information on creating a shortcut in the program section of the Start menu, check out how to customize the Start menu in Windows 10.

How to create Internet shortcuts in Windows 10

To create a shortcut to a webpage in Windows 10, you will need to open your favorite web browser and navigate to the webpage you want to create a shortcut. Make sure the browser is not maximized to full screen, as you are going to need access to your Desktop.

  • In your browser's address bar, place your mouse cursor over the icon to the left of the web page address. Then press and hold the left mouse button and drag it to an empty spot on your Desktop. If you are not sure about how to do this, watch the video below for more details.

7 things to do before and after upgrading to Windows 10

Updated August 17, 2020

With the release of Windows 10 comes the inevitable upgrade from Windows 7 or Windows 8.1, And with the upgrade being free, why not upgrade to Windows 10? But before you do, there are some things you should do before. Here are seven (7) things to do before and after upgrading to Windows 10.

7 things to do before and after upgrading to Windows 10

1. Run Window 10 Upgrade Advisor

Update 8/1/16: Microsoft ended the Get Windows 10 (GWX) promotion, and the Windows 10 Upgrade Advisor is no longer available. If you perform an in-place upgrade using Windows 10 media, the installer will check your computer for incompatible hardware and software.

Update 8/17/20: Even though the Get Windows 10 promotion has ended, you can still upgrade Windows 7 and Windows 8.1 for free.

How to get a free Windows 10 upgrade for Windows 7 and Windows 8.1

Doing an in-place upgrade has its pros and cons. Even though Microsoft claims that if the software runs on Windows 7 or Windows 8.1, it will run on Windows 10, there will be exceptions to the rule. The same can be said about hardware too. Remember that Windows 10 will only come with generic drivers for a good portion of the equipment. Running the upgrade advisor will tell what issues you may have, and then you can find a fix before performing the upgrade. Download any hardware-specific drivers that you will need and save them to a flash drive or network folder.

The Get Windows 10 icon

    1. Left-click the Get Windows 10 icon on the Taskbar

The Get Windows 10 PC check

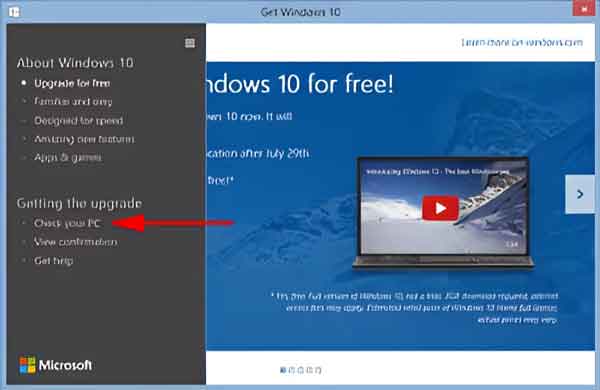
  1. Left-click on the three horizontal bars in the upper left corner to expand the menu and select Check your PC.

2. Check your drive for errors

One of the last things you want is to have the upgrade fail because of errors on the system drive. This is especially so if the failure were to happen while copying new files and left your system un-bootable. To be on the safe side, run Windows disk checking utility CHKDSK.

Check your hard disk for errors in Windows 7
Check your hard drive for errors in Windows 8

3. Clean up the junk

It's now time to clean the system up. Uninstall any program you don't need or want and then run Windows built-in Disk Cleanup utility. You can also use a program like CCleaner, but be careful not to go too far with it.

Windows 7 Disk Cleanup
Windows 8 Disk Cleanup
Clean up and optimize your computer with CCleaner

4. Backup everything

As the old saying goes, "An ounce of prevention is worth a pound of cure", so a complete backup of your system is the next thing to do. Windows 7 and Windows 8.1 both have a built-in File Recovery program that can do a full system image to an external drive, network folder, or DVDs. You will also need to create a system repair disk to boot the system so that you can restore the system image you create, just in case. Links to both are located on the left-side column of the File Recovery program screen.

Now the File Recovery program can be kind of hard to find, especially in Windows 8.1. To make sure you are running it with the correct privileges, I suggest just running the program using an administrative command prompt.

How to open a Command Prompt with Administrator privileges in Windows 7
How to open a Command Prompt with Administrator privileges in Windows 8

To open the File Recovery program, type the following into an admin command prompt and hit enter.

sdclt.exe

5. Perform an inventory with Belarc

Having a complete list of all of the hardware and software inside your computer can come in handy if anything were to go wrong. Belarc Advisor is an excellent program for creating an inventory of your computer software and hardware, including software installation keys. Once it is done creating an inventory, it opens the results in a web browser. Print or save the results to a flash drive, just in case you might need it down the road.

Belarc Advisor

6. Uninstall system utilities

This is not mandatory, but I recommend uninstalling any anti-virus, anti-malware, EMET, etc. program before the upgrade. These programs look for malicious activity geared toward the operating system and could create a massive headache during the upgrade. It's better to be safe than sorry.

Time to upgrade to Windows 10

Grab a drink and have a seat; it'll take a little while.

7. Update drivers and reinstall software

It's now time to install any device-specific drivers you downloaded in Step #1. Once that is done, it's time to download the latest version of all the software you removed in Step #6. If you're unsure what version of a program you had installed, go through the inventory you created in Step #5.

How to defragment and optimize your drive in Windows 10

Updated December 12, 2021

Have you ever tried to find a file in a disorganized filing cabinet? It can take some time. The same thing can happen when your computer's drive becomes fragmented. But you can keep all of the folders and files on your computer organized with regular defragmentation. Here's how to defragment and optimize your drive in Windows 10.

How to defragment and optimize your drive in Windows 10

There are two (2) types of drives used in computers, Hard Disk Drive (HDD) and Solid State Drive (SSD). The kind of drive you have determines whether you need (or want) to defragment and optimize it. To find out what type of drive(s) you have, follow the standard instructions below. The Optimize Drives screen will tell you what kind of drive(s) you currently have in your computer.

The issue of drive fragmentation stemmed from the early '80s when Microsoft needed an OS, and they bought Quick and Dirty Operating System (QDOS) and renamed it MS-DOS. At that time, HDDs were the only type of drive available, and they are still the de facto standard in the industry. And they do need to be defragmented and optimized regularly.

Now SSD's are different in that there are no moving parts inside, just memory chips. So when your computer reads and writes to it, the data is going back to the same location on the drive. You can defrag and optimize an SSD, but it is not recommended since SSDs have limited read/write cycles, and any program that intensively accesses the SSD could shorten the life span of the drive. Microsoft started adding support for SSDs in Windows 7 / Windows Server 2008 with the Trim command. Since the low-level operation of SSDs differs from HDDs, the Trim command handles deletes/format requests.

You can verify Trim is enabled by typing the following into an Administrative Command Prompt:

fsutil behavior query DisableDeleteNotify

If the command returns a 0, then Trim is enabled. If it returns a 1, then it is not. To enable Trim, type the following into the Administrative Command Prompt:

fsutil behavior set DisableDeleteNotify 0

Standard drive defragment and optimization in Windows 10

standard drive defragment and optimization in Windows 10

    1. Bring up the Defragment and Optimize Drives application by:
      1. Left-click on the Start Windows logo button.
      2. Scroll down to Windows Administrative Tools and left-click to expand.
      3. Left-click on Defragment and Optimize Drives.

or

      1. Open File Explorer by left-clicking the File Explorer icon (the manilla folder) on the Taskbar.
      2. In the left-side column, left-click on This PC.
      3. In the right-side column right-click on the drive you want to check and select Properties.
      4. Left-click on the Tools tab.
      5. Under Optimize and defragment drive left-click on Optimize.

then

  1. Left-click on the drive(s) you want to optimize.
  2. Left-click on Analyze (Analyze all) or Optimize (Optimize all)

Advanced drive defragment and optimization in Windows 10

advanced drive defragment and optimization in Windows 10

  1. Open a Command Prompt with Administrative privileges (click here for instructions)
  2. Use the following command line syntax(s) and parameter(s) to run DEFRAG:

Defrag <Volumes> <Operations> [<Options>]

Examples:

  • Defrag C: /U /V
  • Defrag C: D: /TierOptimize /MultiThread
  • Defrag C:\mountpoint /Analysis /U
  • Defrag /C /H /V
Volumes
/C | /AllVolumes On each volume run only the preferred operations from the given list of operations.
/E | /VolumesExcept <volume paths> Perform all the given operations on each volume except those specified. If the exception list is empty, this behaves as /AllVolumes.
volume paths Specifies the drive letter followed by a colon, mount point, or volume name. More than one volume can be specified. Run all the given operations on each specified volume.
Operations
/A | /Analyze Perform analysis.
/B | /BootOptimize Perform boot optimization to increase boot performance.
/D | /Defrag Perform traditional defrag (this is the default). On a tiered volume, traditional defrag is performed only on the Capacity tier.
/G | /TierOptimize On tiered volumes, optimize files to reside on the appropriate storage tier.
/K | /SlabConsolidate On thinly provisioned volumes, perform slab consolidation to increase slab usage efficiency.
/L | /Retrim On thinly provisioned volumes, perform retrim to release free slabs. On SSDs perform retrim to improve write performance.
/O | /Optimize Perform the proper optimization for each media type.
/T | /TrackProgress Track progress of a running operation for a given volume. An instance can show progress only for a single volume. To see progress for another volume launch another instance.
/U | /PrintProgress Print the progress of the operation on the screen.
/V | /Verbose Print verbose output containing the fragmentation statistics.
/X | /FreespaceConsolidate Perform free space consolidation, moves free space towards the end of the volume (even on thin provisioned volumes). On tiered volumes consolidation is performed only on the Capacity tier.
Options
/H | /NormalPriority Run the operation at normal priority (default is low).
/I | /MaxRuntime n Available only with TierOptimize. Tier optimization would run for at most n seconds on each volume.
/LayoutFile <file path> Available only with BootOptimize. This file contains the list of files to be optimized. The default location is %windir%\Prefetch\layout.ini.
/M | /MultiThread [n] Run the operation on each volume in parallel in the background. For TierOptimize, at most n threads optimize the storage tiers in parallel. Default value of n is 8. All other optimizations ignore n.
/OnlyPreferred When volumes are specified explicitly, defrag performs all the given operations on each specified volume. This switch lets defrag run only the preferred operations, from the given list of operations, on each specified volume.

How to check your drive for errors in Windows 10

Updated July 20, 2020

Keeping the drive in your Windows 10 computer error-free is essential to its performance. If you are experiencing issues opening files or applications, it may be time to check your drive for errors. Here is how to check your drive for errors in Windows 10.

How to check your drive for errors in Windows 10

There are two ways of checking drives for errors in Windows 10, standard and advanced. The standard approach is the easiest to use, but the advanced method has more options.

Standard drive error checking in Windows 10

Standard drive error checking in Windows 10

  1. Open File Explorer using one of the following:
    • Left-click on the File Explorer icon (manilla folder) on the Taskbar.
    • Press the Windows logo key Windows logo + E at the same time.
    • Use the Power User menu by right-clicking on the Start Windows logo button and selecting File Explorer.
  2. In the left-side column left-click on This PC.
  3. In the right-side column right-click on the drive you want to check and select Properties.
  4. Left-click on the Tools tab.
  5. Under Error checking left-click on Check.
  6. Left-click on Scan drive.

Advanced drive error checking in Windows 10

Advanced drive error checking in Windows 10

  1. Open a Command Prompt with Administrative privileges (click here for instructions)
  2. Use the following command-line syntax(s) and parameter(s) to run CHKDSK:

CHKDSK [volume[[path]filename]]] [/F] [/V] [/R] [/X] [/I] [/C] [/L[:size]] [/B] [/scan] [/spotfix]

volume Specifies the drive letter (followed by a colon), mount point, or volume name.
filename FAT/FAT32 only: Specifies the files to check for fragmentation.
/F Fixes errors on the disk.
/V On FAT/FAT32: Displays the full path and name of every file on the disk. On NTFS: Displays cleanup messages, if any.
/R Locates bad sectors and recovers readable information (implies /F, when /scan not specified).
/L:size NTFS only: Changes the log file size to the specified number of kilobytes. If a size is not specified, it displays the current size.
/X Forces the volume to dismount first if necessary. All opened handles to the volume would then be invalid (implies /F).
/I NTFS only: Performs a less vigorous check of index entries.
/C NTFS only: Skips checking of cycles within the folder structure.
/B NTFS only: Re-evaluates bad clusters on the volume (implies /R).
/scan NTFS only: Runs an online scan on the volume.
/forceofflinefix NTFS only: (Must be used with "/scan") Bypass all online repair; all defects found are queued for offline repair (i.e. "chkdsk /spotfix").
/perf NTFS only: (Must be used with "/scan") Uses more system resources to complete a scan as fast as possible. This may have a negative performance impact on other tasks running on the system.
/spotfix NTFS only: Runs spot-fixing on the volume.
/sdcleanup NTFS only: Garbage collects unneeded security descriptor data (implies /F).
/offlinescanandfix Runs an offline scan and fix on the volume.
/freeorphanedchains FAT/FAT32/exFAT only: Frees any orphaned cluster chains instead of recovering their contents.
/markclean FAT/FAT32/exFAT only: Marks the volume clean if no corruption was detected, even if /F was not specified.

The /I or /C switch reduces the amount of time required to run Chkdsk by skipping certain volume checks.

How to reset your network adapter in Windows 10

Updated July 19, 2020

Has your Internet connection gotten slower over time? Maybe you had a virus, and now your Internet connection isn't running correctly? It may be time to clean up your network connection. Here's how to reset your network adapter(s) in Windows 10.

How to reset your network adapter in Windows 10

When it comes to restoring network connectivity in Windows 10, sometimes the best thing you can do is reset the network adapter(s). I have found that this is one of the most effective ways of getting a system back online. There are two (2) ways of resetting network adapter(s) in Windows 10, primary and advanced.

The one thing to keep in mind when resetting your network adapter(s) is you may have to reinstall networking software, like VPN software and virtual appliances. Resetting the network adapter(s) back to default will reset the Windows Firewall back to its default settings.

The primary way of resetting the network adapters in Windows 10.

  1. Left-click on the Start Windows logo button to bring up the Start menu.
  2. Left-click on Settings (gear icon).
  3. Left-click on Network & Internet.
  4. In the left-hand column, left-click on Status.
  5. In the right-hand column, left-click on Network reset.
  6. On the Network reset page, left-click on Reset now.
  7. A dialog box will appear, asking if you are sure about resetting the network setting. Left-click on Yes.
  8. Your computer will automatically restart within five minutes.

The advanced way of resetting the network adapters in Windows 10.

Windows 10 has a command-line utility called Netsh (Network Shell) that allows you to display and modify your computer's network configuration. The most common use of Netsh is to reset the TCP/IP (Transmission Control Protocol / Internet Protocol) stack back to default. Since Netsh is a command-line tool, you will need to use a Command Prompt with Administrative privileges.

How to open a Command Prompt with Administrator privileges in Windows 10 (link will open in a separate window)

Netsh commands for resetting your network adapter in Windows 10

Netsh commands run in a Command Prompt with Administrative privileges

Note: This section is intended for advanced computer users. If you are not comfortable with advanced troubleshooting, ask someone for help. Follow these steps to reset the Windows Firewall, TCP/IP stack, and Winsock manually. You will have to restart your system to complete the reset.

The following is a list of the Netsh commands with descriptions that you can use to reset your network adapter in Windows 10:

netsh advfirewall reset

Restores the Windows Firewall with Advanced Security policy to the default policy. The current active policy can be optionally exported to a specified file. This command returns all settings to not configured and deletes all connection security and firewall rules in a Group Policy object.

netsh int ip reset

Removes all user-configured IPv4 (Internet Protocol version 4) settings. Restarting the computer is required before the default settings will take effect.

netsh int ipv6 reset

Removes all user-configured IPv6 (Internet Protocol version 6) settings. Restarting the computer is required before the default settings will take effect.

netsh winsock reset

Resets Winsock Catalog to a clean state. All Winsock Layered Service Providers, which were previously installed, must be reinstalled. This command does not affect Winsock Name Space Provider entries.

Free computer diagnostics

Repairing a PC can sometimes be expensive, and that is why we offer free basic in-shop diagnostics. Give one of our professional and experienced technicians a call at (602) 795-1111, and let's see what we can do for you.

Check out our reviews

Geeks In Phoenix LLC, BBB Business Review

Customer service is #1

Here at Geeks in Phoenix, we take pride in providing excellent customer service. We aim to give the highest quality of service  from computer repair, virus removal, and data recovery.

Bring your computer to us and save

Repairing a computer can be time-consuming. That is why we base our in-shop service on the time we work on your computer, not the time it takes for your computer to work! From running memory checking software to scanning for viruses, these are processes that can take some time.

Contact us

If you have any questions, please feel free to give us a call at (602) 795-1111  and talk with one of our Geeks. Or you can send us a message from our contact page contact page , and one of our Geeks will get back to you as soon as possible. Or you can stop by and see us. Here are our hours and location.

Like Geeks in Phoenix on Facebook

Follow Geeks in Phoenix on Twitter

Watch Geeks in Phoenix on YouTube