Geeks in Phoenix

Geek Blog


How to reset your network adapter in Windows 11

Are you having problems connecting to the Internet in Windows 11? Or maybe you are having issues with your local network connection. If so, you might need to reset your network adapter in Windows 11.

How to reset your network adapter in Windows 11

When it comes to the Internet, there can be several things that could be preventing you from making a connection. It could be as simple as a misconfigured firewall or a bad proxy.

But with Windows 11, a good portion of all network problems can be resolved by resetting the network adapter. And there are two (2) different ways of doing it; Simple and Advanced.

Now there are pros and cons to resetting your network adapter. If your computer is a member of a corporate domain or network, you may want to contact your administrator before resetting your network adapter. There could be some network settings that have to be manually entered in the network configuration.

Also, if you have a VPN (Virtual Private Network) or virtual appliance set up, resetting the network adapter might affect it. Resetting the network adapter can also reset the Windows Firewall.

The simple way to reset your network adapter in Windows 11

  1. Left-click on the Start button Windows logo to bring up the Start menu and select Settings in the pinned apps.
  2. In the left-hand column, left-click on the Network and internet category.
  3. In the right-hand column, left-click on Advanced network settings.
  4. In the right-hand column, left-click on Network reset.
  5. Left-click on Reset now. You will get a prompt asking you are sure you want to reset your network settings.
  6. Left-click on Yes, and your computer will restart within five (5) minutes.

or

  1. Right-click on the Start button Windows logo to bring up the Power User menu.
  2. Left-click on Settings.
  3. In the left-hand column, left-click on the Network and internet category.
  4. In the right-hand column, left-click on Advanced network settings.
  5. In the right-hand column, left-click on Network reset.
  6. Left-click on Reset now. You will get a prompt asking you are sure you want to reset your network settings.
  7. Left-click on Yes, and your computer will restart within five (5) minutes.

or

  1. Press the Windows logo key Windows logo key + X to bring up the Power User menu.
  2. Press the letter N to select Settings.
  3. In the left-hand column, left-click on the Network and internet category.
  4. In the right-hand column, left-click on Advanced network settings.
  5. In the right-hand column, left-click on Network reset.
  6. Left-click on Reset now. You will get a prompt asking you are sure you want to reset your network settings.
  7. Left-click on Yes, and your computer will restart within five (5) minutes.

or

  1. Press the Windows logo key Windows logo key + I to bring up Settings.
  2. In the left-hand column, left-click on the Network and internet category.
  3. In the right-hand column, left-click on Advanced network settings.
  4. In the right-hand column, left-click on Network reset.
  5. Left-click on Reset now. You will get a prompt asking you are sure you want to reset your network settings.
  6. Left-click on Yes, and your computer will restart within five (5) minutes.

The advanced way to reset your network adapter in Windows 11

Windows 11 has a command-line utility called Netsh (Network Shell) that allows you to display and modify your computer's network configuration. The most common use of Netsh is to reset the TCP/IP (Transmission Control Protocol / Internet Protocol) stack back to default. Since Netsh is a command-line tool, you will need to use a Command Prompt with Administrative privileges.

How to open a Command Prompt with Administrator privileges in Windows 11 (link will open in a separate window)

Netsh commands for resetting your network adapter in Windows 11

A Windows 11 administrative command prompt running Netsh commands

Note: This section is intended for advanced computer users. If you are not comfortable with advanced troubleshooting, ask someone for help. Follow these steps to reset the Windows Firewall, TCP/IP stack, and Winsock manually. You will have to restart your system to complete the reset.

The following is a list of the Netsh commands with descriptions that you can use to reset your network adapter in Windows 11:

netsh advfirewall reset

Restores the Windows Firewall with Advanced Security policy to the default policy. The current active policy can be optionally exported to a specified file. This command returns all settings to not configured and deletes all connection security and firewall rules in a Group Policy object.

netsh int ip reset

Removes all user-configured IPv4 (Internet Protocol version 4) settings. Restarting the computer is required before the default settings take effect.

netsh int ipv6 reset

Removes all user-configured IPv6 (Internet Protocol version 6) settings. Restarting the computer is required before the default settings take effect.

netsh winsock reset

Resets Winsock Catalog to a clean state. All Winsock Layered Service Providers, which were previously installed, must be reinstalled. This command does not affect Winsock Name Space Provider entries.

How to reset your network adapter in Windows 10

Updated July 19, 2020

Has your Internet connection gotten slower over time? Maybe you had a virus, and now your Internet connection isn't running correctly? It may be time to clean up your network connection. Here's how to reset your network adapter(s) in Windows 10.

How to reset your network adapter in Windows 10

When it comes to restoring network connectivity in Windows 10, sometimes the best thing you can do is reset the network adapter(s). I have found that this is one of the most effective ways of getting a system back online. There are two (2) ways of resetting network adapter(s) in Windows 10, primary and advanced.

The one thing to keep in mind when resetting your network adapter(s) is you may have to reinstall networking software, like VPN software and virtual appliances. Resetting the network adapter(s) back to default will reset the Windows Firewall back to its default settings.

The primary way of resetting the network adapters in Windows 10.

  1. Left-click on the Start Windows logo button to bring up the Start menu.
  2. Left-click on Settings (gear icon).
  3. Left-click on Network & Internet.
  4. In the left-hand column, left-click on Status.
  5. In the right-hand column, left-click on Network reset.
  6. On the Network reset page, left-click on Reset now.
  7. A dialog box will appear, asking if you are sure about resetting the network setting. Left-click on Yes.
  8. Your computer will automatically restart within five minutes.

The advanced way of resetting the network adapters in Windows 10.

Windows 10 has a command-line utility called Netsh (Network Shell) that allows you to display and modify your computer's network configuration. The most common use of Netsh is to reset the TCP/IP (Transmission Control Protocol / Internet Protocol) stack back to default. Since Netsh is a command-line tool, you will need to use a Command Prompt with Administrative privileges.

How to open a Command Prompt with Administrator privileges in Windows 10 (link will open in a separate window)

Netsh commands for resetting your network adapter in Windows 10

Netsh commands run in a Command Prompt with Administrative privileges

Note: This section is intended for advanced computer users. If you are not comfortable with advanced troubleshooting, ask someone for help. Follow these steps to reset the Windows Firewall, TCP/IP stack, and Winsock manually. You will have to restart your system to complete the reset.

The following is a list of the Netsh commands with descriptions that you can use to reset your network adapter in Windows 10:

netsh advfirewall reset

Restores the Windows Firewall with Advanced Security policy to the default policy. The current active policy can be optionally exported to a specified file. This command returns all settings to not configured and deletes all connection security and firewall rules in a Group Policy object.

netsh int ip reset

Removes all user-configured IPv4 (Internet Protocol version 4) settings. Restarting the computer is required before the default settings will take effect.

netsh int ipv6 reset

Removes all user-configured IPv6 (Internet Protocol version 6) settings. Restarting the computer is required before the default settings will take effect.

netsh winsock reset

Resets Winsock Catalog to a clean state. All Winsock Layered Service Providers, which were previously installed, must be reinstalled. This command does not affect Winsock Name Space Provider entries.

3 things you can do to restore network connectivity

One of the most frequent issues I get doing computer repair is the loss of internet connectivity. Yes, a good portion can be attributed to viruses/malware. But there are times when something, plain and simple, goes wrong. A couple of bad settings or corrupt software, and you're not getting on the internet any time soon. Here are three things you can do to restore network connectivity.

Reset the TCP/IP stack and Winsock

If you recently installed or uninstalled software before losing your network connection, it could be some of your TCP/IP settings had been changed. TCP/IP is the internet protocol suite used for the internet and other networks. Resetting them back to default is easy; it requires an administrator command prompt to do it.

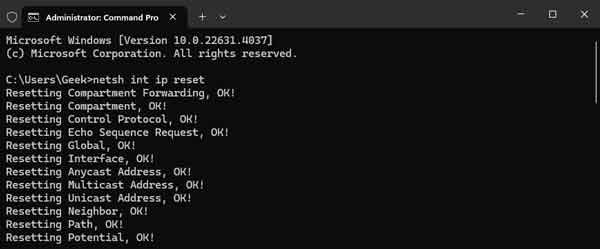
Reset the TCP/IP stack and Winsock interface using an administrator command prompt

The command syntax and accessing an administrator command prompt is different for each version of Windows, so just click on the link below for your version of Windows. And make sure you reset Winsock, too, while you're at it. Winsock defines the interface between applications and the TCP/IP stack. Remember to restart Windows after you reset the TCP/IP stack and Winsock.

Resetting your network adapter in Windows XP

Resetting your network adapter in Windows Vista

Resetting your network adapter in Windows 7

Resetting your network adapter in Windows 8

Resetting your network adapter in Windows 10

Resetting your network adapter in Windows 11

Check security software

Quite often, the problem can be caused by security software that has become corrupt. Most of them have some type of network monitoring, and if it stops working correctly, it could block network access. To check if the problem is with your security software, just open it up, disable it, and try your network connection. If you now have network connectivity, you know that there is something wrong with the software. Try resetting it back to default settings and then enable it. If you still cannot get network access after you reset it, then reinstalling it may be the way to go.

If you open your security software and all you get is a blank white box, it has become corrupt. The same is true if it doesn't open up at all. At this point, uninstalling and reinstalling is the best thing to do. And if you find that it will not uninstall, most anti-virus software vendors have removal tools for their products. Using another computer and a flash drive, search the 'name of the product' + 'removal tool' (example: bogus security removal tool) and download it to the flash drive. Remember to restart your computer after you have run the removal tool.

Reinstall the network adapter(s)

Sometimes, the network adapter settings, wired or wireless, may get corrupted and cause a loss of network connectivity. Uninstalling and then reinstalling the driver(s) will reset it back to manufacturer defaults. Just go into Device Manager and expand the network adapters section. From there, right-click on the adapter you want to reinstall and select Uninstall.

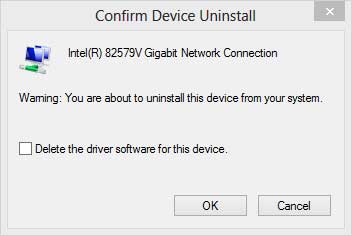
Do not delete the driver when reinstalling the network adapter

When the Confirm Device Uninstall prompt comes up, make sure the 'Delete the driver software for this device' box is unchecked, as you want to keep the driver. Exit Device Manager and restart Windows. When Windows restarts, it will discover the network adapter and automatically install the driver(s) for it.

Resetting your network adapter in Windows 8

Is your network connection running slow? Or maybe your Internet browser isn't allowing you to go to specific websites? Installing/uninstalling applications or viruses/malware/spyware can add unwanted entries into the network protocol. If so, it may be time to reset your network adapter inside of Windows 8.

Command Prompt with administrator privileges in Windows 8

Windows 8 has a built-in administrator tool, Network Shell (Netsh), that allows you to configure and monitor network adapters on your Windows 8 computer. Netsh can completely reset your network adapter back to its default state. It can also reset the Windows Firewall in Windows 8. All you need is a Command Prompt with administrator privileges.

How to open a Command Prompt with administrator privileges in Windows 8

To use Netsh, you will need to open a Command Prompt with administrator privileges. There are a few ways to do this:

    Using a mouse
  1. Go to the Start menu.
  2. Right-click the Start menu background to bring up the app commands.
  3. Select 'All apps'.
  4. Right-click the 'Command Prompt' tile to bring up the app commands.
  5. Select 'Run as administrator'. If you're prompted for an administrator password or confirmation, type the password or provide confirmation.
    Using a keyboard
  1. Go to the Start menu.
  2. Press the Windows logo key Windows logo key + Z to open the app commands.
  3. Press Enter to select 'All apps'.
  4. Use the arrow keys to navigate to the 'Command Prompt' tile.
  5. Press the Application key Application key to bring up the app commands.
  6. Use the arrow keys to navigate to 'Run as administrator' and press Enter. If you're prompted for an administrator password or confirmation, type the password or provide confirmation.
    Using touch
  1. Go to the Start menu.
  2. Swipe up from the bottom of the Start menu to bring up the app commands.
  3. Select 'All apps'.
  4. Scroll to the 'Command Prompt' tile and press and hold it to bring up the app commands.
  5. Select 'Run as administrator'. If you're prompted for an administrator password or confirmation, type the password or provide confirmation.

Netsh commands for resetting your network adapter in Windows 8

The following is a list of the Netsh commands you can use at a Command Prompt with administrator privileges to reset your network adapter in Windows 8.

netsh advfirewall reset Restores the Windows Firewall with Advanced Security policy to the default policy. The current active policy can be optionally exported to a specified file. This command returns all settings to not configured and deletes all connection security and firewall rules in a Group Policy object.

netsh branchcache reset Resets the BranchCache service. Flushes the local cache. Every configuration parameter of BranchCache will be reset to its default value.

netsh int ip reset c:\resetlog.txt Resets TCP/IP and related components to a clean state.

netsh int ipv6 reset Resets IPv6 configuration state.

netsh winsock resetResets Winsock Catalog to a clean state. All Winsock Layered Service Providers which were previously installed must be reinstalled. This command does not affect Winsock Name Space Provider entries.

How to reset Internet Protocol (TCP/IP) in Windows Vista and Windows 7

One of the components of the Internet connection on your computer is a built-in set of instructions called TCP/IP. TCP/IP can sometimes become corrupted. If your connection to the Internet is really slow or you cannot connect to the Internet, and you have tried all other methods to resolve the problem, TCP/IP might be causing it.

Because TCP/IP is a core component of Windows, you cannot remove it. However, you can reset TCP/IP to its original state. If you have any custom settings (default gateway, DNS server, etc.), you will need to set these again manually.

Use a manual method to reset TCP/IP

Note This section is intended for advanced computer users. If you are not comfortable with advanced troubleshooting, ask someone for help. In Windows Vista, a reset command is available in the IP context of the NetShell utility. Follow these steps to use the reset command to reset TCP/IP manually. You will have to restart your system to complete the reset.

  1. To open a command prompt, click on the Start button, then All Programs, then Accessories, then click on Command Prompt.

  2. At the command prompt, copy and paste (or type) the following command and then press ENTER:

    netsh int ip reset c:\resetlog.txt

    Note: If you do not want to specify a directory path for the log file, use the following command:

    netsh int ip reset resetlog.txt

When you run the reset command, it rewrites two registry keys used by TCP/IP. This has the same result as removing and reinstalling the protocol. The reset command rewrites the following two registry keys:

SYSTEM\CurrentControlSet\Services\Tcpip\Parameters\
SYSTEM\CurrentControlSet\Services\DHCP\Parameters\

To run the manual command successfully, you must specify a file name for the log, in which the actions that netsh takes will be recorded. When you run the manual command, TCP/IP is reset, and the actions taken are recorded in the log file, known as resetlog.txt in this article.

The first example, c:\resetlog.txt, creates a path where the log will reside. The second example, resetlog.txt, creates the log file in the current directory. In either case, if the specified log file already exists, the new log will be appended to the end of the existing file.

Free computer diagnostics

Repairing a PC can sometimes be expensive, and that is why we offer free basic in-shop diagnostics. Give one of our professional and experienced technicians a call at (602) 795-1111, and let's see what we can do for you.

Check out our reviews

Geeks In Phoenix LLC, BBB Business Review

Customer service is #1

Here at Geeks in Phoenix, we take pride in providing excellent customer service. We aim to give the highest quality of service  from computer repair, virus removal, and data recovery.

Bring your computer to us and save

Repairing a computer can be time-consuming. That is why we base our in-shop service on the time we work on your computer, not the time it takes for your computer to work! From running memory checking software to scanning for viruses, these are processes that can take some time.

Contact us

If you have any questions, please feel free to give us a call at (602) 795-1111  and talk with one of our Geeks. Or you can send us a message from our contact page contact page , and one of our Geeks will get back to you as soon as possible. Or you can stop by and see us. Here are our hours and location.

Like Geeks in Phoenix on Facebook

Follow Geeks in Phoenix on Twitter

Watch Geeks in Phoenix on YouTube