Geeks in Phoenix

Geek Blog


How to reset Windows 11

Did you get a new computer and want to get rid of your old Windows 11 system? Or you may want to refresh your existing version of Windows 11 and do not want to lose all of your files. If so, it may be time to reset Windows 11, and here is how to do it.

How to reset Windows 11

In previous articles, we have shown you How to perform a repair upgrade of Windows 11 and How to perform a clean installation of Windows 11. Resetting Windows 11 falls somewhere between them; you want a fresh version of Windows but want to keep all your files.

Resetting Windows 11 is similar to a clean installation, where you get a fresh version of Windows 11 reinstalled. The only difference is that your user profile stays in place if you save your files. If you choose to delete everything, Windows 11 will be reset as if you had just pulled it out of the box. Remember that there are only two (2) options when it comes to Reset this PC:

  • You can keep your files and delete all the apps. This option reinstalls Windows 11 and retains your user profile.
  • You can delete all of your files and all of the apps. This option reinstalls Windows 11 and returns your computer to an out-of-the-box state.

One of the best features of resetting Windows 11 and removing all files and apps is that you can have Windows securely erase all of the data and apps before reinstalling Windows. It works great if you are getting rid of your Windows 11 computer.

Now the first thing I recommend before resetting Windows 11 is that you have a complete (bare metal) backup of your computer to be safe. Of course, if you are not going to keep your computer, you do not need a backup.

How to backup your Windows 11 computer using Windows Backup and File History

The second thing to do is find out if your drive(s) are encrypted with BitLocker drive encryption. To find out if your drive(s) are BitLocker encrypted:

  1. Press the Windows logo key Windows logo + S to bring up Search.
  2. Type in bitlocker and left-click on Manage BitLocker / Control Panel under Best match.

If your drive is encrypted with BitLocker, you have two (2) choices; You can turn off Bitlocker, which will decrypt your drive and take some time to perform, or locate and document (write or print it out) the BitLocker recovery key.

Where to look for your BitLocker recovery key

Now, if you are getting rid of your computer, you should turn off BitLocker before resetting Windows 11. The reason is that the BitLocker recovery key is typically tied to your Microsoft account.

When all is said and done, and your computer is gone, you will want to remove that device from your Microsoft account. When you remove that device, if the drive(s) in that computer are still encrypted with BitLocker, the BitLocker recovery key will also be removed.

Once you have BitLocker taken care of, it is time to start the reset. Now there are two (2) ways of going about resetting Windows 11, when logged into Windows 11 and using the System app, or when logged out and using the Advanced Boot Options.

How to get to Reset this PC when logged in to Windows 11

How to get to the Reset this PC when logged in to Windows 11

  1. Left-click on the Start button Windows logo to bring up the Start menu.
  2. In the upper right-hand corner of the Start menu, left-click on All apps.
  3. Scroll down the list of programs and left-click on Settings.
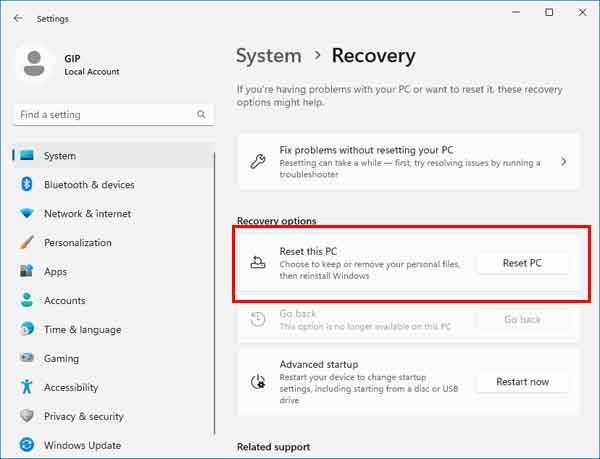
  4. Left-click on the System category in the left-hand column.
  5. Scroll down the right-hand column and left-click on Recovery.
  6. Under Reset this PC, left-click on Reset PC.

How to get to Reset this PC when logged out of Windows 11

How to get to the Advanced Boot Options when logged out of Windows 11

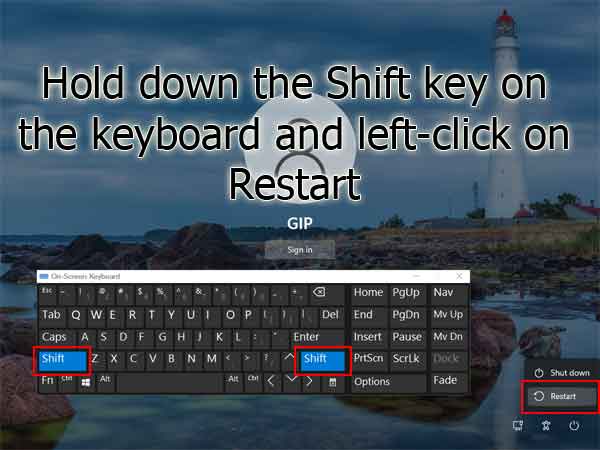
  1. At the login screen, left-click on the Power icon in the lower right-hand corner. This will bring up the power options.
  2. Hold down the shift key while you left-click on Restart.
  3. When the Advanced Boot Options appears, left-click on Troubleshoot.
  4. On the Troubleshoot screen, left-click on Reset this PC

How to use Reset this PC

Reset this PC inside of Windows 11

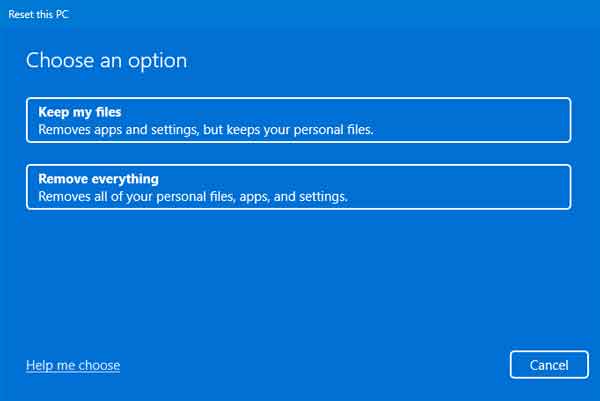
  1. Reset this PC opens to the Choose an option screen. The two (2) options are: Keep my files or Remove everything. Whichever you choose, you will have the ability to change the advanced settings for each.
  2. The How would you like to reinstall Windows? screen appears next. You can choose to download a new copy of Windows 11 (Cloud download) or use the local copy (Local reinstall).
  3. Next, the Additional settings screen appears.
    • If you choose Keep my files, you will see how Windows 11 will be reinstalled. When you click on Change settings, you can change whether to download Windows or reinstall from your device.
    • If you choose Remove everything, you will see how Windows 11 will be reinstalled. When you click Change settings, you can change whether to quick or secure erase data, delete files from all drives or only the Windows drive, and whether to download Windows or reinstall from your device.
  4. The Ready to reset this PC screen appears with a list of all the changes that will take place. This is your last chance to cancel the reset. When you are ready, click Reset, and the reset process begins. Depending on the options you choose, the reset can take a few minutes to a few hours, and your computer will automatically restart.

How to reset Windows 10

Updated July 10, 2020

So, you say your Windows 10 computer is starting to run slow and having errors. Or maybe you just got a new computer and want to recycle your old Windows 10 system. Then it may be time to reset Windows 10 on your computer.

How to reset Windows 10

Now over the years, Microsoft has made resetting Windows difficult, at best. In most versions, you had to reinstall Windows to get a clean copy. But with Windows 10, you can reset the operating system without losing your files.

There are two (2) reset options built-in to Windows 10. You can either keep your user files or remove everything. Take note; either option removes all applications not included with Windows 10. That means you will have to reinstall all of the programs you installed or came pre-loaded on your computer.

Below you will find the instructions for performing a reset of Windows 10 using the built-in feature. But if you want to remove everything, you do have two (2) more options. The first is using the Refresh Windows Tool, which does the same thing as the built-in remove everything option.

Refresh Windows Tool

The second option is a little more complicated but does have some advantages. With this option, you download the Windows 10 installation media and perform an in-place upgrade. With this option, you can choose to save your files and all of your installed programs. Or you can get rid of everything and start with a fresh copy of Windows 10. Now the in-place upgrade does reset all of Windows 10 settings back to default but retains all of the installed programs.

How to repair Windows 10 by doing an in-place upgrade

Always remember to backup your computer before performing any reset. It is better to be safe than sorry.

Backup Windows 10

How to reset Windows 10

  1. Left-click on the Start Windows logo button to bring up the Start menu.
  2. Left-click on Settings (gear icon).
    Windows 10 Reset 1
  3. Left-click on Update & Security.
    Windows 10 Reset 2
  4. In the left-hand column, left-click on Recovery.
    Windows 10 Reset 3
  5. In the right-hand column under Reset this PC, left-click on the Get started button.
    Windows 10 Reset 4
  6. On the Choose an option page, left-click on either Keep my files or Remove everything.
    Windows 10 Reset 5
    • If you select Keep my files, you get a prompt with a list of the apps you will need to reinstall. Left-click on the Next button to proceed. Once you left-click on your choice, you'll come to the Ready to reset this PC screen. Left-click on Reset to proceed with the reset.
    • If you select Remove everything, you will be prompted to either Just remove my files or Remove files and clean the drive. Once you left-click on your choice, you'll come to the Ready to reset this PC screen. Left-click on Reset to proceed with the reset.
  7. In newer versions of Windows 10 (2004 and up), the next screen you get will ask you How would you like to reinstall Windows?
    Windows 10 Reset 8
    Select either Cloud download or Local reinstall.
    • Cloud download requires Internet access and can use more than 4GB of data
    • Local reinstall uses the hidden recovery partition on your computer to reinstall Windows 10
  8. Once you left-click on your choice, you'll come to the Reset this PC screen. Once you confirm your selection of settings, Left-click on Reset to proceed with the reset.

If you selected Remove files and clean the drive, you will need to go through the initial Windows 10 set up. For security reasons, Microsoft would like you to use a Microsoft account to sign in to Windows 10. But if you have used previous versions of Windows, you probably had a local account. And you might not have had a password at all. You can still create a local account in Windows 10, and here is how you do it.

When you get to the How would you like to set up? page,
Windows 10 Reset 6
left-click on Set up for personal use and then left-click on the Next button. On the Sign in with Microsoft page, left-click on the Offline account link down in the lower left-hand corner.
Windows 10 Reset 7
This will take you to a page titled Sign in to enjoy the full range of Microsoft apps and services.
Windows 10 Reset 9
Left-click on the Limited experience link down in the lower left-hand corner. The next page is Who's going to use this PC? This is where you create a local account.
Windows 10 Reset 10
Just type in a username and left-click on Next. The following screen will ask you for a password, but it's not required for a local account. If you do not want a password, leave the password field blank and left-click on Next. Without a password, when Windows 10 starts up, it will boot directly to the desktop.

Free computer diagnostics

Repairing a PC can sometimes be expensive, and that is why we offer free basic in-shop diagnostics. Give one of our professional and experienced technicians a call at (602) 795-1111, and let's see what we can do for you.

Check out our reviews

Geeks In Phoenix LLC, BBB Business Review

Customer service is #1

Here at Geeks in Phoenix, we take pride in providing excellent customer service. We aim to give the highest quality of service  from computer repair, virus removal, and data recovery.

Bring your computer to us and save

Repairing a computer can be time-consuming. That is why we base our in-shop service on the time we work on your computer, not the time it takes for your computer to work! From running memory checking software to scanning for viruses, these are processes that can take some time.

Contact us

If you have any questions, please feel free to give us a call at (602) 795-1111  and talk with one of our Geeks. Or you can send us a message from our contact page contact page , and one of our Geeks will get back to you as soon as possible. Or you can stop by and see us. Here are our hours and location.

Like Geeks in Phoenix on Facebook

Follow Geeks in Phoenix on Twitter

Watch Geeks in Phoenix on YouTube