Geeks in Phoenix

Geek Blog


How to repair Windows 10 by doing an in-place upgrade

Updated May 14, 2020

Are you getting lots of errors when you log into Windows 10? Are you not able to get the Start menu or File Explorer to open? If so, it may be time to repair Windows 10 by doing an in-place upgrade.

Sometimes repairing Windows 10 can be a challenging endeavor. One time I had a Windows 10 system that the right-click mouse function would only work in certain situations.

Another time, I had a Windows 10 system that File Explorer and the Start menu would not work. This was one of those times when you think that you are going to just have to wipe the drive and do a clean installation of Windows 10.

But in both cases, I was able to repair Windows 10 while keeping all of the user's documents, settings, and installed programs. I just performed an in-place upgrade of Windows 10.

Remember that if you start the in-place upgrade by booting your computer up on the Windows 10 installation media, you will only get the option of saving your documents. To also preserve the installed programs, you need to start the in-place upgrade from inside of Windows 10.

Now performing an in-place upgrade is not hard. The only thing you need to do is make the Windows 10 installation media. If you can access the Internet and download the Windows 10 Media Creation Tool, great, if not, you will need to use another computer to make the Windows 10 installation media.

You do not have to be upgrading to a newer version of Windows 10 (1809 to 1903, 1903 to 1909) for this to work. You can perform an upgrade to the same version (1909 to 1909).

Now you never want to use an older version of the Windows 10 media, like the one you created a couple of years ago, to do an in-place upgrade. You will always want to download the latest version directly from Microsoft using the Windows 10 Media Creation Tool.

To make the media, you will need either a blank DVD or a USB flash drive that is at least 8GB in size. Remember that if you use a USB flash drive, it will be reformatted and everything on it will be erased. So, if you have used the USB drive for anything else, you may want to copy the data off of it before using it for the Windows 10 installation media.

Once you get the Windows 10 Media Creation Tool downloaded, all you have to do is double-click the file to run it. It is a stand-alone program, and it does not require any installation.

The first screen that comes up is the legal stuff, just click on Accept. On the next screen, you will have to choose what you want to do.
Windows 10 installer what do you want to do screen
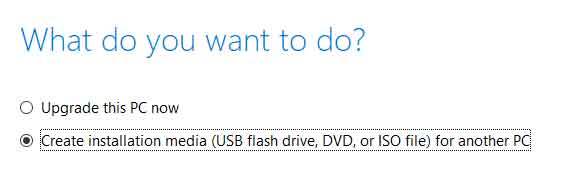
Select Create installation media for another PC and click on Next.

On the next screen, you will select the language, architecture, and edition.
Windows 10 installer select language and edition screen
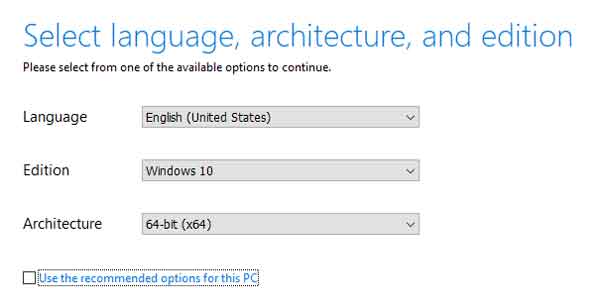
Since you are creating the media for another computer, make sure the Use the recommended options for this PC checkbox is deselected. The majority of users in the US will select the following settings:

  • Language: English (If you use a different language, select it from the pull-down menu)
  • Edition: Windows 10
  • Architecture: 64-bit (x64)

When you are finished selecting the language, architecture, and edition, click on Next. The next screen will ask you what media do you want to use.
Windows 10 installer choose which media to use screen
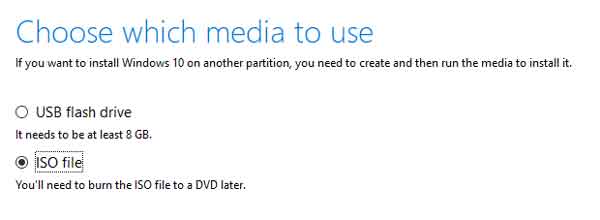
If you select the USB flash drive option, make sure you have the USB flash drive inserted into a USB port on the computer.

If you want to make a DVD, you will need to choose the ISO file option and then burn it onto a blank DVD. Here is how to go about burning the ISO file to a DVD.

Once you have the media created, either a DVD or USB flash drive, you will need to insert it in the computer that you want to repair.
Windows 10 setup program in File Explorer
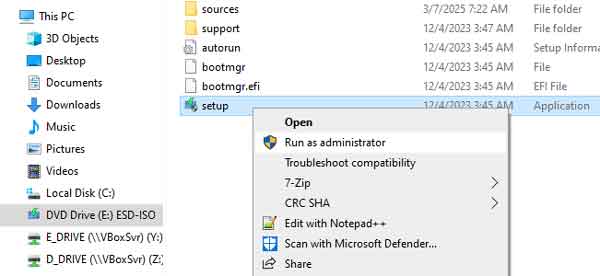
Then just open File Explorer, navigate to the DVD or USB flash drive, and right-click on the setup.exe program and select Run as administrator.
Windows 10 installation start up screen
The Windows 10 installer will then startup.

You will be prompted to download Windows 10 updates, drivers, and optional features. Since you are doing an in-place upgrade, I recommend waiting until the installation is finished before doing any updates.

The next screen you will get is the license agreement. Just click Accept in the lower right-hand corner and continue with the in-place upgrade. Finally, you will get to the screen that asks what you want to keep. Make sure that Keep personal files and apps are selected and then select Install in the lower right-hand corner.

The in-place upgrade will take some time, and your computer could restart a few times before it is complete. When it is done, your version of Windows 10 should be completely repaired and good as new.

Now in the examples I talked about earlier, I could not get either the right-click function to work or could not get the Start menu or File Explorer to open at all. But there is another way of starting the in-place upgrade using Task Manager.

How to start a program using Task Manager

Sometimes the only way to run a program is to use Task Manager. It is a simple, down, and dirty way of running a program with administrative privileges. And we want to use admin privileges to run the setup.exe program.

  1. Press the Ctrl + Alt + Delete keys all at the same time (the 3-finger salute).
    The Windows 10 Ctrl Alt Delete screen
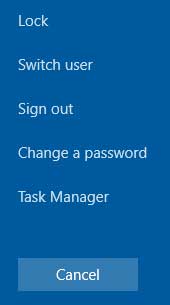
    You will get a screen that has several selections on it. Click on Task Manager.
  2. The Task Manager program will appear next.
    The basic Windows 10 Task Manager screen
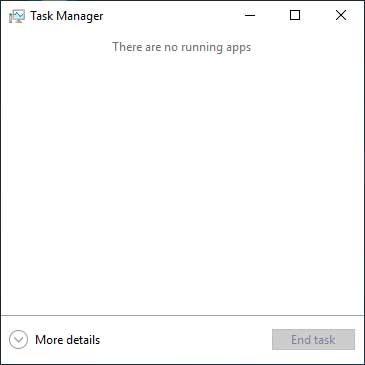
    If it shows says There are no running apps, click on the More details arrow in the bottom left-hand corner. This will bring up all of the running processes.
  3. Click on the File drop-down menu in the upper left-hand corner of Task Manager
    The advanced Windows 10 Task Manager screen with Run new task
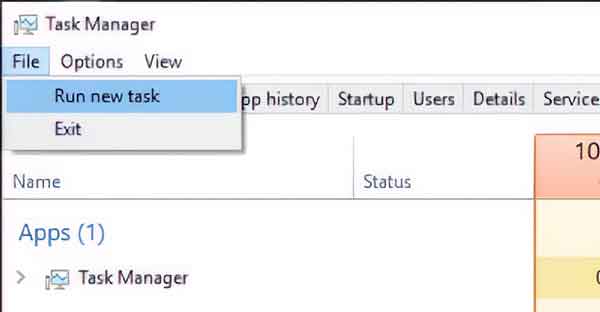
    and select Run new task.
  4. The Create a new task dialog box will appear.
    The Windows 10 Create new task dialog box
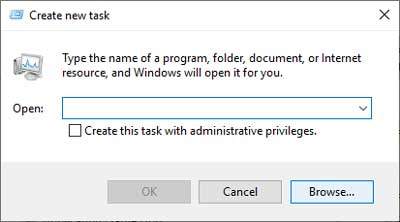
    Click on the Browse .. button in the lower right-hand corner.
  5. Using the Browse dialog box, navigate to the drive with the Windows 10 installation files (either DVD or USB flash drive),
    The Windows 10 Task Manager Browse screen
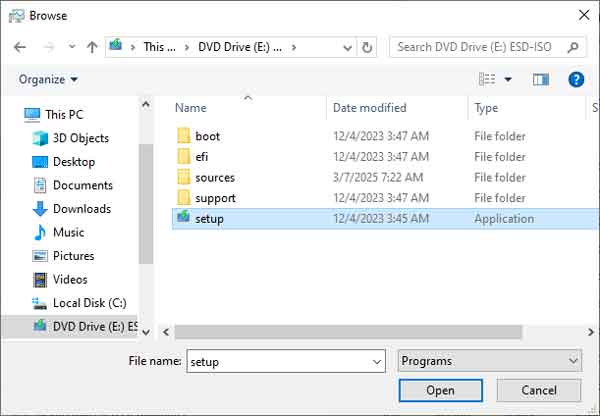
    select setup.exe and then click Open.
  6. This will bring you back to the Create new task dialog box, and the path to the setup.exe program will be in the Open field.
    The Windows 10 Create new task dialog box with file path
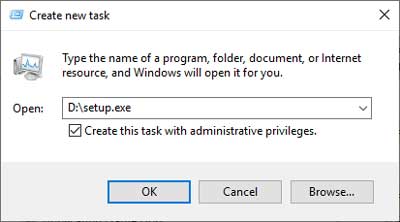
    Make sure that the Create this task with administrative privileges checkbox is selected. Then click on OK.
  7. The Windows 10 installer will now start. Just follow the steps outlined previously in this article for the rest of the in-place upgrade.

The Windows 10 feature you hope you never have to use

Nobody likes to have to reinstall Windows. Nobody. It has been a significant headache with finding or creating the recovery/installation media and finding or reading the product key from the Certificate of Authenticity (COA). But with the Windows 10 online upgrade, things just got a whole lot easier.

 Windows 10 feature you hope you never have to use

There may come a day when you may need to repair or reinstall Windows 10. In previous versions of Windows, you had to create the manufacturer's branded recovery disks or use the hidden recovery partition to reinstall Windows. Or maybe you were one of the lucky ones that got an OEM disk. Either way, you had to have the original operating system installation media from the manufacturer to perform a reinstallation.

The huge problem was a lot of people didn't know they needed to make the recovery disks. They only found out after their hard drives crashed. At that point, they have only two choices; contact the manufacturer to find out if they sell the recovery disks. Some do, some don't. But the cost for replacement recovery disks will be less than the second option, which is to purchase a new installation disk.

If you're one of the millions that have upgraded from Windows 7 or Windows 8.1 to Windows 10 online, you now have a digital license. You can use the Windows 10 Media Creation Tool from Microsoft to create either a bootable USB drive or an ISO file. You can then use the ISO file to create an installation DVD. And the cool thing is that you can make the installation media on another Windows 10 computer, just in case your computer will not boot.

All you need for hardware is a USB drive (8GB or larger) or DVD burner and a blank single-side or double-side DVD. What you need to know about your version of Windows 10 is what language, what edition (Home, Pro, etc.), and what architecture (32-bit or 64-bit). Most consumers use the Home edition as the Pro edition does cost more. Unless you specifically order your computer with the Pro edition or your computer is part of a domain, it's probably the Home edition. And most computers nowadays run 64-bit versions of Windows.

The next thing is the product key. In previous Windows versions, when you installed the operating system, the product key was stored on the hard drive. With Windows 10, when installing the operating system, the product key is stored on the cloud. So, if you are doing a clean/repair installation and Windows 10 has already been activated on that specific computer, you will not need to enter a product key when prompted. You can click on the I don't have a product key link, and Windows 10 will automatically activate when it gets online. It's one of the coolest features of Windows 10 you hope you never have to use.

For more information on the Windows 10 Media Creation Tool from Microsoft, follow the link below.

Windows 10 Media Creation Tool

Check Windows 10 system files with System File Checker

Updated July 20, 2020

I was thinking the other day about what program I use the most in doing computer repair. The one program I use the most on Windows computers would have to be System File Checker (SFC). SFC checks for system files that may have gotten corrupt or replaced with incorrect versions. Here's how to check Windows 10 system files with System File Checker.

Check Windows 10 system files with System File Checker

SFC has been included in every version of Windows since Windows XP. You can also build it into the Microsoft Diagnostics and Recovery Toolset (DaRT). There is no shortcut or link to SFC in Windows 10, as it runs inside an Administrative Command Prompt.

How to open a Command Prompt with Administrator privileges in Windows 10

SFC running inside of Windows 10 Administrative Command Prompt

The following is the syntax and switches for SFC. The most commonly used syntax/switch is: sfc /scannow.

SFC [/SCANNOW] [/VERIFYONLY] [/SCANFILE=<file>] [/VERIFYFILE=<file>] [/OFFWINDIR=<offline windows directory> /OFFBOOTDIR=<offline boot directory>]

/SCANNOW (Scans integrity of all protected system files and repairs files with problems when possible.)
/VERIFYONLY (Scans integrity of all protected system files. No repair operation is performed.)
/SCANFILE (Scans integrity of the referenced file, repairs file if problems are identified. Specify full path <file>.)
/VERIFYFILE (Verifies the file's intergrity with full path <file>. No repair operation is performed.)
/OFFBOOTDIR (For offline repair specify the location of the offline boot directory.)
/OFFWINDIR (For offline repair specify the location of the offline windows directory.)

Examples

sfc /scannow sfc /verifyfile=c:\windows\filetobereplaced.dll sfc /scanfile=d:\windows\filetobereplaced.dll /offbootdir=d:\ /offwindir=d:\windows sfc /verifyonly

Once SFC is done scanning the system files, it will give one of four possible results:

  • Windows Resource Protection did not find any integrity violations.
    All system files are fine, and you're good to go.
  • Windows Resource Protection could not perform the requested operation.
    There may be another program preventing SFC from running. In this case, boot the system up into safe mode and run SFC from there.
  • Windows Resource Protection found corrupt files and successfully repaired them.
    All system files are now correct, and you're ready to go. If you want to view the repair details, see below.
  • Windows Resource Protection found corrupt files but was unable to fix some of them.
    If you get this message, SFC found a file or files that it couldn't repair. The next thing you will need to do is find out the name of the file(s). Using the Find String utility, you can filter out the SFC results with only the scanned components and create a text file with that information on your Desktop called sfcdetails.txt. Just copy the following code into an Administrative Command Prompt:

findstr /c:"[SR]" %windir%\Logs\CBS\CBS.log >"%userprofile%\Desktop\sfcdetails.txt"

Manually replacing a corrupt system file in Windows 10

Note: To replace a corrupt system file, you will need to have a known good copy of the file(s) in question. A good source for files is another computer or virtual machine running Windows 10. Since I do computer repair for a living, I have all of the versions of Windows that are still supported by Microsoft running inside of Oracle VirtualBoxes.

The first thing to do is note the location (path) and name of the file(s) that need to be replaced from the sfcdetails.txt file. Once you have another copy of the corrupt file(s), you will need to take administrative ownership of the file(s). To do this, modify the following command with the path\filename of the file you want to replace and then type it into an Administrative Command Prompt:

takeown /f path\filename

Example: takeown /f C:\Windows\FileToBeReplaced.dll

Next, you will have to grant administrators full access to the file(s) being replaced. To do this, modify the following command with the path\filename of the file you want to replace and then type it into an Administrative Command Prompt:

icacls path\filename /grant administrators:F

Example: icacls C:\Windows\FileToBeReplaced.dll /grant administrators:F

The third thing to do is copy over the new file(s) and replace the corrupt one(s).To do this, modify the following command with the path\filename of the file you want to replace and then type it into an Administrative Command Prompt:

copy path\filename path\filename

Example: copy C:\Temp\FileToBeReplaced.dll C:\Windows\FileToBeReplaced.dll

Free computer diagnostics

Repairing a PC can sometimes be expensive, and that is why we offer free basic in-shop diagnostics. Give one of our professional and experienced technicians a call at (602) 795-1111, and let's see what we can do for you.

Check out our reviews

Geeks In Phoenix LLC, BBB Business Review

Customer service is #1

Here at Geeks in Phoenix, we take pride in providing excellent customer service. We aim to give the highest quality of service  from computer repair, virus removal, and data recovery.

Bring your computer to us and save

Repairing a computer can be time-consuming. That is why we base our in-shop service on the time we work on your computer, not the time it takes for your computer to work! From running memory checking software to scanning for viruses, these are processes that can take some time.

Contact us

If you have any questions, please feel free to give us a call at (602) 795-1111  and talk with one of our Geeks. Or you can send us a message from our contact page contact page , and one of our Geeks will get back to you as soon as possible. Or you can stop by and see us. Here are our hours and location.

Like Geeks in Phoenix on Facebook

Follow Geeks in Phoenix on Twitter

Watch Geeks in Phoenix on YouTube