Geeks in Phoenix

Geek Blog


My first look at Windows 11

Microsoft recently announced that they are releasing a successor to Windows 10, aptly named Windows 11. So join me as I take a look at Windows 11.

My first look at Windows 11

When Microsoft announced the next version of Windows, I went looking for a beta or technical preview of Windows 11. I soon found out that the only way to get a version of Windows 11 is through their Insider Program.

Well, it just so happens that I had created a Virtual Machine (VM) a couple of years ago for the Windows 10 Insider Program. I started it, and sure enough, Windows informed me that I need to download a new build of Windows.

I went through the upgrade process, and when all was said and done, I had Windows 11 Insider Preview running inside a VM. So let's take a look at Windows 11.

Note: This build of Windows 11 that I am using for this article is just a beta, so the look and the way it operates may and probably will change before the final release of Windows 11.

Login Screen

The Windows 11 Logon Screen

Not much different here from Windows 10. The default font has changed, but other than that, it looks and feels like Windows 10.

Taskbar

The Windows 11 Taskbar

The first thing you will notice when the Desktop appears is that the Start button and pinned programs are centered in the Taskbar. Is this by default, and can it be easily changed back to left-justified.

Start Menu

The Windows 11 Start Menu

The Start Menu has gotten a makeover, with a new cleaner looking layout. All the same features are available, but they are arranged completely different.

Power User menu

The Windows 11 Power Users menu

It is still there, The only component of Windows 8.1 to still be inside of Windows. Don't remember Windows 8.1? That is one version of Windows I would love to forget.

Settings

The Windows 11 Settings app

As with the Start Menu, the Settings app has also received a makeover, getting broken into two (2) columns. The categories are now listed in the left-side column, and sub-categories are listed in the right-hand column.

Control Panel

The Windows 11 Control Panel

Microsoft has been trying to eliminate the Control Panel for a while now, but it still exists in the preview build I am running. Who knows if it will make it to the final build of Windows 11.

File Explorer

The Windows 11 File Explorer

File Explorer has gotten a small makeover too. The Ribbon appears to be gone, and a simple toolbar with the most commons functions has taken its place. We will have to wait until the final build to see if the Ribbon is truly gone.

The overall look and feel of Windows 11 is smoother than Windows 10. With rounded corners on dialog boxes and newer icons, Windows 11 looks like an excellent successor to Windows 10.

But of course, we will have to wait and see how the final build of Windows 11 looks and feels. For a more in-depth look at this version of Windows 11, check out the video below.

How to use Libraries in Windows 10 and Windows 11

Updated October 2, 2022

Remember the old saying, "A place for everything and everything in its place"? The same holds for your files inside of Windows 10 and Windows 11. And managing your data in Windows 10 and Windows 11 can be a breeze when you use Libraries.

One of my favorite Windows file/folder organization features has to be Libraries. Libraries are nothing more than a collection of shortcuts to the original file/folder locations. But the places can be on your local computer or a network drive. Once you add a location to a library, it's just one click away inside of File Explorer.

Now let's not confuse user file folders with Libraries. User file folders are actual folders; Libraries are collections of shortcuts to user file folders. Your user files are already included in the Libraries by default. User file folders must be located on your computer, but Libraries can be shortcuts to both local and network file folders.

It's somewhat ironic that one of the coolest features that I can think of inside of Windows 10 and Windows 11 is hidden by default. But you can un-hide Libraries in just seconds. Here's how:

How to enable the Library view in Windows 10

  1. Open File Explorer by either
    • Left-clicking on the File Explorer icon (manilla folder) on the Taskbar.
    • Left-clicking the Start button, scrolling down and expanding the Windows System folder and left-clicking on File Explorer.
    • Right-click on the Start button and left-click on File Explorer from the Power User menu.
    • Press the Windows logo key Windows logo key + E.
  2. Left-click on the View tab on the top of the Ribbon.
    How to enable the Library view in Windows 10
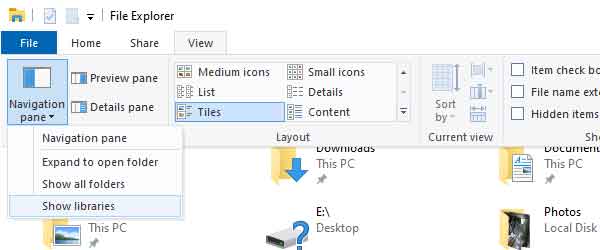
  3. Left-click on the Navigation pane button and left-click on Show libraries.

How to enable the Library view in Windows 11

  1. Open File Explorer by either
    • Left-clicking on the File Explorer icon (manilla folder) on the Taskbar.
    • Left-clicking the Start button, left-clicking on All apps, scrolling down and left-clicking on File Explorer.
    • Right-click on the Start button and left-click on File Explorer from the Power User menu.
    • Press the Windows logo key Windows logo key + E.
  2. Left-click on the See more three horizontal dots (...) in the upper right-hand corner
  3. In the context menu that appears, left-click on Options.
    Where to find Folder Options in Windows 11 File Explorer
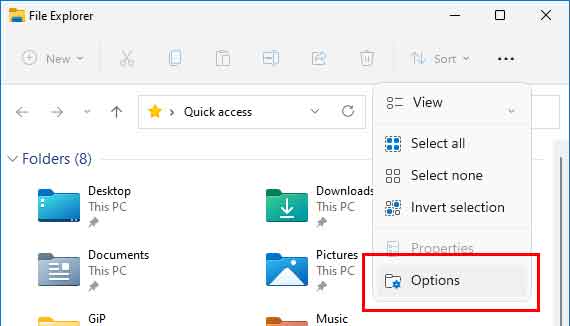
    The Folder Options dialog box will appear.
  4. On the Folder Options dialog box, left-click on the View tab.
    Folder Options inside of Windows 11
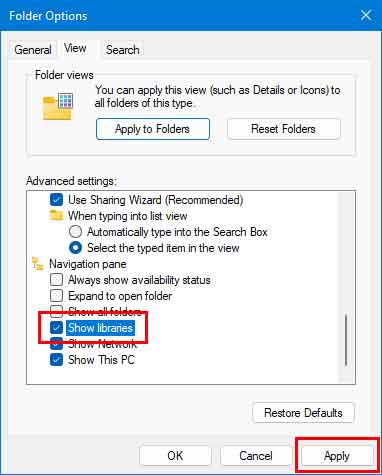
    Scroll to the bottom of the Advanced settings, select Show libraries, and then left-click the Apply button.

How to modify Library properties in Windows 10 and Windows 11

We are all familiar with files and folders, but when Windows 7 came out, we got another way to manage them, Libraries. Libraries are where you go to manage your documents, music, pictures, and other files. You can browse your data the same way you would in a folder, or view your files arranged by properties like date, type, and author.

In some ways, a Library is similar to a folder. For example, when you open a Library, you'll see one or more files. However, unlike a folder, a Library gathers data stored in several locations. This is a subtle but significant difference. Libraries don't hold your files, just shortcuts to them. Libraries monitor folders containing your data and let you access and arrange the files differently. For instance, if you have music files in folders on your hard disk and an external drive, you can access all of your music files at once using the Music Library.

Windows 10 and Windows 11 have four (4) default libraries (Documents, Music, Pictures, and Videos) and include links to your user files by default. Remember that you can add up to fifty (50) folders to a Library. And if you like, you can also create your own Libraries. Here are some other ways you can modify an existing Library.

  • Include or remove a folder. Libraries gather content from included folders or Library locations.
  • Change the default save location. The default save location determines where an item is stored when it's copied, moved, or saved to the Library.
  • Change the type of file a library is optimized for. Each Library can be optimized for a specific file type (such as music or pictures). Optimizing a Library for a particular file type changes the available options for arranging your files.

How to add a folder to a Library in Windows 10 and Windows 11

  1. Open File Explorer (see enabling Library view).
  2. Right-click on the Library you'd like to change and select Show more options (Windows 11), Properties.
  3. Below the Library Locations box, click on Add, navigate to and highlight the folder you want to add to the Library, and left-click on Include folder.
  4. Left-click OK.

How to change a Library's default save location in Windows 10 and Windows 11

A Library's default save location determines where an item will be stored when it's copied, moved, or saved to the Library. You will need two or more folders in a Library to change the default save location.

  1. Open File Explorer (see enabling Library view).
  2. Right-click on the Library you'd like to change and select Show more options (Windows 11), Properties.
  3. Select the Library location you want as default, left-click on Set save location, and then left-click Apply.
  4. Left-click OK.

How to change the type of files a Library is optimized for in Windows 10 and Windows 11

Each Library can be optimized for a specific file type (such as music or pictures). Optimizing a Library for a particular kind of file changes the available options for arranging the data in that Library.

  1. Open File Explorer (see enabling Library view).
  2. Right-click on the Library you'd like to change and select Show more options (Windows 11), Properties.
  3. In the Optimize this library for list, select a file type and then left-click Apply.
  4. Left-click OK.

How to create a new Library in Windows 10 and Windows 11

  1. Open File Explorer (see enabling Library view).
  2. Right-click on Libraries and select Show more options (Windows 11), then New, then Library.
  3. Enter a name for the new Library, and then press Enter.

How to remove a folder from a Library in Windows 10 and Windows 11

If you don’t need a folder in a Library anymore, you can remove it. When you remove a folder from a Library location (shortcut), the folder and everything in it is still kept in its original location. Remember that when you delete a folder from a Library (folder), the folder and everything in it is deleted in its original location.

  1. Open File Explorer (see enabling Library view).
  2. Right-click on the Library you'd like to change and select Show more options (Windows 11), Properties.
  3. In the Library Locations dialog box, left-click on the folder you want to remove, left-click Remove, and then left-click OK.

How to add a network folder that is not indexed to a Library in Windows 10 and Windows 11

There will be times when you cannot get a shared network folder added to a Library due to indexing issues, and I found a way to get around this problem by creating a symbolic link.

  1. Open File Explorer (see enabling Library view).
  2. Left-click on This PC and create a folder on your drive for your network folders, for example, c:\share.
  3. Create another folder within that folder, for example, c:\share\music.
  4. Right-click the subfolder you just created and select Show more options (Windows 11), Include in library, and then select the library to which you want to add the folder or create a new Library.
  5. Delete the folder.
  6. Open a Command Prompt with Administrator privileges
  7. Enter mklink /d, and then enter the path of the folder you just deleted and the path of the network folder. For example, mklink /d c:\share\music \\server\music. If either of the folder names has spaces, encase the path(s) inside of quotes. For example, mklink /d "c:\shared files\music" "\\server\shared music". This creates what is called a symbolic link.

Here's how to create a symbolic link in Windows 8. It's the same procedure for Windows 10 and Windows 11.

The Ribbon and Quick Access Toolbar inside File Explorer in Windows 8

There are so many new features introduced in Windows 8; I wouldn't even know where to begin. Microsoft even renamed Windows Explorer to File Explorer. But they didn't add any truly 'new' features to File Explorer. They brought in some elements from older programs and versions. Let's take a look at the Ribbon and Quick Access Toolbar inside the Windows 8 File Explorer.

The Ribbon and Quick Access Toolbar locations in Windows 8 File Explorer

The Ribbon first appeared in Office 2007, and over the past few years, other software companies have adopted the Ribbon. The Ribbon is meant to optimize file management by exposing over 200 top-level features previously hidden in right-click context menus. The Quick Access Toolbar (QAT) first appeared in the Windows XP version of Windows Explorer.

text
The Quick Access Toolbar in Windows 8 and Windows XP

Some of the Ribbon features are:

  • Every command in the ribbon is given a keyboard shortcut. Press Alt to reveal them.
  • You can pin your favorite commands to the Quick Access Toolbar (QAT).
  • The Ribbon is collapsible to maximize vertical screen space. Even with the ribbon visible, more vertical screen space is provided in the default configuration than Windows Explorer in Windows 7.
  • The Ribbon is minimized by default.
  • File menu includes options for things like opening a Command Prompt as an administrator, opening a new File Explorer window, and accessing the folder and search options.
  • The Ribbon contains three primary tabs: Home, Share, and View, plus a File menu and various contextual tabs.
  • Contextual tabs are shown when selecting certain areas or file types in File Explorer.

Standard Ribbon Tabs (shown at all times)

Tab name Command Group(s)
File Open new window, Open command prompt, Open Windows Powershell, Delete history, Help, Close
Home Clipboard, Organize, New, Open, Select
Share Send, Share with, Advanced security
View Panes, Layout, Current view, Show/hide, Options

Contextual Ribbon Tabs (shown when selecting certain areas or file types)

Tab name Command Group(s)
Library Tools Manage, Restore settings
Music Tools Play
Picture Tools Rotate, View
Video Tools Play
Drive Tools Protect (Enterprise only), Manage, Media
Search Tools Location, Refine, Options, Close search
Compressed Folder Tools Extract To, Extract all
Application Tools Pin to taskbar, Run
Recycle Bin Tools Manage, Restore

Working with Libraries in Windows 8

When I'm working on my computer, the one thing I hate having to do is navigating File Explorer to get to a folder. Windows 8 has a handy feature built-in called Libraries. With Libraries, I can get to my documents, music, pictures, videos, and frequently used folders with just a couple of clicks. Here's how to work with Libraries inside of Windows 8.

text
View of Libraries inside of Windows 8 File Explorer

What is a library?

Libraries are collections where you can get to all your documents, music, pictures, and other files in one single place. In some ways, a library works like a folder: you can use it to browse and sort files. But unlike a folder, a library gathers files that are stored in several locations. This is a subtle but significant difference. Libraries don't hold your items. They pull from folders that contain your items and let you open and arrange the items in different ways. For example, if you have music files in folders on your PC and an external drive, you can get all of your music files from the Music library.

There are four default libraries (Documents, Music, Pictures, and Videos), but you can create new libraries for other collections. You can also add and remove folders from libraries. Libraries can include up to 50 folders.

What folder locations are supported in libraries?

You can include folders in a library from many different locations, such as your C drive, an external drive, or a network. Only folders can be included in libraries. Individual files and other items can't be included.

How to create a new library

  1. Swipe in from the right edge of the screen or press the Windows logo key Windows logo key + C to bring up the Charms bar and then tap or left-click Search.
  2. Enter File Explorer in the search box, and then tap or left-click Apps. Tap or left-click File Explorer in the search results
    or
    Press the Windows logo key Windows logo key + E.
  3. Tap or left-click Libraries.
  4. Tap or left-click the Home tab, tap or left-click New item, and then choose Library.
  5. Enter a name for the library, and then press Enter.

How to add a folder to a library

If the folder you want to add is on an external hard drive, make sure the drive is connected to your PC and that you can open it.

  1. If you're viewing the New Library page in File Explorer, tap or left-click Include a folder, select the folder, and then tap or left-click Include folder.

If you don't have the New Library page open, continue following these steps.

  1. Swipe in from the right edge of the screen or press the Windows logo key Windows logo key + C to bring up the Charms bar and then tap or left-click Search.
  2. Enter File Explorer in the search box, and then tap or left-click Apps. Tap or left-click File Explorer in the search results
    or
    Press the Windows logo key Windows logo key + E.
  3. Expand the location to find the folder you want to add, and then select it. (For example, if you're going to add a folder from a network, expand the network location and select the folder.)
  4. Tap or left-click the Home tab, tap or left-click Easy access, choose Include in library, and then select the library to which you want to add the folder.

Notes:

  • If you don't see the Include in library option for a network folder, it means the folder isn't indexed. Follow the steps below to add the folder to a library.
  • Folders on removable media (such as CDs and DVDs), network-attached storage (NAS) devices, and some USB flash drives can't be included in a library.

How to add a network folder that isn't indexed to a library

If your PC is running Windows 8 Pro or Windows 8 Enterprise, the easiest way to do this is to make the folder available offline and then add the offline folder to a library by following the steps above.

If you don't want to make the folder available offline because you don't want to keep the folder contents on your PC, go to the PC where the network folder is located, and make sure the folder is in an indexed location. If it isn't, add the folder to the indexed locations or move the folder to an indexed location.

If neither of these options works for you, follow these steps to add the folder to a library. Note that doing this will make searching, sorting, and filtering in the whole library slow. For best results, we recommend creating a new library for the network folder alone.

How to add a network folder that is not indexed to a Library in Windows 8

  1. Swipe in from the right edge of the screen or press the Windows logo key Windows logo key + C to bring up the Charms bar and then tap or left-click Search.
  2. Enter File Explorer in the search box, and then tap or left-click Apps. Tap or left-click File Explorer in the search results
    or
    Press the Windows logo key Windows logo key + E.
  3. Tap or left-click Computer and create a folder on your drive for your network folders, for example, c:\share.
  4. Create another folder within that folder, for example, c:\share\music.
  5. Select the subfolder you just created, tap or left-click the Home tab, tap or left-click Easy access, choose Include in library, and then select the library to which you want to add the folder.
  6. Delete the folder.
  7. Open a Command Prompt with Administrator privileges (click here for complete instructions)
  8. Enter mklink /d, and then enter the path of the folder you just deleted and the path of the network folder. For example, mklink /d c:\share\music \\server\music. If either of the folder names has spaces, encase the path(s) inside of quotes. For example, mklink /d "c:\shared files\music" "\\server\shared music". This creates what is called a symbolic link.

How to remove a folder from a library

If you don’t need a folder in a library anymore, you can remove it from the library. When you remove a folder from a library, the folder and everything in it is still kept in its original location.

  1. Enter File Explorer in the search box, and then tap or left-click Apps. Tap or left-click File Explorer in the search results
    or
    Press the Windows logo key Windows logo key + E.
  2. Select the library where you want to remove a folder.
  3. Tap or left-click the Library Tools tab, and then tap or left-click Manage library.
  4. In the dialog box that appears, select the folder you want to remove, tap or left-click Remove, and then tap or left-click OK.

Modifying the default locations of user files and library properties in Windows 7

This article will show how to change the default locations of user files and modify the library properties in Windows 7. In a recent article, I showed the default locations for user files in Windows 7. But did you know you can modify them?

You can change the location of the folders in your personal folder (such as My Documents and My Pictures) by redirecting them. For example, if you have a large number of files in your My Documents folder, you might want to store the files on a different hard drive or on a network to free up space on your primary hard drive.

When you redirect a folder to a new location, you change where the folder and files are stored in the folder. However, you'll still be able to access the folder the same way you did before you redirected it.

Geek Tip:

  • Instead of redirecting a folder, you might want to consider including a folder in one of your libraries. For example, if you have a large number of pictures, you can store those pictures in a location other than your primary hard drive, then include that location in your Pictures library. For more information, see below.

To redirect a folder to a new location

  1. From the desktop, left-click on the File Explorer icon on the Taskbar or press the Windows logo key Windows logo key + E.
  2. Navigate to C:\Users\your user name\
  3. Right-click the folder that you want to redirect, and then click Properties.
  4. Click the Location tab, and then click Move.
  5. Browse to the location where you want to redirect this folder. You can select another location on this computer, another drive attached to this computer, or another computer on the network. To find a network location, type two backslashes (\\) into the address bar followed by the name of the location where you want to redirect the folder (for example, \\mylaptop), and then press Enter.
  6. Click the folder where you want to store the files, click Select Folder, and then click OK.
  7. In the dialog that appears, click Yes to move all the files to the new location.

To restore a folder to its original location

  1. From the desktop, left-click on the File Explorer icon on the Taskbar or press the Windows logo key Windows logo key + E.
  2. Navigate to C:\Users\your user name\
  3. Right-click the folder that you previously redirected and want to restore to its original location, and then click Properties.
  4. Click the Location tab, click Restore Default, and then click OK.
  5. Click Yes to recreate the original folder, and then click Yes again to move all the files back to the original folder.

Note:

  • If you don't see the Location tab in a folder's Properties dialog, then the folder can't be redirected. If you see the Location tab but can't edit the folder path, you don't have permission to redirect it.

We are all familiar with files and folders, but with the release of Windows 7, we now have another way to manage them, Libraries. Libraries are where you go to manage your documents, music, pictures, and other files. You can browse your files the same way you would in a folder, or you can view your files arranged by properties like date, type, and author.

In some ways, a library is similar to a folder. For example, when you open a library, you'll see one or more files. However, unlike a folder, a library gathers files that are stored in several locations. This is a subtle but significant difference. Libraries don't hold your items. They monitor folders that contain your items and let you access and arrange the items in different ways. For instance, if you have music files in folders on your hard disk and an external drive you can access all of your music files at once using the Music library.

Windows 7 has four default libraries: Documents, Music, Pictures, and Videos. You can also create new libraries.

Here are some ways you can modify an existing library:

  • Include or remove a folder. Libraries gather content from included folders or library locations. You can include up to 50 folders in one library.
  • Change the default save location. The default save location determines where an item is stored when copied, moved, or saved to the library.
  • Change the type of file a library is optimized for. Each library can be optimized for a specific file type (such as music or pictures). Optimizing a library for a specific file type changes the available options for arranging your files.

To change a library's default save location

A library's default save location determines where an item will be stored when it's copied, moved, or saved to the library.

  1. From the desktop, left-click on the File Explorer icon on the Taskbar or press the Windows logo key Windows logo key + E.
  2. Open the library you'd like to change.
  3. In the library pane (above the file list), next to Includes, click Locations.
  4. In the Library Locations dialog box, right-click a library location that's not currently the default save location, click Set as default save location, and click OK.

To change the type of file a library is optimized for

Each library can be optimized for a specific file type (such as music or pictures). Optimizing a library for a specific file type changes the available options for arranging the files in that library.

  1. From the desktop, left-click on the File Explorer icon on the Taskbar or press the Windows logo key Windows logo key + E.
  2. Right-click the library you'd like to change, and then click Properties.
  3. In the Optimize this library for list, click a file type and then click OK.

Free computer diagnostics

Repairing a PC can sometimes be expensive, and that is why we offer free basic in-shop diagnostics. Give one of our professional and experienced technicians a call at (602) 795-1111, and let's see what we can do for you.

Check out our reviews

Geeks In Phoenix LLC, BBB Business Review

Customer service is #1

Here at Geeks in Phoenix, we take pride in providing excellent customer service. We aim to give the highest quality of service  from computer repair, virus removal, and data recovery.

Bring your computer to us and save

Repairing a computer can be time-consuming. That is why we base our in-shop service on the time we work on your computer, not the time it takes for your computer to work! From running memory checking software to scanning for viruses, these are processes that can take some time.

Contact us

If you have any questions, please feel free to give us a call at (602) 795-1111  and talk with one of our Geeks. Or you can send us a message from our contact page contact page , and one of our Geeks will get back to you as soon as possible. Or you can stop by and see us. Here are our hours and location.

Like Geeks in Phoenix on Facebook

Follow Geeks in Phoenix on Twitter

Watch Geeks in Phoenix on YouTube