Geeks in Phoenix

Geek Blog


How to repair Windows 10 by doing an in-place upgrade

Updated May 14, 2020

Are you getting lots of errors when you log into Windows 10? Are you not able to get the Start menu or File Explorer to open? If so, it may be time to repair Windows 10 by doing an in-place upgrade.
Sometimes repairing Windows 10 can be a challenging endeavor. One time I had a Windows 10 system that the right-click mouse function would only work in certain situations.

Another time, I had a Windows 10 system that File Explorer and the Start menu would not work. This was one of those times when you think that you are going to just have to wipe the drive and do a clean installation of Windows 10.

But in both cases, I was able to repair Windows 10 while keeping all of the user's documents, settings, and installed programs. I just performed an in-place upgrade of Windows 10.

Remember that if you start the in-place upgrade by booting your computer up on the Windows 10 installation media, you will only get the option of saving your documents. To also preserve the installed programs, you need to start the in-place upgrade from inside of Windows 10.

Now performing an in-place upgrade is not hard. The only thing you need to do is make the Windows 10 installation media. If you can access the Internet and download the Windows 10 Media Creation Tool, great, if not, you will need to use another computer to make the Windows 10 installation media.

You do not have to be upgrading to a newer version of Windows 10 (1809 to 1903, 1903 to 1909) for this to work. You can perform an upgrade to the same version (1909 to 1909).

Now you never want to use an older version of the Windows 10 media, like the one you created a couple of years ago, to do an in-place upgrade. You will always want to download the latest version directly from Microsoft using the Windows 10 Media Creation Tool.

To make the media, you will need either a blank DVD or a USB flash drive that is at least 8GB in size. Remember that if you use a USB flash drive, it will be reformatted and everything on it will be erased. So, if you have used the USB drive for anything else, you may want to copy the data off of it before using it for the Windows 10 installation media.

Once you get the Windows 10 Media Creation Tool downloaded, all you have to do is double-click the file to run it. It is a stand-alone program, and it does not require any installation.

The first screen that comes up is the legal stuff, just click on Accept. On the next screen, you will have to choose what you want to do.
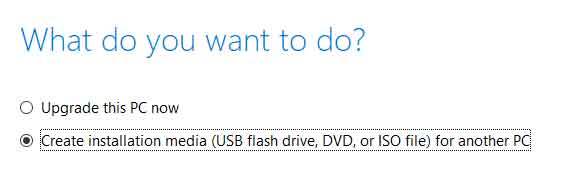
Windows 10 installer what do you want to do screen
Select Create installation media for another PC and click on Next.

On the next screen, you will select the language, architecture, and edition.
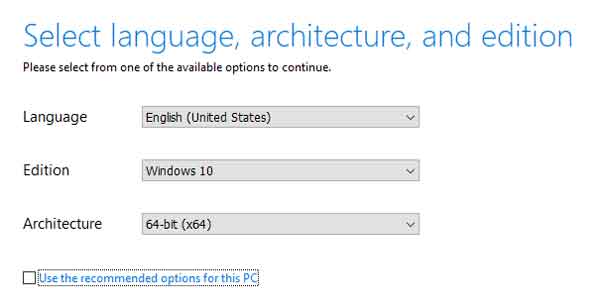
Windows 10 installer select language and edition screen
Since you are creating the media for another computer, make sure the Use the recommended options for this PC checkbox is deselected. The majority of users in the US will select the following settings:

  • Language: English (If you use a different language, select it from the pull-down menu)
  • Edition: Windows 10
  • Architecture: 64-bit (x64)

When you are finished selecting the language, architecture, and edition, click on Next. The next screen will ask you what media do you want to use.
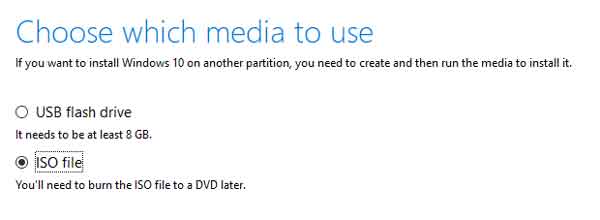
Windows 10 installer choose which media to use screen
If you select the USB flash drive option, make sure you have the USB flash drive inserted into a USB port on the computer.

If you want to make a DVD, you will need to choose the ISO file option and then burn it onto a blank DVD. Here is how to go about burning the ISO file to a DVD.

Once you have the media created, either a DVD or USB flash drive, you will need to insert it in the computer that you want to repair.
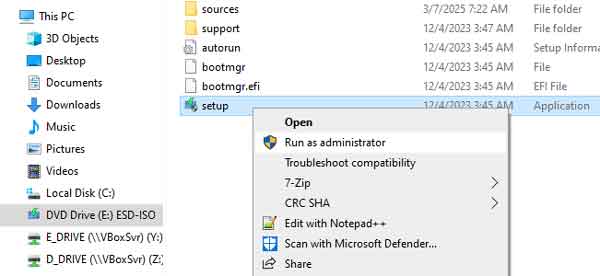
Windows 10 setup program in File Explorer
Then just open File Explorer, navigate to the DVD or USB flash drive, and right-click on the setup.exe program and select Run as administrator.
Windows 10 installation start up screen
The Windows 10 installer will then startup.

You will be prompted to download Windows 10 updates, drivers, and optional features. Since you are doing an in-place upgrade, I recommend waiting until the installation is finished before doing any updates.

The next screen you will get is the license agreement. Just click Accept in the lower right-hand corner and continue with the in-place upgrade. Finally, you will get to the screen that asks what you want to keep. Make sure that Keep personal files and apps are selected and then select Install in the lower right-hand corner.

The in-place upgrade will take some time, and your computer could restart a few times before it is complete. When it is done, your version of Windows 10 should be completely repaired and good as new.

Now in the examples I talked about earlier, I could not get either the right-click function to work or could not get the Start menu or File Explorer to open at all. But there is another way of starting the in-place upgrade using Task Manager.

How to start a program using Task Manager

Sometimes the only way to run a program is to use Task Manager. It is a simple, down, and dirty way of running a program with administrative privileges. And we want to use admin privileges to run the setup.exe program.

  1. Press the Ctrl + Alt + Delete keys all at the same time (the 3-finger salute).
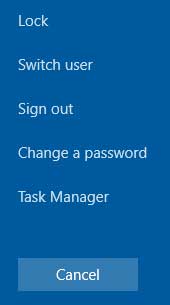
    The Windows 10 Ctrl Alt Delete screen
    You will get a screen that has several selections on it. Click on Task Manager.
  2. The Task Manager program will appear next.
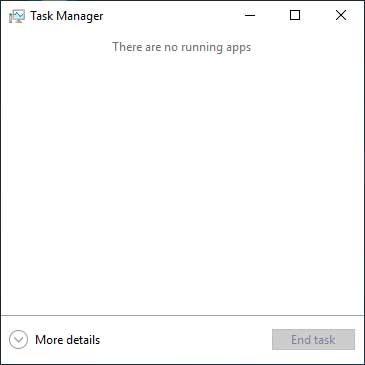
    The basic Windows 10 Task Manager screen
    If it shows says There are no running apps, click on the More details arrow in the bottom left-hand corner. This will bring up all of the running processes.
  3. Click on the File drop-down menu in the upper left-hand corner of Task Manager
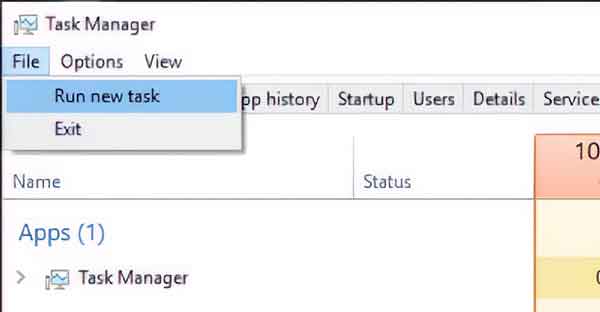
    The advanced Windows 10 Task Manager screen with Run new task
    and select Run new task.
  4. The Create a new task dialog box will appear.
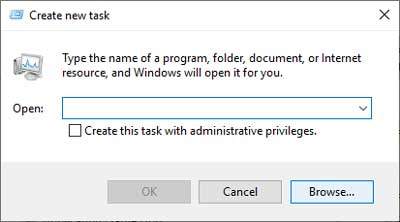
    The Windows 10 Create new task dialog box
    Click on the Browse .. button in the lower right-hand corner.
  5. Using the Browse dialog box, navigate to the drive with the Windows 10 installation files (either DVD or USB flash drive),
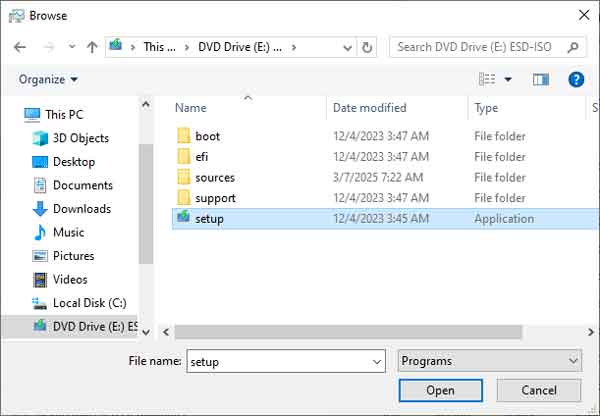
    The Windows 10 Task Manager Browse screen
    select setup.exe and then click Open.
  6. This will bring you back to the Create new task dialog box, and the path to the setup.exe program will be in the Open field.
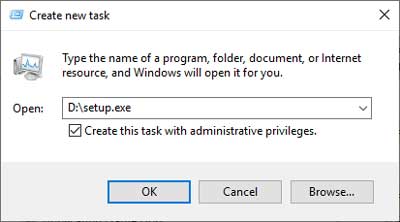
    The Windows 10 Create new task dialog box with file path
    Make sure that the Create this task with administrative privileges checkbox is selected. Then click on OK.
  7. The Windows 10 installer will now start. Just follow the steps outlined previously in this article for the rest of the in-place upgrade.

Things to consider when replacing or upgrading computer components

Updated May 16, 2020

When doing computer repair for a living, there is one thing I do quite often: replacing and upgrading computer components. Whether it be replacing a hard drive or installing a new graphics card, there is always something you need to consider. So here are a few things you should ask yourself when selecting computer components.

Things to consider when replacing or upgrading computer components

Things to consider when replacing or upgrading your motherboard

    Form factor
  • What form factor size does your existing case support?
    If the motherboard you are looking at getting is ATX and your present case only has space and stand-offs for a mini-ATX motherboard, you will not be able to install the new motherboard.
  • Do you have any of the extra parts that came with the case, including stand-offs for the motherboard?
    If you are replacing a mini-ATX motherboard with an ATX motherboard and your case is large enough for it, do you have the stand-offs and screws for the extra mounting points that the new ATX motherboard will require?
  • Do you have the installation media for the operating system and all of your programs?
    When you change out a motherboard, unless it is from the same manufacturer and same model line, odds are you will need to perform a clean installation of the operating system and your apps. If you try and use the existing operating system currently installed with a new motherboard, you more than likely to get all sorts of errors. Be prepared to reinstall the OS and apps.
    CPU socket
  • What is the socket type of your existing CPU?
    You cannot use an LGA1150 processor in an LGA1151 socket.
  • Will the new motherboard your thinking about getting support your existing processor?
    You will need to do your research on the motherboard you are thinking about getting. If you cannot find the information online, give the manufacturer a call. There is nothing worse than getting a motherboard that you cannot use.
    Memory slot(s)
  • Does the motherboard your thinking about getting support your existing memory modules?
    Again, do your research. You have to make sure that everything is going to go smoothly when you do the upgrade.
  • Or are you going to need to get new memory modules?
    If you find out that you will need new memory modules, buy them in pairs (twin-pack, quad-pack). Try to avoid mixing different memory modules if you can. You will also find it cheaper to buy them in twin-packs or quad-packs than as single modules.
    Expansion slots (PCI-e)
  • What do you currently have for expansion cards?
    These include graphic card(s), RAID controller card(s), M.2 adapter card(s), Wi-Fi / ethernet card(s), etc..
  • And what type of expansion slot(s) do they use (PCI-e x16, PCI-e x4, PCI-e x1)?
    Make a note about all of the different PCI-e slots that are used on your existing motherboard and reference it when you are looking at a new motherboard.
    M.2 Slot(s)
  • If your existing mother has M.2 slot(s) and you use them, what form factor, key notches, and interface do they utilize?
    M.2 2242, M.2 2260, M.2 2280? B key, M key, or both? SATA 3, PCI-e 3, or NVMe?
    Internal USB connections
  • What type of USB headers does your current motherboard have?
    USB 2.0, USB 3.0, USB 3.1 Gen 1 or USB 3.1 Gen 2.
    Internal drive connectors
  • What type of internal drive connectors does your current motherboard have?
    SATA, SATA Express or U.2?
    Power connector
  • What type of power connectors does the motherboard your thinking about getting have (4-pin or 8-pin ATX 12V)?
    Does your existing power supply have the correct connector?

Related articles
Things to keep in mind when building a custom-built computer

Things to consider when replacing or upgrading your processor / CPU

    Socket type
  • What socket type does your current motherboard have (LGA 1151, LGA 2011, AMD AM3+, etc.)?
    Remember that you cannot use an LGA1150 processor in an LGA1151 socket.
    Motherboard compatibility
  • What processors does your current motherboard support?
    You will need to do your research on your existing motherboard. If you cannot find the information online, give the manufacturer a call. You may need to update the BIOS on your current motherboard to run the new processor you are thinking about getting.

Things to consider when replacing or upgrading your CPU cooler

    The space inside of case
  • Does your present case have the room for an upgraded CPU cooler?
    If you are thinking of air-cooled, do you have enough space on top of the CPU for it? If your thinking about liquid-cooled, do you have the correct mounting holes for it? And are you going to need to replace any of the existing case fan(s) to accommodate a new CPU cooler?
  • Does your motherboard have all of the connectors for running a liquid CPU cooler?
    Some liquid-coolers require power from an onboard USB header. Also, does your motherboard have any special liquid-cooler fan headers?

Things to consider when replacing or upgrading your graphics card / GPU

    Slot version
  • What version PCI-e slot (2.0, 3.0, 4.0) does your current motherboard have?
    To answer this question, you will need to reference the motherboard manual or specifications online. If you have a problem finding this information, just contact the motherboard manufacturer.
  • What PCI-e version is the graphics card you are looking at getting?
    Again, to answer this question, reference the graphic card manual or specifications online. If you have a problem finding this information, just contact the motherboard manufacturer.
    If the PCI-e slot on your motherboard is version 3 and the graphics card you are looking at getting is version 4, you will have a problem.

Related articles
How to add an expansion card to your desktop computer

    Power connection(s)
  • Does the graphics card you are looking at getting require a separate PCI-e power connector(s)? If so, are they 6-pin or 8-pin PCI-e connector(s), and how many does it need?
    You should be able to find this information on the vendors or manufacturers website. Even the box should have the information on the outside.
  • Does your current power supply have all of the proper PCI-e connector(s) for it?
    Some lower wattage power supplies have only 6-pin PCI-e connectors. Visually check your existing power supply for the type and quantity of PCI-e power connectors.

Things to consider when replacing or upgrading your memory

    Slot type and speed
  • What slot type and memory speed does your existing motherboard support (DDR3 2400, DDR4 4200, etc.)?
    To answer this question, you will need to reference the motherboard manual or specifications online. If you have a problem finding this information, just contact the motherboard manufacturer.
    Existing memory compatibly
  • Are you going to added more memory to your current memory?
    The one thing you want to try and avoid when adding memory is incompatibility with existing memory. If you plan on adding a couple of more memory modules, try to use the exact make and model of your current memory. Even though memory from different manufacturers may be the same slot and speed type, their clock timings can be different. So, it is always recommended to use the same make and model of memory in all of the slots.

Related articles
How to upgrade or add more memory to your computer

Things to consider when replacing or upgrading your drive

    Form factor and size
  • What size and form factor drive(s) are you looking at getting?
    If you are replacing an existing drive, you should go with one that is the same form factor (3.5", 2.5", M.2, or U.2) and the same size (GB's, TB's) or larger than your existing drive. If you are upgrading your drive to a different form factor (SSD, HDD, or U.2), you need to make sure your current case has a place to mount the other kind of drive (3.5" or 2.5"). If you are upgrading your drive to a different form factor (M.2, mSATA), you need to make sure your existing motherboard has the correct form factor (M.2 2242, M.2 2260, M.2 2280), key notches (B key, M key or both) and interface (SATA 3, PCI-e 3 or NVMe) as the drive you are looking at getting. If you are looking at getting an M.2 or mSATA and your motherboard does not have the appropriate slot, you will need to use an expansion card.

Related articles
How to upgrade the hard drive in your computer

Things to consider when replacing or upgrading your case

    Motherboard Form Factor (micro-ATX, ATX, ITX, etc.)
  • What is the form factor of your existing case?
    If the case you are looking at getting is designed for a mini-ATX motherboard, you will not get a standard ATX motherboard to fit in it. Check the case manufactures website to verify the motherboard form factors that will fit in it.
    CPU fan
  • Does the case you are looking at getting have enough space for your existing CPU fan?
    There is nothing worse than getting the motherboard, CPU, and cooler installed in a new case only to find out that you cannot get the side of the case on. Double-check all dimensions.
    Peripheral/expansion
  • Does it have enough front panel connectors for the onboard headers of the motherboard?
    It sucks having USB 3.0 header(s) on the motherboard and not having any or enough connectors on the front of the case.
  • If you have a DVD or BD drive, does it have a 5.25" drive bay in front for it?
    A lot of cases nowadays do not have 5.25" drive bays. If you have a 5.25" drive or drives (CD, DVD, BD), you will need to double-check the case you are looking at getting.

How to power reset your laptop computer

Updated May 16, 2020

Did you turn off your laptop, and now it will not start up again? Maybe you closed the lid, and now it will not come out of sleep mode? If so, you may need to power reset your laptop computer.

How to power reset your laptop computer

This has to be one of the most frustrating problems with laptops, you press the start button, and nothing happens. No lights, no sounds, no display. It seems like it is entirely dead. And in a way, it is. If your laptop computer turned off while you were using it, a power reset would not help. That would be a completely different problem.

The problem is that the system has built-up residual electrical charge in the capacitors. And the only way to get it to run again is to discharge the electrical load. The majority of the time, it is a quick fix. But there are times when it is not a quick fix. Let me explain. This procedure requires that you completely disconnect all power sources, ac adapter, and battery.

If you can remove the battery in your laptop from the bottom of the case, this will be pretty quick. If the battery is inside the laptop case, then it can be tricky, as you will have to disassemble the laptop to get to the internal battery. If you feel uncomfortable about taking your computer apart, please contact a local computer repair specialist like Geeks in Phoenix.

  1. Disconnect all devices from your laptop. This includes docking stations, USB devices, external displays, etc..
  2. Disconnect the ac adapter.
  3. Remove/disconnect the battery. The following steps require access to the battery.
    A laptop computer with a battery that is accessible from the bottom
    If the battery for your laptop is accessible from the bottom, remove it and proceed to the next step.
    A laptop computer with a battery that is accessible by removing the base
    If the battery is not accessible from the bottom, you would need to disassemble your laptop to gain access to it. Before you or a technician takes the computer apart, try step #4 first. If, after trying step #4, your laptop still does not startup, then you may need to disassemble it to get to the battery.
    A typical internal battery connection inside of a laptop computer
    Some batteries connect directly to the motherboard, and some connect via a cable. Depending on the type of battery your laptop has, you may or may not have to remove it.
  4. Hold down the Power button for 15 - 30 seconds. By holding down the Power button, you release all of the residual power left in the laptop. If you had to remove the base to get to the battery connection, place the bottom back on the computer and put it back in the standard operating position. Do not worry about screwing the base back on yet. Once you have discharged the laptop, you will reassemble it.
  5. Connect the ac adapter and plug it into an ac jack. Most instructions for releasing the residual electrical charge will have you reinstall/reconnect the battery first, then connect the ac adapter. If you leave the battery removed/disconnected, you avoid any issue that the battery might have, like low output.
  6. Press the power button. If the problem was a built-up residual electrical charge, your laptop should startup. The only error you might encounter is a warning about the battery missing.
  7. Shut down the laptop. If all went well, your computer started up and booted up the operating system. Just turn it off as you usually would.
  8. Disconnect the ac adapter.
  9. Reinstall/reconnect the battery. If you had to remove the base to get to the battery connection, you can reconnect it and screw the base back on to the laptop.
  10. Reconnect the ac adapter and start the laptop up again.

How to build a computer

Updated March 18, 2024

Are you considering building your own computer? Have you acquired the necessary components but need help with how to proceed? If so, you have come to the right place. In the following article, I'll walk you through the step-by-step process of building your computer. From unpacking the parts to connecting the wires and cables, I'll provide clear and concise instructions to ensure your computer is built safely, correctly, and easily. Let's get started!

How to build a computer

I will assemble a computer from all the separate components in this article. If you don't have all the tools or are scared of making a mistake, feel free to contact a local computer shop and have them assemble it for you. If you live in the greater Phoenix, Arizona, area, feel free to call us.

Tools required to build a computer

Tools required to build a computer

  • Wire ties
  • Snipers (for trimming wire ties)
  • 3/16" nut driver (for stand-offs)
  • #1 Phillips screwdriver
  • Thermal compound (may or may not be required)
  • Anti-static wrist strap (optional)
  • Needle nose pliers (optional)

Building a computer step-by-step

Cable management is one thing you will need to keep in mind as you build your computer. Take the time to secure all wires, even if it is temporary. It's okay if, during your assembly, you have to cut and replace some wire ties. When you perform cable management, this is normal. Just make sure you have plenty of extra wire ties handy.

Remember that if you are going to use an anti-static wrist strap, you need to attach the clip to a metal portion of the computer case before you start building your computer. I like to assemble as many components on the motherboard as possible before installing it in the case. Installing the CPU, M.2 drive(s), or memory modules can be a hassle when the motherboard is inside the case.

  1. Install the CPU.
    Install the CPU
    Ensure the CPU's notches align correctly with the motherboard's socket. Refer to the motherboard manual for instructions on securing the CPU in the socket.
  2. Install the memory modules.
    Install the memory modules
    The modules will have a notch in them, so they will only go into the slot one way. Check the memory modules against the memory slots on the motherboard for the correct orientation. Also, refer to the motherboard manual for the proper installation order.
  3. Instal the M.2 drive(s).
    Install the M.2 drive(s)
    Installing an M.2 drive with the motherboard outside the case is simple. Now is the time to do it.
  4. Unpack the computer case.
    Unpack the computer case
    Make sure to do an inventory of all the parts (screws, drive caddies, etc.) that come with it. If the case did not come with a manual, download a copy online. You will be referencing it quite a bit during the assembly.
  5. Install the I/O shield in the rear of the case.
    Install I/O shield in rear of case
    Some motherboards come with the I/O shield built into them, and some do not. If your motherboard has a separate I/O shield, be careful when installing it, as the metal edges of the case can easily cut your hand.
  6. Install the stand-offs for the motherboard.
    Install the stand-offs for motherboard
    Some cases have stand-offs built in, while others do not. If your case does not have them built in, check the hole pattern on the motherboard or the motherboard manual to ensure you have the stand-offs in the correct locations. Then, hand-tighten them using a 3/16" nut driver.
  7. Install the motherboard.
    Install the motherboard
    You may have to work it a bit to get the I/O ports under any tabs on the I/O panel. Tilting the motherboard at a 45-degree angle will allow you to get any I/O ports under the tabs on the I/O shield. Then attach it to the stand-offs using the supplied screws.
  8. Install the power supply.
    Install the power supply
    Depending on the power supply, the power cables may or may not be already attached. Route the wires through the case, making sure not to cut them on any sharp metal edges. Make sure to connect the ATX12V 8-pin (4+4) and ATX 24-pin (20+4) power cables to the motherboard now, as you might not have access to the ATX12V power connector after installing the CPU cooler.
  9. Install the CPU cooler.
    Install the CPU cooler
    If you use a new cooler, thermal compound will already be applied. If you are rebuilding an existing computer, you will need to clean any current thermal compound from the CPU and cooler. Then, you will need to apply a new layer of thermal compound. Spread a thin coat of thermal compound across the entire CPU surface. A business card works great.
  10. Install the case fan(s).
    Install the case fan(s)
    Some cases come with fans already installed, and some don't. If you have to install the can fans, make sure you have the airflow correct. The airflow should go from the front of the case to the rear of the case. The fans have directional arrows printed on one side of them. Once installed, connect them to the appropriate fan and LED (optional) connector(s) on the motherboard. Refer to the motherboard manual for the locations.
  11. Attach devices to the I/O connectors on the motherboard.
    Connect the front panel connectors to the motherboard
    The locations of all the pins (power button, power LED, hard drive LED, audio jacks, USB jacks, and case LEDs) for the connectors are in the motherboard manual.
  12. Install the drive(s).
    Install the drive(s)
    Depending on your case, you may have separate or combination carriages for Solid-State Drives (SSD) and Hard Disk Drives (HDD). If you are also installing CD / DVD drive(s), you may have to remove knock-out metal panel(s) from a 5 1/2" bay in the front of the case. Be careful, twisting it back and forth to break it free, as the metal can be sharp and cut your hand.
  13. Install the cables for the drive(s).
    Install the cables for the drive(s)
    Refer to the motherboard manual for the port location and numbering. If you have M.2 drive(s) installed, check the manual to determine if it shares resources with any SATA ports. You will want the primary (boot) drive to be in the M.2._1 slot or attached to the SATA 1 connector.
  14. Install any PCI-e expansion cards (Graphics Card(s), Wi-Fi, etc.).
    Install any expansion cards
    Refer to your motherboard manual for the location and types of the PCI-e slots. If your GPU requires additional power, carefully route the required PCI-e power cable through the case to avoid cutting it with any sharp metal edge. Here is an article we wrote about installing expansion cards.

Trim all the wire ties and remove any protective film from the case and the components. Attach the keyboard, mouse, and monitor and go into the BIOS (Basic Input / Output System) to verify and change any settings. Refer to the motherboard manual for instructions on how to do this. After editing the BIOS settings, you will be ready to install the operating system.

My digital toolbox 3

When it comes to repairing computers, every technician has what I call a digital toolbox. It is software that they use for specific tasks, like finding information on hardware or cloning drives. So here is another installment of my digital toolbox.

My digital toolbox 3

CPU-Z

Screenshot of CPU-Z

When it comes to finding the specifications of your motherboard, processor, etc., you could open your computer case and disassemble the components to get that information. Or you could download and run CPU-Z.

CPU-Z will display all of the information on your CPU (Central Processing Unit), motherboard, memory, and GPU (Graphics Processing Unit). It can even benchmark your existing processor against preloaded reference CPU's.

I recently needed to find out what specific memory a laptop was running. Instead of tearing it down to look at the memory modules, I just ran CPU-Z. If you need to know the specifications of your computer's hardware, CPU-Z is a great way to do it.

Click here for more information on CPU-Z

Samsung Data Migration

Screenshot of Samsung Data Migration

Now upgrading your HDD (Hard Disk Drive) to an SSD (Solid State Drive) can be tricky. But if you purchase specific Samsung SSD's, you can utilize their free cloning software, Samsung SSD Data Migration.

I have used this software before, and it does work pretty flawlessly. All you have to do is download and install the Samsung Data Migration software on your computer. The only thing you will need is a drive adapter or docking station to attach the Samsung SSD to your system.

Once you have the Samsung Data Migration software installed, you attach your new Samsung SSD via an adapter or docking station and then start up the Samsung Data Migration software.

Now you have to keep in mind that you want to have a Samsung SSD that is relatively the same size or larger (in gigabytes) than your existing drive (HDD or SSD). That way, you don't have any issues with shrinking any of the partitions. Expanding them is easy, shrinking them can cause problems.

Another thing to keep in mind is if your cloning a 3.5" desktop HDD to a 2.5" Samsung SSD and your computer case does not have a 2.5" mounting bracket, you will need to have a 2.5" to 3.5" adapter bracket.

As I mentioned before, Samsung Data Migration software works with specific Samsung SSD's, so check the user manual first for the list of supported Samsung drives.

Click here for more information on Samsung Data Migration

Acronis True Image WD Edition Software

Screenshot of Acronis True Image WD Edition Software

Now when it comes to free drive cloning software, nobody can beat Western Digital. They offer a stripped-down version of Acronis True Image for use with any Western Digital HDD or Sandisk SSD.

The beautiful thing about this software is that besides drive cloning, it will also backup the entire system, individual partitions, or just folder/files. You have to have a qualifying drive (Western Digital or Sandisk).

Now, this software will clone to either a physically installed drive or one connected via a drive adapter or docking station. It has its boot loader in which it boots to when cloning a drive.

Just remember that when using any drive cloning software, you will need to turn the computer off after the cloning process is finished and change the new cloned drive out for the old existing drive.

Click here for more information on Acronis True Image WD Edition

Free computer diagnostics

Repairing a PC can sometimes be expensive, and that is why we offer free basic in-shop diagnostics. Give one of our professional and experienced technicians a call at (602) 795-1111, and let's see what we can do for you.

Check out our reviews

Geeks In Phoenix LLC, BBB Business Review

Customer service is #1

Here at Geeks in Phoenix, we take pride in providing excellent customer service. We aim to give the highest quality of service  from computer repair, virus removal, and data recovery.

Bring your computer to us and save

Repairing a computer can be time-consuming. That is why we base our in-shop service on the time we work on your computer, not the time it takes for your computer to work! From running memory checking software to scanning for viruses, these are processes that can take some time.

Contact us

If you have any questions, please feel free to give us a call at (602) 795-1111  and talk with one of our Geeks. Or you can send us a message from our contact page contact page , and one of our Geeks will get back to you as soon as possible. Or you can stop by and see us. Here are our hours and location.

Like Geeks in Phoenix on Facebook

Follow Geeks in Phoenix on Twitter

Watch Geeks in Phoenix on YouTube