Geeks in Phoenix

Geek Blog


Diagnose computer hardware issues with the Ultimate Boot CD

Updated March 14, 2024

Every computer repair technician has a handful of software they regularly use to diagnose computer hardware issues. They are usually bootable drives and have their operating system included (FreeDOS or Linux). But carrying around all of these drives can be a nightmare. But luckily, there is a solution to this problem called the Ultimate Boot CD (UBCD).

The Ultimate Boot CD main menu

UBCD is a bootable disk image (ISO) containing the most complete computer hardware diagnostic tools I have ever seen. It includes diagnostic tools for testing BIOS, memory, and everything in between. It includes programs like Memteset86 and Windows Memory Diagnostics for testing memory and Data Lifeguard (Western Digital) and SeaTools (Seagate) for testing drives. In fact, it has an extensive collection of drive utilities.

All of the software inside the UBCD is non-commercial (freeware) and free to download. It comes as an ISO image from which you can create a bootable USB drive (see Rufus below) or burn it to a CD. You can even add more programs to it if you like. The UBCD is like the Swiss Army knife for computer hardware diagnostics.

Note: Some of the programs inside of the UBCD can render your drive unreadable or completely erase the data from it. The following is a list of the program categories inside of the UBCD. Please visit their website for a complete list of utilities included in the UBCD (see link below).

  • BIOS (Basic Input Output System)
  • CPU (Central Processing Unit)
  • HDD (Hard Disk Drive)
    • Boot Management
    • Data Recovery
    • Device Info and Management
    • Diagnosis
    • Disk Cloning
    • Disk Editing
    • Disk Wiping
    • Installation
    • Partition Management
  • Memory
  • Others
  • Peripherals
  • System

Now, for all of the Geeks out there, here's the technical information on the UBCD. The UBCD is formatted using the FAT (File Allocation Table) file system and operates one of two Linux boot loaders: SYSLINUX (default) or GRUB4DOS. From there, you can start either a Linux-based or DOS-based utility. UBCD is also customizable, so you can add any floppy or ISO image or FreeDOS-based application to it (see link below).

To boot your computer using the UBCD, you may have to change some settings in the BIOS. Turning off secure boot and enabling legacy boot options in the BIOS will ensure you can boot your computer on the UBCD.

The UBCD is a privately funded project, and donations are encouraged. Please donate if you find the UBCD as helpful as I do (see link below). For more information on the UBCD, follow the links below.

Ultimate Boot CD (UBCD)

Create a bootable USB drive with Rufus

How to customize the Ultimate Boot CD

Donate to support the UBCD project

How to fix a computer that cannot wake up from sleep or standby mode

Doing computer repair, I fix a wide range of problems. One problem that I see more often are systems that go into sleep/standby mode and cannot come out of it. The cause varies from computer to computer, but the fix is usually a change in the software and/or hardware settings. Here's a couple of ways to fix a computer that goes to sleep/standby and won't wake up.

Your computer uses a standard for power management called Advanced Configuration and Power Interface (ACPI). There are six (6) different 'sleep' states that your computer can use. The following is a portion of the Wikipedia article on ACPI.

The ACPI specification defines the following four Global "Gx" states and six Sleep "Sx" states for an ACPI-compliant computer-system:

  • G0 (S0): Working. "Awaymode" is a subset of S0, where monitor is off but background tasks are running.
  • G1, Sleeping subdivides into the four states S1 through S4:
    • S1: All processor caches are flushed, and the CPU(s) stops executing instructions. Power to the CPU(s) and RAM is maintained; devices that do not indicate they must remain on may be powered down.
    • S2: CPU powered off. Dirty cache is flushed to RAM.
    • S3: Commonly referred to as Standby, Sleep, or Suspend to RAM (STR). RAM remains powered
    • S4: Hibernation or Suspend to Disk. All content of main memory is saved to non-volatile memory such as a hard drive, and is powered down.
  • G2 (S5), Soft Off: G2/S5 is almost the same as G3 Mechanical Off, except that the PSU still supplies power, at a minimum, to the power button to allow return to S0. A full reboot is required. No previous content is retained. Other components may remain powered so the computer can "wake" on input from the keyboard, clock, modem, LAN, or USB device.
  • G3, Mechanical Off: The computer's power has been totally removed via a mechanical switch (as on the rear of a PSU). The power cord can be removed and the system is safe for disassembly (typically, only the real-time clock continues to run - using its own small battery).

Changing the power management options in the operating system

General power options in Windows 8

Sometimes just changing the software settings in the operating system power options will fix the issue. Access to the power options in Windows can be done thru the Control Panel. Depending on your version and view by settings, you may or may not see a power option link. In that case, look for power options under the hardware category.

Editing advanced power settings in Windows 8

Once there, create a new plan or modify an existing plan, changing the advanced settings as needed.

Advanced power option settings in Windows 8

You can also disable S4 hibernation and make it unavailable quickly and easily using an administrator command prompt.

How to open a Command Prompt with Administrator privileges in Windows Vista and Windows 7

How to open a Command Prompt with Administrator privileges in Windows 8

How to open a Command Prompt with Administrator privileges in Windows 10

How to disable Windows hibernation

Changing power management options in the BIOS

Power management settings in a typical computer BIOS

If changing the operating system's power options does not fix the problem, you can try changing the APCI setting to the computer's Basic Input/Output System (BIOS). To access the BIOS, you will need to do so at the time the computer boots up. When the computer starts up, it usually displays a 'splash' screen with the manufacturer's name and logo. On this screen, you typically see something like 'Press F2 or Del or F10 for setup' (it varies from manufacturer to manufacturer). The 'splash' screen may only appear for a second or two and may take a few reboots to get into the BIOS. Once there, you need to look for Power Management Options. There you will find the different ACPI standby states.

Troubleshoot your computer and more for free with Sysinternals Suite from Microsoft

Updated July 23, 2023

Are you looking for a program that tells you what apps are starting when you start up Windows? Or a presentation app for zooming and drawing on your screen? How about one you can use to find out what files, registry keys, etc., are currently open? These are a few of the free utilities included in the Sysinternals Suite by Mark Russinovich and from Microsoft.

The Autoruns program from the Sysinternals Suite

Sysinternals Suite is a collection of handy utilities for Windows. I have been using them since Windows 95. From an everyday user to a computer repair technician, you will find these utilities indispensable. There are currently over seventy utilities included in the Sysinternals Suite.

The Process Explorer program from the Sysinternals Suite

For the everyday user, there are Autoruns, Desktops, and ZoomIt. With Autoruns, you can see what programs are configured to start when your system boots automatically. Desktops allow you to create up to four virtual desktops and switch between them. And with the presentation app ZoomIt, you can zoom in/out and draw on the screen.

The TCPView program from the Sysinternals Suite

For the computer repair technician, there is Process Explorer, Process Monitor, and TCPView. With Process Explorer, you can see what files and folders a program has open. Process Monitor is a real-time monitoring tool that provides detailed information (PIDs, path, etc.) for files, registry, and processes. And TCPView gives you a detailed listing of all network endpoints, local and remote, with addresses and port numbers.

For more information on Sysinternals Suite and all the free utilities included, check out the Sysinternals Utilities Index. To download the Sysinternals Suite, click on either of the following links.

Sysinternals Suite - Microsoft website

Sysinternals Suite - Microsoft Store

A computer that randomly and frequently freezes up

When it comes to computer repair, you have to be a detective of sorts. And once in a while, I come across a really good mystery. I recently got an HP M7360N in the shop that would randomly freeze-up in Windows XP when you moved the mouse. It would run perfectly fine in Safe Mode. Maybe a bad driver?

A check of the event logs yields absolutely nothing, not a single error. I check Device Manager and find the hard drive controller listed under the Unknown category, even though it is correctly identified as an Intel controller. I uninstall it inside Device Manager and then scan for hardware changes. The hard drive controller reinstalls back into the Unknown category.

The system is still freezing up randomly when the mouse is moved. I tried a PS2 and USB mouse and got the same results with both. I disable all non-essential drivers and reboot with no change. I download the original and latest drivers for the system, trying all with no luck. Maybe a corrupt installation?

I create an image of the hard drive and then wipe it clean. Using the supplied recovery disks, I proceed to re-install the operating system and recovery partition. The system froze-up three times during reinstallation. But this time, the hard drive controller is under the correct category, IDE ATA/ATAPI controllers. It's starting to look like a hardware issue.

I run a few DOS-based utilities to test the memory, hard drive, etc. with no luck. I even try the HP recovery diagnostics. Every test I run tells me that there is nothing wrong with the hardware. Using the keyboard only in Windows, I can install another utility to test all of the motherboard components. I allow it to run for six hours, and the system passes every test.

The BIOS is the next place I look and find it's a few versions older than what is currently available for download. I download and install the latest BIOS version, and it still keeps freezing up randomly when the mouse is moved. I start searching the internet for clues.

After a few different search queries, I come across an article at Badcaps.net discussing symptoms of capacitor failure on motherboards, one being 'system randomly and frequently freezes'. I check the motherboard thoroughly and find no capacitors that look bad. I start checking the expansion (add-in) cards, and all at once, the mystery was solved.

There on the graphics card was a bank of capacitors that the tops were swollen.

Top view of the graphics card showing the difference between a good and bad capacitors
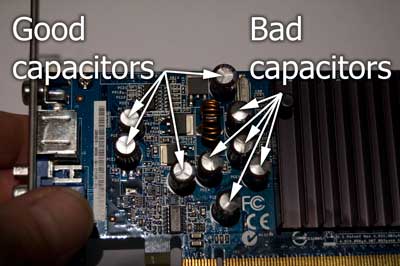
Top view of the graphics card showing the difference between good and bad capacitors.

Side view of the graphics card showing the difference between a good and bad capacitor
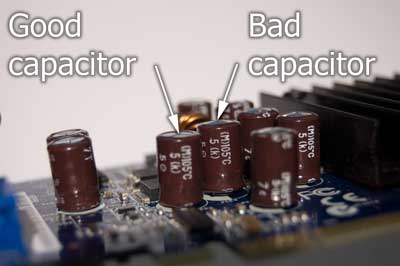
Side view of the graphics card showing the difference between a good and a bad capacitor.

The movement of the mouse on the screen was causing the graphics card to freeze-up. I re-assembled the system with a new graphics card, and the issue was gone. Another computer repair mystery was solved.

How to manually eject your computer CD / DVD drive tray

This article shows how to use the Eject Pin Hole to manually eject the tray on your computer's CD / DVD drive. There will be times when you need to open the tray on your computers CD / DVD drive when the system is powered off.

  • You need to boot your computer using the CD / DVD drive
  • You need to retrieve a disk without starting up the computer

Caution: Turn off power to the system before manually ejecting a disk.

All CD / DVD drives have an Eject Pin Hole. The only thing we need is a paper clip to use it (I am using a #1 size for this article).

All we need is a paper clip

All we have to do is bend it at the first curve 180 degrees (straitening it out). Then take the second curve and bend it 90 degrees. Now we need to locate the Eject Pin Hole.

Desktop CD / DVD drive Eject Pin Hole location

Desktop CD / DVD drives:
Gently insert the modified paper clip into the Eject Pin Hole until you feel it make contact with the gear underneath the tray. Firmly pressing inward, you will notice the tray to start to move out. Press inward until you have enough room to get your finger under the tray and then pull it out the rest of the way. If you can only get a small portion of the tray out, you can use the other end of the paper clip to gently pry open the tray enough to get your finger under it. Once done, gently push back the tray to the closed position. It will close firmly when the system is powered up.

Laptop - Notebook CD / DVD drive Eject Pin Hole location

Laptop - Notebook CD / DVD drives:
The trays on laptops/notebooks are spring-loaded, so all that is needed is to release the locking mechanism. You do not have to insert the paper clip as far as with a desktop CD / DVD drive, as you are not connecting to the gearing under the tray. Gently insert the paper clip into the Eject Pin Hole. Once you feel it make contact, gently push in, and the tray will eject immediately. Once done, gently push the tray back inward until it locks back into place.

Free computer diagnostics

Repairing a PC can sometimes be expensive, and that is why we offer free basic in-shop diagnostics. Give one of our professional and experienced technicians a call at (602) 795-1111, and let's see what we can do for you.

Check out our reviews

Geeks In Phoenix LLC, BBB Business Review

Customer service is #1

Here at Geeks in Phoenix, we take pride in providing excellent customer service. We aim to give the highest quality of service  from computer repair, virus removal, and data recovery.

Bring your computer to us and save

Repairing a computer can be time-consuming. That is why we base our in-shop service on the time we work on your computer, not the time it takes for your computer to work! From running memory checking software to scanning for viruses, these are processes that can take some time.

Contact us

If you have any questions, please feel free to give us a call at (602) 795-1111  and talk with one of our Geeks. Or you can send us a message from our contact page contact page , and one of our Geeks will get back to you as soon as possible. Or you can stop by and see us. Here are our hours and location.

Like Geeks in Phoenix on Facebook

Follow Geeks in Phoenix on Twitter

Watch Geeks in Phoenix on YouTube