Geeks in Phoenix

Geek Blog


The correct ways to shut down your Windows based computer

Updated March 29, 2023

Doing computer repair, I see a lot of different issues. But there is one problem I see over and over again, start-up corruption. This most commonly occurs when the computer is not turned off properly. And laptops appear to be more prone to this issue than desktops. So here's how to properly shut down your Windows-based computer.
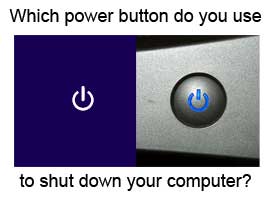
Which power button do you use to shut down your computer?

Logic dictates that if you use a button to turn on a device, you should also use it to turn it off (button on / button off). You use a button to turn your TV, audio/video components, and smartphone on and off. But this is only sometimes the case when it comes to your computer. It is always recommended that you allow the operating system to close down all applications and turn the computer off itself.

Using the Start menu / Start screen to shut down Windows

This may seem like a no-brainer, but you would be amazed at how many people don't use this method. It's mainly laptop users who instinctively close the lid or reach for the power button. But if you don't watch how long you hold the power button down, you could perform a hard shutdown. It's simpler and recommended to use the shut down button on the Start menu / Start screen.

Windows Vista
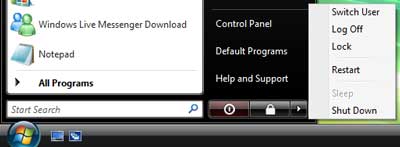
Shut down button location in Windows Vista
Start button > Power button > Shut down

Windows 7
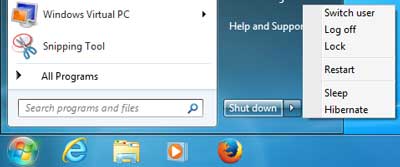
Shut down button location in Windows 7
Start button > Shut down

Windows 8
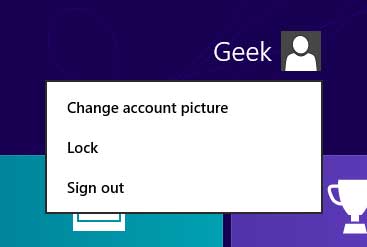
Sign out button location in Windows 8
1. Start screen > Sign out
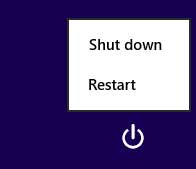
Shut down button location in Windows 8
2. Sign in screen > Power button > Shut down

Windows 8.1
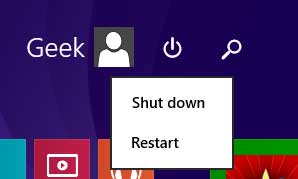
Shut down button location in Windows 8.1
Start screen > Power button > Shut down

Or

Power users shut down button location in Windows 8.1
Power users menu (Windows logo key Windows logo + X) > Shut down or sign out > Shut down

Windows 10
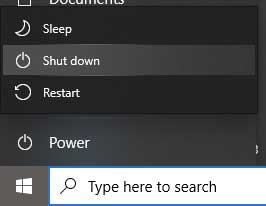
Shut down button location in Windows 10
Start button > Power button > Shut down

Or
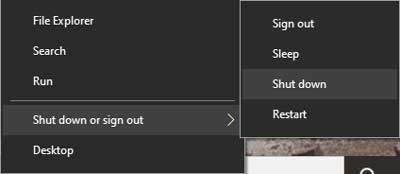
Power users shut down button location in Windows 10
Power users menu (Windows logo key Windows logo + X) > Shut down or sign out > Shut down

Windows 11
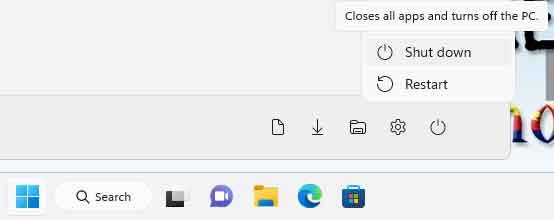
Shut down button location in Windows 11
Start button > Power button > Shut down

Or
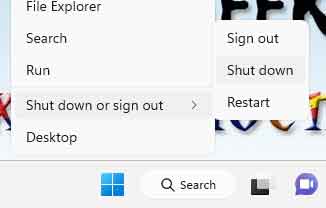
Power users shut down button location in Windows 11
Power users menu (Windows logo key Windows logo + X) > Shut down or sign out > Shut down

Using the power button on the computer to shut down Windows

This method is acceptable for turning off your computer, as it performs the same command as the shut down button on the Start menu / Start screen. But you have to check and ensure that the power options inside the operating system are configured to shut down the system when the power button is pressed.
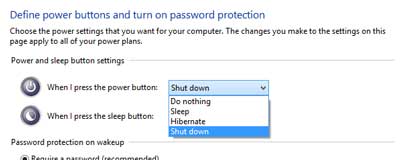
Power button options inside of Windows 8.1
Power button options inside of Windows 8.1 / Windows 10

The power button can be configured to put the system into sleep or hibernate. And if your system loses power while it's asleep, you will get an error when you restart it. This happens quite often with laptops when they are not using the ac adapter and the battery runs out.

Using the power button on the computer to force it to shut down

How do you turn off your computer when it freezes and has no reset button? This is where the Advanced Configuration and Power Interface (ACPI) specification comes into play. This spec has been built into every computer for well over a decade now. It mandates that when the power button is held down for 10 seconds or longer, the system performs a hard shutdown, turning off power to all components. This will most likely cause an error upon restart.

How to fix a computer that cannot wake up from sleep or standby mode

Doing computer repair, I fix a wide range of problems. One problem that I see more often are systems that go into sleep/standby mode and cannot come out of it. The cause varies from computer to computer, but the fix is usually a change in the software and/or hardware settings. Here's a couple of ways to fix a computer that goes to sleep/standby and won't wake up.

Your computer uses a standard for power management called Advanced Configuration and Power Interface (ACPI). There are six (6) different 'sleep' states that your computer can use. The following is a portion of the Wikipedia article on ACPI.

The ACPI specification defines the following four Global "Gx" states and six Sleep "Sx" states for an ACPI-compliant computer-system:

  • G0 (S0): Working. "Awaymode" is a subset of S0, where monitor is off but background tasks are running.
  • G1, Sleeping subdivides into the four states S1 through S4:
    • S1: All processor caches are flushed, and the CPU(s) stops executing instructions. Power to the CPU(s) and RAM is maintained; devices that do not indicate they must remain on may be powered down.
    • S2: CPU powered off. Dirty cache is flushed to RAM.
    • S3: Commonly referred to as Standby, Sleep, or Suspend to RAM (STR). RAM remains powered
    • S4: Hibernation or Suspend to Disk. All content of main memory is saved to non-volatile memory such as a hard drive, and is powered down.
  • G2 (S5), Soft Off: G2/S5 is almost the same as G3 Mechanical Off, except that the PSU still supplies power, at a minimum, to the power button to allow return to S0. A full reboot is required. No previous content is retained. Other components may remain powered so the computer can "wake" on input from the keyboard, clock, modem, LAN, or USB device.
  • G3, Mechanical Off: The computer's power has been totally removed via a mechanical switch (as on the rear of a PSU). The power cord can be removed and the system is safe for disassembly (typically, only the real-time clock continues to run - using its own small battery).

Changing the power management options in the operating system

General power options in Windows 8

Sometimes just changing the software settings in the operating system power options will fix the issue. Access to the power options in Windows can be done thru the Control Panel. Depending on your version and view by settings, you may or may not see a power option link. In that case, look for power options under the hardware category.

Editing advanced power settings in Windows 8

Once there, create a new plan or modify an existing plan, changing the advanced settings as needed.

Advanced power option settings in Windows 8

You can also disable S4 hibernation and make it unavailable quickly and easily using an administrator command prompt.

How to open a Command Prompt with Administrator privileges in Windows Vista and Windows 7

How to open a Command Prompt with Administrator privileges in Windows 8

How to open a Command Prompt with Administrator privileges in Windows 10

How to disable Windows hibernation

Changing power management options in the BIOS

Power management settings in a typical computer BIOS

If changing the operating system's power options does not fix the problem, you can try changing the APCI setting to the computer's Basic Input/Output System (BIOS). To access the BIOS, you will need to do so at the time the computer boots up. When the computer starts up, it usually displays a 'splash' screen with the manufacturer's name and logo. On this screen, you typically see something like 'Press F2 or Del or F10 for setup' (it varies from manufacturer to manufacturer). The 'splash' screen may only appear for a second or two and may take a few reboots to get into the BIOS. Once there, you need to look for Power Management Options. There you will find the different ACPI standby states.

Free computer diagnostics

Repairing a PC can sometimes be expensive, and that is why we offer free basic in-shop diagnostics. Give one of our professional and experienced technicians a call at (602) 795-1111, and let's see what we can do for you.

Check out our reviews

Geeks In Phoenix LLC, BBB Business Review

Customer service is #1

Here at Geeks in Phoenix, we take pride in providing excellent customer service. We aim to give the highest quality of service  from computer repair, virus removal, and data recovery.

Bring your computer to us and save

Repairing a computer can be time-consuming. That is why we base our in-shop service on the time we work on your computer, not the time it takes for your computer to work! From running memory checking software to scanning for viruses, these are processes that can take some time.

Contact us

If you have any questions, please feel free to give us a call at (602) 795-1111  and talk with one of our Geeks. Or you can send us a message from our contact page contact page , and one of our Geeks will get back to you as soon as possible. Or you can stop by and see us. Here are our hours and location.

Like Geeks in Phoenix on Facebook

Follow Geeks in Phoenix on Twitter

Watch Geeks in Phoenix on YouTube