Geeks in Phoenix

Geek Blog


How to use Task Scheduler inside of Windows 10 and Windows 11

Have you ever wanted a program on your computer to run automatically at a specific time? Maybe you want to defrag a drive or clean up your computer in the background? If so, here is how to use Task Scheduler inside Windows 10 and Windows 11.

How to use Task Scheduler inside of Windows 10 and Windows 11

Task Scheduler has to be one of the most utilized of all of the programs inside Windows. It is one of those apps you never really think about because it works in the background and runs everything from syncing the time to running Windows Update.

And if you have your anti-virus software perform scheduled scans, it is more than likely to use Task Scheduler. There are so many things that Task Scheduler can do that are kind of mind-blowing.

I have been known to write script files containing multiple actions to have Task Scheduler run them. A simple script file can empty a network folder of temporary scanned files on a regular schedule.

But you do not have to know how to write code to use Task Scheduler. You only need to know what program you want to run, where it is located, and when and how often you want to run it. This is where we get into Triggers and Actions.

Simply put, their names, Triggers and Actions, are pretty self-explanatory. Triggers are the conditions that have to happen to start the Action, and the Action is what program or script is executed. With all this said, let's look at Task Scheduler.

How to open Task Scheduler in Windows 11

  1. Left-click on the Start button Windows logo to bring up the Start menu.
  2. In the upper right-hand corner of the Start menu, left-click on All apps.
  3. Scroll down the list of programs and left-click on Windows Tools.
  4. Left-click on Task Scheduler.

How to open Task Scheduler in Windows 10

  1. Left-click on the Start button Windows logo to bring up the Start menu.
  2. Scroll down the list of programs to Windows Administrative Tools and left-click to expand.
  3. Left-click on Task Scheduler.

Once Task Scheduler has opened, you will see three columns; Console Tree (left), Task Scheduler summary (center), and the Action Pane (right).
The Task Scheduler inside of Windows 11
Left-click on the Task Scheduler Library in the Console Tree to display all of the tasks that have been scheduled.

In the task summary in the center column, you will find a list of general tasks.
The Task Scheduler library screen
This is where any custom tasks should be created. I recommend using the Create Basic Task... shortcut over the Create Task shortcut in the Action Menu. It is a straightforward interface and if you need to, you can modify the properties later.

For this demonstration, I am going to use the built-in Disk Cleanup program. Using the steps outlined in the following articles, I created a command-line configuration, and I am going to use that to create a task.

Clean up Windows 11 with Storage Sense and Disk Cleanup

Clean up Windows 10 with Disk Cleanup

How to create a basic task in Task Scheduler

The following instructions will create a task for the built-in Disk Cleanup program. A previous setup using an Admin Command Prompt was required to set the parameters for cleanmgr.exe (see articles above).

  1. Left-click on the Create Basic Task... link in the Action Menu.
    The Create Basic Task Wizard screen
    The Create Basic Task Wizard appears.
  2. Give the new task a Name and Description, and then Left-click on Next.
  3. Select when you want the task to start (trigger) and then left-click on Next.
    The Create Basic Task Wizard Task Trigger screen
    If you select Daily, Weekly, Monthly, One time, or When a specific event is logged, you will be prompted for more specific parameters.
  4. You now have to select what task you want to perform.
    The Create Basic Task Wizard Action screen
    Usually, you would select Start a program and then left-click on Next.
  5. On the right side of the Program/script field, left-click the Browse button,
    The Create Basic Task Wizard Start a Program screen
    navigate to C:\Windows\System32\, and select cleanmgr.exe.
  6. In the Add arguments section, type /sagerun:n and select Next.
  7. Then select Finish, and you're all set.

How to set up a mobile hotspot inside of Windows 11

Mobile hotspots are becoming more and more popular, with being able to share Internet access with a few devices. But did you know you can use your Windows 11 computer as a mobile hotspot? Here is how to set up a mobile hotspot in Windows 11.

How to set up a mobile hotspot in Windows 11

The rise in the popularity of wifi hotspots is due to mobile devices and is usually associated with them. So most people are surprised that they learn they can create one inside of Windows 11. But how could you use it?

I like to set up a wifi hotspot on my laptop when I go on vacation. Hotels will usually have an ethernet port in the room, so I connect my laptop to it and share the Internet connection with up to eight (8) devices through the wireless network adapter in my laptop.

The only hardware requirement is your computer has to have two (2) network adapters, and at least one (1)of them needs to be a wireless network or Bluetooth adapter. And if your computer has only one network adapter, you can use USB wired and wireless adapters too.

Now the mobile hotspot does have a couple of drawbacks. You can only have eight (8) devices connected at a time, and you cannot share files or printers; the only thing you can share is your Internet connection.

How to set up a mobile hotspot in Windows 11

  1. Bring up the Settings app by:
    • Left-clicking on the Start button Windows logo to bring up the Start menu.
    • In the list of pinned apps on the Start menu, left-click on Settings.
    • or
    • Right-click on the Start button Windows logo to bring up the Power User menu.
    • In the list of programs that appear, left-click on Settings.
    • or
    • Press the Windows logo key Windows logo + I
  2. Scroll down the left-hand column and left-click on Network & internet.
    Mobile hotspot highlighted in the Network & Internet properties inside of Windows 11
  3. In the right-hand column, left-click on Mobile hotspot.
  4. First, select the connection you want to share from the Share my internet connection from the pull-down menu.
    Mobile hotspot highlighted in the Network & Internet properties inside of Windows 11
  5. Second, check the Network properties to see if they are acceptable. If you want to change the hotspot's name or password, left-click on the Edit button.
  6. Third, click the Mobile hotspot Off/On switch to turn it on. When you enable the hotspot, you may get an additional switch for Power saving.

How to enable the complete right-click context menu in Windows 11 File Explorer

Do you like to right-click on a file or folder to show the context menu? Have you noticed that Windows 11 only displays a condensed context menu? Here is how to enable the complete context menu in Windows 11.

How to enable the complete right-click context menu in Windows 11 File Explorer

One of the most time-saving features in Windows 11 has to be the context menu that appears when you right-click on a file or folder. It usually displays all of the actions that can be performed, like open with or send to, and application-specific actions.

But Windows 11, by default, only shows a condensed context menu. The only way to get all the available actions to appear in the context menu is to select Show more options. But there is a way to enable the complete view of the context menu, but it does require editing the registry.

Note: Editing the registry incorrectly can cause your computer to run erratically or not even boot. It is highly recommended to backup your computer's registry before editing it. Creating a Restore Point will backup the current state of your computer, including the registry. If you do not feel comfortable editing the registry, please get in touch with a local computer technician for assistance.

How to backup and restore the registry in Windows 10 and Windows 11

How to enable the full right-click context menu inside of File Explorer

  1. Backup the registry (see the above article).
  2. Open the Registry Editor.
    • Left-click on the Start button Windows logo to bring up the Start menu.
    • In the upper right-hand corner of the Start menu, left-click on All apps.
    • Scroll down the list of programs and left-click on Windows Tools.
    • Left-click on Registry Editor. If you're prompted for an administrator password or confirmation, type the password or provide confirmation.
  3. Navigate to the following registry key.
    Windows 11 CLSID registry key
    HKEY_CURRENT_USER\Software\Classes\CLSID
  4. Right-click on CLSID and select New > Key.
    Windows 11 CLSID new key
  5. Type or paste the following code in the name field, then press Enter.
    {86CA1AA0-34AA-4E8B-A509-50C905BAE2A2}
  6. Right-click on {86CA1AA0-34AA-4E8B-A509-50C905BAE2A2} and select New > Key.
    Windows 11 InprocServer32 new key
  7. Type or paste the following name in the name field, then press Enter.
    InprocServer32
  8. In the right-hand column, you will find the default value listed under Data is (value not set).
    Changing the default Windows 11 InprocServer32 key
    Right-click on the default value and select Modify.
  9. The Edit String dialog box will appear. Leave the Value data field blank and left-click on OK.
    The revised default Windows 11 InprocServer32 key
    The default value for InprocServer32 should now be blank. Restart your Windows 11 computer for the registry changes to take effect.

How to backup your Windows 11 computer using Windows Backup and File History

Did you know that Windows 11 includes two (2) programs for backing up your computer? And when used together, they can provide excellent backup protection. Here is how to use Windows Backup and File History to back up your Windows 11 computer.
How to backup your Windows 11 computer using Windows Backup and File History

Backing up your computer has never been glamorous, and most people tend just to put it off. But without a good backup plan, you could be heading for a huge problem. Windows 11 includes two (2) programs to help you back up your system; Windows Backup and File History. Each of them performs a specific type of backup and use different methods of backing your computer. But when used together, they can be a pretty robust backup plan.

Now Windows Backup has been around since Windows 7. In fact, the name of the shortcut is Backup and Restore (Windows 7). File History has been around since Windows 8. They work differently but complement each other in backing up your computer and data.

By default, Windows Backup and File History like to back up to external or network drives. In fact, using a drive inside your computer is not recommended because if you have any problems with your computer, you may not be able to access any of the data. But you can use the same external or network drive for both programs if you like.

Now a typical backup scenario would use Windows Backup for complete system (bare metal) backup once a week and File History set to back up personal files every hour. Bare metal refers to restoring your computer to a new drive using a Recovery Drive and a Windows Backup image.

If you frequently make software changes (installing, uninstalling, updates, etc.) to your computer, you may want to have Windows Backup run more often. Remember that Windows Backup typically includes all your personal files (Desktop, Documents, Downloads, Music, Pictures, and Videos).

Windows 11 File History
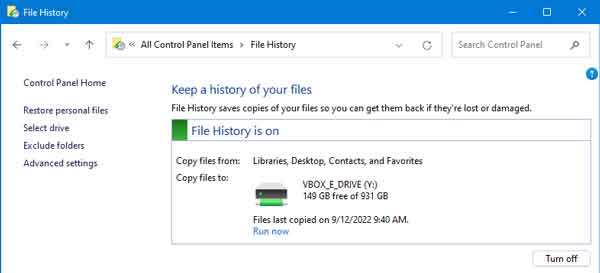
Windows 11 File History main screen

File History creates time-stamped versions of your personal files; Libraries (Camera Roll, Documents, Music, Pictures, Saved Pictures, and Videos), Desktop, Contacts, and Favorites. It saves your files on a regular schedule, from 10 minutes to daily (every hour is the default), adding the date and time to the file name.

File History saves backup file versions from 1 month to forever or until space is needed (forever is the default). It does not use any compression or encryption when saving files, so you can easily navigate through them and preview or open any that you want to view. You also access the backup files from another computer, and no special software is required.

Now you can exclude folders from being backup by File History, but you cannot add folders. The only way to add folders to the list of items to be backed up is by creating a new library, But for most Windows 11 users, the default libraries are more than enough.

Windows 11 Windows Backup
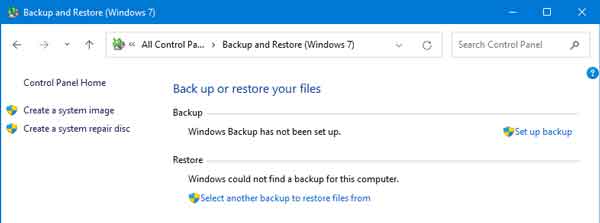
Windows 11 Windows Backup main screen

Windows Backup creates an encrypted and compressed backup image of your computer that can only be accessed through Windows Backup or a Recovery Drive. Windows Backup can restore individual folders and files, and a Recovery Drive can restore a complete drive image.

You can set up Windows Backup to run on a set schedule, or you can run it on demand. Windows Backup, by default, is set to perform incremental backups, which means that every time you run it, it backs up only files that have changed since the last backup.

You can customize which files and folders it backs up, but I recommend using the Let Windows choose (system image) option. I have restored numerous failed drives using a Recovery Drive and a system image, and it works great and can be a lifesaver.

How to access and configure Windows Backup and File History

The Control Panel is the only way to get to Windows Backup or File History. There are several ways to get to the Control Panel inside of Windows 11, so here is an article on all the different ways to get there. The following is the most straightforward way of doing it.

  1. Left-click on the Start Windows logo key button to bring up the Start menu.
  2. In the upper right-hand corner of the Start menu, left-click on All apps.
  3. Scroll down the list of programs and left-click on Windows Tools.
  4. Left-click on Control Panel.
  5. If viewing the Control Panel by Category, left-click on either Save backup copies of your files with File History or Backup and Restore (Windows 7) under System and Security. If viewing by Large/Small Icons, left-click on either Backup and Restore (Windows 7) or File History.

How to configure File History

Once File History is open, you will find four (4) options in the left-hand column; Restore personal files, Select drive, Exclude folders, and Advanced settings. You first need to select the drive you want to use for backing up files. Remember, you can only use external or network drives, so make sure you can access that drive before you start to set up File History.

Once you select your backup drive, you can omit any of your personal folders (Exclude folders) you do not want to backup (Camera Roll, Documents, Music, Pictures, Saved Pictures, and Videos). You can also change how often your files get backup and how long to keep saved versions (Advanced settings).

How to configure Windows Backup

Once you have Windows Backup (Backup and Restore (Windows 7)) open, select the Set up backup link in the right column.
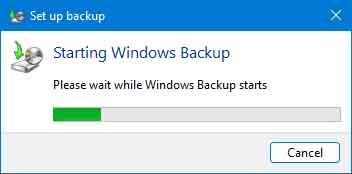
Windows 11 Windows Backup starting screen
This will start Windows Backup, and you will be prompted as to where you want to save your backup.

After selecting where to save your backup, you will be prompted for what to backup.
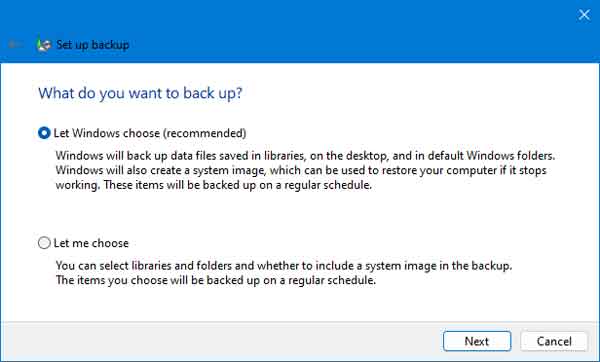
Choose what to backup screen
You will get two (2) choices; Let Windows choose (recommended) or Let me choose. I highly recommend the Let Windows choose option, as it will create a system image that can be used for bare metal recovery.

Once you have selected what to backup, you will be prompted to review your backup settings.
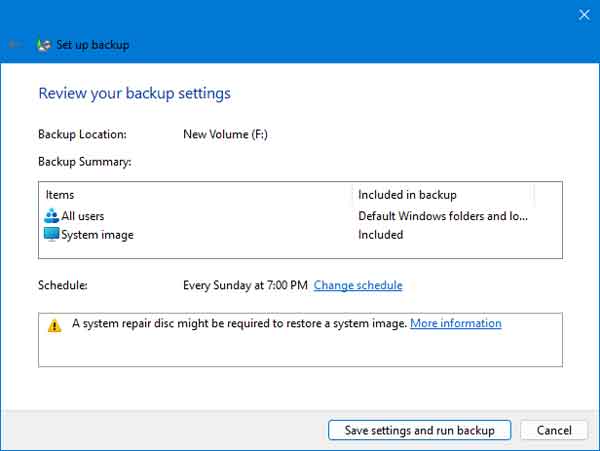
Review your Windows Backup settings
Next, you will need to set up a backup schedule. Quite often, the default once a week on Sunday at 7:00 PM will work but can be changed to fit your schedule.

After you set the schedule, left-click on the Save settings and run backup button, and Windows Backup will perform the first backup. Remember that you need to be connected to the drive you have chosen for Windows Backup to use before the scheduled time.

How to use Windows with only a keyboard

Have you ever had to use your Windows-based computer with only a keyboard? Do you think it is even possible? Here is how to navigate Windows using only a keyboard.

How to use Windows with only a keyboard

The idea for this article came to me the other day when I remembered one of my first computers. It was running Windows 3 and only had a keyboard for input. It was not easy, to say the least. But once I got used to all the different keys, I could get around Windows 3 pretty well.

So I was wondering, could I do the same with Windows 10 or Windows 11? And since I use a lot of keyboard shortcuts already, this should be pretty easy. I will admit that it was hard not to reach for the mouse at the beginning, as I had to relearn what keys to use and where to use them. But it all started returning to me once I remembered how the keyboard keys were arranged in groups.

There are five (5) groups of keys, and you will find four (4) on both desktop and laptop keyboards. They are Control, Function, Navigation, and Typing, and the fifth group is the Numeric keypad, which some laptops do not have.

Windows keyboard key groups

As you can see from the image above, there are Control keys on the left and right sides of the keyboard. Typically, both sides have an Alt, Windows logo, and Ctrl keys, the left side has the Esc, and the right side sometimes has an Application key.

The Function keys are on top of the Typing keys with the Navigation keys to the right. The Numeric keypad (if your keyboard has one) is located on the right side.

So the best way I could think of showing you how to use just a keyboard for Windows is to create a video. The computer in this video has a keystroke visualizer which displays on-screen the keys on the keyboard being pressed.

Here are some commonly used keyboard key combinations that help when using only a keyboard with Windows. At the bottom of this article, you will find links to more Windows keyboard shortcuts.

Press To
Windows logo key Open Start menu
Ctrl + A Select all
Ctrl + C Copy
Ctrl + X Cut
Ctrl + V Paste
Ctrl + Z Undo
Alt Moves the focus of the keyboard to the menu bar of the active program
Alt + F4 Close the active item, or quit the active program
Alt + Enter Displays the properties of the selected object
Alt + Spacebar Opens the shortcut menu for the active window
Alt + Tab Switch between open items
Alt + Esc Cycle through items in the order they were opened
Esc Cancel the current task
Tab Move forward through options
Tab + Shift Move backward through options
Enter Carry out the command for the active option or button

Windows logo key shortcuts for Windows 11

Windows logo key shortcuts for Windows 10

General keyboard shortcuts

Dialog box keyboard shortcuts

Free computer diagnostics

Repairing a PC can sometimes be expensive, and that is why we offer free basic in-shop diagnostics. Give one of our professional and experienced technicians a call at (602) 795-1111, and let's see what we can do for you.

Check out our reviews

Geeks In Phoenix LLC, BBB Business Review

Customer service is #1

Here at Geeks in Phoenix, we take pride in providing excellent customer service. We aim to give the highest quality of service  from computer repair, virus removal, and data recovery.

Bring your computer to us and save

Repairing a computer can be time-consuming. That is why we base our in-shop service on the time we work on your computer, not the time it takes for your computer to work! From running memory checking software to scanning for viruses, these are processes that can take some time.

Contact us

If you have any questions, please feel free to give us a call at (602) 795-1111  and talk with one of our Geeks. Or you can send us a message from our contact page contact page , and one of our Geeks will get back to you as soon as possible. Or you can stop by and see us. Here are our hours and location.

Like Geeks in Phoenix on Facebook

Follow Geeks in Phoenix on Twitter

Watch Geeks in Phoenix on YouTube