Geeks in Phoenix

Geek Blog


How to upgrade the hard drive in your computer

Updated September 28, 2020

Are you running out of free space on your computer's hard drive? You've uninstalled unused programs and cleaned it up, but still cannot free up any more room? Doing computer repair, I've seen this often and have personally run out of space more times than I care to remember. Here's how to upgrade the hard drive in your computer.

Changing out a hard drive may sound scary, but it's not. If your existing drive is healthy and you have a good backup of the data on it, you should be good to go. The procedure is the same for desktop computers and laptops, with slight differences due to the form factor (physical size).

Two different sizes of hard drives side-by-side

There are two types of drives, SSD (Solid State Drive) and HDD (Hard Disk Drive), two different types of hard drive interfaces, SATA (7 pin connection cable) and PATA (40 pin ribbon connection cable), and two different form factors (physical size) of drives; 2.5" and 3.5" (the dimension relates to the width of the drive). HHD's come in 3.5" and 2.5" sizes; SSD's come in only the 2.5" form factor. Laptops use the 2.5" form factor, and desktop computers can use either size. If you're planning on using an SSD or 2.5" HDD in a desktop computer, you'll have to use 2.5" to 3.5" adapter brackets. Also, if you're installing an SSD into a laptop, check the physical dimensions first. Some SSD's are higher (thicker) than standard 2.5" HDD's and may not fit into a laptop.

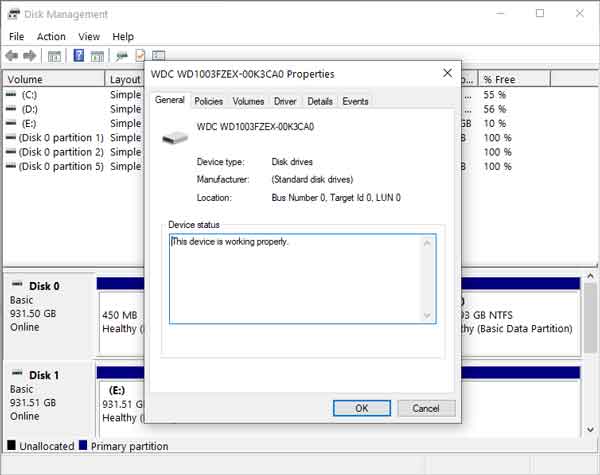
View of hard drive properties inside of Disk Management

The next thing to do is find out what you have for an existing drive. Open Computer Management, expand the Storage section, and select Disk Management. Find the disk you want to upgrade, right-click on the disk name (Disk 0, Disk 1, etc.) and select Properties. On the General tab, you will find the model number of that drive. Do a Google search for it and find out the specifications (form factor, data capacity, and interface). Now it's just a matter of getting a new drive that matches the form factor and interface. Remember that your new drive's data capacity has to be equal to or larger than your existing drive.

If your existing drive is an HDD, the first thing to do is to check the current drive for errors. Running a Checkdisk will find any errors that might prevent the successful cloning of the drive.

Running Checkdisk in Windows 7 / Windows Vista

Running Checkdisk in Windows 8

Running Checkdisk in Windows 10

If errors are found on the existing drive, you may not be able to use the new drive's manufacturer's software. In this case, you will have to use third-party software like R-Drive that can ignore read errors.

Two ways to clone a hard drive

Drive-to-drive cloning

Drive-to-drive is the easiest to do, and a few drive manufacturers (Western Digital, Seagate, etc.) have free utilities to do this. There are also a few free disk cloning utilities out there. Check out the UBCD; it has a few. All you have to do is turn off your computer and install the new drive into your computer. If your system is a desktop computer, consult the manufacturer's documentation on how to do this. If it's a laptop, you will have to attach it using either a USB adapter or inside of an external case.

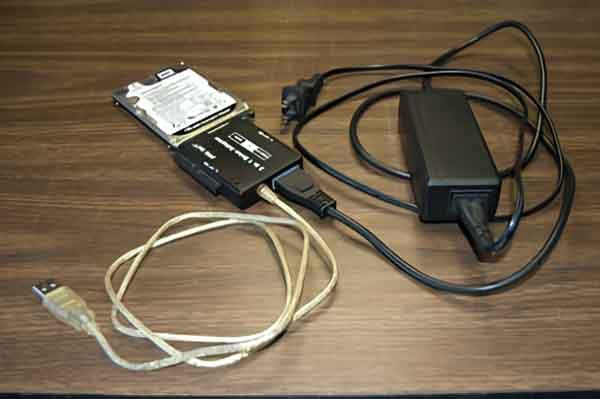
A laptop hard drive connected to a USB adapter

If you plan on reusing your existing laptop drive, an external case might be the way to go. That way, when you're done, you can put your current drive into it, reformat it and use it as an external drive for storage.

Once you have the new drive in place, start your computer up, install the manufacturer's software and start the disk clone. If you're installing a larger drive, always remember to check and make sure that the new free space is going to partition you want to expand. Once done, just power off the computer and change the drives out. If your system is a laptop, consult the manufacturer's documentation on how to change out the hard drive. If you installed an HDD, the first thing you want to do is a Checkdisk. When you clone a drive, you copy everything, including the MFT (Master File Table). SSD's will automatically adjust them, HDD's don't. Run a Checkdisk to fix them.

Drive-to-image / image-to-drive cloning

Drive-to-image / image-to-drive are a bit harder to do, but it has an advantage, a full disk backup. This process does require third-party software like R-Drive and an external drive or network drive. Most disk cloning tools allow you to create a boot disk; that way, you can boot your system up on it to clone the drive. Once you have made a boot disk, you're ready to go.

The process is the same as drive-to-drive, but instead of cloning to the new drive, you create a file containing an image of the existing hard drive on a removable hard drive or network folder. I prefer the portable (2.5") external hard drive, as they don't require any additional source of power (AC adapter). Boot your computer up on the disk you created. Once it is booted up, attach an external hard drive or configure the network settings and select your drive image location.

After you create the drive image, you can shut down your computer and change out the drives. Consult the manufacturer's documentation on how to change out the hard drive. Then you boot your computer back up on the disk you created, reconnect your external drive or network drive, and restore the drive from the image file. If you're installing a larger drive, always remember to check and make sure that the new free space is going to partition you want to expand. Once done, just shut the system down, remove the boot disk and start it back up. If you installed an HDD, the first thing you want to do is a Checkdisk. When you clone a drive, you copy everything, including the Master File Table. SSD's will automatically adjust them, HDD's don't. Run a checkdisk to fix them.

For more information on upgrading computer drives. click on the following links.

How to clone the drive in your Windows computer

How to upgrade your computers hard disk drive to a solid state drive

Custom cases: Back in Black

Here are the before and after pictures of the finished case for the upgrading your computer cheaply article.

Back in Black 1Back in Black 2

The face and body are RUST-OLEUM's 'Satin Black' Universal All-Surface Paint. I then applied a couple of coats of RUST-OLEUM's Crystal Clear Enamel.

Side note: I contacted RUST-OLEUM to let them know about my daughter's faux stone and chalkboard case. They thought it was cool and hoped they might be able to add it to their web site. Here's the image we sent them.

Faux stone and chalkboard with RUST-OLEUM on side

Custom cases: Faux Stone and Chalkboard

Here are the pictures of my daughter's finished customized computer case.

Faux Stone and Chalkboard 1Faux Stone and Chalkboard 2

RUST-OLEUM products used

The face is RUST-OLEUM's American Accents 'Sierra' Stone textured finish. The top and sides are RUST-OLEUM's Chalkboard specialty paint.

Pretty sweet, Brittany! Can't wait to see how you decorate it with chalk.

Upgrading your computer cheaply (part 3)

I started by taking the side panels and top off. It was at this point I decided to go excessive. Since most computer peripherals come with black finishes, I decided to change the case's color to black (this is where Home Depot comes into the picture). So I took off the face of the case and gently removed all of the buttons and lights.

A completely empty case.

I then proceeded to install the motherboard, processor/fan assembly, and memory. Next came the expansion card (wi-fi) and onboard connections. Note: Since I have some spare parts, I did install back panel connections for one serial port, one printer port, and four USB ports (for a total of eight on the back). These did not come with the motherboard. Then came the power supply and the drives.

The brand new system.

Here is a photo of the finished system, less the face and sides. I did add two more items into this $164.98 machine. Anybody who knows me knows I'm not particularly eager run onboard video cards. It uses a part of your system memory, which can be detrimental to a system's performance with a small amount of RAM. Say you have a system with 512 MB of RAM, and you have to have 128 MB for your video card. You have now cut your available system memory by 25%. Also, the memory on internal (opposed to onboard) video cards is faster. So I added a Microstar NX-8400GS with 512 MB for $43 and an Antec 80mm Tri-Cool case fan for $5.

So here's what I ended up with:

Intel Celeron 430 1.8 GHz with 4 GB's of DDR2 memory running with an FSB speed of 800 MHz, Microstar video card with an NVidia GeForce 8000 Series GPU with 512 of GDDR2 with a Western Digital 320 GB SATA Hard Drive.

Total for the whole system, $213.97, excluding labor. I will post a picture of the finished case when it's done.

Side note: My younger daughter decided she wanted to change her case too. This one is cool! Faux stone and chalkboard! Stop back by and see how this turns out.

Upgrading your computer cheaply (part 2)

Before we can go shopping, we need to see what we can reuse.

An inside view of the 'old' system.

The motherboard and hard drive need to be replaced. The new motherboard will require a new processor and memory. So here's a list of what we can reuse:

  • Mid-tower case
  • CD-ROM
  • CD-RW
  • Floppy drive
  • Internal wi-fi card
  • Power supply

Usually, you would also have to change out the power supply to accommodate the new motherboard's increased electrical requirements. This power supply was replaced within the last two months, so that it can run the new configuration.

Time to go shopping. We can go online and local retailers. I prefer to go with local retailers, as returning items purchased online can be a hassle. But if you're sure that the possibility of returning the items is slim, it's a great way to get a bargain. The first item is a new motherboard, and what type of CPU (Intel or AMD)?

I'm going with Intel this time. O.K., an Intel processor may not be the most frugal way to go (AMD processors cost less), but for this system, I think it's the way to go. I went looking locally and found a Biostar G31-M7 for $50. It has an LGA775 processor socket. The array of processors available for it is broad.

I found an Intel Celeron 430 1.8 GHz (Retail box) on-line for $35. This is something I am relatively sure I will not have to return. Geek tip: Intel warranties are different for retail (boxed w/ cooling fan - 3 years) and wholesale (no box or cooling fan - 1 year). The price difference is the cost of a cooling fan. So unless you are going to overclock your processor (which requires more cooling than the standard fan provides and voids the warranty), go with the retail version.

I found a deal on memory locally. Got a Corsair twin pack of 2gb DDR2 PC-6400 memory for $50. It came with a $25 mail-in rebate, making the final cost $25 for 4GB of memory.

I also got the hard drive locally. It's a Western Digital 3200AAKS 320 GB SATA hard drive for $52. I could have gone with a smaller size to keep down the cost, but this is the time to think about storage requirements (now and future). The larger the drive, the less the cost per gigabyte.

The total cost at this point is $162 (if you get the feeling I'm not done yet, you'd be right). We have an Intel Celeron 430 running at 1.8 GHz on a Biostar G31-M7 motherboard with 4 GB's of memory. The system has been running on a preinstall environment for over 24 hours and passed several stress tests. So it's time to...

Outside view of the 'old' system.

'Pimp my Box' (sorry MTV, just had to use it).

The next time I write, we'll start building this system and take a trip to Home Depot. (Note: I am going excessive at this point).

Upgrading your computer cheaply (part 3)

Free computer diagnostics

Repairing a PC can sometimes be expensive, and that is why we offer free basic in-shop diagnostics. Give one of our professional and experienced technicians a call at (602) 795-1111, and let's see what we can do for you.

Check out our reviews

Geeks In Phoenix LLC, BBB Business Review

Customer service is #1

Here at Geeks in Phoenix, we take pride in providing excellent customer service. We aim to give the highest quality of service  from computer repair, virus removal, and data recovery.

Bring your computer to us and save

Repairing a computer can be time-consuming. That is why we base our in-shop service on the time we work on your computer, not the time it takes for your computer to work! From running memory checking software to scanning for viruses, these are processes that can take some time.

Contact us

If you have any questions, please feel free to give us a call at (602) 795-1111  and talk with one of our Geeks. Or you can send us a message from our contact page contact page , and one of our Geeks will get back to you as soon as possible. Or you can stop by and see us. Here are our hours and location.

Like Geeks in Phoenix on Facebook

Follow Geeks in Phoenix on Twitter

Watch Geeks in Phoenix on YouTube