Geeks in Phoenix

Geek Blog


Check Windows 10 system files with System File Checker

Updated July 20, 2020

I was thinking the other day about what program I use the most in doing computer repair. The one program I use the most on Windows computers would have to be System File Checker (SFC). SFC checks for system files that may have gotten corrupt or replaced with incorrect versions. Here's how to check Windows 10 system files with System File Checker.

Check Windows 10 system files with System File Checker

SFC has been included in every version of Windows since Windows XP. You can also build it into the Microsoft Diagnostics and Recovery Toolset (DaRT). There is no shortcut or link to SFC in Windows 10, as it runs inside an Administrative Command Prompt.

How to open a Command Prompt with Administrator privileges in Windows 10

SFC running inside of Windows 10 Administrative Command Prompt

The following is the syntax and switches for SFC. The most commonly used syntax/switch is: sfc /scannow.

SFC [/SCANNOW] [/VERIFYONLY] [/SCANFILE=<file>] [/VERIFYFILE=<file>] [/OFFWINDIR=<offline windows directory> /OFFBOOTDIR=<offline boot directory>]

/SCANNOW (Scans integrity of all protected system files and repairs files with problems when possible.)
/VERIFYONLY (Scans integrity of all protected system files. No repair operation is performed.)
/SCANFILE (Scans integrity of the referenced file, repairs file if problems are identified. Specify full path <file>.)
/VERIFYFILE (Verifies the file's intergrity with full path <file>. No repair operation is performed.)
/OFFBOOTDIR (For offline repair specify the location of the offline boot directory.)
/OFFWINDIR (For offline repair specify the location of the offline windows directory.)

Examples

sfc /scannow sfc /verifyfile=c:\windows\filetobereplaced.dll sfc /scanfile=d:\windows\filetobereplaced.dll /offbootdir=d:\ /offwindir=d:\windows sfc /verifyonly

Once SFC is done scanning the system files, it will give one of four possible results:

  • Windows Resource Protection did not find any integrity violations.
    All system files are fine, and you're good to go.
  • Windows Resource Protection could not perform the requested operation.
    There may be another program preventing SFC from running. In this case, boot the system up into safe mode and run SFC from there.
  • Windows Resource Protection found corrupt files and successfully repaired them.
    All system files are now correct, and you're ready to go. If you want to view the repair details, see below.
  • Windows Resource Protection found corrupt files but was unable to fix some of them.
    If you get this message, SFC found a file or files that it couldn't repair. The next thing you will need to do is find out the name of the file(s). Using the Find String utility, you can filter out the SFC results with only the scanned components and create a text file with that information on your Desktop called sfcdetails.txt. Just copy the following code into an Administrative Command Prompt:

findstr /c:"[SR]" %windir%\Logs\CBS\CBS.log >"%userprofile%\Desktop\sfcdetails.txt"

Manually replacing a corrupt system file in Windows 10

Note: To replace a corrupt system file, you will need to have a known good copy of the file(s) in question. A good source for files is another computer or virtual machine running Windows 10. Since I do computer repair for a living, I have all of the versions of Windows that are still supported by Microsoft running inside of Oracle VirtualBoxes.

The first thing to do is note the location (path) and name of the file(s) that need to be replaced from the sfcdetails.txt file. Once you have another copy of the corrupt file(s), you will need to take administrative ownership of the file(s). To do this, modify the following command with the path\filename of the file you want to replace and then type it into an Administrative Command Prompt:

takeown /f path\filename

Example: takeown /f C:\Windows\FileToBeReplaced.dll

Next, you will have to grant administrators full access to the file(s) being replaced. To do this, modify the following command with the path\filename of the file you want to replace and then type it into an Administrative Command Prompt:

icacls path\filename /grant administrators:F

Example: icacls C:\Windows\FileToBeReplaced.dll /grant administrators:F

The third thing to do is copy over the new file(s) and replace the corrupt one(s).To do this, modify the following command with the path\filename of the file you want to replace and then type it into an Administrative Command Prompt:

copy path\filename path\filename

Example: copy C:\Temp\FileToBeReplaced.dll C:\Windows\FileToBeReplaced.dll

How to use Windows 10 Advanced Boot Options

Since I do computer repair for a living, there are times when I need to boot a Windows 10 system up into Safe Mode. But with newer computers utilizing UEFI (Unified Extensible Firmware Interface) and fast/safe boot features, this can be not easy. So here is how to use the Windows 10 Advanced Boot Options.

How to use Windows 10 Advanced Boot Options

In previous versions of Windows, getting to the advanced boot options was pretty easy. All you had to do was press the F8 key at startup. But with Windows 10, getting the advanced boot options is a little different. You can bring up the advanced boot options just one time or set it up permanently. Both require the system to be able to boot up into Windows 10 first.

Enable Window 10 Advanced Boot Options screen one-time

You can bring up the one-time Windows 10 boot options, either logged on or off. Since I repair computers for a living, I prefer not to log in under any user's profile. That way, I don't have to deal with any of the programs that may load when a user signs in. There are two (2) ways (logged in and logged out) of getting to the Windows 10 one-time boot options.

When you are logged in to Windows 10:

  1. Left-click on the Start Windows logo button.
  2. Left-click on Settings (the gear icon).
  3. Left-click on Update & Security.
  4. In the left column, left-click on Recovery.

    Windows 10 advanced startup option when logged in
  5. Under Advanced startup, left-click on Restart now. The computer will log you off and bring up the Choose an option screen.

When you are logged out of Windows 10:

  1. At the login screen, left-click on the Power button in the lower right-hand corner to bring up the different options.

    Windows 10 advanced startup option when logged out
  2. Hold down the Shift key on the keyboard and right-click on Restart. This will bring up the Choose an option screen.

When you get to the Choose an option screen:

    Windows 10 choose an option screen
  1. Left-click on Troubleshoot.

    Windows 10 troubleshoot screen
  2. Left-click on Advanced options.

    Windows 10 advanced options screen
  3. Left-click on Startup Settings.

    Windows 10 startup settings screen
  4. Left-click on the Restart button.

    Windows 10 standard advanced boot options screen
  5. When the Startup Settings page appears, select the number that coincides with the function you would like to perform.

Enable Window 10 Advanced Boot Options screen permanently

This option should be used very carefully. Not only do you have to edit the boot configuration of your Windows 10 computer, but once permanently enabled, you will have to select a boot option you want to use every time your computer starts or restarts. There is no timer for this screen as there was in previous versions of Windows. To edit the boot configuration, you will need to use an administrative command prompt.

How to open a Command Prompt with Administrator privileges in Windows 10

The first thing we have to do is turn on the Windows 10 Advanced Boot Options. Type or cut and paste the following code into an administrative command prompt:

bcdedit /set {globalsettings} advancedoptions true

To turn off the Windows 10 Advanced Boot Options, type or cut and paste the following code into an administrative command prompt:

bcdedit /set {globalsettings} advancedoptions false

You can also change the default boot manager used with the advanced boot options. The default is the Windows 10 standard version, but you can change it to the legacy version if you like the old DOS look.
Windows 10 legacy advanced boot options screen
To change to the legacy boot manager used in previous Windows versions, like Windows 7, you can type or cut and paste the following code into an administrative command prompt:

bcdedit /set {default} bootmenupolicy legacy

To restore the boot menu to the default, type or cut/paste the following code into an administrative command prompt.

bcdedit /set {default} bootmenupolicy standard

Clean up Windows 10 with Disk Cleanup

There are a lot of programs out there that can clean up your Windows 10 computer. But did you know that one of the best ones comes with Windows 10? Here's how to clean up your Windows 10 computer with Disk Cleanup.

Clean up Windows 10 with Disk Cleanup

Disk Cleanup has been included with Windows since Windows XP and is part of my regular scheduled maintenance. Disk Cleanup can be run two (2) different ways and can have three (3) different sets of options. The first way to run it is from any of the shortcuts built into Windows (Start menu or disk properties). When you use a built-in shortcut, you will have two (2) different sets of options, user and system.

Disk Cleanup user options in Windows 10
Disk Cleanup system options in Windows 10

When you run Disk Cleanup with user options, you can clean up user-specific files such as downloaded program files, temporary Internet files, and the recycle bin. With system options, you can also clean up Windows system files like Windows temporary files, device driver packages, and previous installations of Windows, just to name a few.

Disk Cleanup command line options in Windows 10

Disk Cleanup can also be run using command line switches. When you do this, you get the maximum options available. But you will have to run it at an administrative command prompt to configure these options. These options include all user and system options plus a few more, like old chkdsk files, Windows Update Cleanup, and Windows ESD installation files.

How to run Disk Cleanup from the Start menu

  1. Left-click on the Start Windows logo button.
  2. Scroll down to Windows Administrative Tools and left-click to expand.
  3. Left-click on Disk Cleanup. If you have more than one (1) drive, you will be prompted on which drive you want to clean up.

Disk Cleanup will scan your system for files that it can remove and open with the available user options. You can now choose which user files you would like to delete. To activate the system options, you will need to select Clean up system files in the lower left-hand corner. When you do this, Disk Cleanup will close and rescan your computer.

This time Disk Cleanup will now include system files that can be removed. It will also have a second tab on top called More Options. Under More Options, you will find other options, Programs and Features and System Restore and Shadow Copies.

Programs and Features will take you to the Control Panel, where you can uninstall programs or add/remove Windows features. Selecting System Restore and Shadow Copies will delete all but the most recent restore point. Use this carefully, as you cannot get back any restore points once they are deleted.

How to run Disk Cleanup from an administrative command prompt

You can run Disk Cleanup with or without command-line switches. When you run Disk Cleanup without any switches, it opens with the system options selections. When you run it with switch /sageset:n, you will get even more options than the system settings.

The first thing you will need to do is open an Administrative Command Prompt.

How to open a Command Prompt with Administrator privileges in Windows 10

Then type the following into the command prompt to run Disk Cleanup.

cleanmgr

Disk Cleanup can also be used with command-line switches, further expanding on its features. And when used with the /sageset:n and /sagerun:n switches, you can save multiple configurations that can be used in a shortcut or as a scheduled task. Here's an explanation of the /sageset:n and /sagerun:n switches.

cleanmgr /sageset:n

/sageset:n - This switch displays the Disk Cleanup settings dialog box and creates a registry key to store the settings you select. The n value is stored in the registry and allows you to specify different tasks for Disk Cleanup to run. The n value can be any integer value from 0 to 65535. To get all the available options when using the /sageset switch, you may need to specify the drive letter that contains the Windows installation.

cleanmgr /sagerun:n

/sagerun:n - This switch runs the specified tasks assigned to the n value by using the /sageset switch. All drives in the computer will be enumerated, and the selected profile will be run against each drive.

How to run Disk Cleanup as a Scheduled Task

First, you will need to have created a preset configuration using the /sageset:n switch. Then open Task Scheduler and create a new task.

  1. Left-click on the Start Windows logo button.
  2. Scroll down to Windows Administrative Tools and left-click to expand.
  3. Left-click on Task Scheduler.
  4. In the right column labeled Actions, select Create Basic Task. The Create a Basic Task Wizard will appear.
  5. Give the task a name and description and then select Next.
  6. Select when you want it to run (trigger).
  7. When prompted for what task you want to perform, select Start a program, then select Next.
  8. When prompted for a program/script to start, select Browse and navigate to C:\Windows\System32\ and select cleanmgr.exe.
  9. In the Add arguments section, type /sagerun:n and then select Next.
  10. Then select Finish, and you're all set.

Backup your files with File History and Windows Backup in Windows 10

Updated August 12, 2020

Backing up your computer has never been exciting, but it needs to be done regularly. And with the increase of file-encrypting malware, having a good backup has never been more critical. Here's how to back up your files with File History and Windows Backup in Windows 10.
Backup your files with File History and Windows Backup in Windows 10

Windows 10 backup basics

Now there are two (2) different backup programs inside of Windows 10, Windows Backup, and File History, and each one does a specific type of backup. Windows Backup is geared more towards scheduled backups (nightly, weekly, etc.) and is usually used for full system backups / complete 'bare metal' system images. File History is more for personal files that frequently change, like Word documents and Excel spreadsheets, as it saves multiple versions of the same file.
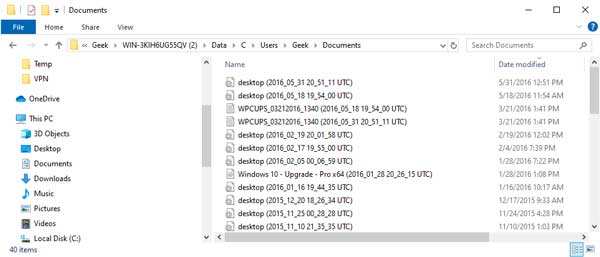
File History creates multiple versions of the same file with time stamps in the names
File History creates multiple versions of the same file with time-stamps in the names

The one thing that Windows Backup and File History have in common is that both of these programs can back up to an external drive or network folder. Windows Backup can also use writeable disks like CDs or DVDs.

With the recent outbreak of file-encrypting malware, if you're going to use a network folder, it is recommended you do not map a network folder to a drive letter (N:\Files), but instead use Uniform Naming Convention (UNC) (\\Server\Volume\Files).

Never use the same drive that Windows is installed on for File History or Windows Backup. If your computer gets a virus or the operating system gets corrupted, you may have to reformat the drive and reinstall Windows.

Remember, when not in use, store the media used for backups (external hard disks, DVDs, or CDs) in a secure place to prevent unauthorized people from having access to your files. It is also recommended to use a fire-proof location, like a data safe, to store the backup media.

Using File History to back up your files

File History will automatically create time-stamped versions of your files (documents, music, photos, etc.) on a set schedule. If the originals are lost, damaged, or deleted, you can restore them from an earlier point in time. You can schedule File History to run from every ten (10) minutes to daily. And you can also set the length time that File History keeps copies of your files, from 1 month to forever or whenever space is needed.
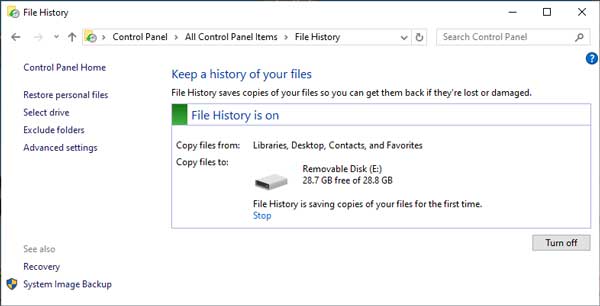
The main screen for File History

To use File History, you will need to either have an external drive or network folder to save the files. By default, File History will back up your folders (documents, photos, videos, etc.), but you can add additional folders to its configuration. Now configuring File History inside of Windows 10 can be a little confusing, as there are two (2) different places to change the settings, Settings and Control Panel.

How to open File History in Settings

  1. Left-click on the Start Windows logo menu and select Settings (the gear icon).
  2. Left-click on Update & security.
  3. In the left column, left-click on Backup.

How to open File History in the Control Panel

  1. Left-click on the Start Windows logo menu.
  2. Scroll down to Windows System and left-click on it to expand it out.
  3. Left-click on Control Panel.
  4. If viewing by category, left-click on Save backup copies of your file with File History. If viewing by large/small icons, left-click on File History.

or

  1. In the search box next to the Start Windows logo button, type Control Panel, and click on it from the results.
  2. If viewing by category, left-click on Save backup copies of your file with File History. If viewing by large/small icons, left-click on File History.

Here is a breakdown of what options can be changed and where to find them.

File History option Settings Control Panel
Turn on or off X X
Manually run File History X  
Change frequency (how often it runs) and duration (how long they are kept) of history X X
Add or remove folders X  
Exclude folders (useful for sub-folders) X X
Change where backups are stored X X
Clean up older versions   X
Restore files   X

Using Windows Backup to back up your files

The Windows Backup version included in Windows 10 is actually from Windows 7, hence the name in the Control Panel, Backup and Restore (Windows 7). If you used the version in Windows 7, everything will be familiar to you. With Windows Backup, you can back up just specific files and folders or do a complete system backup/system image. And you can schedule it to run whenever you want.
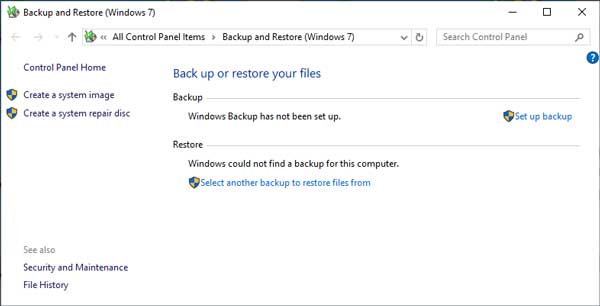
The main screen for Windows Backup

But unlike File History, Windows Backup creates a single backup that gets updated when it is run. No multiple file versions here, just the latest version of files at the time Windows Backup was run.

Along with using an external drive or network folder for backup, Windows Backup can also use CDs or DVDs. But if you're going to do a complete system backup on CD's or DVD's, be prepared with plenty of blank disks.

If you're creating a complete system image, remember to make a system repair disk to go along with it. If you ever need to restore your computer from a Windows Backup image, you will need to boot your computer from it. The link to create it is in the left-hand column.

How to open Windows Backup in Settings

  1. Left-click on the Start Windows logo menu and select Settings (the gear icon).
  2. Left-click on Update & security.
  3. In the left column, left-click on Backup.
  4. In the right column, left-click on Go to Backup and Restore (Windows 7).

How to open Windows Backup in the Control Panel

  1. Left-click on the Start Windows logo menu.
  2. Scroll down to Windows System and left-click on it to expand it out.
  3. Left-click on Control Panel.
  4. Left-click on Backup and Restore (Windows 7).

or

  1. In the search box next to the Start Windows logo button, type Control Panel, and click on it from the results.
  2. Left-click on Backup and Restore (Windows 7).

How to customize the Start menu in Windows 10

Updated August 16, 2020

The Start menu was first included in Windows 95 and was a big part of its success. It has undergone many changes over the years, but still is the primary way of navigating Windows. So here is how to customize the Start menu in Windows 10.

How to customize the Start menu in Windows 10

The Windows 10 Start menu is a combination of the Start menu that was in Windows 7 and the Start screen from Windows 8. You have the traditional Start menu features like folders and apps on the left and Start screen tiles on the right side.

The different areas of the Windows 10 Start menu

Now there are four (4) main areas of the Start menu that you can customize; Appearance, Folders, App list, and Tiles. You can also change the size, color, font, and transparency of the Start menu. Changing the size is relatively simple.

Just like any other application, you can change the width and height of the Start menu. Hover your cursor over one of the Start menu edges until the sizing arrows appear, then hold the left mouse button and drag it to the size you want.

Almost all settings to customize the Start menu are located in the Personalization section of the Settings app. To find the Start menu settings in the Settings apps just:

  1. Left-click on the Start Windows logo menu and select Settings (the gear icon).
  2. Left-click on Personalization.
  3. In the left-hand column, left-click on Start.

Appearance

This is where you can set up the way the Start menu looks and operates. In the right-hand column, you will find a list of options that you can turn on. Their functions are pretty self-explanatory.

  • Show more tiles on Start
  • Show app list in Start menu
  • Show recently added apps
  • Show most used apps
  • Show suggestions occasionally in Start
  • Use Start full screen (similar to Tablet mode)
  • Show recently open items in Jump Lists on Start or Taskbar and in Explorer Quick Access

Folders

At the bottom of the list is a link labeled Choose which folders appear on Start. When you click on it, you get a list of the folders that you can toggle on or off. The folders that can be displayed on the Start menu are:

  • File Explorer
  • Settings (on by default)
  • Documents (on by default)
  • Music
  • Pictures (on by default)
  • Videos
  • Network
  • Personal Folder

Tiles

Some of the Tiles are Desktop program shortcuts, and some are UWP (Universal Windows Platform) apps. All of the Tiles can be resized and unpinned. Live Tiles (tiles that display information, like the Photo app) can be turned on and off.

And there are a few that can be uninstalled directly from the Tile section of the Start menu. If you place the mouse cursor over a Tile and hold down the left mouse button, you can move a tile around. If you right-click on a Tile, you will get a context menu with different options.

You can easily pin a program to the Tile area of the Start menu. Just right-click on any application or shortcut in the App list, on the Desktop or inside of the File Explorer, and select Pin to Start from the context menu that appears.

App list

I left this area of the Start menu for last, as it is the most complicated to change. The App list is a special folder on the drive where Windows is installed. Actually, there are two (2) App list folders; a system folder that is for all system users and a user folder that is inside of each user profile.

You can perform almost all of the regular folder and file editing inside the system App list reasonably quickly. Just right-click on an item and select an action from the context menu. Remember that the system App list is propagated into the user App list, so if you make a change here, it affects all users.

Now adding to the system App list is hard, since you can not do it directly. When I say directly, you can not just click inside and select New > Folder or Shortcut from the context menu. You have to copy/paste or drag/drop a folder or shortcut into it. I recommend leaving the system App list alone and changing only the user App list.

How to create a shortcut in Windows 10

Modifying the user App list is easier and is the recommended way of changing the App list. It will have fewer folders and shortcuts, but most of the App list comes from the system App list. Here are the different App list locations.

Just copy and paste the code below into a Run dialog box (Windows logo key Windows logo + R).

The system App list location
%programdata%\Microsoft\Windows\Start Menu
The user App list location
%appdata%\Microsoft\Windows\Start Menu

Free computer diagnostics

Repairing a PC can sometimes be expensive, and that is why we offer free basic in-shop diagnostics. Give one of our professional and experienced technicians a call at (602) 795-1111, and let's see what we can do for you.

Check out our reviews

Geeks In Phoenix LLC, BBB Business Review

Customer service is #1

Here at Geeks in Phoenix, we take pride in providing excellent customer service. We aim to give the highest quality of service  from computer repair, virus removal, and data recovery.

Bring your computer to us and save

Repairing a computer can be time-consuming. That is why we base our in-shop service on the time we work on your computer, not the time it takes for your computer to work! From running memory checking software to scanning for viruses, these are processes that can take some time.

Contact us

If you have any questions, please feel free to give us a call at (602) 795-1111  and talk with one of our Geeks. Or you can send us a message from our contact page contact page , and one of our Geeks will get back to you as soon as possible. Or you can stop by and see us. Here are our hours and location.

Like Geeks in Phoenix on Facebook

Follow Geeks in Phoenix on Twitter

Watch Geeks in Phoenix on YouTube