Geeks in Phoenix

Geek Blog


Run another operating system on your Windows computer with Oracle VirtualBox

Updated November 6, 2022

Have you ever wanted to try another operating system but did not want to have to erase your drive to do it? Maybe you have an app that will not work on the latest version of Windows? If so, then Oracle VirtualBox may be just what you are looking for.

Three different versions of Windows running in VirtualBoxes
Windows 8.1, Windows 10, and Windows 11 running inside of VirtualBoxes

VirtualBox is a virtualization program that allows you to run an operating system (OS) in a Virtual Machine (VM) environment. VMs emulate the most common hardware found in modern computers, including Trusted Platform Module (TPM) ver. 1.2 and 2 (Windows 11 requires TPM v2).

One of my favorite things is to try out different operating systems, like other versions of Linux, including Android-x86 and Wubuntu. I have used VMs for many years now to do just that and have found VirtualBox to be the one I use the most often.

Another thing I use VMs for is running legacy software on older operating systems. I have several programs that will only run on Windows XP, so I have a dedicated Windows XP VM just for these programs.

And you can configure a VM so it appears as a separate computer on your network. You can even map shared network folders and print to network printers. You can even have multiple monitors too.

A Windows 11 virtual machine using dual monitors
Windows 11 with dual monitors running inside of a VirtualBox

Creating a new VM is relatively simple, give it a name, select the operating system being installed, and the location of the installation media. You will need to know what amount of memory and disk space the operating system you are installing requires.

When it comes to creating a VM for another OS, it is the same as if you were installing the OS on physical hardware. If the OS you are installing requires a product key, like Windows, you will need it. Usually, when it comes to Windows, you can only use retail product keys, not Original Equipment Manufacturer (OEM) product keys.

VirtualBox currently runs on Windows 8.1 through Windows 11, Windows Server 2012 through 2022, macOS 10.15 through 12, Ubuntu 18.04 LTS, 20.04 LTS and 22.04, Debian GNU/Linux 10 (Buster) and 11 (Bullseye), Oracle Linux 7, 8 and 9, CentOS/Red Hat Enterprise Linux 7, 8 and 9, Fedora 35 and 36, Gentoo Linux, SUSE Linux Enterprise Server 12 and 15, openSUSE Leap 15.3 and Oracle Solaris 11.4.

With its flexibility in configuration, multiple monitor support, and support for 64-bit virtual machines (only on 64-bit host operating systems), it's my choice for VM. And did I mention that it's free? For more information on Oracle VirtualBox, follow the link below:

Oracle VirtualBox

Disable Windows hibernation and free up disk space

Updated October 6, 2022

If you're a hardcore computer user like me, your system runs 24/7 with no screen or power saver options (I turn off the monitors when not in use). I like to walk into my office and have it ready to go. So when I noticed that my version of Windows still had the Hiberfil.sys file and I do not use hibernation, it was time to remove this file and regain that drive space back (in my case, 16 GB).

The Hiberfil.sys is a hidden system file located in the drive's root folder where Windows is installed. The Windows Kernel Power Manager creates this file when you install Windows. The computer uses the Hiberfil.sys file to store a copy of the system memory on the drive when hibernation is turned on.

The size of the Hiberfil.sys file is approximately equal to how much Random Access Memory (RAM) is installed on the computer. The computer cannot go into hibernation if this file is not present. And even if you have disabled hibernation, your computer can still go to sleep. Here is the difference between sleep and hibernation:

  • Sleep: Windows can turn off the screen(s) and drive(s) while continuing to run in memory. A tap on the keyboard or moving the mouse will turn the screen(s) and drive(s) back on.
  • Hibernation: Windows takes the active memory, writes it to the Hiberfil.sys, and then turns the computer off. Pressing the power button will start Windows back up, where it loads the Hiberfil.sys file.

How to turn on or off hibernation in Windows

To disable hibernation, you must open a Command Prompt with Administrator privileges. Since this article covers multiple versions of Windows, click on the link below that matches your version of Windows for how to open an Admin Command Prompt. All links open in a new window.

How to open a Command Prompt with Administrator privileges in Windows 11

How to open a Command Prompt with Administrator privileges in Windows 10

How to open a Command Prompt with Administrator privileges in Windows 8

How to open a Command Prompt with Administrator privileges in Windows Vista and Windows 7

To delete the Hiberfil.sys file and make hibernation unavailable, follow these steps:

  1. Open a Command Prompt with Administrator privileges (see instructions above)
  2. At the Command Prompt, type powercfg.exe /hibernate off and press ENTER.
    Disable Windows Hibernation at the Command Prompt
  3. Type exit and then press ENTER to close the Command Prompt window.

To recreate the Hiberfil.sys file and make hibernation available, follow these steps:

  1. Open a Command Prompt with Administrator privileges (see instructions above)
    Renable Windows Hibernation at the Command Prompt
  2. At the Command Prompt, type powercfg.exe /hibernate on and press ENTER.
  3. Type exit and then press ENTER to close the Command Prompt window.

My favorite left hand Windows keyboard shortcuts

Updated April 19, 2023

One of the most useful items I use daily is keyboard shortcuts. Especially shortcuts that I can perform with just my left hand, allowing me to keep my right hand on the mouse. You can use keyboard shortcuts to open frequently used files, folders, and programs like File Explorer. Windows has a ton of built-in keyboard shortcuts (see links at the bottom of this article), plus you can create your own custom keyboard shortcuts. Here are my favorite left-hand keyboard shortcuts.

Left hand Windows keyboard shortcuts

Press To
Windows logo key + E Open File Explorer
Windows logo key + R Open the Run dialog box
Windows logo key + D Display the Desktop
Windows logo key + F Search for a file or folder (Windows 7 / 8.1)
Windows logo key + S Search for a file or folder (Windows 10 / Windows 11)
CTRL + A Select all
CTRL + X Cut
CTRL + C Copy
CTRL+ V Paste
CTRL + ALT + (KEY) Custom keyboard shortcut (see below)

Create your own Windows keyboard shortcuts

You can create keyboard shortcuts that use CTRL + ALT + (your choice of a key) for frequently used files, folders, and programs. You will need to have a shortcut to the file, folder, or program you want to open first. You can use an existing shortcut (on your desktop or the Start menu) or create a new one.

How to create a shortcut in Windows

Once you have a shortcut:

  1. Right-click on the shortcut
  2. From the context menu, click Properties
  3. On the Properties box, select the Shortcut tab
    The shortcut key box inside of a Windows shortcut
  4. Click inside the Shortcut key box and press the key which you want to combine with CTRL + ALT

Note:
You can not use the following keys for keyboard shortcuts: ESC, ENTER, TAB, SPACEBAR, PRINT SCREEN, SHIFT, or BACKSPACE.

For more information on Windows keyboard shortcuts, follow the links below:

Windows 11 keyboard shortcuts

Windows 10 keyboard shortcuts

Windows logo key keyboard shortcuts

General keyboard shortcuts

Natural keyboard shortcuts

Dialog box keyboard shortcuts

Accessibility keyboard shortcuts

Windows Explorer keyboard shortcuts

Stitching panoramic images for the web with Microsoft Research HD View

A while back. I wrote an article about creating panoramic images with Microsoft Image Composite Editor (ICE) and Photosynth. With ICE and Photosynth, you can create panoramic images and then upload them to the Photosynth website. But what if you wanted to upload them to your website? That's where HD View comes into the picture.

Microsoft HD View is a new viewer to display large images (gigapixels) across the internet. It allows you to create panoramic images for web pages that do not take a lot of bandwidth. When someone views the image, they are only downloading what is required for that view. It is only when they pan or zoom that more of the image is downloaded. HD View / Deep Zoom is now included in ICE, also as a stand-alone command-line utility, and (here's the best), a Photoshop plug-in.

HD View / Deep Zoom export in Microsoft Image Composite Editor

HD View / Deep Zoom export in Photoshop plug-in

So if you're a Photoshop user, you can now export those panoramic images that Photoshop can create directly to HD View / Deep Zoom format. The Photoshop plug-in is available in both 32-bit and 64-bit. Here's a quote from the HD View website:

About HD View
HD View is a new viewer developed by Microsoft Research's Interactive Visual Media group to aid in the display and interaction with very large images. The HDView development team included Johannes Kopf, Matt Uyttendaele, Howard Good, and Michael Cohen along with Jonathan Fay of the Next Media group.

Recent advances in camera and sensor technology and software for stitching images together has led to the creation of images containing billions of pixels (gigapixels). These images are often panoramic, that is, they cover very wide fields of view. Since monitors typically contain only one to two million pixels, it is only possible to actually see 1/1000th of such image data at once. Also, viewing very wide fields of view require unwrapping of an image projected onto a curved surface (think of a map of the world) which can cause distortions.

HD View leverages current graphics hardware to allow smooth panning and zooming as well as the viewing transformation described below.

HD View was developed with a number of goals in mind. It should:

  • allow smooth panning and zooming on large images,
  • only download enough data to create the current view (and possibly look ahead to the next), and
  • always display the current field of view with an appropriate projection. This means that when zoomed way in you should be presented with a standard perspective projection providing a sense of immersion, and when zoomed out you experience a curved projection so that get a full overview of the scene. In between the projection should smoothly transition.
  • Finally, it should be easy to create your own HD View content and present it to the world via the web.

The HD View plug-in currently supports all major browsers on the Windows platform. The first time that you visit a page with HD View content you will be prompted to install the HD View plug-in.

For more information on HD View / Deep Zoom, follow the links below:

Microsoft Deep Zoom

HD View Utilities (32 bit)

HD View Utilities (64 bit)

Harden / Mitigate the security of your Windows programs with Microsoft EMET

Updated January 31, 2021. Microsoft's Enhanced Mitigation Experience Toolkit reached the end of its life on July 31, 2018, and is no longer available for download.

Enhanced Mitigation Experience Toolkit 5.5

Let's face it, some of the software we use on a daily basis has become subject to security vulnerabilities and exploits. Software manufacturers do their best to develop and test fixes / patches as fast as possible, but this can take time. A lot of users just cannot keep up with all of the updates and hotfixes. A few years ago Microsoft released the Enhanced Mitigation Experience Toolkit (EMET) to deal with just this issue.

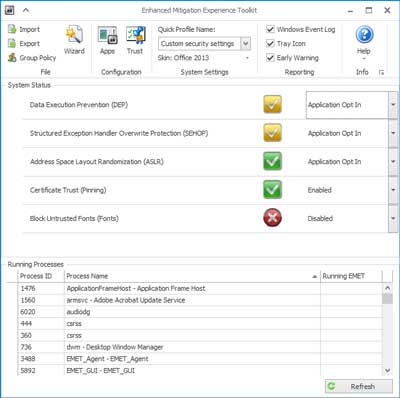
View of the main screen inside EMET 5.5

So what is EMET? EMET monitors selected programs (Internet Explorer, Microsoft Office, etc.) for known attack actions and techniques. When one of the several pseudo mitigation technologies is triggered, EMET will either block the programs' access to the resource it is trying to reach or just terminate it. EMET expands on the technologies that Microsoft implemented with Data Execution Prevention (DEP), which has been included in the Windows operating system since Windows XP SP2. It will also validate digitally signed SSL certificates inside of Internet Explorer.

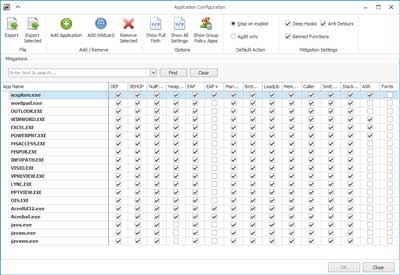
View of the application configuration screen inside EMET 5.5

So how does EMET work? EMET acts as a shim between the program being monitored and the operating system. The monitored program thinks it's talking directly to the operating system, but it's actually talking to it through EMET. EMET comes with predefined profiles for some of the more common programs like Microsoft Office, Internet Explorer, Adobe Acrobat and Java. You can also add to the predefined profiles or create your own. I recommend that you monitor any program that can open files on or from the Internet.

What security exploits are currently covered

Here's is the current list of mitigations EMET 5.5 currently looks for.

  • Attack Surface Reduction (ASR) Mitigation
  • Export Address Table Filtering (EAF+) Security Mitigation
  • Data Execution Prevention (DEP) Security Mitigation
  • Structured Execution Handling Overwrite Protection (SEHOP) Security Mitigation
  • NullPage Security Mitigation
  • Heapspray Allocation Security Mitigation
  • Export Address Table Filtering (EAF) Security Mitigation
  • Mandatory Address Space Layout Randomization (ASLR) Security Mitigation
  • Load Library Check - Return Oriented Programming (ROP) Security Mitigation
  • Memory Protection Check - Return Oriented Programming (ROP) Security Mitigation
  • Caller Checks - Return Oriented Programming (ROP) Security Mitigation
  • Simulate Execution Flow - Return Oriented Programming (ROP) Security Mitigation
  • Stack Pivot - Return Oriented Programming (ROP) Security Mitigation
  • Windows 10 untrusted fonts

What programs should you harden / mitigate

You only want to harden / mitigate certain programs that are targeted on a regular basis. Web browsers like Chrome, Firefox and Internet Explorer, production / office programs like Microsoft Word, Excel and PowerPoint, e-mail clients like Outlook and Windows Live Mail are some of the few. I recommend that you harden any program that can open files on or from the Internet.

What programs should you not harden / mitigate

You should never configure EMET to monitor anti-virus, anti-malware, intrusion prevention / detection software, debuggers, software that handles Digital Rights Management (DRM) technologies or software that uses anti-debugging, obfuscation, or hooking technologies.

Installation notes

New installation: Just download EMET and install

Upgrade install: Since the registry keys for EMET changed with this version, you can either export your existing EMET settings using the method in the 'What's new' section below, download the converter or reconfigure all of the program settings. With the drastic change with the EMET data format inside of the registry, I think that it would be just easier to reconfigure EMET then try the export / import method. Either way, remember to uninstall any older version of EMET and restart your computer before you install this version.

What's new in EMET 5.5?

  • Full-featured GPO management, compatible with reporting and compliance requirements
  • Command line: new syntax and options
  • Implementation of certificate pinning now based on root CA thumbprints. Exceptions logic removed.
  • Export and Import now memorize path
  • EMET registry has been refactored. To convert settings from previous versions of EMET (including EMET 5.5 Beta), registry values must be saved in a file then imported back with the use of the converter PowerShell script after EMET 5.5 is installed. Here are the steps to follow:
  1. Export settings. With elevated PowerShell, run the following command:
    .\Migrate-EmetSettings.ps1 -RegFile .\NewEmetSettings.reg -MissingCertCsv .\MissingCerts.csv PowerShell script Migrate-EmetSettings.ps1 is provided with EMET 5.5 RTM. It includes documentation about its usage.
  2. Uninstall former version of EMET.
  3. Install EMET 5.5 RTM. When asked to choose between Use recommended settings and Configure manually later, chose option Configure manually later.
  4. Import settings. With elevated PowerShell, run the following command:
    reg.exe import .\NewEmetSettings.reg

Supported Operating Systems

Windows 10 , Windows 7, Windows 8.1, Windows Server 2008, Windows Server 2012, Windows Server 2012 R2, Windows Vista

  • EMET 5.5 requires .NET Framework 4.5.
  • For Internet Explorer 10 on Windows 8 you need to install KB2790907 - a mandatory Application Compatibility update that has been released on March 12th, 2013 or any other Application Compatibility updates for Windows 8 after that

Free computer diagnostics

Repairing a PC can sometimes be expensive, and that is why we offer free basic in-shop diagnostics. Give one of our professional and experienced technicians a call at (602) 795-1111, and let's see what we can do for you.

Check out our reviews

Geeks In Phoenix LLC, BBB Business Review

Customer service is #1

Here at Geeks in Phoenix, we take pride in providing excellent customer service. We aim to give the highest quality of service  from computer repair, virus removal, and data recovery.

Bring your computer to us and save

Repairing a computer can be time-consuming. That is why we base our in-shop service on the time we work on your computer, not the time it takes for your computer to work! From running memory checking software to scanning for viruses, these are processes that can take some time.

Contact us

If you have any questions, please feel free to give us a call at (602) 795-1111  and talk with one of our Geeks. Or you can send us a message from our contact page contact page , and one of our Geeks will get back to you as soon as possible. Or you can stop by and see us. Here are our hours and location.

Like Geeks in Phoenix on Facebook

Follow Geeks in Phoenix on Twitter

Watch Geeks in Phoenix on YouTube