Updated March 29, 2023
Doing computer repair, I see a lot of different issues. But there is one problem I see over and over again, start-up corruption. This most commonly occurs when the computer is not turned off properly. And laptops appear to be more prone to this issue than desktops. So here's how to properly shut down your Windows-based computer.
Logic dictates that if you use a button to turn on a device, you should also use it to turn it off (button on / button off). You use a button to turn your TV, audio/video components, and smartphone on and off. But this is only sometimes the case when it comes to your computer. It is always recommended that you allow the operating system to close down all applications and turn the computer off itself.
Using the Start menu / Start screen to shut down Windows
This may seem like a no-brainer, but you would be amazed at how many people don't use this method. It's mainly laptop users who instinctively close the lid or reach for the power button. But if you don't watch how long you hold the power button down, you could perform a hard shutdown. It's simpler and recommended to use the shut down button on the Start menu / Start screen.
Windows Vista

Start button > Power button > Shut down
Windows 7
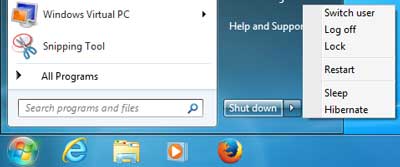
Start button > Shut down
Windows 8

1. Start screen > Sign out
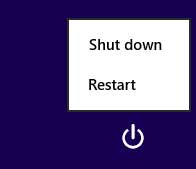
2. Sign in screen > Power button > Shut down
Windows 8.1
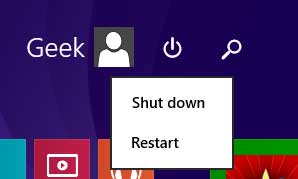
Start screen > Power button > Shut down
Or
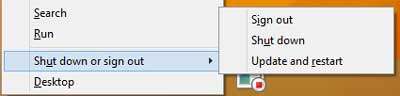
Power users menu (Windows logo key  + X) > Shut down or sign out > Shut down
Windows 10
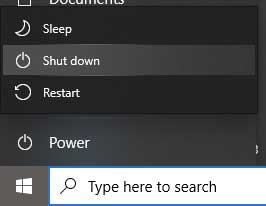
Start button > Power button > Shut down
Or
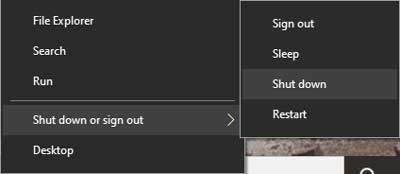
Power users menu (Windows logo key + X) > Shut down or sign out > Shut down
Windows 11

Start button > Power button > Shut down
Or
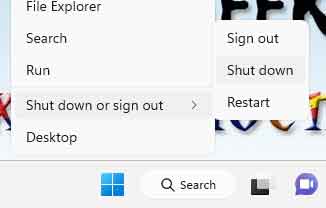
Power users menu (Windows logo key + X) > Shut down or sign out > Shut down
Using the power button on the computer to shut down Windows
This method is acceptable for turning off your computer, as it performs the same command as the shut down button on the Start menu / Start screen. But you have to check and ensure that the power options inside the operating system are configured to shut down the system when the power button is pressed.
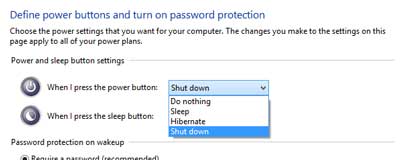
Power button options inside of Windows 8.1 / Windows 10
The power button can be configured to put the system into sleep or hibernate. And if your system loses power while it's asleep, you will get an error when you restart it. This happens quite often with laptops when they are not using the ac adapter and the battery runs out.
Using the power button on the computer to force it to shut down
How do you turn off your computer when it freezes and has no reset button? This is where the Advanced Configuration and Power Interface (ACPI) specification comes into play. This spec has been built into every computer for well over a decade now. It mandates that when the power button is held down for 10 seconds or longer, the system performs a hard shutdown, turning off power to all components. This will most likely cause an error upon restart.
64576e5c-a061-4521-a3e1-f8a93a9fb157|0|.0|96d5b379-7e1d-4dac-a6ba-1e50db561b04