Geeks in Phoenix

Geek Blog


Use the Microsoft Update Catalog to find and install Windows drivers and updates

Updated March 12, 2024

Are you having problems finding Windows drivers for your older hardware? Or have you had an update to Windows recently fail to install and want to install it manually? Then the Microsoft Update Catalog may be just what you need.

Using the Microsoft Update Catalog to find Windows drivers and updates

Sometimes repairing Windows computers can be hard, especially when it comes to drivers and updates. Usually, using the standard means of obtaining drivers (Device Manager / manufacturer website) and updates (Windows Update) is relatively easy.

But there are times when I cannot find a device driver or an update to Windows fails to install. That is when I go over to the Microsoft Update Catalog and see what I can find.

The Microsoft Update Catalog is a collection of Microsoft drivers, hotfixes and software updates like Windows Update. They are the same files you receive through Windows Update.

Just like Windows Update, there are three (3) types of updates: Important, Recommended, and Optional (drivers). The only difference is that you can choose what version you download.

Searching the catalog is relatively straightforward. For failed updates, I use the Knowledge Base (KB???????) number. For drivers, I use manufacturer/model number or the hardware id from Device Manager.

Finding and installing Windows Updates

Now before downloading updates, make sure that Windows Update is working correctly. Check the Windows Update history and see if all updates are failing to install or if it is just one.

If all updates are failing, take a look at this article, Troubleshooting Windows Update problems. If it is only one particular update that is failing, then I would go ahead and download it then manually install it.

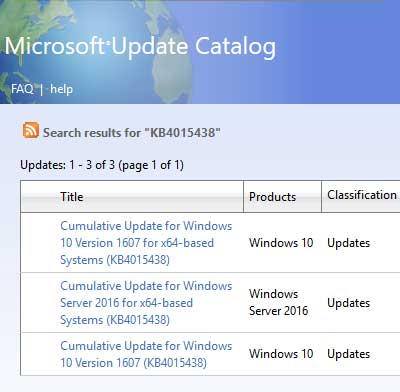
First, you will need the Knowledge Base number from the Windows Update history to use for the search query.
Finding and installing Windows Updates 1
Once you have it, type it into the search field and click on Search.

The second thing you will need to know is what version of Windows you have and if it is 32-bit or 64-bit for the search results.
Finding and installing Windows Updates 2
Some updates are specific to one version of Windows. Some are general, across the board, every version of Windows.

Once you find the update you need, click on the Download button. A separate window will open with the update name and link to it. Just left-click on the link and choose whether you want to open it or save it. Since some of these can be rather large, I like to download them to my computer first, then install them.

Finding and installing Windows device drivers

Usually, the Device Manager inside of Windows works great for finding device drivers. If there is a driver for your version of Windows, it can automatically download and install it.

But what happens when there is not a device driver for your version of Windows? That is when you need to look for one for a previous version of Windows. Let me explain.

For example, you find that Windows 10 doesn't have a driver for your older hardware. You check the manufacturer's website, and they do not have one either. Or worse, they have gone out of business.

For this exercise, I will use a Windows 10 computer and a brand-new RAID controller I have had sitting here for around eight (8) years or so. The box indicates the last operating system that was supported was Microsoft Vista, so it is safe to say that Windows 10 will not have a driver.

Usually, the first thing I do is psychically check the device for any manufacturer name or model number. If I can find a model name or number, I use it as the search query in the Microsoft Update Catalog.

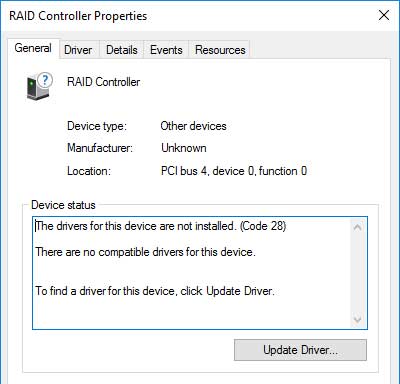
If I cannot find anything on the device that identifies it, I install it a computer and start it up.
Finding and installing Windows device drivers 1
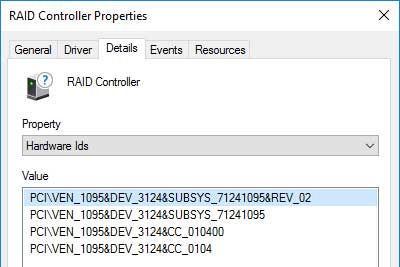
I then go into Device Manager and let it try to find a driver. If Device Manager cannot find a driver, I use the hardware id
Finding and installing Windows device drivers 2
as a search query in the Microsoft Update Catalog.

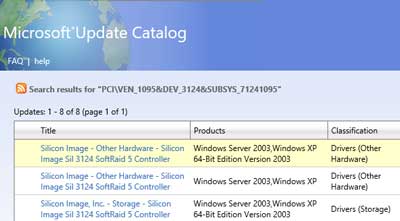
Now I know that there are no drivers for Windows 10, so I have to find one for an earlier version of Windows. I will first look for a Windows 8.1 driver, then a Windows 7 driver, then a Windows Vista, and then a Windows XP driver.
Finding and installing Windows device drivers 3
As long as it is the right platform (32-bit or 64-bit), I should be able to use it.

Once I find a driver, in this case, it's for Windows XP 64-bit, I download it to a folder on my local drive. Now the downloaded driver file will have a .CAB extension, so before I can use it, I will need to extract the data from it.

Once I get the files/folders extracted, I go into Device Manager and select Update Driver. I then select Browse my computer for driver software. From there, I browse over to and select the folder where I extracted the driver files. I also check the Include subfolders checkbox. I then click on Next,
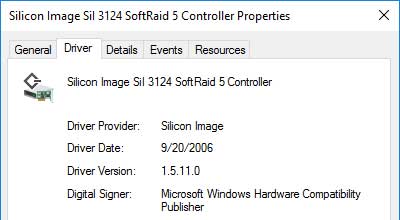
Finding and installing Windows device drivers 4
and Windows 10 installs the driver.

For more information on the Microsoft Update Catalog, follow the links below.

Microsoft Update Catalog
How to download updates that include drivers and hotfixes from the Windows Update Catalog

How to manually install the Windows 10 Creators Update

By now, you must have heard about the Windows 10 Creators Update. There is plenty of information about the new features on the Internet, but nobody tells you how to perform a manual installation. So, let's walk through a manual Windows 10 Creators Update installation.

How to manually install the Windows 10 Creators Update

So, Microsoft has released the latest major update for Windows 10, the Creators Update. With all of the hype about the new features, it was time to check them out.

Now with major updates like this one, I used to install them the day they were released. I hate to admit it, but I went out and purchased Windows 95 the day it was released. Not one copy, but two (floppy disks and CD).

But after having issues with being an early adapter, I started taking the 'wait and let all of the bugs get worked out' approach. There is nothing like spending a couple of hours restoring your primary production computer after a failed update or upgrade.

And to make sure that nothing would happen to my production computer, I decided to use a Virtual Machine (VM). For this exercise, I wanted to work with a vanilla installation of Windows 10. No additional software had been installed, including an anti-virus program.

Now the first thing I did was set up a VM with the most recent version (1607) of Windows 10. I then made sure that it was entirely up to date with patches. I then shut down the VM and backed it up.

If I were upgrading a regular computer, I would use Windows Backup inside Windows 10. And of course, you don't want to forget to make the accompanying System Repair Disk. See the link below for more information on Windows Backup.

Backup your files with File History and Windows Backup in Windows 10

Now that I have a known good backup, it was time to start the manual update. I opened up the
The Setting icon on the Start Menu inside of Windows 10
Settings in Windows 10 and left-clicked on Update and security.
Windows Update is the first tab on the left-hand column and is also the default page for Update and security.

In the right-hand column, there is a link below the blurb about the Windows 10 Creators Update being available.
Windows 10 Creators Update notification inside of Windows Update
Left-click on Yes, show me how and it takes you to a page about the Creators Update.

On that page, there is a link labeled Update Assistant.
The Windows 10 Creators Update download link
Left-click on it will start the download of the Windows 10 Upgrade program. Save it on your computer, open the folder you saved it to, right-click on the Windows 10 Upgrade program and select Run as Administrator from the context menu that appears.

The first screen shows me the current version of Windows 10 and what version it will be when the update is complete.
The first screen in the Windows 10 Update Assistant
I left-click on the Update Now button in the lower right-hand corner.

The next screen gives a compatibly report, and everything is good to go.
The second screen in the Windows 10 Update Assistant
Before I have a chance to click on the Next button in the lower right-hand corner, the download automatically begins.

The next screen shows me the progress of the download.
The third screen in the Windows 10 Update Assistant
Before I know it, the download is complete, and the installation begins-time to grab another cup of coffee.

The next screen shows the progress of the update installation.
The forth screen in the Windows 10 Update Assistant
I love the warning about not turning your computer off like someone would get this far and then say 'forget it' and turn their computer off. But the note on the update taking a while to install is correct.

Finally, after a couple of restarts, the VM comes back to life with the intro screens. You know the ones that say Hi, We didn't do anything with your files.

Finally, the desktop appears with a Thank you for updating page and Microsoft Edge displaying a welcome to the Windows 10 Creators Update info page.
The final screen in the Windows 10 Update Assistant
The update is now complete.

So how long did the update take? Almost two (2) hours. And remember that this was a vanilla install of Windows 10 that I updated. I would imagine updating a system that has been in use for a while may take longer.

You will notice that the Windows 10 Upgrade Assistant was been installed with the update. There are shortcuts to it on the Desktop and the Start Menu. If you would like to uninstall the Windows 10 Upgrade Assistant, here's how.

  1. Left-click on the Start Menu and left-click the Settings icon (it looks like a gear).
  2. Then left-click on Apps.
  3. Scroll down the list of apps in the right-hand column until you find the Windows 10 Upgrade Assistant.
  4. Left-click on it and then left-click on Uninstall.

How to setup Family Safety for Windows 10 using Microsoft accounts

I don't know about you, but keeping my family safe on their Windows 10 computers is priority number one. Sure, you can install anti-virus software and browser extensions, but what about the kids under 18? Here's how to set up Family Safety using Microsoft accounts.

How to setup Family Safety for Windows 10 using Microsoft accounts

Years ago, the only way I found to lock down my kid's computers was to add it to a domain and restrict the user permissions. And it did work. But not everyone has a server/domain controller. So, what is a parent to do?

Well, back in Windows 7 and Windows 8.1, Microsoft had a product called Family Safety. It was part of Windows Essentials, which was a separate download. It worked quite well, but Microsoft dropped support Windows Essentials, and it is no longer available for download.

So, if you think that Family Safety just faded away, you would be wrong. Microsoft has taken all of the original program features and added them to its Microsoft account interface.

All of the same great features are there. You can still filter what websites your kids can visit and restrict access to certain apps and games. You can also set what time(s) your kids can use their Windows 10 computer. You can even set the appropriate age for the apps and games that can be accessed.

Now there are some requirements for using Family Safety in Windows 10 that may be a bit disturbing. Everyone, you, and your child need to have a Microsoft account. That, in itself, is no biggie. But your child will need an email address to create a Microsoft Account.

I don't know many five-year-old kids that have an email address, but if you create and monitor it yourself, you should be alright. You don't have to let them have access to it. They will only need the Microsoft account email address and password to log into Windows 10.

If you are looking at ways to protect your family when they are online, using Microsoft accounts is one way to go.

How to set up Family Safety in Windows 10 using Microsoft accounts

  1. Log into your personal Microsoft account. If you don't have one, then you will need to create one.
  2. Once you log in, look along the top menu bar and click on the tab named Family.
  3. Under Your Family, click on Add a child.
  4. Enter your child's email address and click on Send invite. If they don't have one, create one by clicking Create a new email address for your child. If you do that, then you'll be creating a Microsoft account at the same time. When you have your child's account all set up, you will still need to send them an invite. To protect your child's privacy, Microsoft does charge a small one-time fee ($.50) to verify your identity.
  5. Once they (or you) accept the email invite, then you can start configuring their online settings.

What your child sees and can do when they log into their Microsoft account

What your child sees and can do when they log into their Microsoft account

  • Manage sign-in preferences, just like a standard Microsoft account.
  • Edit personal information like gender, State, ZIP Code, and time zone.
  • Edit payment information. It only applies to their account, not yours. You can add funds to their Microsoft account through your account. They can also redeem codes and gift cards.
  • Edit their Xbox profile if they have an Xbox account. If not, they can create one.
  • Edit their Skype profile if they have a Skype account. If not, they can create one.

What you see and can do when you log into your Microsoft account

What you see and can do when you log into your Microsoft account

  • Recent activity. This section is where you can view your child's activity in a week by week format. You can also turn on or off weekly activity email reports.
  • Web browsing. You can turn on or off the blocking of inappropriate websites. You can create a (white) list of allowed sites and a (black) list of blocked websites. You can also only enable websites on the approved list, but your kid's computer will need the Windows 10 November update (11/16) or newer version installed for this option. And Safe Search is turned on, and InPrivate browsing is turned off by default. Now all of these web filters require that your kid only uses Microsoft Edge or Internet Explorer. You can disable the use of Firefox and Chrome under Apps, games, and media.
  • Apps, games, and media. Here you can block inappropriate apps and games. This section applies not only to Windows 10 but also to Windows Phones and Xbox One. There is a pull-down menu that allows you to select the appropriate age for your child. This section will dictate some pre-configured settings which will enable or disable certain features. You can also view the list of blocked apps and games. If you want, you can also remove any program you feel should not be on the list.
  • Screen time. This section is where you set up the times your kid is allowed on the PC. There is a grid broken down by the week's days along the side and hours of the day going across the top. When you activate the time limits, the default time periods are triggered (7:00 AM to 10:00 PM). You can manually add, remove, or modify any of the periods, and you can have multiple periods per day.
  • Purchase and spending. This section is where you can add funds to their Microsoft account for use at the Microsoft and Xbox stores. There is also a pull-down menu that you can choose what types of apps and games your child gets; all games and apps, only free games and apps or none. You can also enable or disable receiving an email when your child gets a new app or game.
  • Find your child. With this feature, you can locate your child using the GPS inside of their Windows 10 Phone. If they don't have a Windows 10 device, you cannot use this feature.
  • Xbox privacy settings. This section I found only to apply to the logged-in adult account, not your kid's account. It is probably best to do the editing of your child's Xbox profile under their login.

Manage Mac disks inside of Windows with MacDrive

Even though we primarily work on Windows computers, there are times when we need to access Mac formatted disks. And being able to do that from inside of Windows is essential. That's where MacDrive comes into play.

Manage Mac disks inside of Windows with MacDrive

Now in repairing computers, we are often asked to recover files from old drives and transfer them to external drives. Sometimes they are two (2) different formats; NTFS (Windows) & HFS+ (Mac). And since Mac and Windows computers don't natively read and write to each other's disk format, having MacDrive is a necessity.

With MacDrive, you can read and write to Mac formatted drives inside of Windows. And since MacDrive works so seamlessly with Windows, you might not even notice you are using a Mac formatted drive. The little Apple drive icon kind of gives it away (but you can turn it off).

The Mac drive icon inside of Windows File Explorer

It can also perform various disk management tasks, including formatting and repairing Mac disks. It can also burn Mac formatted CDs and DVDs.

View of a Mac formatted disk inside of Windows 10 Disk Management without MacDrive installed

View of a Mac formatted disk inside of Windows 7 Disk Management with MacDrive installed

MacDrive supports USB, FireWire, Thunderbolt, eSata, SATA, IDE, SCSI, and Fibre Channel drives. It also supports legacy drives like Jaz, MO, and ZIP.

You can mount Mac OS partitions on Boot Camp systems. And you can also go through Time Machine backups. It even works with Mac files without an extension.

You can access all of the MacDrive tools from either the built-in Disk Management Window or inside Windows Explorer. And you can directly access working files straight from your favorite programs.

MacDrive comes in two (2) versions; Standard and Pro. The Standard version is more geared to the everyday user. The Pro version has more advanced features like mounting RAID sets creating Mac ISO files.

MacDrive is compatible with Windows 7, Windows 8, Windows 8.1, Windows 10 (32-bit & 64-bit) and Windows 11. For more information on MacDrive, follow the link below.

MacDrive

Inside the Windows 10 Control Panel

Updated July 8, 2020

When it comes to finding features and settings in Windows, the Control Panel has always been where I go. The same holds for Windows 10. Let's take a look inside the Windows 10 Control Panel.

Inside the Windows 10 Control Panel

The Control Panel in Windows 10 contains all sorts of different features and settings. Some of them are easy to find, and others are not. But with a little patience, you find everything you are looking for and more.

Now finding the Control Panel in Windows 10 can be a little hard. There are two (2) different shortcuts: One on the Start menu and one on the Power User menu. I like to use the Power User menu shortcuts as they are speedy and easy to use.

How to access the Control Panel in Windows 10

  1. Left-click on the Start Windows logo menu.
  2. Scroll down the list of programs and left-click on the Windows System folder to expand it.
  3. Left-click on Control Panel.

or

  1. Right-click on the Start Windows logo menu or press the Windows logo key Windows logo key + X to bring up the Power User command menu.
  2. Left-click on Run.
  3. In the Run dialog box that appears, type control and left-click on Ok.

or

  1. Press the Windows logo key Windows logo key + R to bring up the Run dialog box.
  2. In the Run dialog box that appears, type control and left-click on Ok.

I am still amazed at how many features and settings I can access from the Control Panel. You can access everything from creating hard drive partitions to managing work folders.

I like the Settings app in Windows 10, but I am more familiar with the Control Panel like many other people. Did you know that it first appeared in Windows 2.0?

But with Windows 10, Microsoft has now deprecated it in favor of the Settings app. But there are still items that you can only find in the Control Panel. Third-party applets are one that comes to mind.

Going through all of the Control Panel features and settings in Windows 10 could take some time. Even changing the view from Category to Large icons or Small icons still doesn't give you all that the Control Panel contains.

Windows 10 Control Panel in God Mode

And then there is God Mode. If you're not familiar with God Mode, it lists all of the Control Panel features and settings in detail. Using God Mode, you can find some cool features and settings.

How to list everything inside of the Windows 10 Control Panel in one folder

For example, living in Arizona has one unique feature, never changing our clocks for daylight savings time. Now the downside is that all the rest of the U.S. does change its clocks twice a year.

Additional clocks on Taskbar in Windows 10

With having vendors across the U.S., I need to know what the time is in their time zone. I found under Clock, Language, and Region > Date and Time that I can add multiple clocks for the different time zones.

When you have some time, take a minute or two and explore through the Control Panel and see what cool features and settings you can find.

Free computer diagnostics

Repairing a PC can sometimes be expensive, and that is why we offer free basic in-shop diagnostics. Give one of our professional and experienced technicians a call at (602) 795-1111, and let's see what we can do for you.

Check out our reviews

Geeks In Phoenix LLC, BBB Business Review

Customer service is #1

Here at Geeks in Phoenix, we take pride in providing excellent customer service. We aim to give the highest quality of service  from computer repair, virus removal, and data recovery.

Bring your computer to us and save

Repairing a computer can be time-consuming. That is why we base our in-shop service on the time we work on your computer, not the time it takes for your computer to work! From running memory checking software to scanning for viruses, these are processes that can take some time.

Contact us

If you have any questions, please feel free to give us a call at (602) 795-1111  and talk with one of our Geeks. Or you can send us a message from our contact page contact page , and one of our Geeks will get back to you as soon as possible. Or you can stop by and see us. Here are our hours and location.

Like Geeks in Phoenix on Facebook

Follow Geeks in Phoenix on Twitter

Watch Geeks in Phoenix on YouTube