Geeks in Phoenix

Geek Blog


How to add an expansion card to your desktop computer

Have you ever wanted to add more USB ports to your desktop computer? Or maybe a video card or wireless (Wi-Fi) network adapter? Here's how to add an expansion card to your desktop computer.

How to add an expansion card to your desktop computer

One of the coolest things about desktop computers is that you can add more functionally to it by installing an expansion card. Expansion cards range from video cards and RAID controllers to USB ports and wireless (Wi-Fi) network adapters. But before you can do anything, you will need to know a few things:

  • What expansion slots you have available in your computer?
  • What is the height (full or half) of your computer case?
  • What are the power requirements for the expansion card you want to install?

But before you can do anything, you need to know what expansion card slots your desktop computer may have available. The most common expansion slot is the PCI Express (Peripheral Component Interconnect Express (PCIe, PCI-e)) bus type. See #1 and #2 in the installation instructions at the bottom of this article to find out how to open up your computer case to check.

The different PCI-e bus types

Now PCI-e slots and expansion cards come in different bus sizes, varying in the number of connectors and bus speed. Generally, the more connectors, the faster the transfer rate.

A photo of a PCI Express x16 slot
PCI Express x16 slot (82 connectors per side x 2 sides = 164 connectors)

A photo of a PCI Express x4 slot
PCI Express x4 slot (32 connectors per side x 2 sides = 64 connectors)

A photo of a PCI Express x1 slot
PCI Express x1 slot (18 connectors per side x 2 sides = 36 connectors)

The two different computer case heights

Once you know what expansion slot(s) your desktop computer has available, you need to find out what height (full-size or half-size) your computer case is.

A photo of a full-height expansion slot
Full-height expansion slot

A photo of a half-height expansion slot
Half-height expansion slot

Now a full-size case can use either full or half size expansion cards. If the expansion card you are looking at installing is low profile, the manufacturer usually includes full-size and half-size mounting brackets. If the expansion card is full height, you will not be able to put it in a half-size case, so double check it before purchasing.

Check the expansion card power requirements

Now everything that you plug into your motherboard requires power. The drives, processor, and even the memory modules require a certain amount of energy. Check the specifications for the expansion card you want to install and determine how much power it requires.

The next thing you need to check is how many watts your power supply delivers. The power output is crucial. Typically there is a power output table on the side of the power supply inside of your desktop computer that tells you what the maximum DC output is.

A photo of a typical desktop power supply output table
A typical desktop power supply output table

If your computer is a low-profile or Small Form Factor (SFF), knowing what the power output is critical. Most SFF computers have smaller power supplies (physical size) that have lower power output. Generally, the output of an SFF power supply is less than 300 watts, which may or may not have enough power to run an additional expansion card.

And to top it off, the expansion card you want to install might even require more power than it can get through the PCI-e bus, thus requiring an additional connection or two from the power supply.

High-end video cards are known to require an additional PCI-e power plug(s) from the power supply. If your power supply doesn't have enough PCI-e (6 or 8 pins), Molex (4 pins), or SATA (15 pins) connections, you will need to upgrade your power supply.

A photo of a video card that has both 8-pin and 6-pin PCI-e power connections
A video card that has both 8-pin and 6-pin PCI-e power connections

Now that you have the required information and purchased your expansion card, it is time to install it.

Installing an expansion card in a desktop computer

Installing an expansion card is relatively easy. You may or may not require tools, as some computer cases are tool-free. At the most, you might need a Philips head screwdriver to get the side of the case open and to secure the expansion card to the computer case.

  1. Disconnect the power cord from the computer. After disconnecting the power cord, place your hand on any metal part of the case to discharge any residual energy. Never work on a system that is plugged in and energized.
  2. Open the computer case. This step usually requires taking the side or top panel off. Look at the back of the computer case and determine what side the motherboard connections are on. The side panel you need to remove is on the opposite side of these.
  3. Remove the expansion slot cover panel on the backside of the case. Some expansion slot panels have a screw holding them in-place; some are stamped right into the metal back of the case. If it is a stamped panel, you will have to work it back and forth to break it off, so be careful not to cut your fingers.
  4. Install the expansion card. Most cards will slip right in, but make sure the notched edge of the mounting bracket slides down into the slot in the case. Sometimes you have to give it a little push from the outside of the case to get it in. Once it is in place, secure it down.
  5. Replace the side of the case, connect the power cord, and power your computer up.

If Windows doesn't automatically install the driver for the expansion card, you may have to use the installation disk that came with it. If the expansion card did not come with installation media, go to the manufacturer's website and download it.

Should you repair or upgrade your computer or just get a new one

Doing computer repair for a living, I get a lot of questions. One of my favorites has to be, "Should I repair or upgrade my computer or just get a new one." So, let's look at whether to repair or upgrade an existing computer or buy a new one.

Should you repair or upgrade your computer or just get a new one

First off, let's start with the three (3) theories I follow regarding computers and their components.

  1. Infant Mortality is the belief that if it runs for a day (24 hours), it will run for its lifetime. It is also the start of what is called the Bathtub Curve.
  2. The Bathtub Curve refers to the expected failure rate of electronics over time, as it resembles an end-to-end section of a bathtub. The failure rate starts high at the beginning of life (Infant Mortality) and then drops to almost nothing until rising again when it fails.
  3. The definition of the Lifetime of computer components, from my experience, is three years from the start of service. At three years or older, it's not if it will break down, but when will it break down. But there are exceptions to this rule, mainly how well you take care of the electronics.

To repair or replace

With that said, let's start with the repair or replace scenario. Most of the time, if the computer (desktop or laptop) is within the expected lifetime, repairing is the best way to go. Now the exception is with the price and availability of replacement parts.

With computers over three (3) years old, you have to take a look at the cost of replacement parts and labor versus the price of a new system. If the parts and labor total more than $200, I will usually ask a client at least twice if they are sure they want to replace the part(s).

You also have to look at whether the replacement parts are new or refurbished (a fancy way of saying used). For laptop bases, lids and bezels, refurbished will work quite well. For motherboards and IO/daughter boards, a refurbished unit may or may not work out.

Keep in mind that if a particular component has a flaw that caused it to fail, a refurbished (used) part may also have the same defect and could fail just like the component you are replacing. I've had about 50 / 50 success rate with refurbished parts, with some parts lasting only months and some lasting years.

Hard drives, memory modules, desktop DVD drives, power supplies, laptop displays, laptop keyboards, and laptop fans are standard parts and often need replacement. These parts are generally easy to find and purchase. Laptop parts like hinges, display bezels, display lids (tops), and bases can be tricky. A quick Google search for computer model + part name should yield some results.

The availability of replacement parts

In my experience finding replacement parts, I have found that the computer's age has a lot to do with being able to find parts.

  • If the computer in question is under 1 year old, the only way to get replacement parts is through the manufacturer. And you can be sure that you will pay full retail price for them.
  • If the computer is 1 - 3 years old, the cost of replacement parts should go down, as the supply of parts should get better. At this point, people are starting to 'part-out' failed systems and posting the parts on eBay.
  • If the computer is 3 - 5 years old, the replacement parts will be at their lowest cost. The supply will be high, and you will be able to find multiple vendors carrying the same components. It's a buyer's paradise.
  • If the computer is 5 years or older, the supply of parts starts to dwindle, and prices go up. I had a client who wanted to replace a motherboard with bad capacitors that was fifteen (15) years old. I found one (1) refurbished motherboard at almost $500. We had the board recapped for a whole lot less.

To upgrade or replace

Now when it comes to upgrading a computer, there are quite a few things that you can do to desktop and laptop computers. The one thing with the most bang-for-the-buck is memory. Allot of systems come with a nominal amount of memory and can easily be upgraded.

The problem with upgrading memory is that many manufacturers will purchase smaller memory modules and fill up all of the memory slots with them. For example, let's say you bought a computer with eight (8) gigabytes of memory installed. The motherboard has four (4) memory slots, and each one can handle a 4-gigabyte memory module (max.), for a total of sixteen (16) gigabytes (max.).

But when you open up the computer, you find that instead of using two (2) 4-gigabytes memory modules, the manufacturer used four (4) 2-gigabyte modules. To upgrade the memory to sixteen (16) gigabytes, you have to replace all of the 2-gigabyte memory modules with 4-gigabytes modules. Why do they do it? They can get smaller memory modules cheaper.

How to upgrade or add more memory to your computer

Another way to breathe new life into a computer is to upgrade the hard drive. You can go with a Hard Disk Drive (HDD) that spins faster or a Solid State Drive (SSD) that has a faster transfer rate. Either of these should give you better performance. Combine it with a clean installation of Windows, and you will feel like you got a brand new computer.

How to upgrade the hard drive in your computer

How to upgrade your computers hard disk drive to a solid state drive

If you have a desktop computer and like playing games, upgrading the graphics card may be an option. Just make sure you know what the motherboard specification is for the PCIe slot(s) (version 1, version 2, etc.) and use a compatible graphics card. Also, make sure you have enough power connector(s) (6-pin or 8-pin PCIe).

The bottom line

You are the only one who has to decide whether to repair or upgrade an existing computer or replace it with a new one. If it has sentimental value or runs a program you cannot reinstall, then maybe you should repair or upgrade it. But if the cost of fixing it is more than the total value of your existing computer, then perhaps you consider just replacing it with a new system.

My personal upgrade to Windows 10

Upgrading your computer to Windows 10 can be a pretty simple task. But there are occasions when upgrading can be a massive headache. And then there is my Windows 10 upgrade. Here's my personal experience upgrading to Windows 10.
My personal upgrade to Windows 10

Let me start by saying that I knew right from the start that upgrading my personal computer to Windows 10 would be a lot of work. But it was something that needed to happen. When I built this system in January of 2013, it was because the original motherboard failed. So I picked up a new motherboard, processor, and memory and reloaded all of the software.

Little did I know that my biggest problem for my Windows 10 upgrade started when I installed all of the software in 2013. I installed Windows 8 instead of Windows 7 that I had previously. All worked well until Windows 8.1 was released. It turned out that one of my major programs, QuickBooks Pro 2010, didn't support Windows 8.1. If I upgraded to Windows 8.1, I would have to upgrade to QuickBooks Pro 2013. It seemed like a waste of time and money, so I decided to wait.

Now let's fast forward three years or so to February of 2016 when Microsoft ends support for Windows 8 (not Windows 8.1). I decided it was time to move to Windows 10. I picked up a new 1TB hard drive and installed it alongside my 1TB Windows 8 drive. I was going to switch boot drive in the motherboard BIOS (Basic Input Output System) temporarily until I got the Windows 10 drive set up. That's when I remembered that my version of QuickBooks Pro 2010 would not install on Windows 10.

So just for the fun of it, I tried to install QuickBooks Pro 2010 inside a Windows 10 Virtual Machine (VM) running on the Windows 8 drive. The installer just wouldn't run. I tried everything, including compatibility mode, nothing worked. So I decided that I could run QuickBooks Pro 2010 inside of a Windows 7 VM. I got the Windows 7 VM all set up and running. Things got busy at work, and I had put my upgrade to Windows 10 on hold. So I disconnected the drive with Windows 10 and kept using Windows 8.

My Windows 10 upgrade got back on track last month when Intuit made me an offer to upgrade my version of QuickBooks. It seems there is a security issue with older QuickBook versions, and Intuit offered me the latest version for 70% off. That was just the thing to get my Windows 10 upgrade going again. I would have lost the integration with Microsoft Word (printing envelops) and Outlook (contacts, e-mail) running QuickBooks inside of a VM. That was something I didn't want to lose.

My original plan was back on. I already had a clean installation of Windows 10 and need to finish installing all of the programs. Yes, it is a lot of work, but a Windows 8 to Windows 10 upgrade isn't possible. And besides the new version of QuickBooks, I had several other software upgrades that I'd been waiting to do. It seemed like the perfect time to do them all.

My idea was to recreate the three (3) partitions and drive letters (C:, D: and E:) from the original 1TB drive using both of the 1TB drives. The C: and D: drive partitions would be on the first (boot) drive, and the E: drive partition would take up the whole second drive. Setting up the disks this way would double my storage space.

Now when I originally started this upgrade in February, I disconnected the old 1TB and performed a clean install of Windows 10 on the new 1TB drive. Once I had Windows 10 installed and drivers updated, I shut down my computer and reattached the old 1TB drive. During this time, I also changed the port that the drives connected to on the motherboard (I wanted the boot drive on port 0).

Now I've done this type of upgrade many times before. The only problem I was having was the motherboard BIOS was having issues with the boot records on the two drives. It didn't help that the disks were from the same manufacturer (Western Digital) and the same size (1TB). The new one was a 'Black' drive, and the old one was a 'Blue' drive. They have the same specs, but the 'Black' drive has a five (5) year warranty, where the 'Blue' drive has only a two (2) year warranty.

It was time to make the changeover. I booted up to Windows 8 one last time and did a software inventory using Belarc Advisor. When it was complete, I printed out a copy for my use. Belarc Advisor gives a full list of all the software installed on your computer. Since I was doing a clean install of Windows 10, I would defiantly use the audit for reinstalling the software.

Then I went into the BIOS and changed the boot order so that Windows 10 drive booted automatically. Once Windows 10 was back up and running, I needed to get my files off of the old drive. I had already created the new C: and D: drives/partitions on the new drive, so I just copied over the contents of the old D: drive (which was now H:) to the new D: drive. The contents of the third partition (E:) on the old drive would have to go onto an external drive temporarily.
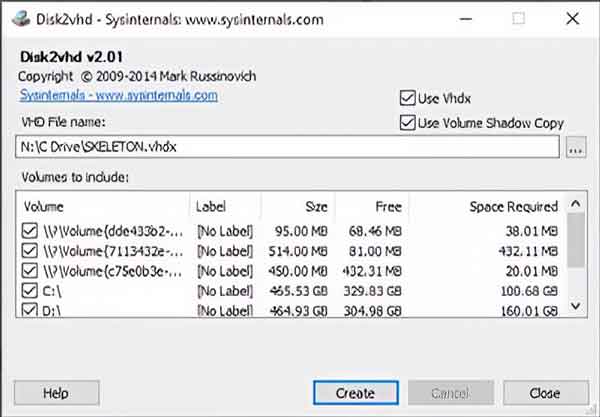
A screen shot of the Disk2vhd user interface
A screenshot of the Disk2vhd user interface

At this point, I have two of the original three partitions/drives recreated (C: and D:). It was time to take care of the original C: drive. To be on the safe side, I decided to create an image of it. I downloaded the latest version of Disk2vhd from Microsoft (it's part of the Sysinternals Suite) and proceeded to create an image of the C: drive. When it was complete, I copied the image over to an external drive along with a copy of the AppData folder from my old profile.

It was now time to delete all of the original partitions on the old 1TB drive and reformat it into just one partition/drive (E:). Reformatting the drive erased all of the partitions and the original Master Boot Record (MBR). That solved the problem with the motherboard not knowing what MBR to use at startup. Now that the E: drive was back in place, I copied all of the files I had put on the external drive.
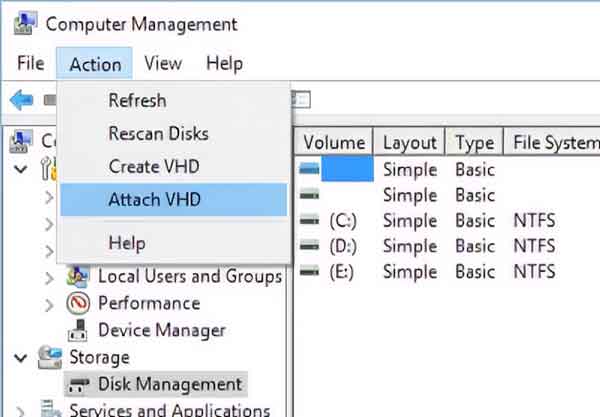
Attaching a VHD file inside of Disk Management

Everything from here on out was downhill. The only issue I had was a disk collision warning when I first attached the VHD in Windows 10. Windows 10 wrote a new disk signature to the VHD file, and all was good. Now all I had to do was reinstall all of my software.

Should you upgrade your computer to Windows 10?

With Microsoft giving away free Windows 10 upgrades to Windows 7 and Windows 8.1 users, the one question that I keep getting asked is, "Should I upgrade to Windows 10?" The real question should be, "Will my hardware run smoothly with Windows 10?" Let's take a look and see if you should upgrade from Windows 7 or Windows 8.1 to Windows 10.

Should you upgrade your computer to Windows 10?

When Microsoft first released Windows 10, they had an application called Get Windows 10 (GWT). This program would analyze the hardware and software inside your computer and let you know if there was anything that was not Windows 10 compatible. That program is gone, but the Windows 10 installer will still analyze your computer before starting the installation.

Just remember that even if the Windows 10 installer says everything is compatible, it doesn't mean it will work smoothly with Windows 10. I have seen systems that were completely compatible with Windows 10, but when they got the upgraded, the performance was below what it was with the previous version of Windows.

The first thing we should look at is the hardware requirements for Windows 10. When compared to Windows 7 and Windows 8.1, they are necessarily precisely the same for all three versions.

Windows 7 requirements:

  • 1 Gigahertz (GHz) or faster 32-bit (x86) or 64-bit (x64) processor
  • 1 Gigabyte (GB) RAM (32-bit) or 2 GB RAM (64-bit)
  • 16 GB available hard disk space (32-bit) or 20 GB (64-bit)
  • DirectX 9 graphics device with WDDM 1.0 or higher driver

Windows 8.1 requirements:

  • Processor: 1 Gigahertz (GHz)* or faster with support for PAE, NX, and SSE2
  • RAM: 1 Gigabyte (GB) (32-bit) or 2 GB (64-bit)
  • Hard disk space: 16 GB (32-bit) or 20 GB (64-bit)
  • Graphics card: Microsoft DirectX 9 graphics device with WDDM driver

Windows 10 requirements:

  • Processor: 1 Gigahertz (GHz) or faster processor or SoC
  • RAM: 1 Gigabyte (GB) for 32-bit or 2 GB for 64-bit
  • Hard disk space:
    • Windows 10 version 1809 and prior: 16 GB for 32-bit OS 20 GB for 64-bit OS
    • Windows 10 version 1903 and newer: 32 GB for 32-bit and 64-bit OS
  • Graphics card: DirectX 9 or later with WDDM 1.0 driver

So what differentiates Windows 10 from Windows 7 or Windows 8? The hardware drivers. Let me explain.

In the past, when a manufacturer discontinued a hardware piece, Microsoft would take the last known Windows Hardware Quality Labs (WHQL) certified driver for that hardware and incorporate it into the driver's directory for the next version of Windows. The Windows\System32\Drivers directory is the generic driver collection that is inside of the installation media for Windows. If Windows cannot find a driver for a specific type of hardware in the driver's directory, it will go out to the Internet database and look for a suitable driver.

But when a type of hardware gets outdated, Microsoft has been known to remove the driver from the driver's directory after a couple of years. That's when things can get tough. I've have had to go back into previous versions of Windows installation media and extract drivers from older driver directories. I have a customer with a large format plotter that Windows hasn't had a driver for since Windows Server 2003 64-bit. But I have extracted the driver from the installation media and have used it on 64-bit versions of Windows Vista and Windows 7 with no problem.

So what am I saying? It comes down to whether the manufacturer(s) of your hardware is still supporting them with new drivers. If the device is no longer being sold, you can assume that there will be no new drivers for it. Now there are exceptions to this rule. Expansion cards, like graphic/video cards, are one of them. I've found that companies like NVIDIA and AMD will create new drivers for what they call legacy hardware (discontinued hardware).

Before you decide to upgrade your Windows 7 or Windows 8.1 computer, take a couple of minutes and go over to all of the manufacturer's website(s) and locate the drivers for your system components. A few minutes now can save you hours later. As Benjamin Franklin once said, "An ounce of prevention is worth a pound of cure."

With all of that in mind, if the last version of drivers that came from the manufacturer was for Windows 7, then the drivers in Windows 8.1 were Microsoft WHQL certified drivers. And if that is the case, then Windows 10 may or may not come with a compatible generic driver. It may have to go out to the Internet database and find a driver. And if that's the case, you can bet it will be a completely generic driver.

But if the last version of drivers that came from the manufacturer was for Windows 8.1, then the Windows 10 driver will most likely be a Microsoft WHQL certified hardware driver.

Bottom line; if your system or components were built before the release of Windows 8 / Windows 8.1 (October 2012) and are no longer in production, I would be skeptical about whether to upgrade to Windows 10. But if your system and/or components were built after the release of Windows 8 / Windows 8.1 (October 2012) and may or may not be still in production, there is a good chance that Windows 10 will run perfectly fine. But remember, there will be exceptions.

7 things to do before and after upgrading to Windows 10

Updated August 17, 2020

With the release of Windows 10 comes the inevitable upgrade from Windows 7 or Windows 8.1, And with the upgrade being free, why not upgrade to Windows 10? But before you do, there are some things you should do before. Here are seven (7) things to do before and after upgrading to Windows 10.

7 things to do before and after upgrading to Windows 10

1. Run Window 10 Upgrade Advisor

Update 8/1/16: Microsoft ended the Get Windows 10 (GWX) promotion, and the Windows 10 Upgrade Advisor is no longer available. If you perform an in-place upgrade using Windows 10 media, the installer will check your computer for incompatible hardware and software.

Update 8/17/20: Even though the Get Windows 10 promotion has ended, you can still upgrade Windows 7 and Windows 8.1 for free.

How to get a free Windows 10 upgrade for Windows 7 and Windows 8.1

Doing an in-place upgrade has its pros and cons. Even though Microsoft claims that if the software runs on Windows 7 or Windows 8.1, it will run on Windows 10, there will be exceptions to the rule. The same can be said about hardware too. Remember that Windows 10 will only come with generic drivers for a good portion of the equipment. Running the upgrade advisor will tell what issues you may have, and then you can find a fix before performing the upgrade. Download any hardware-specific drivers that you will need and save them to a flash drive or network folder.

The Get Windows 10 icon

    1. Left-click the Get Windows 10 icon on the Taskbar

The Get Windows 10 PC check

  1. Left-click on the three horizontal bars in the upper left corner to expand the menu and select Check your PC.

2. Check your drive for errors

One of the last things you want is to have the upgrade fail because of errors on the system drive. This is especially so if the failure were to happen while copying new files and left your system un-bootable. To be on the safe side, run Windows disk checking utility CHKDSK.

Check your hard disk for errors in Windows 7
Check your hard drive for errors in Windows 8

3. Clean up the junk

It's now time to clean the system up. Uninstall any program you don't need or want and then run Windows built-in Disk Cleanup utility. You can also use a program like CCleaner, but be careful not to go too far with it.

Windows 7 Disk Cleanup
Windows 8 Disk Cleanup
Clean up and optimize your computer with CCleaner

4. Backup everything

As the old saying goes, "An ounce of prevention is worth a pound of cure", so a complete backup of your system is the next thing to do. Windows 7 and Windows 8.1 both have a built-in File Recovery program that can do a full system image to an external drive, network folder, or DVDs. You will also need to create a system repair disk to boot the system so that you can restore the system image you create, just in case. Links to both are located on the left-side column of the File Recovery program screen.

Now the File Recovery program can be kind of hard to find, especially in Windows 8.1. To make sure you are running it with the correct privileges, I suggest just running the program using an administrative command prompt.

How to open a Command Prompt with Administrator privileges in Windows 7
How to open a Command Prompt with Administrator privileges in Windows 8

To open the File Recovery program, type the following into an admin command prompt and hit enter.

sdclt.exe

5. Perform an inventory with Belarc

Having a complete list of all of the hardware and software inside your computer can come in handy if anything were to go wrong. Belarc Advisor is an excellent program for creating an inventory of your computer software and hardware, including software installation keys. Once it is done creating an inventory, it opens the results in a web browser. Print or save the results to a flash drive, just in case you might need it down the road.

Belarc Advisor

6. Uninstall system utilities

This is not mandatory, but I recommend uninstalling any anti-virus, anti-malware, EMET, etc. program before the upgrade. These programs look for malicious activity geared toward the operating system and could create a massive headache during the upgrade. It's better to be safe than sorry.

Time to upgrade to Windows 10

Grab a drink and have a seat; it'll take a little while.

7. Update drivers and reinstall software

It's now time to install any device-specific drivers you downloaded in Step #1. Once that is done, it's time to download the latest version of all the software you removed in Step #6. If you're unsure what version of a program you had installed, go through the inventory you created in Step #5.

Free computer diagnostics

Repairing a PC can sometimes be expensive, and that is why we offer free basic in-shop diagnostics. Give one of our professional and experienced technicians a call at (602) 795-1111, and let's see what we can do for you.

Check out our reviews

Geeks In Phoenix LLC, BBB Business Review

Customer service is #1

Here at Geeks in Phoenix, we take pride in providing excellent customer service. We aim to give the highest quality of service  from computer repair, virus removal, and data recovery.

Bring your computer to us and save

Repairing a computer can be time-consuming. That is why we base our in-shop service on the time we work on your computer, not the time it takes for your computer to work! From running memory checking software to scanning for viruses, these are processes that can take some time.

Contact us

If you have any questions, please feel free to give us a call at (602) 795-1111  and talk with one of our Geeks. Or you can send us a message from our contact page contact page , and one of our Geeks will get back to you as soon as possible. Or you can stop by and see us. Here are our hours and location.

Like Geeks in Phoenix on Facebook

Follow Geeks in Phoenix on Twitter

Watch Geeks in Phoenix on YouTube