Geeks in Phoenix

Geek Blog


How to tell if your desktop computer power supply has failed

Updated March 18, 2024

There may be a time when your desktop computer does not start. There could be a few reasons why it does not start. The first thing that comes to mind is a failed power supply. Here's how to test your desktop power supply.

How to tell if your desktop computer power supply has failed

Living in Phoenix, we have one thing that takes a toll on a desktop computer. No, it is not the heat; it is the dust. Since our environment here is so dry, we get a lot of dust.

How to clean the dust out of your computer

And since dust conducts electricity, power supplies tend to fail. Even if you routinely clean your desktop computer, it only has a life span of 3 to 5 years. So, if you press the power button, your desktop computer does not start, and there are no lights that light up, you may have a failed power supply. Now, if you do not feel comfortable working around electricity or inside your desktop computer, please contact a local computer technician.

How to test your desktop computer power supply

  1. Disconnect the power cord that comes from the outlet to the power supply.
  2. After you have disconnected the power cord, open up the case and touch any metal part of the power supply or case to discharge any remaining energy.
  3. Make a note or take pictures of the connections that lead from the power supply to the devices. Once you have documented all of the power leads, then remove all of the connectors (SATA, Molex, PCI-e, ATX, ATX12V, etc.) that lead to all of the different devices and motherboard.
  4. Create a jumper from a piece of thin gauge wire or paper clip.
  5. Using the jumper you created,
    Motherboard power supply connectior
    connect Pin 16 to either Pin 17 or Pin 18 on the ATX 24-PIN (20+4) connector.
  6. Make sure the power supply is turned on and then plug the power cord back into the jack on the back of the power supply. If the power supply fan starts to run, the power supply has an output voltage and is in good condition. If the power supply fan does not spin, it is time to replace it.

If your power supply has failed, make a note of what type and how many connectors your existing power supply has.
Common desktop power supply connections
Also, check the stated output of your existing power supply from the label on the side.

I also recommend that you use a tape measure or ruler to measure the dimensions of the power supply, (Width x Height x Depth) as you will want to get as close as possible to these for the replacement power supply.

Should you repair or upgrade your computer or just get a new one

Doing computer repair for a living, I get a lot of questions. One of my favorites has to be, "Should I repair or upgrade my computer or just get a new one." So, let's look at whether to repair or upgrade an existing computer or buy a new one.

Should you repair or upgrade your computer or just get a new one

First off, let's start with the three (3) theories I follow regarding computers and their components.

  1. Infant Mortality is the belief that if it runs for a day (24 hours), it will run for its lifetime. It is also the start of what is called the Bathtub Curve.
  2. The Bathtub Curve refers to the expected failure rate of electronics over time, as it resembles an end-to-end section of a bathtub. The failure rate starts high at the beginning of life (Infant Mortality) and then drops to almost nothing until rising again when it fails.
  3. The definition of the Lifetime of computer components, from my experience, is three years from the start of service. At three years or older, it's not if it will break down, but when will it break down. But there are exceptions to this rule, mainly how well you take care of the electronics.

To repair or replace

With that said, let's start with the repair or replace scenario. Most of the time, if the computer (desktop or laptop) is within the expected lifetime, repairing is the best way to go. Now the exception is with the price and availability of replacement parts.

With computers over three (3) years old, you have to take a look at the cost of replacement parts and labor versus the price of a new system. If the parts and labor total more than $200, I will usually ask a client at least twice if they are sure they want to replace the part(s).

You also have to look at whether the replacement parts are new or refurbished (a fancy way of saying used). For laptop bases, lids and bezels, refurbished will work quite well. For motherboards and IO/daughter boards, a refurbished unit may or may not work out.

Keep in mind that if a particular component has a flaw that caused it to fail, a refurbished (used) part may also have the same defect and could fail just like the component you are replacing. I've had about 50 / 50 success rate with refurbished parts, with some parts lasting only months and some lasting years.

Hard drives, memory modules, desktop DVD drives, power supplies, laptop displays, laptop keyboards, and laptop fans are standard parts and often need replacement. These parts are generally easy to find and purchase. Laptop parts like hinges, display bezels, display lids (tops), and bases can be tricky. A quick Google search for computer model + part name should yield some results.

The availability of replacement parts

In my experience finding replacement parts, I have found that the computer's age has a lot to do with being able to find parts.

  • If the computer in question is under 1 year old, the only way to get replacement parts is through the manufacturer. And you can be sure that you will pay full retail price for them.
  • If the computer is 1 - 3 years old, the cost of replacement parts should go down, as the supply of parts should get better. At this point, people are starting to 'part-out' failed systems and posting the parts on eBay.
  • If the computer is 3 - 5 years old, the replacement parts will be at their lowest cost. The supply will be high, and you will be able to find multiple vendors carrying the same components. It's a buyer's paradise.
  • If the computer is 5 years or older, the supply of parts starts to dwindle, and prices go up. I had a client who wanted to replace a motherboard with bad capacitors that was fifteen (15) years old. I found one (1) refurbished motherboard at almost $500. We had the board recapped for a whole lot less.

To upgrade or replace

Now when it comes to upgrading a computer, there are quite a few things that you can do to desktop and laptop computers. The one thing with the most bang-for-the-buck is memory. Allot of systems come with a nominal amount of memory and can easily be upgraded.

The problem with upgrading memory is that many manufacturers will purchase smaller memory modules and fill up all of the memory slots with them. For example, let's say you bought a computer with eight (8) gigabytes of memory installed. The motherboard has four (4) memory slots, and each one can handle a 4-gigabyte memory module (max.), for a total of sixteen (16) gigabytes (max.).

But when you open up the computer, you find that instead of using two (2) 4-gigabytes memory modules, the manufacturer used four (4) 2-gigabyte modules. To upgrade the memory to sixteen (16) gigabytes, you have to replace all of the 2-gigabyte memory modules with 4-gigabytes modules. Why do they do it? They can get smaller memory modules cheaper.

How to upgrade or add more memory to your computer

Another way to breathe new life into a computer is to upgrade the hard drive. You can go with a Hard Disk Drive (HDD) that spins faster or a Solid State Drive (SSD) that has a faster transfer rate. Either of these should give you better performance. Combine it with a clean installation of Windows, and you will feel like you got a brand new computer.

How to upgrade the hard drive in your computer

How to upgrade your computers hard disk drive to a solid state drive

If you have a desktop computer and like playing games, upgrading the graphics card may be an option. Just make sure you know what the motherboard specification is for the PCIe slot(s) (version 1, version 2, etc.) and use a compatible graphics card. Also, make sure you have enough power connector(s) (6-pin or 8-pin PCIe).

The bottom line

You are the only one who has to decide whether to repair or upgrade an existing computer or replace it with a new one. If it has sentimental value or runs a program you cannot reinstall, then maybe you should repair or upgrade it. But if the cost of fixing it is more than the total value of your existing computer, then perhaps you consider just replacing it with a new system.

How to quickly free up space on your hard drive

Updated March 29, 2023

Are you getting a low disk space warning in Windows? Or maybe you have been prompted to delete a previous version of Windows to gain some disk space? If so, here's how to quickly free up space on your drive.

How to quickly free up space on your hard drive

We have all been there. You are working along, and all of a sudden, a little dialog box pops out and tells you that you are low on disk space. It used to happen a whole lot more years ago when drives were smaller. But it is scary when it does pop up.

Disk Cleanup

Disk Cleanup user options in Windows 10

Now one way to quickly free up some disk space is to use the built-in Disk Cleanup utility. If you click on the Low Disk Space warning, it brings up Disk Cleanup with default settings.

The default settings for Disk Cleanup are pretty good and will do the job. But there are more advanced settings that can clean up even more files; you have to know how to get to them. You can also run Disk Cleanup as a Scheduled Task. Check out the links below.

Clean up Windows 7 with Disk Cleanup

Clean up Windows 8.1 with Disk Cleanup

Clean up Windows 10 with Disk Cleanup

Clean up Windows 11 with Disk Cleanup

Manually delete temporary files

The Run dialog box inside of Windows 10

If you are looking to delete the temporary files/folders quickly on your computer, here's a down-and-dirty quick way to do it. All you have to do is bring up a Run dialog box.

How to open a Run dialog box

All versions of Windows:
On the keyboard, press the Windows logo key Windows logo key + R

Windows 8, Windows 8.1, Windows 10 and Windows 11:
Right-click on the Windows logo Windows logo key on the Start Menu or press the Windows logo key Windows logo key + X and then select Run

In the Run dialog box that appears, cut and paste or type either:

  • %temp%
    (user temp folder)
  • %systemroot%\temp
    (system temp folder)

and then select OK. If you get a prompt telling you that you do not currently have permission to access the folder, click on the Continue button. File Explorer will open and display the contents of that folder.

Now highlight one of the files and then press the CTRL + A keys simultaneously to select all of the files/folders. Right-click on them and select Delete. If you get a prompt about permanently deleting the files, left-click on Yes. If you get a prompt telling you that a file is still in use, make sure the Do this for all current items checkbox is selected and then left-click on Skip.

Turn off hibernation

Turn of hibernation

If you still need to free up some space, you can disable hibernation and delete the hilberfil.sys file. That should give you a few more gigabytes of free space. You will need an administrative command prompt to run these.

How to open a Command Prompt with Administrator privileges in Windows 7

How to open a Command Prompt with Administrator privileges in Windows 8

How to open a Command Prompt with Administrator privileges in Windows 10

How to open a Command Prompt with Administrator privileges in Windows 11

Once you have an administrative command prompt open, just cut and paste or type the following into it:

  • powercfg.exe /hibernate off
    (turn off hibernation)
  • powercfg.exe /hibernate on
    (turn on hibernation)

Graphic Visualization Tools

Now when it comes to finding large files or folders, nothing can beat an excellent visual treemap. Instead of the usual file/folder data like you see in File Explorer, a graphic visualization tool shows file/folder information using blocks. The larger the square, the bigger the file/folder.

SpaceMonger version 1.4.0

Years ago, I started using a graphic visualization tool when I had a client that all of the desktops began running out of disk space. Using a visualization tool, I found that the network-deployed anti-virus clients were downloading new virus definitions, but they were not deleting previous versions.

Now there are a couple of different graphic visualization tools out there. I first started using SpaceMonger but have since moved over to SpaceSniffer. It does not require any installation (unzip and go) and is entirely free (but donations are recommended).

SpaceSniffer Version 1.2.0.2

Now right out-of-the-box SpaceSniffer can be a bit overwhelming with all of the information it provides. But with a couple of changes to the configuration, SpaceSniffer can open up just the way you like.

Now be careful not to go crazy and start deleting folders/files in the Windows folder. I know that it is one of the largest folders on the C: drive, but resist the urge to delete anything inside of the Windows folder. I would focus on the size of the user(s) folders/files. For more information on SpaceSniffer and how to use it, follow the link below.

SpaceSniffer, find lost disk space the easy way

How to clean up an old joystick or game controller

Do you have an old PC joystick or game controller you haven't used in a long time? Did the buttons or the gamepad start to stick? Here's how to clean up old PC joysticks and game controllers.

If you're like me, you hate to get rid of anything that still works. So when I wrote the DosBox and Internet Archive articles, I started to think about the old game controllers I have. There is nothing wrong with them, just a little dirt and grime.

And how much fun would it be to play the original DOS version of Doom with an original Gravis Gamepad Pro from the mid-'90s? Gravis made a couple of variations of the gamepad with a couple of different connectors (USB and joystick port). I had both types but only have the USB version now.

After a little research, I found I could use a Gravis Gamepad Pro, as long as it had a USB connection. Microsoft still includes support for the Gravis Gamepad Pro inside of Windows 10.
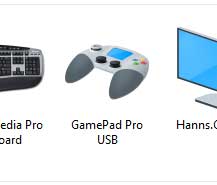
The Gravis Gamepad Pro icon inside of Windows 10 Devices and Printers

And to top it off, DosBox does support USB game controllers, so I am almost ready to start playing games with my gamepad. But first, I need to clean it up, as some of the buttons have gotten sticky.

Now when you start talking about disassembling and reassembling any piece of electronics, always remember to never work on anything that is plugged in (energized). Always disconnect the device from any connection and de-energize it before working on it. Never work on a device that is connected and energized!

The following procedures are the same for almost any computer device, except for Hard Disk Drives (HDD). HDD's have to be disassembled/reassembled in an environment free of contaminants, like a cleanroom.

Now before I start tearing down my gamepad, I will need some necessary tools. First and foremost is a digital camera or smartphone w/ camera and a notepad. Remember the old saying 'A picture is worth a thousand words'? The same holds here. With no service manual or online instructions, I'll be tearing down the gamepad blind. The photos and notes will be my guide for reassembly.

The teardown will be simple, and I'll only need a Philips head screwdriver (Ph.1), a couple of brushes, some cleaning solution, paper towels, and some compressed air. Tweezers or needle-nose pliers may also come in handy but are not required.

The first thing I'll do is take photos of the top, bottom, and sides of the gamepad. That way, I have a record of how the wholly assembled gamepad should look. Next, I'll start removing the screws on the bottom and checking to see if all of them are the same size. If any are different, I'll note it and place them separate from the rest.
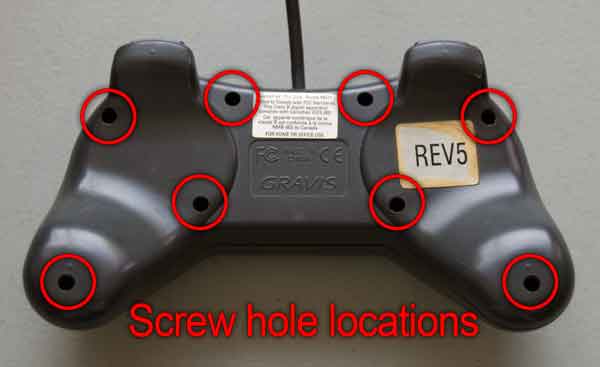
Screw hole locations on bottom of Gravis Gamepad Pro
Screw hole locations on the bottom of Gravis Gamepad Pro

Once I have all of the screws out of the bottom, I can carefully separate the top and bottom of the gamepad chassis. I can see there are two (2) screws that hold the main circuit board in place. After I remove the two (2) screws, I carefully remove the main circuit board from the chassis. Remember to take photos of everything you do!
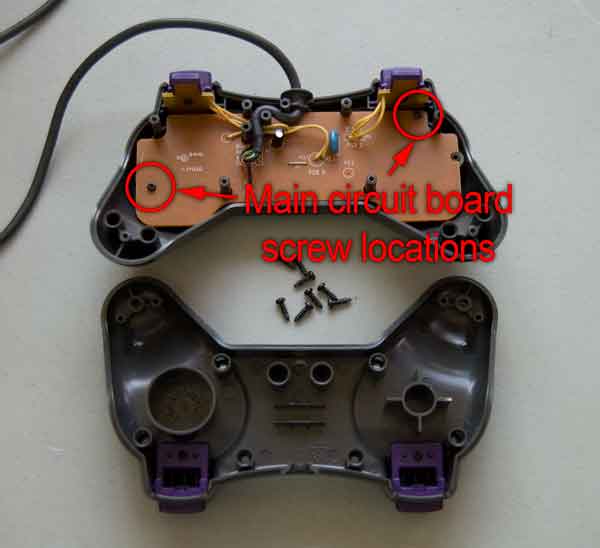
Main circuit board screw locations inside of the Gravis Gamepad Pro
Central circuit board screw locations inside of the Gravis Gamepad Pro

Now I can access all of the buttons and the rubber castle switch tops. I first inspect the heads of castle switches for any damage. They have no physical damage and appear to be pretty clean. Since they are almost twenty (20) years, I've decided they don't need cleaning.
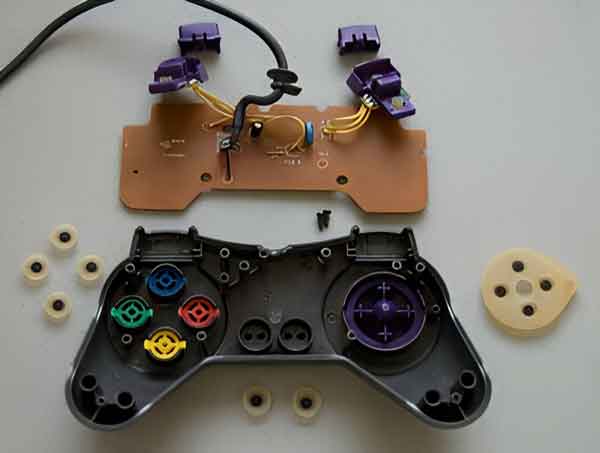
The Gravis Gamepad Pro completely disassembled

Now on to the buttons. As I remove them, I can see some gunk built-up around the sides of the buttons and the adjacent holes in the chassis. Quick cleaning of the button and frame will take care of this and should fix the sticky button problem.
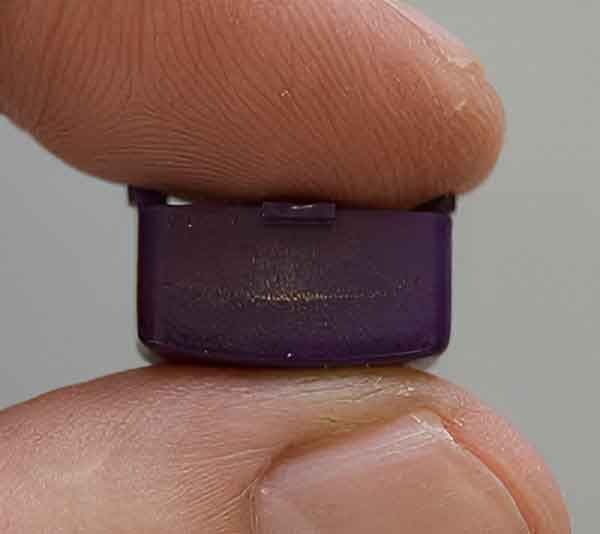
A gunked up button from a Gravis Gamepad Pro

When it comes to drying all of the parts off, I usually use paper towels to get the majority of moisture off and then use some compressed air to get any moisture out from the cracks and crevices.

Once all of the parts are clean and dry, refer to your photos and notes to reassemble. Remember not to overtighten any screw or nut; you can always make a second pass around and snug up any screws and nuts that need it.

The Windows 10 feature you hope you never have to use

Nobody likes to have to reinstall Windows. Nobody. It has been a significant headache with finding or creating the recovery/installation media and finding or reading the product key from the Certificate of Authenticity (COA). But with the Windows 10 online upgrade, things just got a whole lot easier.

 Windows 10 feature you hope you never have to use

There may come a day when you may need to repair or reinstall Windows 10. In previous versions of Windows, you had to create the manufacturer's branded recovery disks or use the hidden recovery partition to reinstall Windows. Or maybe you were one of the lucky ones that got an OEM disk. Either way, you had to have the original operating system installation media from the manufacturer to perform a reinstallation.

The huge problem was a lot of people didn't know they needed to make the recovery disks. They only found out after their hard drives crashed. At that point, they have only two choices; contact the manufacturer to find out if they sell the recovery disks. Some do, some don't. But the cost for replacement recovery disks will be less than the second option, which is to purchase a new installation disk.

If you're one of the millions that have upgraded from Windows 7 or Windows 8.1 to Windows 10 online, you now have a digital license. You can use the Windows 10 Media Creation Tool from Microsoft to create either a bootable USB drive or an ISO file. You can then use the ISO file to create an installation DVD. And the cool thing is that you can make the installation media on another Windows 10 computer, just in case your computer will not boot.

All you need for hardware is a USB drive (8GB or larger) or DVD burner and a blank single-side or double-side DVD. What you need to know about your version of Windows 10 is what language, what edition (Home, Pro, etc.), and what architecture (32-bit or 64-bit). Most consumers use the Home edition as the Pro edition does cost more. Unless you specifically order your computer with the Pro edition or your computer is part of a domain, it's probably the Home edition. And most computers nowadays run 64-bit versions of Windows.

The next thing is the product key. In previous Windows versions, when you installed the operating system, the product key was stored on the hard drive. With Windows 10, when installing the operating system, the product key is stored on the cloud. So, if you are doing a clean/repair installation and Windows 10 has already been activated on that specific computer, you will not need to enter a product key when prompted. You can click on the I don't have a product key link, and Windows 10 will automatically activate when it gets online. It's one of the coolest features of Windows 10 you hope you never have to use.

For more information on the Windows 10 Media Creation Tool from Microsoft, follow the link below.

Windows 10 Media Creation Tool

Free computer diagnostics

Repairing a PC can sometimes be expensive, and that is why we offer free basic in-shop diagnostics. Give one of our professional and experienced technicians a call at (602) 795-1111, and let's see what we can do for you.

Check out our reviews

Geeks In Phoenix LLC, BBB Business Review

Customer service is #1

Here at Geeks in Phoenix, we take pride in providing excellent customer service. We aim to give the highest quality of service  from computer repair, virus removal, and data recovery.

Bring your computer to us and save

Repairing a computer can be time-consuming. That is why we base our in-shop service on the time we work on your computer, not the time it takes for your computer to work! From running memory checking software to scanning for viruses, these are processes that can take some time.

Contact us

If you have any questions, please feel free to give us a call at (602) 795-1111  and talk with one of our Geeks. Or you can send us a message from our contact page contact page , and one of our Geeks will get back to you as soon as possible. Or you can stop by and see us. Here are our hours and location.

Like Geeks in Phoenix on Facebook

Follow Geeks in Phoenix on Twitter

Watch Geeks in Phoenix on YouTube